
Baking Flat Polymer Clay Sheets – Avoiding Common Problems
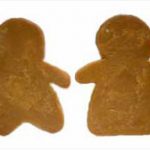
Photo shows baked polymer clay gingerbread cookies with unwanted texture caused by uneven heat:
More...

The other day a reader submitted this question: “Hey Cindy – Attached is a photo showing the texture of the baked polymer clay I was talking about. Is it bubbling that has occurred? How do I prevent this? I’ve noticed it happens to my thin products. Thanks, Rae.”
Thank you, Rae, for sharing your photo and describing the problem. This used to happen to me all the time. No worries though. I’ll tell you how to prevent it from happening next time you bake your flat polymer clay cookie pieces.

Treasure Hunt Contest
Clue #2 >> Sanding Polymer Clay
First of all, I am assuming your photo is showing the backside of your gingerbread men / women (hard to tell what their gender is at this stage :). I am also guessing you baked them on a metal pan or cookie sheet.
When thin flat pieces of polymer clay are baked on metal sheets, the metal heats up unevenly and air gets underneath the clay. This causes little “pock” marks, textures and shiny spots on the clay during the baking process. In this case, your clay did not have air in it, but rather under it. Think of what the back of a ‘real’ gingerbread man looks like after baking… very much the same.
To prevent this from happening, the clay needs to have full contact with the surface it is baking on, and it needs to be baked more evenly.
In my bead making course video #37 **on baking polymer clay pendants, I show how to place your flat sheet of clay (in this case your gingerbread people) on a piece of paper card stock; Followed by placing that card stock on a smooth surfaced ceramic tile. The paper gives the clay a nice smooth surface to stick to and the tile helps evenly distribute the heat. (** This bead making course has been retired.)
To add extra weight and keep everything nice and flat, a piece of parchment paper is placed on top of the polymer clay and another tile is placed on top of that. Make sure to put the smooth sides of the tiles next to the clay rather than the backside of the tile, which often has rough ridges.
This sandwich (bottom tile / cardstock / polymer clay / parchment paper / top tile) is then placed into the oven to bake. Make sure to add extra time for baking because it is harder for the heat to penetrate all these layers. I bake my pieces for at least 1 hour at the recommended clay manufacturer’s temperature.
After your pendant or polymer clay gingerbread cookie is fully baked, let it cool before removing from the tile sandwich. This will make sure your flat pieces stay flat during the baking process. You will see a huge difference if you bake your flat sheets of polymer clay following these instructions and techniques.
As far as the clay gingerbread people that are already baked, all is not lost. You can easily smooth off the rough surfaces with drywall sandpaper. To learn more read my post about using drywall sandpaper on polymer clay.
I hope that helps you, Rae and everyone else that has experienced this problem with baking flat polymer clay sheets. You can let me know if this information was helpful by leaving a comment below.
Sponsored Ads & Special Promotions
Want to chat about today’s post? That’s what the comment section below is for. Scroll Down… We’d love to hear from you!
Or... if you would like to request a topic for a future post, here is the link to do that… PcT Suggestion Box
thanks so much for the clarification! :) i am really excited to peruse this website more and get started creating! :)