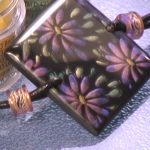
Vol-026-3 Faux Dichroic Glass Mica Technique PcT (Intro)
Video #164: “Dichroic glass engaged my interest a year ago but the results are very much serendipity dominated!” ~Robin-E
More...

** This post is an introduction to one of our paid tutorials.
Since working with real dichroic glass can be difficult and unpredictable, jewelry artists have devised several different methods for creating faux dichroic glass with polymer clay. One super easy approach that I’ve recently come up with, is a technique that uses Mica powder to produces very consistent results are easy to duplicate.
carrie W
I would love to know how you made that pendant with the flowers and leaves done in powders!!
annette r
Wow Cindy! My eyes have been opened to the possibilities of working with polymer clay. I really love my dichroic glass, but there is a lot more scope using your techniques. Attaching clasps and drilling holes through the glass is taxing, as opposed to doing it with moldable and malleable clay. And with real glass, once you fire up the kiln you never quite know what exactly is going to come out when the cycle is completed. I really love your work and am thoroughly enjoying your web site.
robin e
Dichroic glass engaged my interest a year ago but the results are very much serendipity dominated! I wanted to be able to design motifs and get them accurately incorporated in decorative objects including jewellery. I thought I had the answer in the metallic foils. Initial results were very promising but there is a serious reliability problem. Consistently good results elude me and I’ve virtually given up.
Transcript coming soon...
Transcript coming soon...
Our goal is to translate these videos into as many languages as possible. If you are interested in helping with this initiative, then please do contact us and we will figure out a way to make it worth your while :)
Shareable Images


Want to chat about today’s post? That’s what the comment section below is for. Scroll Down… We’d love to hear from you!
Or... if you would like to request a topic for a future post, here is the link to do that… PcT Suggestion Box
I made a pendant design inspired by my polymer clay hero Cindy Lietz, and this Faux Dichroic Glass tutorial, along with the Etching Polymer Clay Lesson. It’s been lots of fun combining the two ideas into one, while adding my own spin.
Cindy, thank You for for always inspiring me to think outside the box. I couldn’t have done it without you.
Cindy – I think of you every day and love playing with my clay. It helps my stress level sooooo much!!! I just made some awesome faux dichroic hearts – love love love love them!!!!
Hi Cindy,
I was wondering where you got the stamp for the project? It is really beautiful. I have looked and looked but have not been able to find this particular stamp. Thanks!
Patricia
I think I got those stamps in the dollar bin at Michaels a couple of years ago Patricia. Don’t know if you’ll find the exact ones again there or not. Another place to look for similar shaped stamps is in the candle making section of Michaels. They are unmounted rubber stamps, meant to be pressed into warm was candles, to make an impression. Hope you find something suitable. Good luck!
I had such a fun weekend doing the faux dichroic technique. They came out beautifully. In the past when I was working with the mica powders I was actually throwing them away when I got it in other places where I did not want it. Why O’ Why do all the people who tell you about it in books, not tell you that you can get rid of the mistakes so easily. I love your video tutorials Cindy.
Karon
Hi Kat, yes I was only talking about the shine. Most of my beads I put in a tumbler with river rocks for about 24 hours and then buff them because I don’t want to use resin on a round bead. I tried it a couple of times and when I had to make the holes bigger it damaged the resin by the hole in the bead. I really like the Fimo Gloss for the beads. I had ordered some Fimo Gloss over the internet and they sent me some old stuff that was made by Eberhard Faber and it was awful. I think the place I ordered it from had it sitting on the shelf a long time. Staedtler has taken over the Fimo part of Eberhard Faber is what I was told so they were trying to get rid of their old stock. I also ordered some Fimo Translucent 00 and really like it. If you are using a lot of translucent it’s really good to work with.
I’m sorry, I missed a couple of comments/replies here. Sorry about that! Thank you guys, for the tips…much appreciated!
Hi Bonnie, are you comparing the Fimo to the look of resin, or just talking about the shine? (Jayne mentioned above that she loves a resin finish on round beads…) I have been hearing good things about the Fimo gloss, so I went ahead and got some last week with a “spare” coupon at JoAnn. I haven’t tried it yet…been insanely busy. Makes me happy to hear another positive review, though…Thanks! :D
Have you tried Fimo Gloss? I just got a jar and I really like it. I also like Diamond Verathane that I get at Ace Hardware and it’s water based.
Two part epoxy can be brushed on round beads and ‘hung’ on a skewer or some such item (bamboo stick, sliver of wood …)to cure. They have to cure for 24 hours. I know this works ’cause I just did it with Terry Morris’ two part epoxy. It can also be colored and used as a paint. Unless detail is desired, the best is just to get a slug of those cheapo paint brushes and just toss them when you are done.
I think you can paint on epoxy too but you will need to clean your brush quickly with alcohol. It would be worth a try. It’s a simple way to make really shiney beads…..no work!!!! I love that!
I love the look of a piece finished with UV resin/gel. I needed a way to use resin/gel on a round bead. Since I teach cosmetology/nail tech here where I live I decided to try UV gel for artificial nails on a round bead. I messed with it for a while before I made it work. I simply brush it on using a gel brush over half the bead making sure not to leave a major line of demarcation, place the bead down where the hole of the bead is to steady it, cure the bead, then turn it over, apply the gel to the other half and cure it. It works great!
@Jayne Shankle: Smart, Jayne! I’ll have to give this a try…sounds like a “winning” strategy! ;D As long as that ‘demarkation’ line isn’t too thick, this seems like it would be pretty forgiving, too. Can’t wait to play with your “round bead” technique!
(The only problem I have now is that I have to buy a UV lamp. I was enjoying curing resin using the sun…but it’s been hiding lately. Then again, it IS October, LOL! I guess I’ll try painting on the 2-part casting epoxy, too. No sun required…but how will it like being painted thin on a round surface?)
hai Brenda, thank you so much for sharing your ideas.
hai iam geetha, i would like to know that is it necessary to wear gloves,masketc.,while using uv resin.In India we have only two part epoxy, can i use it on polymer clay projects.can anyone pls give me some ideas. thank you..
@geetha: Hi Geetha, I too use two part epoxy resin. I don’t think it is necessary to do either. I think it is each individuals preference to wear glove or masks.If you are very careful not to get it on you, there is no reason to use gloves. I like to feel what I am doing, so gloves for me. I use rubbing alchole to remove it if I get it on me ;)
MEMBER PROJECT PHOTOS JUST ADDED… that relate to the theme of this page… Faux Dichroic Glass.
You can view the larger images by clicking on the link by my name.
BTW: Thanks to everyone above, who took the time to comment in this thread. Your feedback, support and engaging conversations are always such a wonderful part of my day. Although I don’t get a chance to address everyone individually, please know that I do read everything. ~Cindy
BTW: Terry’s UltraDome does not pull from the edges.
Well -I finally did it! IT being UV resin. I had (past tense hehe) a sample bottle of Magic-Glos. After doing, my version, of dichro -from the tute, I made a pendant w/ magic glos. IT TOOK THE WHOLE BOTTLE. Of course it was only .5 fl oz. My experience – it kept creeping away from the edges. Maybe it was because it had been sanded and buffed to 800. Hmmmmmmm – it was a smooth as a baby’ bottom. Anyway, I cured it 3 times to get it to cover all the way. Would have liked to do it one more time, but ran out of glos :{. You will see it on FB ( if I can get DH to photo all my stuff -sitting on the diningroom table -sigh). Guess it is time to mention it again and again. Sooon…………hugs
@pattw: Unfortunately that is the nature of Lisa’s Magic Glos … it pulls away from the sides. The best thing to do with hers is to run a bead of the glos around the outside first and cure it, then go back and cover the whole piece and cure again. It doesn’t matter whether you sanded or not … Lisa’s will pull from the edges.
@carolyn: Hi -the only reason I used the Magic-glos is because it was free. ALTHOUGH, because it is so thick, I agree with you. Probably will use it for special things. I am going to get some Ultradome realllllllly soon. Thanks for the info about pulling away from edges. I did put a heavy coat around the border -but it still creeped away. Like I said, the slick surface may have had something to do with it. I have read that magic-gloss does indeed, pull away from the edges. It cured in exactly 15 min – in the sun. Don’t expect to need an uv oven for a while…………….. Actually pretty happy with the results -lots of depth.
@pattw: So happy you took the plunge! Can’t wait to see it on FB!
@Phaedrakat: If the muse strikes him -DH -I have narrowed him down to photo on Sat. Keep your fingers crossed. THOUGH it may take me a while to trans to FB. But I have Cindy’s directions. Don’t hold your breath LOL………see ya
All I can say is “wow” ! I just saw the video as I have been away for 3 weeks. How beautiful these pendants are and how much fun to make. One would truly feel like an artist painting in the nooks and crannies. Can’t wait to make some of my own…