Vol-039-4 Dandelion Ghost Cane PcT Tutorial (Intro)
Video #218: “Been dying to see more about this cane. Mine are far from “ghost-like” which means I have a lot to learn!” ~Jocelyn-C
More...
** This post is an introduction to one of our paid tutorials.
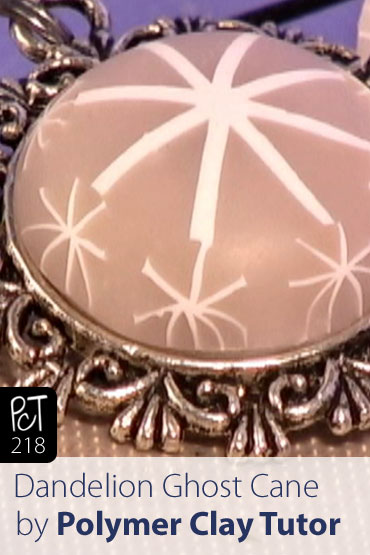
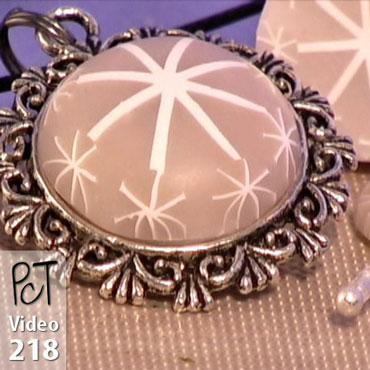
Now, if you aren’t familiar with Ghost Canes… they are basically a polymer line drawing where the lines are made with an opaque clay, usually white or black, but can be any solid color. And the rest of the cane is made up of translucent clay.
When this type of cane is sliced thinly and placed on a background of a different color, the white space disappears, and the lined image appears to float on the surface… like a ghost.
Although I did publish a ghost cane tutorial several years ago, the requests keep coming for me to do more videos on this topic...
“Hi Cindy, a while back you had a video on making ghost canes, and mentioned that later on down the road you would be doing some more. Are you planning on doing another video any time soon? Thanks.” ~Connie-T
“Hi Cindy, I would be interested in more ghost canes. I LOVE all of your videos!!!!” ~Stephanie-B
“Yes, Cindy, I am super interested in your ghost canes!!! What a cool thing!!! I LOVE your ghost cane beads here and on your “Polymer Clay Rose Beads and Ghost Cane Jewelry” page. I am quite intrigued! :) Hugs to you.” ~Cindy-E
“I would love love love to see a tutorial about “floating” things on beads. I have no idea how that is done!!” ~Heidi-W
“I’ve seen these ghost canes on other people’s work and wished I knew how to do them.” ~Freda-K
So in this video tutorial I am going to demonstrate how to make a Dandelion Ghost Cane. It is hard to deny the pleasure that a child (or the child in you) feels when picking a Dandelion Puff, giving it a blow and making a wish as the seeds float away in the breeze. It’s simply magical!
This magic of making a wish on a dandelion is probably the very reason the dandelion image has become so popular again. Do a quick search on Etsy for dandelion jewelry and you will see what I mean.
“
Thanks for the Dandelion cane. Your use of figure of 8 inserts solved a lot of problems I've had in the past. Love the way it all fits together and keeps it's shape! Have a great weekend.
Marion R
“
Hi Cindy, I love everything about this lesson and how easy it is. Before finding you, I wasn't very good at making canes. I always ended up naming them my 'whoops' canes, lol. Now, following your step by step, I have made my first real cane... 'Hooray!' Thank You for being such a great teacher. Sincerely.
Patricia Z
“
Very pretty, am having a go at this one right now. Very clever way of keeping the shape of the outside canes. That's really thinking outside the square, or should I say 'circle'.
Sandra J
Transcript coming soon...
Transcript coming soon...
Our goal is to translate these videos into as many languages as possible. If you are interested in helping with this initiative, then please do contact us and we will figure out a way to make it worth your while :)
Shareable Images


Want to chat about today’s post? That’s what the comment section below is for. Scroll Down… We’d love to hear from you!
Or... if you would like to request a topic for a future post, here is the link to do that… PcT Suggestion Box


Hello out there….I have been checking every couple of hours for my Friday tutorial. I am not at all sure I can sleep tonight without it. Help! Sara
Sorry to not get back to you sooner… we have been pretty busy around here. It seems you must have missed the email. That must mean you are not signed up on the Guest List. Please sign up at the big blue and green box with the arrow at the top right hand corner of the blog. That way you won’t miss any important announcements.
We moved the 5th Friday to the beginning of this month instead of the end, because it is so busy around here with the kids going back to school and the blog upgrades. Here is the post about it: 5th Friday Flip
At that 5th Friday post, we have posted another “Tour” video filmed in my studio, where I show what’s is inside all my little organizational drawers.
The tutorial publishing schedule goes back to normal this week, so you will get the first video of Vol-040 series this coming Friday, Sep 9.
Hopefully you were still able to sleep!
Hi Cindy, been thinking more about this one, love everything about this lesson and how easy it is.. Before finding you have never been very good at making canes, everything that I tried to make never came close to what is was supposed to be.. I always ended up with just naming it my whoops cane lol.. Since then by being here and following you step by step I have actually made my first real cane..”Hooray!!” I would love to see how you make the different background colors and add words to this cane just like the examples in this video. I have decided to save my clay for such an occasion. Thank You for being such a great teacher and sharing your talent with us. Sincerely, Patricia
@Elaine Faulks: I just love the way you tell stories. Makes me feel like I’ve taken a trip ‘over the pond’!
@Ken Hamilton: That is a real cool idea! Why don’t you try it and show is some pics?
@Kathy G: I hope you were able to ride out Irene in safety. What a mess it created!
@Lynn Williams: Believe it or not I made that because of a mistake I made. The green base was a thick and wonky and the circle was warped. So I cut off the back (kind of sliced through it like you would slice a layer cake for a torte) and trimmed around it to make a nice clean circle. Of course the back then looked hideous, so thought I would put a layer of white on the back. I ended up bringing the edges up around the green piece and liked how it turned out. I’ll have to play with the idea a bit and maybe come up with a tute. It ended up looking pretty cool!
@Sandra J: Thank you!
@Mitzi J. Bartlett: No worries I love the long posts! Great comment. It is very satisfying to hear you have found your first cane success with the tutorials. Your ideas for using the Tulip Cane for a Fairy Bouquet sounds lovely! Your ideas are interesting for squaring the cane plug for cutting. It was nice to see the back and forth between the other members on this idea and your final success. That is what this site is all about!
@Linda K.: Fireworks is an awesome idea! Make one and show it to us… I’d love to see that idea come to life!
@Patricia Z: That is a really wonderful thing to say Patricia! Nothing makes me happier than hearing about your successes. Makes me feel very rewarded as an instructor. Thank you so much for your kind words!
Linda, I also thought of fireworks, and, since I do mostly fantasy sculpts, magic stars or similar effects. Or, if you only do the first part of the cane… a webbing effect? The possibilities with this cane have my head spinning!
Elaine,
I actually did better this time around, in part because I had a guide to use. During one of my random websearches sometime back I had found and printed out a few sheets of circular graph paper, and managed to find one of them. Sadly, I can’t give you the link for that page, as I lost the bookmark for it.
When I cut the plug, I laid the graph paper down first, then took a clear acrylic block normally used for stamps and laid it on top of the graph, then centered the plug on top of the block. Then I stood so I was looking straight down over the plug, lined my blade along the graph lines and cut, making sure to keep the blades over the lines. It turned out pretty good.
The cane from a loaf also came out okay, but not as nice as I would have liked. This is probably because I was using less clay, and probably should have reduced the initial loaf first. I did get a bit of distortion, but I think I know the issue with that, and have an idea on how to correct for it.
Hi Mitzi J,
I know what u mean about cutting plug canes (nightmare) but keep trying. Make sure your blade is super sharp. I wipe mine with a baby wipe each time I cut, takes a little longer but works for me. I also stand up and make sure the plug is firmly stuck to cutting surface. Use a thin pad of “blue tack” if it slides around as using a glass cutting surface blunts the blade. The idea of making it square sounds interesting. Where did you see this video? Please share if you can. The more we learn the better the end results will be. Happy claying…cheers x
Thanks for another great video, Cindy. I’m not a big dandelion fan. I think it’s because DH has been waging war against the dandelions since we moved into this house with the big front lawn 7 years ago. But when I looked at the Pandora-style beads (which I loved), I thought FIREWORKS!
As I’ve said before, I don’t have to love the exact item that you’re creating in your tuts because the technique itself always get my creativity going.
(About halfway through writing this, I realized it was a bit of a ramble, so I’m putting in a disclaimer and apology.)
Up until recently I have not been much of a fan of caning… that is, doing it myself (I -always- enjoy looking). This has been mainly for two reasons. One, my biggest focus has been on sculptural work (dragons, the occasional mermaid, etc.), and two… because I suck at them.
That nice cut down the center of the plug in the video? I have yet to manage that one without some major skewing, somewhere between the top and the bottom. Normal for a beginner, I’m sure, but frustrating.
Recently, I watched Cindy’s video about the Parrot Tulip cane, tried it, and yay, I actually managed to pull it off! I now have one of my first decent canes, a frilled tulip waiting to go into a fairy bouquet, the rest waiting for when I get down my to do list to decorate another fairy’s skirt. And maybe a few jewelry pieces for a friend of mine whose “children” are two African Gray parrots.
So, thanks to Cindy, I have learned how to make a stacked layer style cane. But the dreaded “bisecting plug” style continued to fight me… including leaf canes, which my muses have been pestering me with ideas for. Even as early as last week, they were still abominable.
Then the creator of a claying group posted a little video showing how to do what she calls “the Dreaded Chevron Flip”. She made a leaf cane by stacking flattened bullseye canes into a loaf, then cutting down on the diagonal and flipping.
This one intrigued me, and I tried it. With squared off corners, I had clear guides to use for my cutting. It worked. Miracle of miracles, I had a leaf cane that actually -looked- like a leaf cane!
(It did distort a bit on reduction, but by and large, it’s still immensely better than previous tries.)
To drag this into relevance for the current video, when I saw the image in the email, I was both ecstatic and depressed. I -love- Ghost Canes and Lace Canes. At the same time, I was pretty sure it was going to be a “bisecting plug cane”… and I wasn’t wrong.
But I still watched the video. And this time, while I was watching, something happened. I started thinking, “you know, if you started with a square loaf instead of a round plug, you could probably do this. It might take a few more steps, but it could actually work.”
So, my to do list has just been shuffled. I have a half-finished wizard on my table at the moment, maybe a half hour from finishing. When he’s done, instead of the faux cloisonne’ tutorial I had been planning on treating myself with, I’m going to try two versions of this cane. First, Cindy’s way, in the eternal hope that maybe this time I can cut a straight line without a guide, and the second using the alternative method that’s forming in my head.
If anyone’s interested, I’ll report on my results.
Mitz
I Just read it is your birthday today, or is it tomorrow your time?. Anyway, have a great day and i hope the weather is lovely for you.
Very pretty will be having a go at this one today. Very clever way of keeping the shape of the outside canes. That’s really thinking outside the square, or should i say “circle”.
Cindy,let me add my good wishes for a wonderful year.
My fav astrologer says that with your drive you now have the incentive and are ready to make those positive changes… You have reached the crossroads and the next step you take will be one you have thought long and hard about? A new moon in you sign shows you in a glowing light. Got it, Flaunt it!! The stage is set for speech or performance.
How exciting for you Cindy, go for it!! whatever “it” is.
When I told my DH that I was going to make a ghost dandelion clock, he rolled his eyes and I swear when I was in the kitchen I heard him hiding all his watches. He thinks I’m going “steampunk” them to use for my clock!!
Well I DID once cut out the lining of an inside pocket from one of his old jackets and sewed it back up. I needed some silky brown material to use as eyelashes for a family of dolls and the shops were all closed.
I didn,t think he would notice. Months later when he found out I said,
“You have five pockets in that jacket, you don’t need them all, anyway I thought you said you were giving it to the charity shop!!” I will not write down his reply (these are nice people who live in Cindy World) Have fun tommorow Cindy. Cheers.
I can see me making this cane in all the colours of the rainbow. Now where is my Wasabee Green?? Love this colour even though I do not know how to spell it, well who CAN speak Japanese;)
Amazing tutorial! I loved it and as usual you made it seem so doable. The pendant in the fancy bezel is just so beautiful. Thanks Cindy!
I wonder if the dandilions can tell me when its “clay time”. My clock seems to be in advance mode right now. Time just flies by but should slow down soon. This is a super tute, Cindy, and I’m looking forward to doing it trying to use a neon green background. One granddaughter has loved that color for quite a while so hope she doesn’t go on to something else too soon. Will be a month before I can get to it.
MOST IMPORTANT: Have a wonderful, happy birthday tomorrow! May you be showered with all your wishes that are good for you. Hugs and love,
JoyceM
What a fun project. I can remember wishing on the dandelions as we blew on them. If they came off in one blow you got your wish. :-)
This cane reminds me of one I used to make a bandana pattern that I found in a book. It turned out really cute.
My husband and I will be traveling for 5 weeks in our travel trailer, so will be keeping in touch on my laptop as we are able to find wifi. Don’t want to miss any of your lessons, Cindy.
What a nice flashback to my childhood. ALOOOOOOOOOOONG time ago LOL.As Ken wrote -this tute has lots of possibilities. Fun to experiment, huh?. Also, thanks for the headsup on the Frost vs. White Trans. Glad to know they are the same. Thanks – as always – for such an interesting tute -smile !
I really must come up with better adjectives and superlatives!!!! But… WOW just seems to fit. Love this!! I just got some red translucent and the mind reels…..lol. thanks again, Teach!!
Cindy, I loved the video. I always look forward to Friday mornings and your videos. The second pendant in today’s video caught my eye. I love it. Have you made a video that demonstrates how to make the white outline around the green on the pendant. Is it a bezel you placed the green in or is it just the white surrounding the green? Lynn W
I think I can actually do this…..I usually a can idiot no matter how hard I try. Thanks so much. I’m sure I’ll have plenty of time to play w/clay while we are riding out Irene.
P.S. Forgot to say thanks
for another interesting Video.
XXX
Elizabeth K.
Hi Cindy and all, I like this Dandelion Ghost Cane. Very sweet.
Will be trying this one..
Like it in colours too.
Love
Elizabeth K.XXX
Looks like, with a little experimentation you could do an asterism technique in a faux gemstone (star ruby sapphire, etc.) can’t wait to see this and see if my assumptions are correct.
Just finished watching the tutorial. Wonderful! You are so ingenious Cindy that it’s simply amazing.
Just like Silverleaf, us kids in the UK use the fluffy seedheads to tell the time. I was always blaming the dandelion clocks too for being late home. (Still do!!) but then, I never grew up.
Now how many “puffs” till Friday’s Tute? This looks beaut Cindy and thanks for suggestion of using Purple or pink (not much white left in my stash) have been busy claying away for two days getting ready for my first craft fair using my PC creations, have only 3666,000,00 “puffs” till then.
Thanks for explaining that there is no difference between Premo White translucent and Frost as have never been able to locate Frost, now I know why. Cheers X
Hi Cindy I noticed that you are going to be using the White Translucent Premo Accent color— Have you (or anyone else) noticed any difference between that color and Premo Frost? I did a little test w/ a conditioned pc of each— if anything was different I couldn’t tell—just wondering-thanx
Thanks guys! I hope you enjoy the tutorial. Hey, I was just thinking… looking at this design today I noticed it would also make a great Purple or Pink Allium Flower-head. You could just swap out the White Clay for some nice shade of Purple or Pink. Maybe even from the Pink Allium Palette. That would be nice!
@Rebecca (Becky) Chisenhall: You’re welcome! We love to quote people that say clever things :-) I love it you get to have Christmas every week. It’s like a year round holiday!
@Silverleaf: OMG I have never heard of telling time with dandelions. That sounds so cute! I did see online some videos titled dandelion clock, but I thought it was just some scientific name for the fluffy seed head. Now I know!
@Tantesherry: You are correct in saying there is no difference between Premo White Translucent and Premo Frost. They are actually identical. Polyform just renamed it from Frost to White Translucent when they redid the color line.
I don’t know if kids do the same thing over the pond, but here in the UK dandelion seed heads are used to tell the time! If you blow away all the fluff in one breath it’s 1 o’clock, two breaths it’s 2 o’clock and so on.
Of course it isn’t terribly accurate, lol, but it’s fun and we still call the fluffy seed head a dandelion “clock”! I know that one more then one occasion when I got into trouble for being late home for dinner, I blamed the dandelions for telling me the wrong time. ;)
Oh, and Cindy, thanks for quoting me! I am flattered, and truly do feel that way even after a year (or so, lol). Every Thursday is almost like Christmas Eve and then Fridays are Christmas Day! You never fail to please me with your tutorials in content and the way you and Doug deliver them, and now with your daughter’s contribution to the lovely photographs, too. Thanks so much!
Oh wow!!!! This is wonderful!!! Love the look.
How pretty this is! I, too, love ghost canes and that ethereal look they give. Can’t wait to see this one!