Vol-045-2 Faux Wood Cane PcT Tutorial (Intro)
Video #242: “Cindy I would like to make my polymer clay look like different kinds of wood. Do you have any tutorials for oak, walnut, cherry, maple?” ~Sandra-H
More...

** This post is an introduction to one of our paid tutorials.
As promised in the Celtic Heart Tutorial from last week, the next lesson in our February series will show you how to make a faux wood cane.
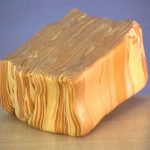
Polymer clay is awesome at imitating different materials, and does an especially good job of mimicking wood and wood grains. Because of the unlimited colors and layering possibilities of polymer clay, with a little planning, you can capture the look of any species and finish of wood that you want.
In the examples, I show you a blonde wood version of a faux wood cane, which I will teach you how to create in this tutorial. But I also show examples of darker woods, such Faux Oak and Faux Black Walnut varieties. Once you learn the techniques of making a faux wood cane, you can go on to experiment with different color and grain patterns of your own, making the options unlimited!
“
Fantastic tute, as usual, Cindy. I had found a different tute on wood grain quite a while ago, and not only was it not as clear and concise as yours, the result was not half as realistic (turned me off after the first try). BUT, Yahoo, thanks to you and Doug am back in the lumber business!
Marlene C
“
Ah, the knots are the key to the realism you get... great idea. Also, encourage folks to push the color way boundaries, try reds, greens, purples, etc. The wood grain is so apparent and lovely, and by using colours outside of the normal range, it causes the whole design to pop.
Jocelyn C
“
Now I can 'faux' my beloved Mesquite wood! What a great tute. Jocelyn is right - the knots are the key. Imagine ANY wood - what a gift. Thanks so much - spread my wings.
Patt W
Transcript coming soon...
Transcript coming soon...
Our goal is to translate these videos into as many languages as possible. If you are interested in helping with this initiative, then please do contact us and we will figure out a way to make it worth your while :)
Shareable Images


Want to chat about today’s post? That’s what the comment section below is for. Scroll Down… We’d love to hear from you!
Or... if you would like to request a topic for a future post, here is the link to do that… PcT Suggestion Box
Hi Christine, glad you liked the tutorial! As for colors to use for a darker wood, I like to use different combinations of Burnt Umber, Gold, Raw Sienna, Bronze, Copper and a touch of Black. You can really use any color combo you like. Just make sure to include some metallic or pearl colors to keep the wood from looking flat and try to vary the colors so there is some contrast between layers. Otherwise you won’t be able to see the grain. Go to Google images to get some wood grain inspiration if you like. The combinations are endless!
Hi Cindy,
Thank you so much for your great tutorial on the faux wood grain-you have done such a great job explaining how make the cane I can’t wait to get started!
Your video gave the color used for blond wood but I really love the oak color you used on the pocket knife. Would you be able to share which colors you used for the darker wood…also should I use a darker color than beige to cover my piece in the beginning when using a darker veneer?
Thank you in advance for your information!
Cindy, could you please tell me what would be an appropriate thickness of clay to cover a thin cell phone case. I purchased a beautiful wooden case for my delicate Samsung GalaxyS III. I had a feeling it wouldn’t be able to stand up to any accidental drops… and I was correct. I am attempting to make a replacement case.
Hi Mary-Ann,
I’m obviously not Cindy :D but a couple of factors would be the clay brand you’re using — some are stronger than others, some are stiffer than others — and also whether you’re planning for your replacement case to function on its own (e.g. replacing the standard back of the phone entirely) or whether you’re thinking of attaching a decorative polymer clay layer to something like the standard polycarbonate backpiece. (You mention a thin phone case… is it the standard polycarbonate one, or some other material such as a weaker plastic?)
I’ve had a Samsung Galaxy S III for about 15 months, and mine at least isn’t actually that delicate: I’ve dropped it heaps of times, have had it bashed against all sorts of things, and when it’s not in my back pocket it’s usually thrown into a sports bag with nearly 20kg of miscellanea. (Not that I recommend treating it that way! :D) I would suggest protecting it from bending, however, as after 14-1/2 months of being sat upon and pressed against the curve of my buttock the glass developed a crack, although the case itself is fine after all the above ill treatment.
So make sure your replacement case is quite stiff by using a strong clay brand that cures stiff rather than bendy, and/or by having a stiff standard case underneath, and/or by increasing the clay thickness if you are using a bendy brand like Premo in order to counteract the bendiness somewhat.
I hope that helps a bit. :)
Sue
Thank You for your reply Sue.
I attempted to make one case on a rigid plastic case using the faux burl wood style. It held up great in the oven and looked great polished up with Renaissance Wax, but it too did not last after a fall or two. It started to chip away.
Can you share with me if you were to attempt to do this, what thickness you’d attempt and if you’d recommend using all of 1 particular brand of clay, as far as lending to its strength (& if so which brand)? I tried to use as much Premo Sculpey as possible, because I thought Cindy had determined it was strongest, but with the number of different colors used to create the Burl look, perhaps it wasn’t enough. I appreciate your input. My phone is not made sturdy and it really needs as much protection as I can provide it.
Sue, I was seeking the information that you have noted to be important. Strongest Brand of Clay to use, suggested thickness for added strength (the least “safe” thickness to maintain the sleekness of the phone) in anyone’s experience and I’ll add, any coating I should apply to lend strength? I used to polish the first one, just to finish it off in a polished look.
I am awaiting input, to be able to make the case as soon as possible. I appreciate any input (hopefully experienced). I can’t afford to “practice” on this one. Either I am able to make it and it works or I’ll have to buy one. I always prefer to have something that either no one else has or is rare, not just the same look that millions of others have. Thanks for Any & All Help!
Hi Mary-Ann,
That sounds nice… what a shame it wasn’t quite robust enough!
When you say that your faux burl wood-covered case started to chip away, do you mean:
(1) bits of polymer clay broke away leaving some polymer clay underneath, i.e. it was the polymer clay itself that broke, rather the bond between the polymer clay and the rigid plastic, or the rigid plastic itself; or
(2) bits of the polymer clay veneer you applied started to break away fairly cleanly from the underlying rigid plastic case, i.e. the bond between the polymer clay and the rigid plastic was insufficiently strong to secure and support the polymer clay; or
(3) complete bits of the covered case chipped off, i.e. pieces of polymer clay and rigid plastic broke off together, without the polymer clay veneer separating from the underlying rigid plastic?
If it was scenario 1, i.e. insufficient polymer clay strength, what temperature and time did you use to cure your clay? Premo isn’t the strongest clay but it’s pretty decent, so maybe curing at a more consistent temperature, or at a higher temperature, or for a longer time would be sufficient to give you the strength you need. (I’ve also added some notes below on what I’d do and the stronger clay I’d use, but it brings other factors into play.)
If it was scenario 2, i.e. the polymer clay veneer chipped from the rigid plastic underneath, did you use any kind of glue to attach the polymer clay firmly to the rigid plastic? My expectation is that you would need to do so to get a strong bond between the two, and that depending on the type of glue and the type of underlying rigid plastic, you might possibly need to treat the rigid plastic somehow to ensure a strong bond to it as well. In other words, your clay might have been strong enough for a veneer, just not firmly enough attached.
If it was scenario 3, i.e. pieces of polymer clay and rigid plastic broke off together, you’re even rougher on your phone than I am! As with scenario 1, adjustments to the clay curing process or a stronger clay would probably help, as might a coating of resin, but you might be better off working with a metal case underneath the polymer clay as well.
Anyway…
If I were to attempt this myself I’d use Kato clay… and not just because it’s my favourite! However, I’d also use a metal case underneath the polymer clay rather than a plastic one.
Some of the reasons that make Kato my favourite clay make it most suitable for this kind of thing too in my opinion. Kato is quite a bit stronger than Premo when cured properly — noting that Kato must be cured at a minimum temperature of 150C/300F for proper strength, i.e. noticeably higher than Premo’s curing temperature — and it’s also much, much stiffer.
Kato’s high curing temperature is actually one of the reasons why I’d apply my decorative polymer clay veneer to a metal case rather than a plastic one, although the added strength of the metal is a bonus. If I were to use a plastic case I’d probably be looking at a polycarbonate one for its relative strength, but polycarbonate deforms at the temperatures needed to cure Kato properly which imposes logistical difficulties. I couldn’t bake the Kato polymer clay on the polycarbonate backpiece because the backpiece would deform. I could use the polycarbonate backpiece to make a temperature-safe support on which to bake the Kato polymer clay, and I could then take advantage of Kato’s reheat-and-reshape versatility to glue it tightly and cleanly to the polycarbonate backpiece, but that’d be a lot of stuffing around.
I like mixing my own colours, but if you don’t then Kato has another downside for the faux burl wood technique you mentioned (which I love too). Kato and Premo appear to have applied different philosophies in setting their colour ranges. With Kato the expectation is that you’ll mix your own colours: there are only a limited number of packaged colours although they’re well suited to logical colour mixing, and you’d definitely need to mix up your own component colours for the faux burl wood. Premo, on the other hand, has a large number of packaged colours including some lovely metallics and pearlescents, and seems more set up for people using colours straight out of the packet. You can make the same standard, metallic and pearlescent colours with Kato that you can with Premo, but you have to mix them yourself.
As for the clay thickness I’d use, if I were applying a Kato polymer clay veneer to a metal backpiece, I’d probably go for a thickness of about 0.5mm (i.e. very thin!). I’d bake it on the metal backpiece at 160C/320F (which will make it even stronger than the usual Kato curing temperature of 150C/300F) for 30-40 minutes, then once it had cooled I’d prise it off, apply suitable glue, and glue it back to the metal (polymer clay won’t bond strongly to metal). I’d probably consider finishing it with a coating of clear resin too, for a shiny finish and a bit of extra strength.
With Kato I’d also consider making a backpiece from scratch, i.e. purely from Kato with no commercial backpiece underneath it, with the polymer clay being structural as well as decorative. Judging by large thin pieces I’ve made in the past, Kato should be strong enough and stiff enough for this to work although I’d need to experiment a bit to determine an optimum thickness. The main difficulty with this approach would be forming it precisely enough that the fully-home-made backpiece attached securely and tidily to the phone body, and on balance I’d be almost certain to be “lazy” and veneer a metal case as described above instead.
If I were using Premo, I’d still use a metal backpiece underneath a polymer clay veneer, but I’d make the polymer clay veneer thicker at about 1mm. I’d bake it on the metal backpiece at 135C/275F for an hour, then do the rest as described above for the Kato veneer (cool, prise, glue, and maybe coat with resin).
But I must emphasise that I haven’t actually tried making such an item! (I’m boring and really like the plain slate blue of the standard Galaxy S III case ;D) Hopefully someone with direct experience in what you’re after will chime in.
Im off to work but wanted to watch the tutorial on faux wood making a perfect little 10 minute Play before work. THis is my FAVE tutorial so far. I will be watching again and again. Wish my Dad was alive he was a woodworker and someone mentioned tiger eye and quarter sewn. I wonder if the way you slice it. ie like wood is sliced or what would happen if you put more eyes in it like birds eye maple. Yes I wish premo would track it too. Gosh I wonder how many members there are now. This is the BEST PROGRAM ever. its to the point. and what you learn is incorporated into projects. Yes I love Willows spoon design. Is Willow going to follow in moms footsteps.
Also I wonder if Cindy is going to do some more extensive jewelry teaching. She has me wandering off into that realm as well. and I prob need to stay focused. but see how she is. she gets your creative Play mind going. thanks Cindy. More of Willow’s work available to see. Happy Easter to you.
I love this wood grain tute. It looks so natural. I am so anxious to try this. Cindy you are such an artist. It amazes me how you put things together! I just finished the Mokume Gane Can that looks like metal and it is just beautiful and so easy with the metallics. Now if I could only get the shaded rose cane to come out right. I can’t figure out what I am doing wrong but after 3 trys it just does not look like a rose, just a squishy mess. I think it is in the reducing part of it. Some canes are easy and others are just so frustrating. I really love this Rose cane so will probably try it again later on.
Okay, I’ll admit it, I’m weird. When you mentioned not wanting “too many knots” in the cane pattern, my mind went in the reverse direction. -Lots- of knots, a few half turns, maybe even a few bends of the cane… Burlwood!
Tiger eye maple? Quarter sawn oak? Silverized teak?
I predict a bump in sales for all wood tones, lol.
Cindy, you should ask Premo to track it…think lots of folks will eagerly try faux wooding over the next little bit.
Very neat to know little Willow’s a big part of it, too.
I’ve seen other faux wood grain tutorials but never like this. Wow! you never cease to amaze me.
Now I can faux my beloved Mesquite wood ! What a great tute. Jocelyn is right -the knots are the key. Imagine ANY wood – what a gift. Thanks so much – spread my wings…………
As always a great lesson. I do have a part of my project that the woodgrain will work well with, but it would have to be pretty long… wondering how I would bake that? Would have to use my regular oven instead of the clay oven due to the size required if I chose to do it in clay instead of real wood.
another great tutorial.
Karonkay
Thanks Karon! When Willow baked her spoon, it was too large for the toaster oven, of course. So she covered one of the wire racks in our regular oven with 4″x6″ ceramic tiles, (I think she used 9). On the tiles she placed a sheet of parchment paper. On the paper she placed her spoon and tented it with another sheet of parchment. Hopefully your pieces won’t be longer than the size of your racks, corner to corner. Otherwise you will have to figure out how to bake shorter pieces, that you can glue together after baking. Hope that helps!
Ahhhh, the knots are the key to the realism you get! Very nice idea. Also encourage folks to push the color way boundaries, try reds, greens, purples, etc. The wood grain is so apparent and lovely, but, by using out of the norm colors, it causes the whole design to pop.
My complex just completed post storm trimming, and took out all the junior black walnut trees. For some reason, they grow like weeds here. I nearly choked, if they had just let that stuff mature, what a bounty they could reap selling it to wood workers.
Had the maintenance person slice some of the bigger diameter lengths into rounds, can’t wait for them to dry. In addition, now I can’t wait to try and replicate the patterns, as it ages, the color darkens to deep browns and blacks.
Another great tutorial. If and when I find the top of my work table I want to try that. My head is filling with ideas for that cane.
Thanks again Cindy, it was awesome.
“This is going to be hard on some of you that need to have things absolutely precise” Hah! I had to stop the video cause I was laughing so hard! That is SOOO me… comes in handy for some skills (quilt piecing, counted Xstich) but a bit of a hindrance when we attempt to be “random”… Can’t get my hands on the clay for a while but that won’t stop me from watching your videos, Cindy (even if that gets squeezed in while I exercise LOL)
loved this. Such a realistic wood grain. Thanks once again.
Fantastic tute, as usual Cindy. I had found a different tute on wood grain quite a while ago, and not only was it not as clear and consise as yours, the result was not half as realistic(turned me off after the first try). BUT, Yahoo, thanks to you and Doug am going to be back in the lumber business!
Just watched the Video. It was awesome as usual. I can see using this technique in several ways.
I love this tutorial. thanks again for making things so easy :o)
Hi Cindy & Doug:
Yay- looking for to the package coming in tomorrow. I am a night owl also, and I am just going to discipline myself to get myself beside BEFORE that comes in, or I just might go through another daytime before I find the time to try that bedtime thing again!
Thank you for your diligent work, and I would like to say that your Daughter Willow ….is a Polymer Clay artist to be reckoned with…Great job Willow!
Pauline (MtnMaMaDuke)
Love working with faux wood, another wonderful gift. Willow you keep going like you are Mom and Dad are going to retire early and put you in charge. You do great work Sweetie. Enjoy it all. I feel like I am complaining all the time but I have missed so much here. I was just wondering if there is a way to get to all the old color recipes yet. You know how the saying goes. Third times a charm !!!. NO not for me, yep you guessed it. I now have shingles for the 3rd. time since last fall. I miss so many of the color palettes until they are no longer available. So if there is a way we can get to them so I can get them downloaded that would AWESOME. If not I will just keep on patiently waiting like everyone else.
Thanks for all the GOOD PC YOU HAVE BROUGHT INTO MY LIFE. Praying for Love, Great Health, Relaxing crafts and sending many many Uuuuuugggggs
Very sorry Peggy, to hear that Shingles has hit you yet again. I’m also sorry to say that we still don’t have archives set up for the B-recipes. It is still on the agenda though. Of late, all of our spare time has been going into the upcoming launch for our art therapy book. And I am am also continuing to look for new video player options in an attempt to find a solution that will work across the board, for everyone. The latest challenge has been for those who are using some of the new “Tablet” computers (i.e. Galaxy Tab, Kindle Fyre, Toshiba Thrive, etc). As it turns out, many of these devices are using the brand new HTML-5 technology. Supposedly this new HTML-5 platform is going to standardize web video so that it will work more seamlessly with all makes and models of computers and operating systems. But in the early stages of this transition, it is actually causing me and some of the members a lot of grief. It will all work out in the end though.
PS: Also want let everyone know about a couple of pics that were just posted yesterday, of a Red Clover Flower design (click link to see the pics), that Cindy just came up with.
This is wonderful ! So much better than using a wood grainer from Home Depot !! This is the real thing – soooooooooo useful ! This is really new to me -can’t wait – did I say that last week,too ? Well, it’s true. Fridays are special -“Cindy’s Tutes”. Grab a cup of coffee and enjoy – see you then……….
Another can’t wait. This will be used in so many things.
Oh wow! That’s the best looking faux wood I’ve seen. Sooooo excited to try this. I’d better go make sure I have the right colors (or at least something close to them).:)
As usual, I can’t wait to try this technique! Just watched the preview and am very impressed with the realism of your cane. Unfortunately, I have put away my PC stuff to protect it from the inevitable dust – I am setting up my sewing machines to catch up on overdue quilting projects. Hope that proceeds without too much drama so I can get back to my new fave CLAYING!! Catch up with everyone later. xoxo
Oh, Cindy, I forgot to say: SO glad you added Kelli’s inspirational story here! Hope things are going well for you, Kelli…
Thanks Monique! Now don’t be gone too long… we need you around here! You brighten up our day with your sweet and helpful comments.