Polymer Clay Skinner Blend Instructions
Video #356: Combining triangles geometrically so that your colors blend into smooth gradients.
More...

IN THIS POST: — teardrop blends — skinner –blends — gradients shifts — (Topics marked with an asterisk* are discussed in the Comments Section below).
Topics Covered In This Video:
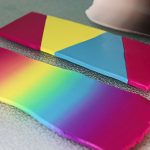
- How to make a Skinner Blend – A polymer clay color blend that gradually shifts from one color to another.
- You can make a 2 color Skinner Blend from white to black, for example. Or you can have a multicolor blend that more like a rainbow.
- In a previous video I demonstrated the old school way of making a Stepped Graduated Color Blend, where you mix individual colors by hand in stepped proportions from one pure color to another pure color, with multiple hand mixed shades in between.
- A few years ago (20yrs? or so), a polymer clay artist by the name of Judith Skinner, developed a technique that made blending from one color to another, much faster and simpler.
- In this video, I show you how to make a two color Skinner Blend. You will see the biggest effect if you use two colors of polymer clay that have high contract.
- I then demonstrate how to make an Off-Set Skinner Blend.
- In a future video, I will show you how I developed an even faster way to make color blends… the Lietz Teardrop Method.
Have you ever made one of these Skinner Blends? And do you have any challenges making them?
Looking forward to hearing from you!
00:00:03 –> 00:00:07 Hi guys, its Cindy Lietz, your Polymer Clay Tutor, and in today’s studio tip, I’m going
00:00:07 –> 00:00:13 to show you how to make a Skinner Blend, I’m gonna show you a couple of different versions.
00:00:13 –> 00:00:20 Now the coolest thing about Polymer Clay is that you can use it in… you can blend it
00:00:20 –> 00:00:27 actually in a beautiful color blend that shifts from one color to another.
00:00:27 –> 00:00:31 And you can do it in a two color shift like I have done here, where you’ve got a White
00:00:31 –> 00:00:42 to Black but you can also do it in more complicated… such as a rainbow blend such as this.
00:00:42 –> 00:00:48 Now in a previous video, I showed you the old school way of making blends, and it was
00:00:48 –> 00:00:54 a stepped blend where you actually mixed different amounts of clay together by hand, and you
00:00:54 –> 00:00:57 got a color blend like this.
00:00:57 –> 00:00:59 But a few years ago…
00:00:59 –> 00:01:05 I don’t know, 20 years ago or so, a Polymer Clay Artist named Judith Skinner came up with
00:01:05 –> 00:01:13 a much simpler method of making a graduated blend, and it’s actually a lot smoother as
00:01:13 –> 00:01:16 well, and I’m gonna show you how to do that.
00:01:16 –> 00:01:23 What you take is…we’re gonna do the 2 color one here, so I’ve got 2 colors…you’ll see
00:01:23 –> 00:01:30 the biggest…you’ll see the biggest effect if you use colors with contrast in them, if
00:01:30 –> 00:01:35 you use 2 colors that are very, very close to each other, you may not see the shift as
00:01:35 –> 00:01:41 clearly, but they’ll still… it’ll still show, it can be quite a pretty effect.
00:01:41 –> 00:01:45 Now I’m gonna use…where is this, I need a little bit of water, I wanna stick these
00:01:45 –> 00:01:52 2 together temporarily, and this clay is quite sticky, and the lights are a little bit warm,
00:01:52 –> 00:01:56 so I’m gonna put some water in between my layers here, but you don’t necessarily have
00:01:56 –> 00:02:01 to do that, depending on if your clay is sticky or not.
00:02:01 –> 00:02:08 And I’m just gonna lay these 2 on top of each other, and I’m gonna cut them into a rectangle,
00:02:08 –> 00:02:14 like this, it could be square or rectangle, with the water in between, it comes apart
00:02:14 –> 00:02:22 super easy.
00:02:22 –> 00:02:28 Now we have a rectangular shape, 2 of them, 1 of each color, and then what we’re gonna
00:02:28 –> 00:02:34 do is we’re going to cut… while they’re stacked together, we’re going to cut them
00:02:34 –> 00:02:39 from corner to corner, and essentially, what we’re gonna do is create some triangles.
00:02:39 –> 00:02:46 So I’m gonna just cut straight through the stack, both stacks at once from corner to
00:02:46 –> 00:02:50 corner, then I’m gonna peel them apart and I have some triangles.
00:02:50 –> 00:02:57 Now I’m gonna dry them off, because I don’t wanna mix the water into the clay when I blend
00:02:57 –> 00:03:04 it, if you have really stiff clay, you won’t have that issue.
00:03:04 –> 00:03:11 Now I’m gonna take this triangle and flip it over so that it matches the one on the
00:03:11 –> 00:03:17 bottom, so the White clay on top of White clay, and this will be the bottom part of
00:03:17 –> 00:03:18 the rectangle.
00:03:18 –> 00:03:25 Then I’m gonna match up the Black on the other side, just to reform the triangle…I mean
00:03:25 –> 00:03:32 the rectangle that was there before, only now we’re gonna have White on one side and
00:03:32 –> 00:03:36 Black on the other, okay?
00:03:36 –> 00:03:44 So as we blend this whole stack together, it’s going to be similar to this one here,
00:03:44 –> 00:03:51 where…if you look carefully, you can actually see a triangle shape here, and you’re going
00:03:51 –> 00:03:54 to be…we’re gonna be blending this together.
00:03:54 –> 00:04:02 But on this side, basically you’re gonna have more White and just a touch of Black, half
00:04:02 –> 00:04:07 way through, it’s gonna be 50-50, you’re gonna have equal amounts White and equal amounts
00:04:07 –> 00:04:11 Black, and then by the time you get down to this side of the blend, you’re gonna have
00:04:11 –> 00:04:18 very little White and a lot of Black, so it’s the same idea only much simpler.
00:04:18 –> 00:04:24 And I guess Judith had a background in Science or Math or something and that’s what made
00:04:24 –> 00:04:31 her think in this Geometric kind of way, which was nice for all of us.
00:04:31 –> 00:04:36 So I’m just gonna roll this a little bit so that I know that they’re stuck together, and
00:04:36 –> 00:04:39 a little thinner so that I can put it through the pasta machine.
00:04:39 –> 00:04:48 Now, we’re going to run it through the pasta machine at the thickest setting, and I’m putting
00:04:48 –> 00:04:55 it in carefully, that I have White on one side and Black on the other, I don’t want
00:04:55 –> 00:05:01 to turn it this way, I’m gonna turn it this way, and I’m gonna kinda try to control the
00:05:01 –> 00:05:07 sides with my fingers here, so as I roll it through, we’ll have one sheet of clay.
00:05:07 –> 00:05:15 Now what we have to do is put it…fold it in half, always fold it in half the same way
00:05:15 –> 00:05:19 every time, and then we’re going to run it through the pasta machine again, and what
00:05:19 –> 00:05:29 this does is each time we do that it starts mixing those layers together and starts creating
00:05:29 –> 00:05:30 a blend.
00:05:30 –> 00:05:37 Now at first, it will look terrible, or you won’t see much of an effect, but as you keep
00:05:37 –> 00:05:48 doing it, the colors will start to blend together.
00:05:48 –> 00:05:58 So you can see it’s starting to blend, so I’ll keep doing that and come back and show
00:05:58 –> 00:06:00 you a little further along.
00:06:00 –> 00:06:07 Okay, I’m about halfway through the process, it’s starting to blend together, it’s still
00:06:07 –> 00:06:11 quite streaky, and a little bit uneven, there’s still little bits here that aren’t completely
00:06:11 –> 00:06:17 folded in, but I will just continue to do this folding in half and running it through
00:06:17 –> 00:06:20 until it’s much smoother, and then I’ll come back.
00:06:20 –> 00:06:26 Okay, so I went through another bunch of times, and it is much smoother now, I could probably
00:06:26 –> 00:06:30 go on a little bit further if I wanted to.
00:06:30 –> 00:06:36 You’ll find that you’ll need to go through…depending on how soft or hard your clay is, you know,
00:06:36 –> 00:06:42 anywhere from 15 – 40 times before you have it properly blended, so that’s how you do
00:06:42 –> 00:06:48 that one, as you can see, it’s quite Gray, there’s not any really pure White at this
00:06:48 –> 00:06:54 side, and not really any pure Black because there was still just a little touch of Black
00:06:54 –> 00:06:58 here, remember when the triangle was there, and just a little touch of White, so you never
00:06:58 –> 00:07:02 really get a completely pure color on either side.
00:07:02 –> 00:07:10 Unless you do something that’s called an Offset Skinner Blend, so I’m gonna show you that.
00:07:10 –> 00:07:17 So we got 2 more pieces of clay here, and I’m gonna use the water again, you can use
00:07:17 –> 00:07:25 this water trick on anything that you don’t want your clay to stick together on, and…
00:07:25 –> 00:07:36 when it’s raw of course, so I’m cutting out another triangle again…or a rectangle,
00:07:36 –> 00:07:45 it’s getting late in the day, I’m surprised my brain is still even working, anyways, so
00:07:45 –> 00:07:50 here we go we have a rectangle.
00:07:50 –> 00:08:01 And this time, instead of going from corner to corner, I wanna leave a little bit of the
00:08:01 –> 00:08:05 White on one side and little bit of the Black on the other, so I’m gonna offset my blade
00:08:05 –> 00:08:12 and come in about a quarter of an inch off the end here and about a quarter of an inch
00:08:12 –> 00:08:15 off this end here, so I’m off- setting it.
00:08:15 –> 00:08:20 It needs to be about the same size, you can measure it if you want, I tend to eyeball
00:08:20 –> 00:08:26 everything, but I’m just gonna cut through both layers like that, peel them apart once
00:08:26 –> 00:08:33 again, dry them off once again, I don’t want that water mixing into the clay, otherwise
00:08:33 –> 00:08:39 you’ll get bubbles and plaquing and other issues.
00:08:39 –> 00:08:43 Now we’re gonna take this and we’ll have to flip it around to get it to match, we’re
00:08:43 –> 00:08:50 stacking it the same way, only it has this little flat edge on it this time.
00:08:50 –> 00:08:59 And we need to do this Black one here, and it’s got the Black flat edge, like that, so
00:08:59 –> 00:09:06 that’s why it’s called offset ‘cause that cut is offset a bit.
00:09:06 –> 00:09:12 This time, when we blend it and fold it and do all that, it’s gonna leave a bit of a pure
00:09:12 –> 00:09:20 White section here, and a little bit of a pure Black section, and make for a bit more
00:09:20 –> 00:09:26 of an obvious blend.
00:09:26 –> 00:09:30 We’re gonna run it through the pasta machine the same way, I like to use my fingers on
00:09:30 –> 00:09:36 the side so it doesn’t get too wide.
00:09:36 –> 00:09:42 Fold it in half, again, and keep doing this until it’s blended, we’ll come back when it’s
00:09:42 –> 00:09:45 about halfway blended for you.
00:09:45 –> 00:09:52 Okay, so I’m about halfway through the blending process, I have to be a little bit careful
00:09:52 –> 00:09:56 that I don’t bend it too sideways and get too much Gray into this White, but we still
00:09:56 –> 00:10:02 have some pure White on this side and some pure Black on that side, what I mean is, I
00:10:02 –> 00:10:09 need to make sure I keep them straight together and not like kitty corner or angled at all,
00:10:09 –> 00:10:17 ‘cause then you can mess up the alignment of your blend, so I’ll keep blending and come
00:10:17 –> 00:10:19 back when I’m done.
00:10:19 –> 00:10:25 Alrighty, so this is starting to come along quite nicely, I could blend it a little bit
00:10:25 –> 00:10:31 further if I wanted to, but we have a nice White edge blending off to a nice Black edge.
00:10:31 –> 00:10:39 Now clay blends can be used for all kinds of beautiful projects for Polymer Clay.
00:10:39 –> 00:10:46 The Skinner Blend is a nice simple way of making a gradiated blend.
00:10:46 –> 00:10:52 You can, like I said, you can get really complicated and have all these different angled ones and
00:10:52 –> 00:10:56 make some Rainbow blends.
00:10:56 –> 00:11:02 Plus there’s a bunch of other neat ways as well, other techniques and faster ways to
00:11:02 –> 00:11:06 do color blends as well, which I’ll show you in another video.
00:11:06 –> 00:11:12 So my question is, have you ever made one of these Skinner blends?
00:11:12 –> 00:11:15 Do you have any challenges with them?
00:11:15 –> 00:11:22 And make sure to leave those in the comment section below, and let us know what you think.
00:11:22 –> 00:11:25 If you like this video and it was helpful for you, make sure to press that like button;
00:11:25 –> 00:11:27 that would be great.
00:11:27 –> 00:11:32 And if you have suggestions or anything for future videos, please let us know.
00:11:32 –> 00:11:34 So we’ll see you next time, and bye for now.
Our goal is to translate these videos into as many languages as possible. If you are interested in helping with this initiative, then please do contact us and we will figure out a way to make it worth your while :)
Resource Links:
- Related Video: Stepped Graduated Color Blend
- Related Video: Lietz Teardrop Method
- Related Video: Square Polymer Clay Rainbow Cane Skinner Blend Plug
- Related Video: The Skinner Blend Plug
- Related Video: A Basic Skinner Blend Polymer Clay Cane Project
- Related Video: Rainbow Teardrop Blend Or Multicolored Skinner Blend
- Related Video: Easy Polymer Clay Zipper Cane Tutorial
Resources marked with a double ** asterisk are affiliate links. If you click on them and decide to buy something, we may receive some compensation. This does not affect the price you pay in any way. What it does do, however, is helps us to continue providing free videos for you, here at the PcT website. Using our links to purchase your tools and supplies, is always greatly appreciated.
Sponsored Ads & Special Promotions
Shareable Images


To share this full blog post anywhere on the web that allows links in comments, here's a shortened url to copy and paste...
>> https://mypct.ca/v356 <<
Want to chat about today’s post? That’s what the comment section below is for. Scroll Down… We’d love to hear from you!
Or... if you would like to request a topic for a future post, here is the link to do that… PcT Suggestion Box
How do I keep a skinner blend from becoming too wide using multiple colors
Hi Theresa, you’ll find your answer in this post and video called…
Is your Skinner Blend or Teardrop Blend Too Wide?
.
When I did the teardrop blend using three colors how do I keep from making my blend so wide.
I have done the complex Skinner Blend. As I recall each try, after laying out the triangles, the blend just became too wide.I like your way of stacking and even the offset is good. I would have liked to see you do the rainbow Skinner. When the Lietz blend came along, I once again started making rainbow blends. As always, cf
Your work table looks fabulous. Would love to just see all the unique tools you use I love all of your tutorials!
You tutorials are awesome for a complete newbie like me. :)
thanks loved it,, now i have it down pat!!!!
Hi Cindy, I think I will stick with the teardrop blend that you showed us a long time ago. It’s been working beautifully for me.
You are not doing anything wrong Andrea… it was I that put the wrong link in the original newsletter email… oops!
Thank you for the pointing this out and… apologies for any confusion it has caused.
I will broadcast an addendum email shortly, with the correct link to help minimize confusion for others.
—————————————————————————–
Now… since we ended up having to send out two emails today… I figured we may as well provide some advance notice about the next video post scheduled for Monday (Nov 11).
Many of you will be at home on Nov 11, since it is a national holiday in many countries, honoring those who have served in the armed forces.
Up here in Canada, we call it Remembrance Day. Many of us wear red poppy pins to show respect.
If on Monday (because of the national holiday) you are spending some of your day at home (and in your studio)… then this special announcement may be of interest…
Due to a steady stream of requests over the last few years, we have finally decided to post a public version of Cindy’s Teardrop Blend Video for everyone’s benefit.
Based on feedback received, this Teardrop Technique has had a very positive impact on the way many clayers are now doing their color gradients.
“Cindy, your Teardrop technique has brought a wonderful and sudden change in my way of working with color blends.” ~Debbie-G
.
.
.
Super quick and easy color blending technique — No Geometry Required :-)
So… coming up on Monday (Nov 11, 2013), be sure to come back here to the PolymerClayTutor blog… where the latest post will include a step by step video on how to do the quickest (& easiest) color blend ever.
In the mean time, here is a link to where 100’s of comments have already been posted about the Teardrop Blend Technique, when it was first published way back on Feb 17, 2009.
Hi, Cindy and Doug!
Don’t know if I’m doing something wrong but you have a link in the newsletter to the free Skinner Blend Video #356 and when I click on it I end up on your YouTube Channel Video. I tried twice. Thought I’d let you know in case there is confusion.
I use Skinner Blend ever since I started with polymer clay. When I first read about it, I learned that the offset was the original way Skinner created it and the reason why. I always use the offset method and make Skinner plugs and all sorts of things with them. I have no difficulty using this method at all and love to experiment with it all the time. It always comes out great.
Yes I have made “one” so far. It did not turn out as neat or blended as yours. I will give it another try. This time I will hold the sides in, fold it straighter and be prepared to run it through the pasta machine many times. Thanks for the help. You make it look easy.
I make all my skinner blends offset because I like having the original colors in the blends. I cut my triangles evenly and then lay them on the tile offset and cut the points off.
Used it a lot especially in a kalidascope tecnique by Sarah shriver. My only problem was the clay getting too wide but u have already addressed that. I intend to make the clay wedges to stop that happening. I much prefer the “Lietz” blend as it doesn’t have to be too precise.
I watched the Skinner blend being made many times years ago on the Carol Duvall show but never realized why they offset the cut. Good thing I watched something I thought I already knew.