How To Make Long Skinner Blends or Teardrop Blends
Video #464: A viewer asks how to change her wide Skinner Blend sheet into a long narrow strip.
More...
IN THIS POST: — teardrop blends — skinner blends — gradients — shifts — ombre — long skinner blends — skinny blends — color blends — gradation — lietz blend — (Topics marked with an asterisk* are discussed in the Comments Section below).
Topics Covered In This Video:
- Problem with missing instructions.
- Converting a wide Skinner Blend or Teardrop Blend sheet, into a long strip.
- Viewer request for more info.
- Warming up the clay.
- Rolling up the clay.
- No air bubbles.
- Using a clay brayer to flatten your clay.
- Using several different settings on your pasta machine.
- Smooth color transitions.
- Playing card thickness measurement.
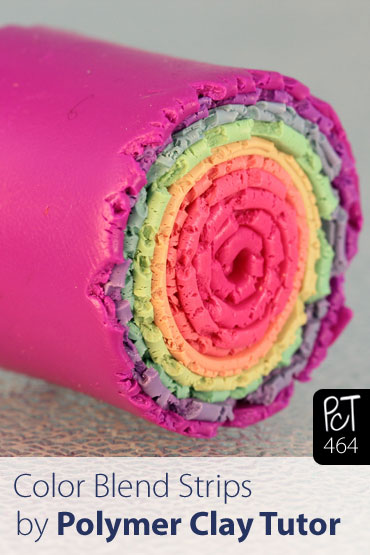
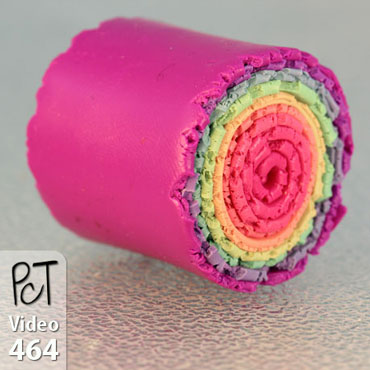
- Rainbow bullseye blend strip.
- Skinner blend plug.
00:00:03 –> 00:00:07 Hi guys, its Cindy Lietz, your Polymer Clay Tutor, and today’s Studio Tip, I’m gonna
00:00:07 –> 00:00:12 show you how to make a long Skinner blend or Teardrop blend.
00:00:12 –> 00:00:18 Now I got a request from somebody the other day who had seen a tutorial on making a cane,
00:00:18 –> 00:00:23 and they took a Skinner blend, or Teardrop blend…if you don’t know how to make one
00:00:23 –> 00:00:30 of these blends, check out one of the other videos, but they had taken one of these blends
00:00:30 –> 00:00:36 in the tutorials and just showed up at the next step with it long and skinny, and the
00:00:36 –> 00:00:40 person that had watched the tutorial had no idea what was going on, and they didn’t
00:00:40 –> 00:00:45 know how to convert this into a long skinny blend, so I thought I’d show you how to
00:00:45 –> 00:00:46 do that.
00:00:46 –> 00:00:51 Alright, so you’ve got your Teardrop blend, or Skinner blend…
00:00:51 –> 00:00:57 I’m just gonna warm it up here a little bit, and it’s gotten wide, and you want
00:00:57 –> 00:01:03 it long and skinny so you can roll it up into a bulls eye cane or something like that.
00:01:03 –> 00:01:07 So what I’m gonna do first… my first step is I’m just going to roll it up nice and
00:01:07 –> 00:01:16 tight like this, you don’t want air bubbles or anything in there, so make sure it’s
00:01:16 –> 00:01:23 tight, and then what you’re gonna have is a long roll where your blend is going from
00:01:23 –> 00:01:29 one color to the next color, in this case, it’s a rainbow blend so it has lots of colors.
00:01:29 –> 00:01:34 Then what we’re gonna do is we’re gonna start flattening it out, and you can use a
00:01:34 –> 00:01:39 brayer, like this acrylic brayer, and what you wanna do is get it flat enough that it
00:01:39 –> 00:01:45 can go through your pasta machine without being too hard on your machine…so I’m
00:01:45 –> 00:01:48 just flattening it out a bit.
00:01:48 –> 00:01:52 And then we’ll go…we’ll start at the…well we’re actually just gonna roll it at the
00:01:52 –> 00:01:59 thickest setting to start with, and instead of going into the machine this way, we’re
00:01:59 –> 00:02:07 gonna go in lengthwise, we’re just gonna end up with a nice long tape, where the color
00:02:07 –> 00:02:11 goes from one color to the next…and I’ll try to keep this going straight.
00:02:11 –> 00:02:17 Now, if I roll this up from one end to the next, we’re gonna have the blend going through
00:02:17 –> 00:02:24 the log, now, this is quite a thick blend here, so what I’m gonna do is I’m gonna
00:02:24 –> 00:02:33 run it a little bit thinner…just because the thinner it is, the smoother the transition
00:02:33 –> 00:02:38 is when you use the colors, so I’m gonna go one setting thinner, and then just one
00:02:38 –> 00:02:44 more after that, so I’m gonna go down to a 3 on this machine which is, let’s see,
00:02:44 –> 00:02:50 how many…it’s about 5 playing cards thick and that’ll be fine, so I’m just gonna
00:02:50 –> 00:02:53 run it through.
00:02:53 –> 00:03:01 And then now, I’ve got a long skinny blend and I’m just gonna roll it up from one end
00:03:01 –> 00:03:13 to the other, and what we’re gonna get is a neat rainbow bulls-eye blend, they often
00:03:13 –> 00:03:20 call these Skinner blend plugs, ‘cause it’s a plug of clay with a Skinner blend.
00:03:20 –> 00:03:27 And you know that…see how beautiful this is becoming, we’re getting a rainbow that
00:03:27 –> 00:03:34 starts in the center, and goes all the way… from the center all the way out to the outside
00:03:34 –> 00:03:36 color, isn’t that pretty?
00:03:36 –> 00:03:41 So that should help you if you didn’t have any idea how to make a long Skinner blend
00:03:41 –> 00:03:46 or Teardrop blend…and like I said, I have a Teardrop blend video in my channel if you
00:03:46 –> 00:03:51 wanna check it out, and…so you can make these great rainbow blends.
00:03:51 –> 00:03:55 If this video was helpful for you, make sure to press that like button we really appreciate
00:03:55 –> 00:03:56 it.
00:03:56 –> 00:04:01 And my question for you today is more of a request.
00:04:01 –> 00:04:07 Do you have any suggestions for me, for videos where you’ve seen something but it doesn’t
00:04:07 –> 00:04:11 quite makes sense and you’d like me to help you out with that, I’d love to make a video
00:04:11 –> 00:04:16 on it, and you can leave those suggestions in the comment section below.
00:04:16 –> 00:04:21 And don’t forget to subscribe to our channel, we have new videos that come out every week
00:04:21 –> 00:04:23 and you’re not gonna wanna miss a thing.
00:04:23 –> 00:04:25 Well see you next time and bye for now.
Our goal is to translate these videos into as many languages as possible. If you are interested in helping with this initiative, then please do contact us and we will figure out a way to make it worth your while :)
Resource Links:
- Related Video: Polymer Clay Skinner Blend Instructions
- Related Video: Lietz Teardrop Blend Color Gradients Made Easy
Resources marked with a double ** asterisk are affiliate links. If you click on them and decide to buy something, we may receive some compensation. This does not affect the price you pay in any way. What it does do, however, is helps us to continue providing free videos for you, here at the PcT website. Using our links to purchase your tools and supplies, is always greatly appreciated.
Sponsored Ads & Special Promotions

Shareable Images


To share this full blog post anywhere on the web that allows links in comments, here's a shortened url to copy and paste...
>> https://mypct.ca/v464 <<

Want to chat about today’s post? That’s what the comment section below is for. Scroll Down… We’d love to hear from you!
Or... if you would like to request a topic for a future post, here is the link to do that… PcT Suggestion Box

Cindy, I have haven’t worked with Polymer in years (‘did publish a book during that time tho)…
AND I cannot tell you how poorly done so many of the “instructional” videos for polymer are.
They have no business even putting them on YouTube.
Finding yours is a JOY FOR ME! I watched two this evening and will watch all eventually.
I have forgotten most of the methods and you are PREPARED, PRECISE and right down to
business.
I’m sure I’ll have an idea or two for another video when I get underway again.
THANK YOU EVER SO MUCH.
Sincerely, Layte (pronounced late)
Hi Layte, (Great name btw! Reminds me of an old saying my Dad used to say. “You can call me anything but late for dinner.” :) )
Thank you for your enthusiastic comment! Both Doug and I appreciate your support. I hope you enjoy your journey here. There is so much we can learn from each other.
Looking forward to hearing your ideas!
Hi Cindy,
I just watched your video on taking a Skinner Blend and making it narrow into a Skinner blend Rainbow cane. My question is how do I make the Skinner Blend narrow across the full length of each individual color? I’m trying to do a zipper cane using a Skinner blend and the way the video shows is opposite of what I want to do. Example: If the original blend is 6 inches wide, how do I narrow that down so that when inserting it back into the pasta machine the colors lengthen in the same direction as the original Skinner blend does when coming out of the pasta machine?
I’m not sure if I worded that correctly. Hopefully you know what I’m trying to say.
Thanks
Luann
Hi Luann, I think I know what you mean… this video should help:
Is Your Skinner Blend or Teardrop Blend Too Wide?
.
Hi Cindy~
I haven’t really had the chance to comment or do much as far as polymer clay for awhile since my husband and I bought a new house!!! Exciting AND Stressful at the same time!!! Which leads me to my request/question for a Tip Video……
In setting up my new studio area, I have had a terrible time organizing everything in an effieceint way!!! I am very much a TYPE A personality and need things neat and TIDY!!!! I bought all new bead containers and have most of them organized by type and color, my problem is I would like to be able to SEE what I have instead of having to get out every rubbermaid tote or bead tray or looking thru every shelf for what I need or want!!!!!
I have a workbench for “metal work” a table with my kiln and lampwork torches, an area for polymer clay play, BUT all the “‘accessories” for each medium seem to get put in totes or stuck under,behind or on top of what I have worked on last.. LOL!!! I laugh about this~ BUT it has really constricted my creative flow!! JUST HOW IS IT YOU KEEP ALL THESE THINGS FROM GETTING LOST AMONGST EACH OTHER???!!!!!
My hope is that you will do ANOTHER studio tour?!?! Maybe some new tips on storage or how you manage to keep your tools and other larger items stored!!!!
HONESTLY I think I have bought MOST of the tools/products needed to complete every project you have done a tutorial on for two years~ Well, maybe not every one, but pretty closeto it. You make these projects look so EASY, and the fact that if I need to stop and go some where~when I return to my work table~ I can just hit play, and you are waiting to continue my personal lesson, as if you were sitting right next to me.
The only thing missing is How to keep all the tools, gadgets and supplies organized so they are not hidden away, not being used~ or forgotten about!!!!
I hope you will consider doing “Studio Tour Part 2” maybe a bit more behind the scenes than the first one! Thank You for ALL the GREAT INFO, TIPS AND TRICKS and TESTS YOU SPEND SO MUCH TIME ON, TO BRING US THE MOST UP TO DATE, CORRECT INFO ABOUT POLYMER CLAY and MIXED MEDIA CREATING!!!!!
Happy Holidays to Your Family,
Thanks Again~
Kelli Nelson
Hi Kelly, nice to hear from you! Wow, that is so awesome about you buying a new house! Congratulations! I agree that moving is exciting and stressful at the same time. Especially if it is happening at this time of the year.
I have been getting several studio tour requests, so yes I will be doing so of them in the new year. I have some reorganizing to do, but there is a lot that has been done and definitely could be shared with everyone, so stay tuned for that!
Have a wonderful holiday with your family! Thanks for popping by and saying hi!
Thanks
I am getting back to polymer clay, and am making beads. I make paper beads, and want to expand into clay.
I am glad to find your information
My main problem is too soft clay. I have ordered premo
Hi Betty! *waving back to you!* Happy to hear from you. Hope the weather isn’t too frightful and your fire is delightful… (recognize the theme here?) Have a happy holiday, wire knitting away by the fire. Don’t forget to keep claying though… after all that it your one true love. :)
(Oh btw where did you end up buying your Lazee Daizee? I hear they sold out at Rings and Things. Maybe you got one of the ones they had left?)
The Lazee Daizee is back in stock I believe~ Unless they just got the Draw Plate back in stock!!!! I had to buy mine at Amazon .
.
Hi! *waving to Cindy and Dixie Ann* I’m here! Yes, very busy with shopping among other things, as the weather is questionable going into next week, but had to stop in to check something on the viking knit. While I was here, I decided to take a few minutes to watch this one, too, which was great, as always! I’m loving the viking knit. I haven’t had time to do much with it yet as I just got my Lazee Daizee tools a couple of days ago, but I can see it fast becoming a favorite! Thanks for introducing us to such a cool technique, Cindy!
I just fold it on the opposite side in 2 or 3 then the one used to make the blend. So that could be another alternative. Yours is a great idea too.
Thanks Cindy for the affirmation on making this long blend. I still have to look it up once in awhile to be sure I’m doing it right. Too many irons in the fire and too many brain neuro’s going off at the same time! lol
Thanks for the comment Dixie Ann! Nice to see that someone is around… everyone must be shopping for Christmas! LOL
LOL, Cindy, you made my Christmas, fevourish working on viking knit, went through 15 yds of wire already, still growing!
LOL Dixie Ann I have gone thru about that same amount of WIRE!!!! I never thought I would enjoy doing Viking Knit BUT I very much do enjoy it, THANK YOU CIndy for the GREAT TUTE!!!!
Hi Cindy, I have a suggestion for a video. I have been trying to make small polymer clay miniature flowers, about a half of an inch size. I am having problems with the type of miniature flowers that you add a lot of teardrop shape petals to form the miniature flower, like a rose. I understand the theory of how to do it, but whenever I do it, by the time I have added about 9 petals,
I have squashed together the inner petals & they have lost all their texture, shape & are just stuck together & ugly. Maybe it just takes practise, but I have made about 6 & they all have squashed together inner petals. Maybe you could give us some tips to help prevent this from happening. I don’t have a problem with the more open shape flowers. Thanks, Cynthia