Teardrop Blend (Easy Skinner Blend) No Pasta Machine
Video #487: It takes a bit longer if you only have an acrylic roller, but the end result is the same.
More...

IN THIS POST: — teardrop blends — skinner blends — color blends — gradients — pasta machine — ombre — blending — no pasta machine — acrylic roller — hand blended — gradation — lietz blend — (Topics marked with an asterisk* are discussed in the Comments Section below).
Topics Covered In This Video:
- Making beautiful and easy color blends.
- No pasta machine? No problem. All you need is a roller of some sort.
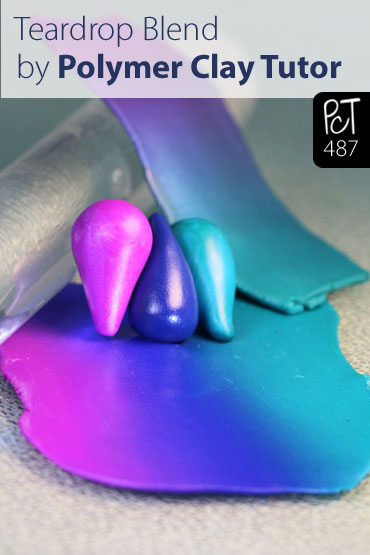
- Teardrop Blends or Skinner Blends are color gradients using more than one color of polymer clay, where the colors gradually shift from one to the next.
- My Teardrop Blend is an easier and faster version of the Skinner Blend.
- Choose 2 or more colors to that you want to work with.
- Softer clay is definitely easier to blend when you are not using a pasta machine.
- Shape balls of clay into pointy teardrop shapes.
- Lay teardrops next to each other in alternating directions.
- Flatten the teardrops into a thin sheet with your rolling tool.
- Fold or roll the sheet, keeping colors aligned in one direction.
- Pushing in the ends of the rolled up blend will keep it from getting too wide.
- Flatten the folded/rolled piece again, until it becomes a flat, thin sheet.
- Repeat process until colors are fully blended.
00:00:03 –> 00:00:08 Hi guys, its Cindy Lietz, your Polymer Clay Tutor, and in today’s PcT Mini Tute, I’m
00:00:08 –> 00:00:11 gonna show you how to do my Teardrop blend without a pasta machine.
00:00:11 –> 00:00:16 Now, this is a big problem for a lot of people out there who would like to do a Skinner blend
00:00:16 –> 00:00:21 or a Teardrop blend, and they don’t have a pasta machine to start off with, and so,
00:00:21 –> 00:00:24 you can do the Teardrop blend without one.
00:00:24 –> 00:00:29 So all you need…and if you don’t know what a Teardrop blend is, this is what I mean.
00:00:29 –> 00:00:35 It’s a blend of Polymer clay where the color shifts from one color to the next one in a
00:00:35 –> 00:00:37 nice smooth gradation.
00:00:37 –> 00:00:44 So, what you need is some clay to start off with, I’m gonna do a 3 color blend because
00:00:44 –> 00:00:45 I can…
00:00:45 –> 00:00:50 I can do as many colors as I like, 2 to 7 if I wanted to, and I’m gonna use a little
00:00:50 –> 00:00:53 bit of a soft clay just ‘cause it’ll be easier to blend.
00:00:53 –> 00:01:01 I’m gonna warm up the colors, now this color here is…they’re all Premo clays, and this
00:01:01 –> 00:01:05 one is Purple Pearl, it’s pretty.
00:01:05 –> 00:01:10 I’m just going to roll it in a ball and then turn it into a teardrop shape, making
00:01:10 –> 00:01:24 sure I have a nice sharp point on it, this color here is Premo Navy Blue, it’s a nice
00:01:24 –> 00:01:30 Blue color that’ll go real nicely with the Purple Pearl, so I’m just gonna make that
00:01:30 –> 00:01:36 into a teardrop with a nice sharp point and lay it opposite.
00:01:36 –> 00:01:40 So these are triangles that we’re putting together here, basically, just like a Skinner
00:01:40 –> 00:01:48 blend would be, and this final color is…oh, which one is this one, this one is Peacock
00:01:48 –> 00:01:55 Pearl and it’s also Premo, and I’m gonna put it in a nice sharp point and flip it and
00:01:55 –> 00:02:01 go the other way, so we have our teardrops going back and forth Then I’m just gonna
00:02:01 –> 00:02:09 take an acrylic rod, and you could use a rolling pin, I like the acrylic ones ‘cause they’re
00:02:09 –> 00:02:17 very smooth…just flattening it down, make sure they stick together, and just roll it
00:02:17 –> 00:02:23 right down until you have a nice sheet.
00:02:23 –> 00:02:29 Now, this clay is a little on the dry side, so it’s not sticking together too much,
00:02:29 –> 00:02:33 but that doesn’t matter, now I’m gonna take it and I’m going to fold it up, making
00:02:33 –> 00:02:40 sure to keep the colors going straight together, I’m not gonna flip it over that way, I’m
00:02:40 –> 00:02:42 just gonna do it in a line.
00:02:42 –> 00:02:49 Then I’m gonna press it right down nice and hard, so that you’re getting it as thin
00:02:49 –> 00:02:54 as you can, then I’m just gonna roll it, I could keep folding it, but rolling it kinda
00:02:54 –> 00:03:00 speeds up the process, and if you’re doing it by hand, the faster the better.
00:03:00 –> 00:03:06 So I’m just gonna make sure that the ends are tucked in, I’m gonna press it down,
00:03:06 –> 00:03:12 keep rolling it and what will happen… at first it’ll just kinda look stripe-y, but
00:03:12 –> 00:03:18 the colors underneath… because you used the triangle shapes of the teardrops, are
00:03:18 –> 00:03:19 gonna start blending together.
00:03:19 –> 00:03:26 So I’m gonna just press it down, pasta machine makes this a lot faster, but, I just wanted
00:03:26 –> 00:03:36 to show you that you can do it without one, so I’m gonna roll it again and keep flattening
00:03:36 –> 00:03:37 it out.
00:03:37 –> 00:03:44 Now I’m gonna tuck in the ends again, ‘cause it’ll just get wider and wider if you don’t,
00:03:44 –> 00:03:51 and this will control the width…and I’m pressing quite hard, I’m in a really strange
00:03:51 –> 00:03:56 angle here, trying to keep my arms from getting out of the… in the way, but you can see
00:03:56 –> 00:04:02 the colors are starting to blend along the edges there, I’m gonna continue to do this,
00:04:02 –> 00:04:09 rolling it, pushing in the ends and flattening it with my roller until I have a nice smooth
00:04:09 –> 00:04:12 blend, so let me do that and come back.
00:04:12 –> 00:04:18 Okay, I’ve done it a few more times…probably 3 more times, and it’s really starting to
00:04:18 –> 00:04:22 blend, but I wouldn’t consider this a smooth blend yet, there’s still a lot of kinda
00:04:22 –> 00:04:26 streaks and things in it, so I’m gonna do it a few more times and come back and show
00:04:26 –> 00:04:28 you how that goes.
00:04:28 –> 00:04:36 Okay, so I went and I rolled it up and flattened it out 4 more times, and we’ve got quite
00:04:36 –> 00:04:44 a nice blend here, and one thing that you should realize, sometimes a little bit of
00:04:44 –> 00:04:51 air can get trapped into your clay when you’re working with it like this, especially by hand,
00:04:51 –> 00:04:55 and you can see the…I don’t know if the camera will pick it up or not, but there can
00:04:55 –> 00:05:01 be some little tiny bubbles in there, just give your clay a bit of a tug, just pull it
00:05:01 –> 00:05:07 gently and it’ll release most of those bubbles, and so you…you don’t want trapped air
00:05:07 –> 00:05:13 in your clay when you’re working on projects, ‘cause it’ll either crack or leave a little
00:05:13 –> 00:05:15 bubble on your finished piece.
00:05:15 –> 00:05:21 So I hope you enjoyed that, and now… for all of you that don’t have a pasta machine,
00:05:21 –> 00:05:26 and you just have a roller handy, you can now make your own blends.
00:05:26 –> 00:05:33 If the clay is softer, it’ll be a little easier and a little smoother, and if the…
00:05:33 –> 00:05:39 if you have a lot of clay, it might be a bit more of a workout, but it’s completely doable.
00:05:39 –> 00:05:43 So I hope you enjoyed that, and please let me know it you like this video.
00:05:43 –> 00:05:49 And also, in the comments section let me know if there’s any tips or tricks you’d like
00:05:49 –> 00:05:54 me to do a video on next time, and if there’s any products you’d like me to demo or things
00:05:54 –> 00:05:55 like that.
00:05:55 –> 00:05:57 We’ll see you next time and bye for now.
Our goal is to translate these videos into as many languages as possible. If you are interested in helping with this initiative, then please do contact us and we will figure out a way to make it worth your while :)
Resource Links:
- Related Video: Lietz Teardrop Blend – Color Gradients Made Easy
- Related Video: Polymer Clay Skinner Blend Instructions
- Related Video: Stepped Graduated Color Blend – Old School Gradients
- Amazon: Acrylic Roller **
Resources marked with a double ** asterisk are affiliate links. If you click on them and decide to buy something, we may receive some compensation. This does not affect the price you pay in any way. What it does do, however, is helps us to continue providing free videos for you, here at the PcT website. Using our links to purchase your tools and supplies, is always greatly appreciated.
Sponsored Ads & Special Promotions
Shareable Images


To share this full blog post anywhere on the web that allows links in comments, here's a shortened url to copy and paste...
>> https://mypct.ca/v487 <<

Want to chat about today’s post? That’s what the comment section below is for. Scroll Down… We’d love to hear from you!
Or... if you would like to request a topic for a future post, here is the link to do that… PcT Suggestion Box
Hi Gail!
Cindy did a blog on them: Polymer Clay Storage Plastic Drawer Cabinets
Also use the search in the upper left, lots of comments on types that work if you cannot get these in your area.
Thx for such quick response!
Sheerly brilliant techique with or without the pasta machine.
I noticed your black sectioned box storage units on your work surface in the front of you in your PCT videos. Would you suggest where I might find some like them? They look like exactly what I have been shopping for 2 yrs. I live in San Antonio.
Thx!
Hi to All!
I have an idea for a tutorial. Pave beads or disco ball beads seem to be very popular now especially for shamballa bracelets. I know there are kits using epoxy clay for these beads, but the kits are small and expensive. I know there are shops on Etsy and on JTV that say the beads are made with polymer clay. Can you do a tutorial or give advice on the best way to tackle this project?
I also have a follow up question about polymer clay being outdoors. Last year someone asked about making clay figures for outside gardens. Ren Wax was the preferred finish. I would like to hang some of my flower petal beads from the rearview mirror in the car (sort of like the Greek worry beads). Has anyone tried this? The beads would not be directly in the weather elements, but we do get extreme temperatures here in Chicagoland! I know from my years of collecting Precious Moments and Cherished Teddies that people had problems with their Teddies which were made from resin. The color would fade to almost white when people kept them in lighted curio cabinets or by the windows. Any suggestions?
Thanks for your help.
Mari
Hi Mari, Thanks for the suggestion for the Pave beads. I will put on my thinking cap and see what I can do.
As far as how your flower petal beads will do in the hot sun, that is tricky for me to answer, since I live in a very mild climate and haven’t tested my beads in that harsh environment. It can get hot in the summer here in Van cover Canada, but nowhere near the extremes that you guys do.
We do have many members in the Arizona area that may be able to help you. Other than that, the only thing I can suggest is for you to test some beads that aren’t important to you and see how they do.
Try a couple of different finishes on them as well and see if that makes any difference. Do come back if you get some results. I am sure there would be lots of people who would find your information interesting. Thanks for commenting!
Hi Marianne, just to let you know that I have garden ornaments outside in southern New Zealand where the sun is strong and it gets pretty cold too. I have a ‘no junk mail’ sign on my letterbox and a fairy door in the tree. For the first three years or so I had no finish at all on my letterbox sign, then I sprayed it with an acrylic sealer like PYMII because I thought the colour might fade. Another two years and it still looks fine. I have painted my fairy door with Future floor polish to see how that stands up outside, three months later, over the summer, it looks good.
Experiment with trial pieces and see how they go. Let us know your results, good luck.
Thanks Cindy and Jan.
I ordered some PMYII. It should come in later this week or the beginning of next week. I think I will make three extra bracelets and try one of each finish: Future, Ren Wax and PMYII.
I have all the flowers from three side stands and one casket blanket from my Mom’s funeral. It took me four and a half hours one day to disassemble them all. I have over thirty plastic containers all over the dining room table.
I will be making enough beads for at least twenty-five bracelets for all of the family. I figured out that I would need ten beads and a heart charm/pendant for each. I have over one hundred beads in five different colors made. I would like to mix another five colors and have one of each color in each bracelet. My Mom’s name is Rosalie (Rose for short) and I will be experimenting with scenting the beads with a rose scent. I don’t expect the bracelets to be worn, I just wanted to make a little something of a remembrance for everyone.
Thanks for the info.
Mari
hi Jan, i live in the middle of the North Island, where did you get the PYMII from? I know it can’t be shipped outsided the states. Curious to know so i can get some or it will have to wait until May when I go to the states.
Thanks Cindy for the refresher on the Teardrop Blend. This has been such a time saver for me and a lot others I’m sure. I agree having a pasta machine makes this technique so much easier but unfortunately some just don’t have or can’t afford one. It’s too bad we don’t have a private destash group where members can offer their extra things for sale or donate them just for the price of postage. Thanks so much for your valuable contribution to the Polymer Clay community with the Leitz Teardrop Blend!