Vol-077 Polymer Clay Fairy Doors PcT Tutorial (Intro)
Video #572: Enchanted miniature decor for the Gnomes and Fairies that may be scampering around your home.
More...

** This post is an introduction to one of our paid tutorials.
I have been getting requests for a Fairy Door Tutorial for some time now, and had never gotten around to it. Now that I have, I can see that they are so much fun, and I’m sure I’ll be making lots of them!
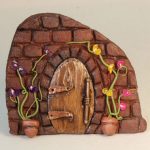
Fairy Doors are wonderful little doorways into the magical miniature world of whimsy. You will find them in homes, gardens and forests. Some are large (around 8 – 10 inches) to accommodate gnomes and elves… and some are small (only 1 – 2 inches), more suited for Fairies, mice or maybe even a Borrower or two.
If you have never been exposed to the idea of Fairy Doors and all the wonderful and creative ways they can be placed, then do a quick search on Pinterest or Google, and you’ll be delighted and amazed. You’ll find they are in forests and parks, cafés and back lanes, in homes nestled in stairwells or embedded onto a Mantle. Basically, anywhere that a Fairy, Gnome or Elf would like to live, is the perfect place for a faerie door.
And if fairy doors around your home are not your thing, you can make them into jewelry, or you can use the techniques that you learn in this very full tutorial, in other polymer clay projects.
“
Cindy, the second my 3 Year old granddaughter saw these fairy doors I have not heard the end of it. So our together project is now the doors. She had to have one at home and one at Nana's house. Thanks so much for such a great tutorial. You sure make life interesting for us!
Debi S
“
Hi Cindy, love the fairy doors. Thinking about making small ones to hang by chain over a wine bottle for Christmas from my house to yours. I'll never get old since you keep my brain active. Thank you.
Pat L
“
Your videos have increased my quality of life. That may sound overly dramatic, but being a stay at home wife and mom, it secludes me from the outside world most of the time, and polymer clay has given me an opportunity to enjoy some ME time. Your videos have helped me hone my skills. Thank you.
Carla H
Transcript coming soon...
Transcript coming soon...
Our goal is to translate these videos into as many languages as possible. If you are interested in helping with this initiative, then please do contact us and we will figure out a way to make it worth your while :)
Shareable Images


Want to chat about today’s post? That’s what the comment section below is for. Scroll Down… We’d love to hear from you!
Or... if you would like to request a topic for a future post, here is the link to do that… PcT Suggestion Box
Thank you sooo much for your tutorials on fairy doors, I am new to clay and I can”t wait to start my fairy doors, your doors are gorgeous!
Thanks so much Gail for saying that! Let us know how your Fairy Door turns out!
To Da! (I hope!)
Fairy Door Front View
Fairy Door Back View
The hopeful part is because I glued everything on just so and THEN realized I needed more support for it to stand because of the way I designed the two pieces to fit together with wire supports… Apparently there’s more to engineering than my imagination… Anyway, we’ll see what happens to the glue after another bake. :/ I decided to take pictures before just in case disaster strikes, except I forgot one little clay rock I made to sit on the walk in front of house by the pot, but this is basically it! *Fingers crossed*
Wow! That looks fantastic, Katy! I love the door fittings especially. An engineer would be in fits of laughter reading your comment LOL.
Fingers crossed for you that it all works out post-curing!
Starting a fairy door!
Oh no! My chalk pastels are cheap junk and don’t show up at all! Wondering what brand Cindy uses to get those rich colors… Anyone else struggle with this?
Back on track… Ok so my brick and door shine metallic cause I used guilders wax, but whatever… It’s a FAIRY door after all… The bricks can shine all they want…
I didn’t really understand the past about how to attach… Maybe cause it’s 330am… (whoops! Carried away again!) so I added some bent wire like structural supports that hopefully might maybe work out after I bake it… Which isn’t going to be till tomorrow because zzzzzzzzzz……
Your fairy door looks awesome Katy! As far as chalk pastels go, I used the Recollections Brand they have at Michaels, but there are lots of other good brands out there. Look for ‘artist’ quality rather than ‘student’ quality and that should help. Another brand that is really popular right now, though I haven’t yet tested them, is Pan Pastels, so you could look for them. Good luck!
You’re claying at 3:30 in the morning? You are addicted!
Despite the sleepy time and “cheap junk” pastels, it looks fantastic! Well done, you!
Hey Cindy,
Can alcohol inks be used with Golden Acrylic Glazing Liquid to color/tint to antique surfaces like the door in this project?
Hi Tom, that I don’t actually know. I am not sure if the alcohol will mix properly with the glaze or not. It might… it might not. You’ll have to test that and see what happens. I am curious about it though, so let us know if you end up testing it. I do know that you can use acrylic paints to tint the glaze though, so you could try that. Good luck!
Loved this video! Great detail and have some ideas to place on a journal first, then only time will tell. Haha!
This would make a fabulous Journal cover Terry!
PC is the most legal fun I’ve ever had! I think I have the signpost covered. I bought a bag of “stuff” at a yard sale. There are all kinds of natural things like pieces of bark, sea sponges, the underside of mushrooms, a lacy leaf, some pods, etc. I bought the bag to use for texture and I think the bark will make a great signpost. Oh, the possibilities! I have many things gathered to make my fairy garden and will do it this year. So anything you want to teach that is tiny I will love,
I would like to start adding more fairy garden tutorials. It is more fun than I thought and there are unlimited number of cool things you you make for them. Could even use tiny elements for Christmas Villages or even jewelry. Any particular suggestions you may have for future tutorials Peg would be greatly appreciated!
Agree, Cindy! A mini corner garden wall encapsilating a display of delights would be perfect! I see blue delphinims, orange poppies, hummingbirds, etc. The best part is that it’s your imagination, so the bloom cycle doesn’t need to match Mother Nature’s.
I’d love a sculpting tutorial for tiny gnomes, mushrooms, toadstools n things!
Yeah I plan to do some fairy garden miniatures in the future. So many fun things that could be done with that theme!
Cindy, I finally found something I would love for you to do a tutorial on. I will be starting my fairy door to go on my fairy house in my fairy garden (s). I saw this pic of mushrooms or toadstools on fb and thought they would be perfect in my garden. They are from Ireland and look enchanting to me.
I am going to try to send a pic to your fb page.
Thanks for the suggestion Peg! I think it would be fun to make all kinds of miniature Fairy garden accessories out of polymer clay. Benches, signposts, wheel barrows, trees, mushrooms, flower pots are all possibilities. Polymer clay is so much fun isn’t it?
This video was the reason I subscribed. I even went out and borrowed another grandchild. This one’s a girl and she is so excited to make a fairy door. I got my first borrowed grandchild to adulthood and needed another to share my crafts with and she can’t wait. My daughter refuse to give me grandchildren so I did what any grandchildless grandmother would do. Borrow!!
Peg, you are such a delight!! I love this comment… It is neat to learn that this was the reason that you got started with us and that you are so resourceful in making sure you have the grandchildren you need… even if they had to be borrowed! :)
Cowabunga Cindy! I love your tutorials and so very happy with myself now that I subscribed! I am making the Fairy Door and am having a lot of fun! Thanks for your talents!
Thank you again for all you do. Your videos have increased my quality of life. That may sound overerly dramatic, but being a stay at home wife and mom secludes me from the outside world most of the time and polymer clay has given me an opportunity to enjoy some ME time and your videos have helped me hone my skills. Blessings to you and yours!!
Of all the videos I’ve purchased, this has been my favourite tutorial and actually the first project that I’ve completed! This is the type of thing I’ve dreamed about doing and now that you’ve given me a few good techniques to accomplish my dreams, look out!! the sky’s the limit! Thank you so much and please give us more projects like this one!!
Hi Denise, that is fantastic to hear about your success with this project! I am very proud of you for finishing your first project. Each accomplishment leads to the next one. Keep going and stretching… and you’re right, the Sky is the limit! :)
I finally finished my fairy door. Very fun! I loved Dixie Ann’s idea for using one as a journal cover.
I was also able to use up this weird brown Fimo I had. When conditioning, it goes from hard and crumbly to sticky and gooey. There is no in-between. Happy to get rid of it! Wonder if it was a bad batch or something. No worries. I’m a Premo girl now.
Here is a link to the fairy door and a couple of photos.
Lena, your fairy door is just adorable, I Love it! Now it make me want to make some and put them around the different rooms in the house like little mouse doors!
i was thinking the same thing. I am seeing the potential for them everywhere!
Very cute little fairy door Lena! Glad that you were able to use up some weird Fimo. (Water can effect Fimo so maybe moisture had something to do with it getting sticky?) Never seem to have that issue with Premo.
I have no idea about their weird Fimo. It’s the only one I’ve had do that. I had decided to try to switch to Premo and while back and took the plunge a couple of weeks ago. Joann’s let me return all the unopened Fimo I had and trade for Premo. I still have some Fimo to use up. But, I am LOVING the Premo. It really makes a big difference. It’s like it’s softer and holds it’s shape better. Hard to explain – but I guess you understand what I’m saying. The only one I’ve had an issue with was the Premo Translucent White. It was kinda crumbly and needed extra conditioning. Not sure if it is always that way or I got an off-block.
Thank you, Cindy! I was so excited to see this tutorial. Just this summer I started collecting things to make a fairy garden. I’m using a fake pumpkin (maybe) and I sent for a fairy mold. I hope to make the koi pond and waterfall and have real plants around it. I am glad you said that everything could be left outside. Now I can hardly wait to get started.
Cindy,
The second my 3 Year old granddaughter saw these fairy doors I have not heard the end of it. So our together project is now the doors. She had to have one at home and one at Nana’s house.
Thanks so much for such a great tutorial. You sure make life interesting for us!
How cool is that! Thanks Debi for sharing that cute story. Make sure you take some photos of your fairy doors. I’d love to see what you two create together! :)
Adorable! I can’t wait to learn how to do these. They are also giving me some ideas for my gingerbread houses….. :)
LOVE IT!!!! Can you hear me singing, lol. I think this is the best Fairy Door I’ve seen out there. I’m gonna call mine an Angel door – teeheehee.
Thanks Cindy, weldbond worked great. Also here is a tip for everyone if you don’t have any sand available to sprinkle on the door. You can use a little bit of kitty litter. It works great and it’s consistancy is just like sand and the color is a dark gray. :)
Unused Kitty Litter I presume? :P Great idea! Way to think out of the box… the kitty litter box that is! lol
Cindy, I loved this tutorial series! As usual, your directions are terriffic!
Cindy Leitz, question on adhesives. What do you recommend to glue the door to a journal cover?
Would the weldbond do the job? Please advise. Thanks Doll.
Hi Dixie Ann, Weldbond or E6000 should do the job quite nicely! Do make sure to share some pics… I’d love to see how it turned out!
Hi Cindy,
Just packing to go on holiday for a few days but thought you would like my first attempt at a fairy door (made in February 2013.) I am no great shakes at photography and am still learning I.T. stuff.
I used your blonde faux wood tutorial for the door and your Grape Hyacinth Cane for the flowers. The door opens and shows a fairy glade behind, but I had difficulty closing it so had to stick it shut. I am still experimenting with hinges and have found strips of leather embedded in the clay works best. Got to be up real early tomorrow so will say bye for now and great that you have done this one. Perhaps I will paint a scene of a Christmas tree all lit up to look at when you open the door
Best wishes …………Elaine….xx
Oh My Gosh Elaine that is too awesome! Love your use of the elements from the other tutorials! Have a wonderful holiday! ‘See’ you when you get back…
Wow Elaine you did an awesome job on the fairy door. Nice work.
LOVE the fairy door!!! Thank you for the great techniques. Thank you for breaking things down into simple, manageable steps. Your teaching style is the best. And thank you Doug for the great video quality.
Thanks so much for saying that Kim! I am super happy you are loving the fairy doors!
I LOVE these doors!! I have been wanting to make fairy doors for a long time now – you make it look so easy. I am so excited!!! thanks so much for your willingness to show us how to do all these wonderful projects.
You are more than welcome Janet! That is great that you find the project easy. DO send pics when you get one finished!
Awesome video Cindy! They are way too cute!! And the texture you have on the bricks and stones …. so real.
Thanks Cherie! I am glad you liked it! Looking forward to seeing pictures.
Fairy doors! Been meaning to do this for ages… one word … enchanting! Thank you so much Cindy, you always offer something new and different (and yes, we ALL need a little magic in our lives :-)
I agree Lesley! SO happy that you are enjoying the tutorial!
Truly lovely… you have really outdone yourselves on this project ! How much would you sale each of the large doors for ?
Take care
Tina
Thank you Tina! Price would be a little tricky to determine, since they do take a while to make and the supplies could be expensive (or totally cheap), depending on what you use for findings.
For the large doors (the sample and the one I made in the tutorial) I wouldn’t charge less than $60 if I wanted to at least recover some of the time but still wanted it to sell. But value wise it should be worth more than that. In the right market it could sell for over $100 and would be profitable to sell. Maybe in some of the specialty garden shops or to interior designers?
Could be difficult to sell at craft fairs or to compete on Etsy with the $20 doors… but maybe not? It really depends on the photos and the descriptions and how and who you market them to. Hopefully that answers your question!
Hey guys, I thought it might be fun to send you to this link to a website called Urban Fairies Operations… a sight that contains maps and photos of the Fairy Doors of Ann Arbor Michigan. Have fun…
Hi Cindy, love the fairy doors. Thinking about making small ones to hang by chain over a wine bottle for Christmas from my house to yours. I’ll never get old since you keep my brain active. Thank you, Pat
What a clever idea Pat! Would not of thought of that. Maybe the recipient can then hang the chain on a door knob or something. Love to see pics when you’re done!
Oh boy! Guess what everyone is getting for Christmas ? So charming and cute. This is something that all my family will enjoy. TY again and again.
I know… perfect thing for Christmas Eh? I figured it would be a good time to do the tutorial. I’ll be giving away a few for Christmas myself. Have the two big ones now… one for my mom and one for myself. Now to make a few others for my nieces and nephews and possibly Doug’s mom… better keep goiong I guess! :)
Hi Cindy
havent been around for some time but was so excited when i saw the latest tut
on the fairy doors.
Have always been interested in them, but never got around to doing.
So thank you so much,will be really enjoy doing them.
XXX
Nice to see you again Elizabeth! I hope the fairies enjoy the new homes you create for them!
Whoa! just in time Cindy, am just starting on a covered journal and wanted to use a fairy door. It couldn’t have come at a better time. Thank you!
Weird how that happens, Eh Dixie Ann? Using these fairy doors on a journal is an awesome idea!
I believe you have outdone yourself on this one Cindy, this looks amazing!
Thank you Michelle! Would love to see pictures of your little fairy door!
These are so cute!
Thanks Jae! Bet you could add your own creative spin to them…
How charming these little doors are, looking forward to tomorrow’s tutorial :)
Looking forward to seeing pictures of your fairy doors Sherry!
How you keep cranking out these new and beautiful pieces is beyond anything I could ever imagine :) SO happy I found you to learn from your mistakes!
Take care,
Susan R.
Thanks Susan! I make things that I would enjoy having… then hopefully there are others who would enjoy them too.
Thank you!!!! Too much fun! Christmas decorated doorways for this one!!!!
You’re welcome! These doors would be fabulous decorated for Christmas! A wreath on the door? A decorated tree out front? Some boughs? Some presents? Maybe snow? Lots of cool things come to mind…
Cindy, you taught me so much great stuff in that video series!!! Only I am stuck on the wall lanterns, lol. I cannot stop making them! Help? Hee hee.