Vol-014-3 Faux Raku (Pt2) Deep Crackle PcT Tutorial (Intro)
Video #115: Taking the Smooth Faux Raku Technique to a Whole New Level!
More...

** This post is an introduction to one of our paid tutorials.
They say that “Imitation is the Mother of Invention.” And that is exactly what happened with my deep crackle, faux raku polymer clay technique. You see, a while ago, my husband received a beautifully crackled fish sculpture as a gift. It was made by a ceramic pottery artist who used traditional, high temperature raku methods to fire and crackle the surfaces of the piece.
The neat thing about invention, is how it is usually spawned from a collection of ideas, combined in a new way through the process of trial an error.
For example, my deep crackle faux raku technique begins with a process that other polymer clay artists are already using. This “Step 1” process is presented here: Smooth Faux Raku Tutorial
Then to get from the smooth surface to the deep crackles, I use an approach that’s kind of similar to what I’ve already demonstrated in my crackled gold leaf video.
And just like what happens with authentic ceramic pottery raku, my faux deep crackle technique produces texture patterns that are unique every time. The color blends will vary, and the cracks will differ to the point where you can honestly label each piece as a one-of-a-kind original.
“
I have successfully made the deep crackle raku technique and I was so proud of my achievement that I did it again and made pendants. And now I have made some more just to prove to myself that it wasn't a fluke. Isn't it wonderful, the feeling of achievement, when something turns out like it should.
Carol H
“
I made a necklace from a piece of my faux crackled raku and donated it to our silent auction. It was a rectangle of raku with a little black bead and a little silver bead on top with a black satin cord. It went for $75.00. I was thrilled, and every time I looked at the piece someone was touching it. Thanks Cindy!
Freda K
“
These faux raku beads are exquisite! I've been working with polymer clay for some time and am always searching for information to enhance my learning. Your site has provided a real shift in how I do things, and I can watch the videos as often as needed until I master a particular step. Thank you!
Elizabeth S
Transcript coming soon...
Transcript coming soon...
Our goal is to translate these videos into as many languages as possible. If you are interested in helping with this initiative, then please do contact us and we will figure out a way to make it worth your while :)
Shareable Images


Want to chat about today’s post? That’s what the comment section below is for. Scroll Down… We’d love to hear from you!
Or... if you would like to request a topic for a future post, here is the link to do that… PcT Suggestion Box
Hi Cindy
Another great tutorial – thank you! I can’t wait to try this technique out!
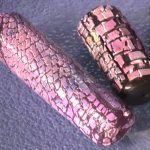
A quick couple of question:: I love the pinky-mauve on black beads you show in the video – did you achieve this with Wild Plum Ranger Adirondack alcohol ink? I don’t have any of those inks yet but I plan to invest in a few a.s.a.p.. Could you maybe recommend some colours that work particularly well for the faux raku technique? Or is this just a matter of personal taste!
Thanks again.
Caroline x
I would have to go watch the video again Caroline, but I believe that would have been the Wild Plum. For a long time the only colors I had were Wild Plum, Stream and Butterscotch, so a lot of my earlier stuff that used alcohol inks, would have been in those colors. :) As far as recommended colors, just Google real Raku and you’ll get some inspiration for the colors you like the best. There are a lot of options when it comes to making faux raku!
Hi Katy, yeah you need to find a balance between being prolific with new stuff… and finishing things so they can be used. If you are finishing it hard to be motivated to finish things, try something that is quick and easy like making earrings! They are fast, don’t use that much in extra supplies and are a great way to use up stray beads. There are tons of styles you can make. Get some 20 gauge Niobium or Silver Filled wire and make your own earwires too. They make great gifts, they sell well at craft fairs and you can never have too many of them yourself!
*finishing it hard = finding it hard
Haha, don’t worry, I am fluent in Typo… Both reading and writing it ;)
And thanks, that’s a good idea… I made several large pieces and not only are they big or require me to think up some brilliant stringing method (because boring methods are boring.) I also made them before I knew what I was doing so I’m finding a lot of them are causing me trouble and I don’t always know how to solve those problems so I get kind of stalled. Maybe it would be smarter to work with some of my newer stuff first and leave the old stuff alone for now. Especially these weird cuff bracelets and necklace chunks that I don’t know what to do with. Tonight I have been up to fun instead of finishing, like starting some faux dichroic glass pieces and using up an old cane on more pillow beads… :D Plus I’m on this weird keychain kick, playing with various stamps, mica powders and Inka gold paints… so I’ve been applying resin to those. Loads of fun fun fun! And thank goodness for Terry’s UV resin! I also tried the magic glos, just because, and it drove me bananas on these key chains! I used up the huge bottle on just 10 or so pieces because I kept trying to add layers in order to get the darn stuff to the edges. I’m sure it would be fantastic in a bezel or something that you fill and want a nice high dome, but on these flat pieces I’m working with it’s just impossible! By the time I get it to stay at the edges it’s so domed that it runs off and under causing all kinds of trouble. I should have rewatched your video before buying that magic glos… I did watch it again, but not till after a few less than ladylike phrases escaped….
Yeah I hesitate to say anything bad about a product that another respected Polymer Clayer has created, but the Magic Glos isn’t near as easy to use as Terry’s resin… plus it is way more expensive. Although the EpoxyJewelry resin is quite a bit thinner than the Magic Glos, it will make a very nice dome, as long as the edges on the piece you are doming are perfectly straight up and down, not beveled at all. In fact the crisper the edge, the higher you can dome…. it’s a surface tension thing. The way the Magic Glos pulls from the edge, totally drives mecrazy. Though there are tricks to working with it to avoid it pulling. (I really should do a video on that soon.) As far as less than ladylike phrases ever escaping from my lips? Me? Never! ;)
Okay, here are my faux Rakuten crackle beads! The deep crackle ones turned into almost smooth crackle because I heated my clay sheet pretty unevenly. I sort of ended up over rolling the beads fussing over the seams. I probably should have left them alone, but these are still very pretty. You can see the smoother Raku beads there in the center too. What fun techniques! It never would have occurred to me to use a partially baked sheet of clay in a project. Cindy, you are just so creative! I know there’s a lot of dedication behind that, too working at finding the best ways to do things, & I really appreciate the time you put into doing that. Thanks!
Ooo I do like the “smooth” crackle that you ended up with Katy! You are right about the length of time effecting the level of crackle, but the beauty of this process is that even if it wasn’t quite what you planned to do, the result is still awesome! Thanks for posting your projects! It is so wonderful to be able to see what you are working on!
Yes, they turned out pretty well! I’ll keep posting more projects as they get done, but I’m trying to commit to finishing projects, so I’ve slowed down some on my output of new things… Now, I said “trying” so I’m sure I’ll be doing lots of new stuff still, but I’m trying to at least sand and buff the pieces before sharing them… Plus I’ve gone back to some of my first clay pieces and I’m finishing them up nicely. It’s amazing that some of what I did months ago when I knew nothing actually comes out ok, especially with the sanding and buffing! I’m making or using chain or beading up necklaces so they’re actually finished pieces! I’ve got about a million beads, pendants, cabochons, larger focal pieces for bib necklaces, etc, but now a total of 3 pieces that I can call completely finished! haha…. ok that’s actually not funny… more daunting!! :/ but I’m pleased to finally see results I’m proud of that I can wear without saying “yeah, I still need to sand this” or “I really should have sealed those mica powders” or whatever the case is… I’m even going back and filling in extra clay on the uneven backs of some of my cabochons that I made before knowing how to get smoother backs without big divets… nothing could be more boring than adding some black to the boring back of a cabochon I made months ago… but the bins full of finished beads are piling up now that I’ve got my tumblers and media worked out and running round the clock, and I’ve got to do something with them all! Maybe if I ever sell these at a craft fair I can offer a free bag of random beads with each purchase just to get rid of some of these that I don’t like well enough to use or don’t have enough of one kind to make a piece like I want or something…. I feel like being one of those car dealership guys on a commercial who yells “they’ve got to go!!!!” :D Anyway… back to some boring finish work… it’s actually not bad, it’s just not nearly as fun as creating something new with the clay!