
Rubber Stamping Polymer Clay – A Popular Topic
Just yesterday, I received yet another question about rubber stamping techniques for polymer clay:
More...

One of my email subscribers said, “One thing I am really interested in, is stamping onto the polymer clay.”
For everyone else that’s also interested in this topic, here was my response to her (plus a bit more info as well)…
Stamping into clay is actually quite easy if you use a release of some kind, so the clay doesn’t stick to the stamp. There are a few ways to do this.
- You can spray water on your stamp as a release.
- You can ink your stamp first, then press it into the clay.
- You can rub mica powder (pearl-x, eye shadow, etc.) on the stamp or on the clay, then stamp.
- You can put a fine dusting of cornstarch on the clay, then stamp.
This info also goes for unmounted rubber stamps, texture sheets, buttons or anything else you would like to press into your clay.
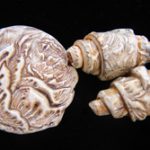
Some of the things you can make by rubber-stamping polymer clay, are pendants, beads, tiles and stamped sheets.
The beads I have pictured above were quite easy to make. The round pendant was first a ball of ivory colored clay, where I pressed a rose stamp, misted with water into it, to flatten it out. I liked how the edges looked ruffled like a rose so I didn’t bother to trim it. After baking, I rubbed an Ocher acrylic paint into the surface to antique it.
The rolled beads were made with the same clay and stamp, but this time I made a flat sheet of clay first and stamped into that. Then triangles were cut using a template and the beads were rolled, wide end first, onto a mandrel. They were also antiqued to match the pendant.
Another way to create stamped beads is to skewer a ball of clay on a bead pin and, holding on to the pin as a handle, press the ball between two rubber stamps.
This makes an image on both sides of the bead at the same time. Then if you want, you can turn the bead 1/4 turn and press again. This makes 4 sides of the bead stamped with images.
With the bead pin already in place, you don’t have to worry about distorting the bead while trying to pierce it or getting fingerprints all over it. You can hang it directly on the bead rack to bake.
You see, it is worth it to ask… I’ll respond! That is what I am here for. So tell me… what else do you want to know?
Sponsored Ads & Special Promotions
Want to chat about today’s post? That’s what the comment section below is for. Scroll Down… We’d love to hear from you!
Or... if you would like to request a topic for a future post, here is the link to do that… PcT Suggestion Box
If you sand lightly you won’t lose the detail. Make sure the stamp impression is deep and avoid getting fingerprints, so you don’t need to sand very much!
Thanks for your comment Sue!
More great information, Cindy. This is the most informative site I’ve found for using polymer clay!
I do have a question about the rose beads you made here. How do you finish them? Do you still sand them and then varnish them? I’m wondering about losing part of the detail that makes them so pretty if you sand them, but I love the smooth feel of sanded beads. What do you recommend? Thanks so much.
Thank you Cindy E.! I always love to see you get excited about things!
Hi Cindy, I love your idea of how to stamp both sides of a rounded bead on a bead pin. Cool!!! My imagination is running again! Thanks!
Sincerely, Cindy E.
Brenda there are lots of scrapbooking tools and embellishments that also work with bead making. Polymer clay is a real mixed media type of craft. You will love that about it!
Cindy Lietz’s last blog post..Clay Cane Leaf Beads for Making Jewelry from Polymer Clay
I use to do scrapbooking so now I know what to do with all my stamps I collected over the years. Thanks
Thank you so much Alison, you are very kind!
Last post..Polymer Clay Contest Treasure Hunt-Win a Bead Jewelry Making Course
You have some brilliant ideas Cindy – loved the silver spoon one too!! ;0) xx
To highlight the stamped areas (if you don’t use ink) you can antique the piece using acrylic paint after baking. Letting the paint sit in the recesses of the stamped image and wiping the excess paint off the rest of the bead.
Cindy’s last blog post..Conditioning Polymer Clay without Trapping Air Bubbles