Vol-022-3 Faux Opal Bake and Bond Technique PcT (Intro)
Video #148: “Your faux opals really capture the deepness and the shimmering layers.” ~Angelghost
More...

** This post is an introduction to one of our paid tutorials.
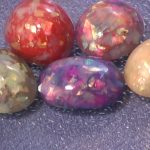
This polymer clay opal tutorial seems like it has been a long time coming… primarily because we started talking about it back around Christmastime of last year. Well, I finally came up with my own version of faux opals that has more depth than any other polymer clay “fopals” you have ever seen before.
Listed below are several of the “Tutorial Yes Votes” that were originally posted at this article: Using Iridescent Buffalo Snow Flakes to Make Beautiful Faux Opals.
“Just two days ago I came across my package of iridescent buffalo snow while looking for something else and wondered if the time to use it was near. That’s a little spooky for me, Cindy. I am ready to go with it. Looks to be a wonderful and never ending technique.” ~Joyce-M
“Oh man, I’ve been waiting for this one!! My big ole bag of Buffalo Snow is begging to be opened and transformed into something gorgeous. The pendant in the photo is stunning! Can’t wait! Can’t wait! Can’t wait!” ~Elizabeth-S
“Like Elizabeth S. I ran into my Buffalo snow this past week and was hoping that your tutorial would be coming out soon. I am ready to learn how to do this Cindy. I call action for the camera crew!” ~Illaya-B
“Yes, definitely! I’m mostly interested in the pale milky white ones. Looking forward to it!” ~Laura-B
“That’s funny, I was just looking at some “Christmas-ey” stuff that didn’t make it into the Holiday put-away gear. Good thing, I would have been reluctant to get it out of the garage. Actually, that’s not true. I would have braved the very crowded garage in order to make these beautiful opals! The ones shown on this page are gorgeous! I’m looking forward to making them.” ~Phaedrakat
“Count me in too, Cindy… been wanting to make these little sparklies.” ~Lupe-M
“Faux gemstones are fun in their own right as well as for the things you can do with them that are just not practical with the real deal. I haven’t made faux opal before although I’ve seen a few ways of doing it, so it will be great to see Cindy’s approach too.” ~Sue-F
“I have been waiting for the opal tutorial. I love fire opals with the red and orange colors. I’m ready to go.” ~Linda-B
“If you didn’t pick up some Buffalo Snow at Christmas time, I think the Arnold Grummer flakes are similar to it. They would be more expensive but I don’t think too bad. I’m looking forward to the tutorial.” ~Freda-K
“I’m ready! I got 2 bags of Buffalo Snow and when I was organizing my studio the other day, I was hoping this tut was coming soon. ” ~Linda-K
“I have been waiting for this tutorial also! Really looking forward to it, Cindy!” ~Marsha-N
“Peggy Barnes – That is so very sweet of you to offer to send some Buffalo Snow Flakes to those who were not able to get to find any. You are another example of how wonderful the people in this community are! Someone else has already generously offered to send me some (thru Cindy – thanks again!!!). So I’m all set. There may be others in need though and I hope they take you up on your thoughtful offer. These Faux Opal beads are just to beautiful for anyone to miss out on. Thanks again Peggy!” ~Lisa-W
“I would love to make the opals…this is my birthstone.” ~Loretta-C
“Hi Cindy. I love the Polymer Clay Faux Opal Pendent with Hammered Copper Jewelry Bail. I would love to see a video on how to make this bail. I tried to make faux opal from someone on the net but did not turn out very well. I think maybe the direction may not have been clear enough, as yours are. I look forward to starting my day reading the news letter with a hot cup of coffee.” ~Barb-C
“You are simply stunning, Cindy. Ever since my parents gave me an opal as a present when I was 10 years old, I have loved these stones. I have always worn it around my neck, since then. I read every article about making fake ones, that I stumbled upon until now and I never ever saw one that even came close to how the real stones look. But your faux opals really capture the deepness and the shimmering layers. I would love to see the tutorial and try it out :D” ~Angelghost
ADDENDUM: Unfortunately, this Vol-022-3 tutorial is no longer available for purchase. However the button below, will take you to our Polymer Clay Tutor Store, where there is a wide variety of other premium tutorials that you can choose from...
Transcript coming soon...
Transcript coming soon...
Our goal is to translate these videos into as many languages as possible. If you are interested in helping with this initiative, then please do contact us and we will figure out a way to make it worth your while :)
Shareable Images


Want to chat about today’s post? That’s what the comment section below is for. Scroll Down… We’d love to hear from you!
Or... if you would like to request a topic for a future post, here is the link to do that… PcT Suggestion Box
Just a reminder for anyone interested in trying Cindy’s Faux Opal technique in Volume 22. This is the time of year to get Buffalo Snow at a craft store like JoAnn’s or Michaels because they sell it for Christmas decorating. I put off getting some until recently because I could only find it via mail order before, and the S&H cost more than the snow.
What a sweetheart you are Bertha to remind everyone to pick up some Buffalo Snow while its cheap and still in the stores. Thank you so much for thinking of everyone! Merry Christmas!
Could you just mix the Buffalo Snow into the TLS or Bake and Bond and then pour into an cabochon mold?
Of course you can try that Gina, but it can be harder to get the nice even clear layer on top, when you do it that way. But as always, whatever works best for you, is the way to do it!
These faux opals are great! Should rename them faux-pals!
Ive tried the opals using half and half white and translucent clay and just translcucent clay, plunged them into icewater directly after baking but i see no transparency at all!!! Ive sanded them for a very long time hoping that would help but no. What did i do wrong? I used fimo effect glitter blue,gold and green -very small amounts. Is that mybe the cause?
Marion, why don’t you make up a list of the stuff you need, and next month, after 8/1 ahem, I’ll purchase it for you at online wholesale outlets here, then pack it all and mail it to you anyway you want? Be glad to do it for you and others who cannot get items due to isolated locations?
@Jocelyn:
Oh Jocelyn, youre an angel!!!! I will have a look around as soon as possible.
Can you advise me on stores where to look for reasonable prices?
It would be easiest for you if i could get the stuff in one store wouldnt it?
But maybe thats not possible. Anyway, if i get a shoppinglist can i pay you for the supplies and shipping to you and shipping to me as well by paypal?
@Marion K: I will extend this offer to you and a few more since will be stuck inside in A/C for August and be more than glad to combine stuff and send if off from me.
You can order from as many online stores as you wish, just have them send it to me, and I will repack all and send it to you the cheapest way I can from my house. Or if you need the credit card help fronted, contact me on Facebook. I am Bluesuede Shoe there.
All I plan on doing is using the cheapest or best (whichever is your choice) system to get it there. All the major carriers stop here daily, as many have their meds bulked via them.
I will come back with a list of my fav online stores…..
@Marion K: Here a a few of my fav links, the final one by Clay Factory contains an instant link to just about any supplier out there…..
polymerclaysuperstore.com
dickblick.com
polymerclayexpress.com
polymerclayworld.com
clayfactory.net
google.com/Top/Shopping/Crafts/Supplies/Polymer_Clay/
@Marion K: Lovely to get the email from you! I’ll be writing back later today. To solve one mystery, due to MS and the way the heat/humidity triggers flares, I spend most of August inside in air conditioning, lol!
Hi!
Of course i cant get the iri snowflakes over here. What i can get is iridescent foil, but i guss i cant use that as its only onesided. I ordered some flakes in a nailshop hoping that will work. Is there anything else i can use. I saw iridescent paper somewhere but i think thats too thick?
Thanks,
Marion
@Marion K: can you get Arnold Grummer Iridescent Flakes, they’re used in paper making if I remember correctly. they’re what I used and they do work.
@Ken H: Oh yes, the Arnold Grummer flakes are gorgeous, such pretty colours! I organised an inchies swap over at polyclay.co.uk recently and one of the ladies who took part sent me three little bags of the flakes along with her swaps, in different colours, and I love them. They are nicer than the flakes I already have, that’s for sure, but I think she had to order them from the US.
@Ken H:
Cant get any iridecent flakes at all. Well, im waiting for the flakes i ordered from the nailshop but i dont think thats what i need. And waiting for fine iri powder as well. Its very hard to get stuff for this hobby overhere. Looked in shops online for scrapbooking as well, but they have only glitter glues.
@Marion K: Whereabouts are you? I have more iridescent flakes than I could ever use and I’d be happy to send you some – I couldn’t find the flakes at all in the UK but I finally ordered some from a company called Economy of Brighton.
Are you on Facebook by any chance?
@Silverleaf: Oh, just to make that clearer (don’t mind me, brain not working today), you CAN get an equivalent product in the UK, it just took me a while to find some at a price I was happy with.
@Silverleaf:
Hi Silverleaf, in in the netherlands. I thought i finally found some at Save-on-Crafts.com but-again- the aswer was: Thank you for contacting us. Unfortunately, we only ship within the United States at this time. We do not currently have plans to expand our business into the international market.
Im not at facebook, ive tried but seem to do something wrong,i get errormessages all the time when i try logging in. Changed password servral times, but it doesnt help.
If youre sure you can miss some of your supplies i would be very grateful!!
Just tell me how i can pay you -maybe with paypal?
Thanks so very much!!
@Silverleaf:
Hi anna, just in case you didnt get my thankyou mail:
Thanks very much for the nice stuff you sent me, im very happy with it!
@Bonnie: I live in Indiana and they put out an annual Festival Guide for the entire state. Another thing that is helpful is to call around to different Chamber of Commerce offices. They can usually tell you what festivals are going on in that particular county and who the contact person is for vendor space. I have also just done searches on Google and Yahoo for “festivals in (whatever state you’re looking for)”. Hope this helps you!
Do you by any chance know of an organization (or the best) that I could join to find information regarding festivals and the likes. I know of many organizations, but they all want you to join, etc. and just don’t feel the need (or have the money LOL) just to be joining all of them. Felt you might have some knowledge in this area (I have filed you under Cindy…All things Polymer Clay)…..thanks for any help and many congratulations to Carrie…perhaps she would have the info I might need…. festivals around TN, GA, NC, SC…..southern eastern states……..Blessings, Bonnie
@Carrie N.: It is so great to hear from you Carrie! Sorry I didn’t get back to you sooner. I read your comment when it came in but didn’t have the chance to answer right away. Then it somehow got buried until now. Congratulations on all your success! I am very proud of you. You must really have a sense of accomplishment. I know how busy and stressful those kind of events are.
Although the faux opals are really cool, they may be too much work for you to be making for an event like this. You may want to try the flat bezel version with the UV Resin instead which is a lot easier and quicker. The technique is in the Katiedid Video (linked by my name) but you could use any type of bezel instead. They use the same flakes and Bake and Bond, but there is no sanding involved.
As far as the ones you have made, it is difficult to know the problem without seeing them. It could be temp, time, not using ice water right out of the oven and/or the sanding process that needs more work. Most Faux Opals made this way do have a cloudiness to them, so unless I can see them, I can’t help that much.
Thank you for answering Bonnie’s question so well!
@Bonnie Blasingame: I think Carrie did a great job helping you out. The only advice I would have right now is to do some Googling like she suggested and to also see if the International Polymer Clay Guild has some helpful information on the events and festivals available in your area.
Boy this is a busy time of year for me! Which is obvious since I’ve been MIA here at the blog for several months now! I am building up inventory, as I am scheduled for 23 festivals this year! (including a 9-day one!) I am also excited to share that I was accepted to an actual “art show” in a nearby town!
I did, however, finally get around to trying the fopals today. I couldn’t find the exact same flakes that Cindy has but I found irridescent confetti flakes at the Factory Card Outlet. They seem to be doing what they are supposed to in the fopals so far. My problem is that mine are coming out cloudy. I am sanding like crazy, am I not baking long enough or at a high enough temp.? Any help would be greatly appreciated!
Has anyone else since this was posted used the tumbler? I bought some small white rocks to use in it. and anyone try to buff with it too?
just curious.
@michelle: Hi Michelle…just trying to “bump” your question–w/my reply–back into the recent comments list. Hopefully someone has used a tumbler recently for their Faux Opals, and is willing to share info about the process (and whether it was a success or failure.)
As for your other beads, you should check out Cindy’s video tute: Polishing Beads w/a Rock Tumbler
There’s lots of information in the article on that page, too (and also in the other rock tumbler posts here at the blog. Use the search box to find at least two other tumbler articles.) The comments under the articles have even more information — and they’re quite entertaining, too. For awhile there, members were trying everything in their tumblers, experimenting with their processes. Cindy finally did her river rock tutorial, though, and that’s the method she loves for her smaller beads. So, anyway…
Good luck to you…I and hope you get the answers you need! ~Kat
@Bonnie Blasingame: Very kind of you Bonnie! In regards to sharing supplies and materials, please follow the link by my name for information about how to to be able to connect with each other directly for sharing personal addresses and contact details.
To Kathy Bloom…..I bought 3 bags of the the Buffalo Snow Flakes just before Christmas and have not had a chance to do anything with them. i would be happy to share 1 bag with you. I know how frustrating it is to see something really cool and get all hyped up about it and then can’t find it. When I get rich I am going to start a Polymer Clay store and have EVERYTHING ever needed or will need by the Polymer Clayer…..don’t get real excited….getting rich doesn’t look like it is about to fall in my lap or anything…..but still will share.
Bonnie. Are you on facebook?
If not, I am.
@Kathy Bloom: I am on Facebook. Looked up your name there were several…I am pretty careful whom I contact, if I am not sure…..but I am on there and I am probably the only one.
I have been trying forever to get buffalo snow flakes. My local Michaels does not have them. I have ordered on line several times only to be told that they are no longer available. Could someone please help me find them?
Thanks Kathy B
@Kathy Bloom: Try looking for Arnold Grummer Iridescent Flakes they’re used in paper making, it may cost more but it’s generally the same thing, mine came in a much smaller bag than the Buffalo Flakes
@Phaedrakat: It was so nice this morning to read all these wonderful comments from you all over the blog. Nice to have you active again. I missed that! Hope your holiday was a good one and that you are rested and refreshed for another exciting year of polymer clay. Happy New year to you my friend!
@Kathy Bloom: Ken had some good advice should you need it. I also know that Terry Morris (our favorite UV Resin Guy at epoxyjewelry.com) is looking into carrying the Buffalo Snow for you all. He asked me what the UPC code was on the bag so he could find the right one. Don’t think he has it in his shop yet but I would keep checking if you’re having trouble finding it elsewhere.
@Ken H: Thanks Ken for helping Kathy! I had kind of forgotten about the Grummer Flakes. Thanks for the reminder!
Well what to do you know! I googled Arnold Grummer Iridescent Flakes and guess what? As soon as I saw the package,I knew I had some. I have a package with three different colors just sitting there in the drawer with my glitter. I can’t remember where I got it but I will remember it the next time I need some. Thanks to everyone for helping me find this in my stash. After all this fuss, gues now I actually have to do something with it!
@ Ken – That’s a really good way to make faux stones, study the real thing and try and get as close as possible. your jade beads are so real looking and simply perfect. I have to try doing some jade. I have some carved tube shaped beads of bone and i would love to replicate them in jade so i have to make a mold; two halves I guess and will have to join it.
@Cheryl Hodges: Another secret of Faux’s, and I don’t remember where I heard/read this is when using the faux in something, treat it as if it was real. I’m trying to work on a formula that looks like cab rubies, when I get the color correct, I will use the clear rhinestone roundels with them, or faux Turquoise with Bali silver beads, they’re the best examples I can give of using a faux as if it were real. That’s why Cindy’s Turquoise bracelet works so well.
B&B is too think to dip with.. I draped it over most. The earrings I used just the B&B and Flakes.
All I can say is sand, sand, sand, And bring out the big tools because that B&B is harder than a rock after it bakes.
@Ken – Just had a look at the site. The opals are stunning and they’re round!
@Cheryl Hodges: I always try to study Mother Nature before I try to recreate it, that’s what I did with the jade, not sure whats next but I will be looking at real examples of whatever my next choice is.
The link to the photo is further up in this blog, but since there are SO many comments on this one here it is again- opalsandgemsofaustralia.com/crystal-opal-bead-necklace-556mm-gold-3500-p-103.html
Just add the www in front and it should work
@Ken H: WHOA!!! Wouldn’t I LOVE to have that beautiful baby!! Thanks for posting that, Ken. My mind’s a’spinnin!
@Tanya L: I dug a little deeper and discovered a 10mm version of the necklace almost $12K. I wanted to do full round beads from day one when Cindy announced the Faux Opal technique, haven’t been able to devote the time to figuring out how to do it though.
@Ken H: I pasted the pic onto a word doc and I’ve been staring at it ever since! :D Uh-oh..The smoke alarms just went off, LOL!
@ Brenda – I want to make round faux opal earrings for my mother. She has arthritis and doesn’t wear neclaces. It’s her birthsotne and she lost the real opal her uncle had given her. I could use a metal back or a bezel but I don’t think she would like that type of earring. Your opal earrings are gorgeous. Could you help me, tell me how to go about getting a round stone?
@Cheryl Hodges: Cheryl, I may be wrong, but I don’t think I’ve ever seen an opal that wasn’t set in a bezel. I’ve always assumed that’s because opals are so delicate. They’re very soft and porous and can crack and break easily.
Anyway, you may not care about this, but I thought I’d point out that it would be obvious that the opal isn’t real if it’s a round dangle…assuming that I’m right about opals always being protected in a bezel.
@Linda K.: When I was on Vaca in Las Vegas a few years back I saw a strand of round opal beads in the shops at Caesars, I will try to find the link to the photos ( the store has closed it’s brick and mortar shops and went totally on line).
@Cheryl Hodges:Sure, I would be happy too assist in helping you. It was really tuff making these. I will chat with you on FB to help you get these done for your mother. It took me day’s to get these to look like that. I had blisters from all the sanding.. I turned to the dremel tool after that :)
@Brenda: Brenda you had to really have a hard time making them. I can’t for the life of me figure out how you’d do it! And they are simply stunning!
@Brenda: Are you keeping your technique secret, or can you let us in on your method, too? I’d be thrilled to learn how to make your round opals as well (if possible.) It’s definitely clay-related, so it’s not like anyone is going to complain about it… ;D
Thanks for any help, Kat
@Phaedrakat: Its not that big of a secret.. I used alot of B&B with the Snow then chipped away the ruff stuff. I then sanded like crazy. It took a week just to make those two beads.
@Brenda: Man that’s a lot of sanding. The Cabochon that I did when I tried this technique took me using the dremel with normal sandpaper to get it oval and to get rid of most of the bumps on the dome of the cab before I could even think of using the micro-mesh sanding pads. When applying the BnB did you dip it in or “drape” it on like in the video?
I just noticed this thread, and was going to mention how I messed up before and had to have Doug/Cindy fix my HUGE, bolded comment! So I just use html from time to time, when I’m really AWAKE. Otherwise, I’m afraid I’ll mess up and cause more work for Doug and Cindy. They certainly do enough as it is!
OK, Cindy.. No more playing, just in case! I know the secret now, so I’m content.. :)
Hey guys… there are some downsides to getting creative with using those html tags. One is that it can sometimes cause your comments to be filtered into the moderation queue (more work for Doug), or worse, to the spam folder (where they will likely never see the light of day after getting buried in amongst all the crap that ends up in that folder).
The other big down side with using html coding is that if you forget to add a close tag, it can really mess up not only your comment, but sometimes the entire page. Again, more work for Doug… or worse depending on how bad you mess up, it can crash the entire blog :-( (MUCH more work for Doug).
Just a word of caution… especially for those of you who know just enough to be dangerous :-)
Woohoo! Thank you, thank you Silverleaf!
Wow, did I mess up! Tried this yesterday using glitter I had on hand. Some of it melted inside. I’ve got bubbles inside where the glitter melted, and I think my bake and bond was way too thick. It never smoothed out and I wound up with ripples. What’s with that? I’m so bummed… I’ve got book beads baking now. Hopefully THEY get good! :)
@Tanya L: Try some rough sandpaper or the low grit drywall paper and grind down the too-thick layer of B&B. Then start sanding them smooth—maybe they look better under that rippled layer of Bake and Bond than you thought??? (The melted glitter might have made some cool effects in some of your beads…)
I’m really sorry that happened. You must have used a plastic glitter with a low melting point. Next time–metallic glitter (or the Buffalo/X-mas snow!) I hope that your book beads turn out well! Fingers crossed… ~Kat
@Phaedrakat: Thanks, Kat. The book beads turned out great! I also made a bunch of hammered copper book marks that turned out good, too (my first try at ’em), so I guess these two successes make up for the opals. I did sand the opals really, really well. There are actually some small holes where, I’m guessing, the glitter melted. It was “snow” glitter, so I thought it would work. Maybe if I use Sculpey Gloss it’ll fill in the holes and salvage them. I’ll play a little. I can’t wait for the Buffalo snow to hit the stores!
@Tanya L: Congrat’s on your books and bookmarks! So cool when something works on your first try. I just love those little book beads; they’re such a cute invention by Cindy. As for the opals, I could send you some snow if you want. I bought a bag of Buffalo Snow last Christmas, and it will take forever to use all of it! I could put some in a snack baggie, enough so you could experiment a bit and make some opals without worrying about melting glitter! Let me know if you want me to—then you could ask Cindy to give me your address or something. I need to remember where I put it, though (I have so much clay, as well as all the “other stuff” that goes with it!) ~Kat
@Phaedrakat: Kat, that would be so great! And so appreciated. That’s what I love so much about people here on this site.. Take your time trying to find it – I don’t want you over doing it. I’ve got plenty of other tuts to try in the meantime. :) Thank you very, very much, Kat. You are awesome!
@Phaedrakat: Hi Kat. Got the word from Cindy- she sent you my info! (No, I’m not excited or anything..!) I’d love it if you’d email me..
OFF TOPIC @Tanya L: I did get your email address from Cindy, but I didn’t have enough time to send you a message from my “trusted” laptop (the only computer I feel safe accessing my email from.) I know, I’m weird, right? I’m fine using the other computers for the blog, but my email and other business is done with my laptop only. Anyway, I promise I will email you soon—it’ll be fun “talking” to you via email! I’ll start looking for the “snow” tomorrow. Then, I will let you know when it’s ready for shipment, so you know to watch for it. I’ll be talking to ya soon! :D ~Kat
OFF TOPIC >Phaedrakat: (We’ll see if my link (?) thingy worked) Thank you so much Kat! I don’t know that that’s being weird. I’m always running all kinds of spyware & adware programs to try to keep my computer clean. And I’ll be watching for your email!
OFF TOPIC @Phaedrakat: Ok, how’d you get Tanya L in blue after “OFF TOPIC”?? OHHHH, I wonder if you added the “OFF TOPIC” after hitting “reply” and all that gibberish was there? And another thing, how do people get italics and bold lettering??
@Tanya L: I’m just testing to see if this will work… hopefully this will be in bold and this will be in italics.
If it does then I’ll tell you how I did it!
@Silverleaf: To do it you just need to know a TINY bit of HTML coding.
For bold, type then your bold text, then to turn the bold off and start normal type again. You’ll need to remove the spaces in the code I’ve written here – I can’t write it exactly because if I do the code will become invisible and just apply the bold to the type and you won’t be able to see it – does that make sense?
For italics you do exactly the same thing but with “i” instead of “b”. your italic text normal text.
Let me know if that isn’t clear! It’s kind if tricky to explain but very easy to do.
@Silverleaf: Oops, even with adding the spaces the code got applied to the page, sorry!
Okay, I’ll try again. For bold, type “b” surrounded by angle brackets/arrows. They look like < and >. So < NO SPACE b NO SPACE > then the text you want in bold. Then turn off the bold by typing exactly the same but with / in front of the b.
< NO SPACE b NO SPACE > bold text < NO SPACE / NO SPACE b NO SPACE >
For italics use i instead of b.
@Silverleaf: Sorry, that looks really really complicated, doesn’t it? Let me see if I can do this in a more sensible way.
Okay, try this page tizag.com/htmlT/htmlbold.php. The first blue box has the code I’m talking about – just use the same code with i instead of b for italics.
@Silverleaf: I saved the link to that page. Yeah, it’s really difficult to explain something that’s pretty easy, especially when things disappear on you! Thank you Silverleaf! :)
@Tanya L: No problem, glad I could help! :)
@Silverleaf: Ok, my test: bold for bold, italics for italics. Fingers are crossed!
@Tanya L: Fantastic! Hopefully we can use colour here too in a similar way – if so this text will be in red.
@Silverleaf: Nope, no text colours. Oh well, it was worth a try!
@Silverleaf: Ok, I’m amazed… HOW’D YOU DO THAT???? Shortcut keys? I’m down on my knees here, and believe me when I tell you that it’s hard for me to get back up, so I don’t do that for just anyone! LOL!
the joanns in porter Ranch finally carries the b&b. Now just have to get the sandpaper.
@michelle: The Bake and Bond seems to be much easier to find, now. I see it whenever I go to JoAnn’s, and it’s at Michael’s now, too. (In my area, Riverside, CA) Cindy’s tute was ahead of it’s time! :D
NEW PHOTOS JUST ADDED:
Hello to Everyone,
Some new Spotlight project pictures that relate to the topic of this page (Polymer Clay Faux Opal Tutorial), have just been added in another post. They were submitted by Carole-H. The link by my name will take you to where you can see them, along with a bit of a write up. Hopefully they will inspire you to achieve great things with your own polymer clay projects.
BTW: Thanks to everyone above, who took the time to comment in this thread. Your feedback, support and engaging conversations are always such a wonderful part of my day. Although I don’t get a chance to address everyone individually, please know that I do read everything. ~Cindy
Hey Cindy and all, I have visions of us all looking for dead bugs to include in our amber pieces…..lol. Down the road I would love to have a tute on this. It’s among my favorite gems.
This place has been a God send for me because I was trying to learn all this from books and seeing it and reading all the tips and hints has been wonderful.
Andrea
@pollyanna: LOL, the bugs would really make it look authentic! There are some good ideas being tossed around for the faux amber — Sue F’s “carmelized” translucent sounds especially exciting. There are lots of gems on Cindy’s list, but I’m sure she’ll get to this one eventually! (I don’t know if she’ll add bugs, though… ;-) I, too, feel like this place is a Godsend. I love all the inspiration, tips, & ideas I get from this place. And of course, Cindy’s videos are fabulous!
@michelle: Brenda tried the rock tumbler (above) with mixed results. See here. It sounds like she did much better using her Dremel. From what Cindy said, it seems like the B&B might be too hard for the tumbler to break down (unless you use some kind of coarse grit — which she said she hasn’t figured out quite yet.)
Sounds like you need some elbow grease & sandpaper to get the deep clarity. (Or the Dremel/rotary tool.) Oh, and if your coating is really thick, you can start the sanding with a low-grit drywall sandpaper. Sorry, you probably didn’t need a summary of what’s already been said, huh? I’m just hoping that someone’s had rock tumbler success by now! ???
anyone try to put them in the rock tumbler? or are they better looking with hand sanding?
Does anyone know where I can pick up bake and bond, on the joann site its 2.99 no big deal there but when they added on the shipping and tax it came over 10.00.
Where are you?
@Judy: southern calif near woodland hills. Im by 2 joanns and 3 michaels.
@michelle: Hi Michelle, I’m from SoCal, too (Riverside.) I’m sorry, but I haven’t been able to find Bake & Bond locally, either. Not at JoAnn’s or Michael’s, anyway. We used to have another big craft store (Beverly Craft,) but it closed last year. Do you have any other large craft stores in your area? I’m curious…
@Phaedrakat: do you have a kit craft or what I hear opening are hobby lobbys?
@michelle: No, but Kit Kraft looks interesting! I checked the website. Hobby Lobby’s website shows no California stores. Did you hear about them coming here? That would be cool. They seem to carry more polymer clay items (or at least more clay.) They carry Kato, which Michael’s & JoAnn do not. Have you placed your order for Bake & Bond yet? I still haven’t done it. I have too much chaos going on right now. I just need to sit down and make a big order. Maybe tomorrow… :D
@Phaedrakat: I want to find somewere thats close because shipping and handling for a 3.00 item is stupid to pay, I think.. Plus our sales tax no matter where we buy it.. Im going to see if ebay or someone in etsy is selling it.
@michelle:
Hi Michelle, I was in Galesburg, IL yesterday taking my grandaughter home and they have a Dick Blick Art store there which has the 4 oz. bake and bond for 3.99. I also contacted Trish at polyclayplay to see if she could add it to items she sales at her site. She doesn’t offer it right now but she does have a lot of Polymerclay items she does sale so maybe she will be able to get the bake and bond also. If you have a Dick Blick art store near you try them. I also think if you google their name you can find out if they have ordering over the internet. I will let you know if I find it anywhere else. I haven’t been reading the blog everyday because of my health or busy with other items. So I did not realize people were still looking for it. I hope this information helps you and others still looking. Good Luck. Also I plan to experiment with my tumbler and faux opals this week. My hands can’t take all that sanding. My husband will help but he does so much for me now I hate to ask if something else will do the trick. Will report back if I have any luck. I am going to rty some of the grits that I got when I bought my tumbler they are for rocks so who knows what will happen. I will say a prayer and give it a go.
Uuuuuuuuugggs to all, Peggy
I forgot to mention I live in Iowa on the boder of IL so Galesburg is only 60 miles that’s my half way spot I meet my daughter at when I am getting or taking my grandchildren. If all else fails I can purchase some and mail it to you just for the actual cost no added shipping and handling fees the others pile on. Let me know if I can help anyone out with the B@B. I also got so more buffalo snow if anyone is still looking for it.
@Michelle, Peggy: The Dick Blick store Peggy mentions has three LA stores, which should be within an hour’s drive from you, Michelle. Well, maybe not counting traffic! :(
If you decide to check it out, please let me know (and which location you went to.) I’ve got several things I’d like to shop for out LA-way, so a store with good polymer clay items would be just the excuse I needed. I, too, hate the idea of spending lots of postage on an inexpensive item. That’s why I’ve been trying to buy everything on my list at once from one place (the shipping’s cheaper that way.) But, I can’t seem to find everything at one single online store. Dick Blick has things from my list, but no Kato clay (been wanting to try.) Hobby Lobby has lots of goodies, but no B&B. And so on. As far as taxes go, I think you can avoid sales tax with certain out-of-state stores (I didn’t have to pay tax when I ordered from Polymer Clay Express.)
Peggy, you’re such a sweetie to offer to mail B&B to people. You’re a lovely person. Always so upbeat and cheerful, too! I wish you luck with sanding your opals in the tumbler. There has to be some way to make the process easier for you. You deserve some gorgeous opals without hurting yourself further! Let us know how the tumbling media works for you… Have fun, ladies! Good luck, too~
@michelle: Hi Michelle, Unless you read this in the next few minutes, this won’t help. But perhaps they’ll repeat this offer in the future! The Clay Store (.com) has free shipping, but today’s the last day. They do have Bake and Bond, and since they’re in another state, no sales tax. I hope you get this in time!
@Phaedrakat: Very behind on blogging as you can see, but I live in TN and can get B&B at a couple of places. Would be happy to purchase….would be good if you could get a couple or more and then send USPS flat rate….It works wonderfully and I use it alot so ordering several would not be a bad idea….and the postage remains low
@Bonnie Blasingame: Hi Bonnie — whew! I guess I’m behind on blogging, too…as my reply 3 weeks later can attest to, LOL! I got my hands on some Bake & Bond thru mail-order (and then found it at JoAnn soon after, of course!) I notice it’s pretty available in the stores these days, so I think I’m okay with my supply level. Thanks for letting me know, though — very ‘cool’ of you! Here’s hoping you had a wonderful holiday season, and that 2011 is totally fabulous for you! ~Kat :D
@michelle: Hi Michelle, you probably have some Bake and Bond by now. JIK though, I found it at my local JoAnn’s (Riverside) today. I ordered it online at The Clay Store, like I mentioned, and rx’d it in the mail yesterday. Wouldn’t you know, I found it after that! Anyway, I wanted to tell you so you could give your JoAnn’s another try. Mine had their Studio by Sculpey clay on clearance for $.97 — yep, 97 cents! They had almost every color left, so I think they just reduced the price. They were also clearing out theirS by S Shape Makers for $1.97. Even though I have tons of clay, cutters, & texture, I had to buy some of the clay and the only leaf set they had left. I’ve been wanting to try the clay — the colors are so gorgeous, and the way people describe its suede-like feel makes it too tempting… Anyway, I hope this helps. I’m officially done telling you about Bake and Bond opportunities now (unless you ask, of course…) :D
Just wanted to let you all know that you can get the Arnold Grummer’s Iridescent Flakes from Donna Kato’s site: prairiecraft.com
Right now they only have mint green and icy blue available. They are on sale now for $3.50 for 5 oz. I went to the Ace site to buy Buffalo Snow but by the time I checked it out they had something called Buffalo Snow Hi-Lites but it looks like thin red tinsel. Hope this helps anyone that is still looking for Buffalo Snow.
I’m super busy today but I just wanted to pop by and thank everyone for your fantastic tips and ideas! Sue your faux Amber sounds awesome, and Linda I love the tooth brush tutorial! The more you guys share with each other, the more valuable a resource this sites becomes for you all. So keep it up, I love it!
I also appreciate what you said Carolyn, “You teach us how to make complex pieces with the least amount of strain. Thank you so much!” I have had trouble with strength issues myself in the past and I know how frustrating it can be when you just want to create and your body fights it. I think polymer clay can be a healer, a positive distraction and a great therapy for your body and mind. Thanks for understanding that and encouraging it!
And lastly for Judy, one of our members by the name Silverleaf lives in the UK and gave us some info in another thread on a UK Equivalent for Buffalo Snow. If you click the link by my name, it will take you to her comment.
Sounds to me like we could start a separate fibromyalgia club. Thank God mine is fairly well under control and has been ever since I broke my back and had to go to a spine and pain specialist. The arthritis is in check also. My son used like to make up words and he said that I had arthralgia. Believe it or not, arthralgia is now a listed medical condition. Cindy, you really do help those of us who have limitations. You teach us how to make complex pieces with the least amount of strain. Thank you so much!
HI there Cindy and everyone else.
Love these faux opals. I’ve already made just one using Crystal Aurora fusible film, but chopping it up is a pain.
Buffalo snowflakes are non-existent in the UK (even on Ebay) as are the other makes you suggested – but … I have just got hold of some ‘wedding table confetti’ made by ‘Bright Ideas Marketing Ltd’ and it looks to be perfect – irridescent, large flakes in a 90g jar.
School holidays started today (I’m a Reception teacher) and I can’t wait to begin.
Judy
@Judy: That sounds perfect, Judy! Have fun!
@Sue F., Carolyn: Regarding the Faux Amber, I’ve seen a couple of tutes on the web showing how to make this stone, and they both involve using the alcohol inks. One of them suggests using the method you talked about, Sue — using different translucent brands (braided together.) This way the subtle differences in them (clarity, color, etc.) more closely resembles nature. It’s a great idea! I’ve got some Faux Amber recipes in my books, but they involve tinting trans with clay. I think using alcohol inks will probably give the best clarity.
@Phaedrakat: Alcohol inks would certainly give better clarity than tinting with opaque clay. But you might not need them… when I was playing with the above process it was the controlled overbaking that turned the translucent ultra-clear. The overbaking also resulted in the translucent becoming somewhere between pale gold and pale brown depending on the brand and how much it’s overbaked, which is exactly what you want for faux amber anyway despite being something you usually try to avoid. You’d probably only need alcohol inks if the colour variations through overbaking weren’t sufficient for the effect you were trying to achieve.
@Sue F: That sounds promising — can’t wait to try!
@ Carolyn- looked at your website ‘Dove Designs’ First of all it’s a wonderful name. And your work is fabulous. I love all of them!!!
@Cheryl: Thank you! Now all I have to do is try to make some of these faux opals. I think they scare me. Have you tried them yet?
Hobokenmary I apologize for the spelling mistake. I never was very good at spelling. Promise I will try not to do it again.
No need to apologize. If it wasn’t for spell check, I’d be in big trouble!!!@Peggy Barnes:
Well I decided to wait until I have the B&B to try my opals but my grandkids and I had fun with other crafts, mostly making Easter cards. So still no clay work for me.
Brenda I love your opal earrings and the other beads exspecially the smaller blue one. I am so sorry to hear about your MIL news. As you said she is a fighter and she has all of us on her side. I will put all of you in my prayers and you MIL on my churches prayer chain. God bless her.
Hobockenmary I love your pendant and I bet the sun compliments it so much. You and Brenda have inspired me. There is so much talent in this lovely community of Cindy’s.
Ken I am sure you will do that necklace proud. I hope you have fun making the opals.
I just want to thank of course Cindy and Doug but everyone else here at this blog you are all so full of information and wonderful help to all. I am really proud to be a part of this group.
Uuuuuggggggs to everyone, Peggy
haha” You have a Don too…. My MIL just found out today that the cancer spread into the tissue of the cervix. I have been blue today. Great MIL’s are hard to come by. She is such a great inspiration to me. This is a different strand of cancer then what she had before. It worries me as well as the other family members. She is such a fighter and God is on her side. She has survived 3 times in the past 20 years. That cancer was rare, they did not expect her to live as long as she did.
@Brenda: Brenda, I’m sorry to hear that about your mother-in-law. My thoughts are with you and your family.
@Phaedrakat: Thank you..
@Brenda: My Don is watching me from heaven … it’s real hard to feel those back pats … but I think he’d be proud of me.
@carolyn: I am sorry…. I am sure he is right there with you patting you along the way. You have us as well :) As long as my laptop holds out. My pc crashed last week >(
Cindy, speaking of faux stones, today I posted on my blog a reconstituted amber cab that I wire wrapped. dovedesigns.blogspot[dot]com I direct attention to you again as I do in so many of my blogs. I bet you could dup this stone … yes? It would be fantastic!
@Cara: I’ll wait to answer these until after I have seen photos and can tell what is wrong.
@Cheryl Hodges: I’m sorry to hear you hands are hurting so much Cheryl. :-( Did the warm water help at all? You could try cutting an even larger hole in the top and let it just pour out. You could also try putting some in a zip loc bag with the corner cut off and you could squeeze it on like you would icing. It might be easier for you hands to squeeze the bag instead of the bottle. Warming up the bag in some water or with your hands may help too. Good luck. Let us know how it goes for you.
@carolyn: Amber is such a pretty stone to make out of polymer clay, though the clarity of the stone you used would be difficult to duplicate. I will consider putting it on the list of tutorials if there is enough interest. Gorgeous pendant BTW! I would love to be able to wrap wire as lovely as that!
@Cindy Lietz: I did manage to get thick layers and snakes of Premo Frost almost fully transparent and amber in colour by deliberately overbaking it when I was seeing how closely I could replicate an internally-ridged encasing lampworking technique in polymer clay a while ago. I’d used a higher than normal temperature for Premo (but not high enough to “burn”; this was more like caramelising it) with a much longer baking time, and was quite surprised at how clear it became. It really did look like amber glass. I don’t have the details immediately to hand but will see if I can dig them up.
@Sue F: Oh, Sue, if you could dig up your notes that would sure get us a long way closer to being able to do faux amber. You are such a treasure – always so thorough and precise in your testing. I truly admire your patience.
@Cindy Lietz from Cracked Kato PolyClay Beads: Cindy-thank you ever so much for the compliment on my wire work. I so admire all that you do and praise from you is high praise indeed!
How do you reply to more than one comment at a time?
@carolyn: I too love the wire work. I am learning how to do the wrapping too.
@Brenda: Thank you! It just warms me all over when I get compliments! Don used to keep my back well patted and without him I find I’m questioning my abilities.
And, more importantly, how is your MIL?
Carolyn, your wire wrapped amber is absolutely magnificent! How long have you been using wire? I’ve attempted wire wrapping but my piece looked like I did it blindfolded using my toes, in other words, a complete disaster! Any suggestions?????@carolyn:
@Hobokenmary: I’ve been working with wire for going on 10 years. Don’t give up … and don’t toss what you consider a complete disaster. I have sold some pieces that I was ready to toss. One was a gold filled wrap that just didn’t work and I twisted it up and was going to trash it. I put it on a chain and it sold for $92! As the saying goes ‘one person’s junk is another person’s treasure’. This principle holds true for our clay work also.
I won’t give up. But I was hoping it would be a little easier to work with. I always have these grand illusions that I will try something new and the first time I try it I will produce a Picasso — then reality hits! The good thing is that I don’t give up easily. Thanks for replying…@carolyn:
@Hobokenmary: I can’t believe it! That piece I told you about that sold for $92 … I had called it ‘My Picasso’!
Great minds think alike!@carolyn:
You are right Cindy about the Sculpey bake and bond being the same as the Studio Sculpey bake and bond. I received a reply from Polyform and they said: The Bake and Bond for Sculpey and Studio are one and the same. The only difference is the labeling. Michael’s is carrying our Sculpey Bake and Bond.
Now, back to the studio!
Cindy you mentioned putting the Bake and bond bottle in warm water. Mine is really thick, it doesnt move at all and though I cut the tip off to make the opening a bit bigger I’m having a real hard time trying to squeeze it out. I have trouble opening bottle lids and taps and have a lot of pain so I’m wondering what I can do to be able to use the bake and bond? have to do the EMG testing on Wednesday to check for muscle strength so i hope they have some answers for me. I’ve had a bad couple of weeks with my back and left arm too.
@Cheryl Hodges: Thanks for reminding me of that tip – I will try that to see if my bake and bond will run better.
Could you take the whole tip lid off and sort of splurge it over? I guess that would mean more sanding though so it may not help.
I hope you get some answers so you can play with your clay without pain!
Can’t seem to post pics on my blog just now for some reason. Will try again later. Thanks Brenda I think I probably need to sand more. I’ll give it a try.
Also I possibly didn’t sand enough. I did sand it for about 20 minutes through grades, 180,240,400,600,800,1000,1500,2000 but I can see some scratches as well as cracks. I really must remember to dry my piece between grades to check I have sanded enough – I can’t tell wet still.
So attempt 2 better but still not great.
The bake and bond was firm enough to sand ok but I wonder if it is too thick – I can’t really see the flakes so it doesn’t sparkle or look like Cindy’s or Hobokenmary’s. When I was applying the bake and bond it didn’t run down the sides really – I even tried leaving it a good while so had to encourage it with a needle tool to the edges.
Also the bake and bond is cracked in places? Have I baked it too long now? I think the first ones ended up being in for about 1 hour and 20 mins. I brought them out straight into iced water. I have to confess I didn’t use the oven thermometer cause I am fairly confident of my oven holding the correct temperature these days but I will get it out when I try the next batch.
I shall post some pictures on my blog so you can see if you can spot anything I could do to make it better.
I am going to crack this!
@Cara: Mine was pretty thick too. The edges I cut away with scissors before I started sanding. You have to sand pretty thin to see the flakes. My hand could not take the sanding that is why I got the dremel out. I can’t wait to see your Fopals though. I visited your blog and love your work…
Phaedracat – the bottle says:
Sculpey
bake&bond
bakeable adhesive for oven-bake clay
I’m wondering if it is a new product from Sculpey. After all, they also sell the Studio by Sculpey products. Hate to open it until I know if I should. I also emailed Sculpey in case Cindy didn’t know about it but I don’t know if they will even answer the email.
@Freda K: I’m thinking that it is probably the new packaging Freda. Polyform has streamlined their products and some of the Studio by Sculpey products including many of the tools, now just have the Sculpey branding. So you probably just have the same stuff in a new package.
I got some Sculpey Bake and Bond. Is that the same as Studio Sculpey Bake and Bond? None of my stores had the Studio Sculpey Bake and Bond. I figured it must be the same or they couldn’t use the name Bake and Bond. What about it?
@Freda K: Hi Freda, it’s called Studio by Sculpey Bake and Bond, but maybe there was and earlier version of it that didn’t include the “Studio” name? Does it say that it is a bakeable adhesive clay? Does it look anything like the picture in this Bake and Bond article?
Let us know if you have the right thing and if it is in different packaging. If you have something else, let us know where you got it. Plus it would be good to know what to look out for — or what not to! Good luck, Freda!
Hi all,
Here is a picture of my faux opal pendant. I’ve gotten so many compliments… thank you! The picture really doesn’t do the piece justice as compared to seeing it in person, but I thought I’d send this along anyway!
@Hobokenmary: Looks really beautiful — I’ll bet it’s a knockout “in person”. The colors are stunning, and the bezel looks great with it – what did you use? Anyway, it is a gorgeous piece! Thank you for sharing~
@Phaedrakat: Hi there Phaedrakat and thank you for the compliment. In the sunlight the pendant and ring is absolutely amazing. I use Patera bezels from Nunn Design. They are a bit expensive but the end result proves worth it. I also made a ring and earings in the fopal and instead of the Buffalo Snow flakes which I couldn’t find I found some iridescent decorating shred (or Easter basket grass) and cut that up instead.
@Hobokenmary: Oh what a great idea! I never thought of Easter basket grass… that is the perfect solution for this time of year!
The Pateras are an excellent choice for ‘setting’ your faux opals. Any bezel or even the pronged settings would work. If you buy the setting first, you can custom design the size of the opal. Not an easy thing to do with a real opal.
Your opal looks GORGEOUS! Thanks so much for sending in your photo!! Sharing these project pictures lets other members see that all of the techniques I teach are very doable.
@Everyone – keep those photos and stories coming. Simply email your pics to me as JPEG attachments, and I’ll post them here at the blog for everyone to see. If you include a bit of write up, you may just end up seeing your name lights for an upcoming Spotlight feature.
@Hobokenmary: Wow looks great! Did you use red clay as a base?
I have just baked my second batch of fopals. The first lot I didn’t bake long enough but I didn’t realise until I had sanded and sanded but they were too soft and didn’t sand well at all.
This batch baked for a good long time and they feel very different – hard. I think they should sand up OK. Too tired to do it tonight so will have to wait til tomorrow. I’ll let you know how they turn out!
@Cara: Hi Cara, no I just used the translucent clay. I also used alcohol inks and I may have been a little heavy handed with the bits I dyed with the color called raisin. What the photo doesn’t show is how much green and blue is in the piece. Good luck with your sanding!
@Hobokenmary: I like how you have it set in a Patera. Love it!!!! I need to think outside the box more. ;)
Ooooh I LOVE real opals, and hadn’t seen a faux technique that really captured them well…until yours! YEAH!!!
I did googled real opal bracelets, and found that they’re mostly cabochons set in some sort of bezel. So this project’s Faux Opals in cabochon form vs. a round bead, is more “authentic.” To use them in a bracelet, you could make a small polymer bezel/backing for each f’opal. Then put holes in both ends of each bezel, and link them together with jump rings. You can find lots of other designs by looking at jewelry made with cabs; your creativity will be sparked and the ideas will flow…
@Phaedrakat: While I agree most opals are prepared as Cabs, I found the picture of the necklace I saw out Las Vegas, it is a $3,500 necklace done in 5.5-6 mm opal beads, I can’t figure out how to get this photo on to the comment section, but for anyone who wants to do a little legwork to see an extrodinary piece of jewelry here is the website: opalsandgemsofaustralia.com/crystal-opal-bead-necklace-556mm-gold-3500-p-103.html
This necklace left an impression on me from when I saw it over a year ago. And I will eventually figure out how to mimic this with Cindy’s technique. (I have high asperations don’t I) :)
@Sue F: That is so cool Sue! I will have to try that. I only have a teeny piece of Frost left, does it work with trans? Or only Frost?
@carolyn: I’m here to pat you on the back as well. Your work is stunning! :-) To reply to more than 1 person I reply to one and copy the message and code to my computer clipboard, then cancel reply. Then I reply to next one and paste the previous message above it. It’s a little bit cumbersome but it works.
@Brenda: I am so sorry to hear that. :-( My thoughts are with you all.
@Hobokenmary: LOL that’s too funny!
@Ken H: Oooo Ken I see why you love that necklace… it is gorgeous! I was thinking you could try and make two half spheres, do the whole technique, bake and then glue them together and bake again. Would be a ton of work, but if you made a few bigger beads it might be worth it. Another option would be to stick the flakes onto a round bead with the B&B like you do but then bake it before adding the top layer. Then you could try dipping it. May get a lot of drips, but those could be sanded off. Just an idea or two to try.
Hi @Cindy,
I’m sure it will work with normal Premo Translucent too, since they seem to be roughly equal in clarity but just slightly different in how coloured they are (or aren’t ;D). However I haven’t tried it exactly since I’m in the opposite situation to you: I have several large blocks of Premo Frost, but only a tiny bit of normal Premo Translucent!
The same kind of “caramelising” and increased clarity seems to happen with all the translucent clays regardless of brand, although they darken differently and achieve different levels of clarity. I actually think it would be really cool to very roughly marble a whole lot of different translucents together and then to gently overbake beads made from that mixture as described in my earlier post, as that would likely replicate the imperfections and random cloudiness that I think are a lot more interesting than perfectly clear “gemstone quality” stones.
(I’ve actually done a similar kind of multi-brand translucent thing before, but using small amounts of opaque+translucent and mica+translucent clay mixtures as well as various plain translucents, with a technique more like faux turquoise: chopping different mixtures of the clays up with a blade, covering the chopped pieces lightly with thinned white acrylic paint, roughly combining the different mixtures, and then pressing portions of this together to make beads. The end result of that was lovely and looked like a stone composed of various types of large crystals in warm but pale neutral colours.)
You could also use a little bit of alcohol ink to further colour parts of the clay before mixing/marbling. And you could cut the mixture and insert very fine sheets of clay (e.g. a different translucent or translucent tint, or an opaque sheet) — or even brush on a thin layer of acrylic paint in a suitable colour — to replicate the planar fractures and linear inclusions that you see in some stones (if you did this, you’d probably want to cut your raw bead shapes out of the lump of prepared clay instead of the normal “pull a pinch off an roll it”, to preserve the straight/planar features added).
I just love making faux gemstones! ;)
(And I really will have to find the notebook where I recorded those particular results!)
Sue
@Marion K: Hi Marion! I don’t want to say too much, or give Cindy’s video secrets away in this “open forum.” Still, did you use Bake-n-bond as shown in the tute? You mentioned using certain Fimo glitter clays…was that instead of flakes? Did you limit the amounts, & did you mix w/regular translucent?
If you followed the steps in the video, then you probably need to sand more, as that’s where alot of members had difficulty (the Bake-n-bond bakes up really hard, so start with a heavy grit…or break out the Dremel.) Also, try reading comments on this page & other “opal” posts for more tips…
Good luck!
@Phaedrakat:
No bake and bond, couldnt get it overhere, have to try get it from somewhere,more searching to do,hahaha.
And i didnt use the fimoglitter instead of the flakes but with flakes.
I think maybe i put too much of the glitterclay in the translucent ?
But i wont give up so easy, will try again until i get something that looks like an opal.
Thanks Phaedrakat
@Ken H: Wow, that is stunning, Ken. I can see the attraction…
What about wrapping the “extra stuff” around a round bead? You know in the video where Cindy takes the excess B&B and flakes and smears them on the parchment to bake for ‘other projects’? She mentions using it for inlays, but maybe you could make lots of that, and wrap it around a bead made with trans/white with flakes, already shaped into a round shape (maybe even pre-baked and attached with more B&B?) Just another idea…
Thanks for the link, Ken H! Just to be different (which is normal for me) I actually don’t really care for the necklace… but I totally love the raw opal chunks that it’s sitting on. The deeper colours peeking out of the matrix… that’s what I’ll be trying to replicate!
@Ken H: Wow, I can’t imagine a reason for someone to say they don’t care for this necklace! The opals are brilliant! There are people who prefer other styles — this is a classic, knotted necklace with gold clasp. A simple piece in design, but anything too elaborate might detract from the glossy beauty of the gorgeous opals. I can only imagine how they look in “person.” Good luck in your endeavor to create fabulous, round “fopals”… :D