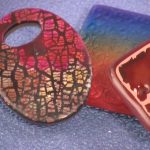
Vol-024-3 Ultradome UV Epoxy Resin PcT Tutorial (Intro)
Video #156: Thanks for testing the UV Resin, Cindy. Perfect for Part III to a bumper May line up of video lessons!” ~Mary-U
More...

** This post is an introduction to one of our paid tutorials.
You wanted it… now you got it!! It is time to start taking your polymer clay skills to the next level by learning how to add beautifully shiny UV Epoxy Resin coatings to your flat charms and pendants!
cheryl v
Ah Cindy – you are amazing. I had been wanting to learn to make faux opals out of polymer clay and I found you just before you did the opal tut. For years I have been wanting to learn how to use resin in jewelry and here you are, coming to my rescue again!! Please count me in as a YES also. I can’t wait! Thank you from the bottom of my heart.
elizabeth s
I am super excited about this, both the product and the tut. I love the effect of resin covered pieces but had experienced so much frustration from the products I tried on my own that I gave up.
phaedrakat
I know when Cindy’s video comes out, it will show me how to use resin in the simplest way… you know how she “makes the mistakes, so we don’t have to.
Transcript coming soon...
Transcript coming soon...
Our goal is to translate these videos into as many languages as possible. If you are interested in helping with this initiative, then please do contact us and we will figure out a way to make it worth your while :)
Shareable Images


Want to chat about today’s post? That’s what the comment section below is for. Scroll Down… We’d love to hear from you!
Or... if you would like to request a topic for a future post, here is the link to do that… PcT Suggestion Box
Sorry about your piece breaking! I’ve never tried to add the ultra dome to both sides of a piece before, though I’ve considered it… I’m curious to see what others might have to say about this.
Thanks Katy for your response too! I too am curious if others have applied ultra dome to both sides & if they have any tips especially for making sure the resin doesn’t drip through the hole for the pendant piece.
Hi Everyone,
I just used Ultra dome Resin yesterday for the first time, it was very easy & I love the results, it was on my blend & switch piece & the resin really makes it pop!! I did have one problem however & wondered if you have any tips. The problem happened when I put the resin on the other side of my piece (it was a flat piece btw)….it was stuck to the Hamma perler pegboard. I had to pry my piece off after putting under the lights and I actually broke my piece ugh! Now I am wondering if I shouldn’t put resin on both sides of my pieces or if I should have waited a day or so before applying. (I think I had waited 30 minutes.) I am making pendants & also think that the resin may have dripped through the hole, is there a way to plug the hole when doing the other side? Is the silicone mat is better to prevent the pieces from getting stuck? Does anyone have any tips to prevent this from happening?
Thank you!
Chris
Hi, Chris, I had the same thing happen to me, too. The resin probably dripped over the edge and it became stuck to the pegboard. Making sure you put it on a level surface and move it very carefully into the UV light. Once the one side is cured and it is hard it won’t “soften” or get “sticky.” Once it is cured it is cured. Just make sure you cure it for the correct amount of time. If the resin is not really fresh, give it ten more minutes or so to cure. I had some UV resin that was 1 1/2 yr old and it cured at 45 minutes. A lot longer but it still worked! Cindy even told me that if you miss a spot you can cover the whole piece again and you can “fix” your mistake! (I haven’t tried that on my butterfly pendant yet, Cindy, but it is on the list!) If you are able to get it off without breaking it you might still be able to salvage it. I hope that helps. Good luck!
Thanks Catalina! I think your are right as far as trying to not to move it too quickly & keeping it level. I did move my piece from where I applied the resin over to the UV light so I think it is very possible that the resin dripped to the other side, plus I think that some could have dripped inside the hole. I was unable to salvage the piece it really had stuck to the pegboard & really had to pry it loose, but that’s OK as I have learned something!! It is nice to know though that you can fix mistakes so I appreciate you passing along Cindy’s tip!
Thanks again:)
Thank you Cindy for all your help,
I just love your tutorials. For all that is out there on the web yours are by far the best.
Stella
Thank you so much Stella for your kind words!! That makes me very happy to know that the videos are of such a great value for you. Thanks for taking the time to let us know! :)
Hope I’m not asking you to repeat yourself, but hours spent looking for an answer finally drove me to YOU! You are a wizard and have (or will get) all the answers…thank goodness!
I’ve been using Easy Cast epoxy resin for coating round beads. I stick them on a tooth pick, coat them (after wiping with alcohol) and stick it in foam mounted on my rotissere. After a couple hours of rotating they are set enough that i can turn it off and let them sit till hard. Has worked well till this summer… in AZ. Sometimes it’s 110 in the shade on the porch….and lately the resin has been pooling somewhere on the bead by pulling away from edges. Does anyone have the answer? I do 50, give or take, beads at a time and the last two batches have shinny spots and dull spots. Most unacceptable!!!!! I measure and mix properly (what else) and this labor intense labor of love is out the window. HELP!
Hi Julie,
This is a guess, but as I understand it the handling and curing characteristics of both 2-part and UV-curing resins will change if they are too old. Proper storage can extend the shelf life, but they don’t last indefinitely.
I haven’t used the Easy Cast brand myself so I don’t know what it does as it ages, but is it possible that your resin is just too old now? Let us know if you find an answer, anyway!
Sue
Sue; Thanks for your reply. Just bought the easy cast from Michael’s which is a busy store. And it seems to me that their inventory should not be “old”, but what do i know.
Our weather is finally cooling down a bit so we will see if that changes things although my mentor does not think so.
Am attending my first guild meeting this weekend and will ask them….maybe someone will have an answer.
Will let you know if i get any info.
Again…thanks.
Julie
Hi Julie, Sue may be onto something… often issues with resin can be due to the age of the product, so if it is a product that you are very familiar with and you know you haven’t done anything different with the mixing or the curing, then it may be the case of being too old.
I love your rotisserie idea btw! That was very ingenuitive! Love it when people are inventive and come up with mechanical solutions to their problems.
Sorry to hear your resin is causing you problems though. DO hope you can get to the bottom of it soon. DO come back and let us know how it goes!
Wow!! What a great tutorial! I have a UV lamp which I purchased for making polymer stamps and I am SO happy to have another use for it! I had no idea how to use the UV resin I bought but this lesson answered all my questions! You rock Cindy!!
Thanks Denise! That’s funny I have been wanting to make polymer stamps with my UV Lamp. What brand of polymer plates do you recommend?
Check out the Teresa Collins Stampmaker at thepapergourmet.ca They have the different liquid polymer packets but you also need the magnetic frame to squish the liquid nice and tight. You have to make a B&W negative on transparency paper – the white will harden into your stamp and the black will stay liquid and you can just wash it away. Hope this makes sense!!
Denise, wow, thanks for the link. That Teresa Collins Stampmaker System sure looks like fun.
Nice that it allows you to use either an ink jet or laser printer to get the images.
I just made a heart shaped uv resin pendant and wanted to make a polymer clay backing. I was going to pop it into the oven when I wondered if you can bake uv resin? I’m thinking you can’t but I thought I would ask.
I can’t see why it wouldn’t work Catalina. But just like everything you don’t know the answer to, it is always a good idea to do a quick test yourself, on a small sample piece. Do come back and let us know how it goes!
Well, I tried it and the clay cracked. I think maybe the resin expanded an caused the clay to crack. I’m out of resin so I will have to try again later. Plus it did get dark. And I had dried flowers embedded into the resin which discolored, too. Maybe not a good thing to do.
Well that is disappointing Catalina. :(
Was the UV resin, Ultradome or something else? Did the resin itself darken and if so how much? I’m not too terribly surprised that the flowers discolored. They usually change when they heat up… like in the rose petal beads. But I am surprised the clay cracked. How was it attached and how thick was it?
You can learn so ouch from these kinds of testing experiments. Hopefully the resin piece wasn’t too important to you. Thank you so much for coming back and letting us know how it went.
Hi Everyone, This is my first time posting here and was eagered to let you know about my new 36watt nail dryer UV lamp for $20. I bought it before reading some of the replies here regarding the timer some nail UV lamps have which might allow only 2-3 minutes of heat time and this really discouraged me because mine has a 120sec and 180sec timer. What I didn’t see was the words “timer off” on the side of the timer, I just clicked top or bottom for the120 or 180, but then when I balanced the button to timer off, the lamp stayed on as long as I wanted, so that made me very happy. I’m telling you this in case some of you have a similar one with a timer and think that you might have bought the wrong one. I haven’t tried to heat anything yet, but will soon, I’m just waiting for my other products to arrive. The name of my UV lamp is USpicy 36W mail UV Lamp Acrylic gel and shellac curing light timer dryer SPA quipment – I got this from Amazon. This equipment is for hands and feet and you can slide the base in and out. If anyone has any negative experience with this machine, I appreciate your input, thank you.
It is so nice to see you here Vivian, Welcome! Thanks for posting such a helpful comment. I am sure everyone will appreciate you taking the time to let them know about that button trick. What a great deal you got on the lamp as well!
Hi Cindy
I purchased Lisa P UV resin and now I have your tut on it.. have not had a chance to watch it yet.. is there anything I should do differently when using hers.
Hi Cindy:
Can I use the uv technique you teach with the Lisa Pavelka Magic Gloss? I am wondering if is similar to the product you use.
Yes Ines, you can use any brand of UV Resin for this technique. There are subtle differences between brands such as viscosity, doming abilities, whether they pull from the sides and cost (a big one!). You’ll find the Ultradome UV resin I show is far cheaper than the other brands you mentioned. But the basic principals are pretty much the same. Hope that answers your question!
Hi everyone, hope you’re having a wonderful Friday.
I purchased and watched the UV Resin video and have a question that I haven’t found the answer for. Where the flame is being used, is this touching the resin directly or is it held a small distance away? In the video, it looks like it might be touching, but I couldn’t be sure.
Thank for the help :)
Hi Angela, wave the flame just above the surface of the resin to pop the bubbles. If it touches the surface briefly, it usually isn’t a problem but if you have it touching for too long, you can scorch the resin. Hope that helps!
Hi Patricia and Dorothy,
Terry Morris, the supplier for the Ultra Dome Resin I have been using, posted an answer to this question in another thread. The link by my name will take you there.
Here are words I typed into the search box at the top of the page to find this answer fairly quickly: “curing uv resin sunlight”
When you read through the other uv resin articles and comment threads that come up in the search results, you will find even more references where members have talked about their personal experiences while curing their uv resin products in the sun.
While sifting through hundreds of UV resin comments, I didn’t see the answer… How long DOES it take to cure it by using sunlight?
Dorothy
@Dorothy H: While Terry estimated an hour in his comment (direct sunlight, not thru a window,) he’s talking about Ultradome — Magic Glos is different. I imagine where you live affects time, as well…
If I want to cure the UV resin in the sunlight (I live in Florida) how long does it take.
Thanks Jocelyn,Cindy and Kat, this really helpt! I decided to order the 2part resin as sterting this new hobby is quite expensive-well any hobby is- and orderdering from the states is as well. But i hope the 2part resin will work fine as well….
Thanks for the links, its hard to find the right spot to look for stuff,hahaha, for me it is!
Hi Cindy,
Do i need a lamp or does resin dry even without sun? I cant find uv resin anywhere. I saw a set of colored resin somewhere, but no clear resin. What exactly should i look for?
Marion
@Marion K: ultradome.com
Terry should have everything you need, and instructional videos. Good luck. It’s wicked fun.
@Marion K: Jocelyn is right, Ultradome is one company that carries the UV Resin and Lamps online. You can find their products and lamps at epoxyjewelry.com as well. Maybe someone here from the Netherlands can help you with a resource that is closer to you.
Just so you know, there is tons of other information that has been discussed on this blog already that may help you out. Just use the search box at the top of the page and type in words like ‘resin’ and ‘two part epoxy’, etc. and a list of articles and comments will come up. Once you click through to an article page, a great tool to use that will help you find what you need, is the ‘Find’ feature in your browser. I use Firefox as my browser, and all I have to do is press the CTRL + F buttons together at the same time on my keyboard, and a little box pops up that that you can type in specific words you are looking for on the page.
Hopefully that makes sense and helps you to find the answers you need.
@Marion K: There are different types of resin, so it will really help to read the comments, as Cindy mentioned above, and decide which type you want to go with (or which is easier to find in your area.)
UV resins do not “dry” on their own — you need a UV lamp or sunlight to cure them. Ultradome, the brand in Cindy’s tutorial above, is a great product…at a low price. Magic Glos is a well-known UV resin (at least in the clay community.) It’s a bit more pricey, but it might be easier to get your hands on overseas (product by PC artist, Lisa Pavelka.)
Two-part (2-part) resins will harden without sunlight. Ultradome makes this type of resin, also. Other ‘non-UV’ resins you may hear things about are ICE Resin, Envirotex Lite, EasyCast, etc… Hope that helps! ~Kat
Hi ladies! I just wanted to let you all know that I found a website that sells Magic glos for $4.95 a bottle. I also purchased a uv light for $18.00. I know most of you have said the 36 watt light is better that the 9watt, but I did not want to go all out before trying out the cheaper one first. Anyway, the website is mimisgems.com They also sell the pendant frames in several finishes.
@Tiffany Morkovsky: Thanks, Tiffany! I checked out mimi’s & they have a lot of cool stuff. The Magic Glos was under “tools & supplies”, but it didn’t show a price, or a way to add it to a shopping cart (at least as far as I could tell.) Did you have to order it by phone or something? Anyway, have you made some fun stuff with your new goodies? Hope you had a lovely Christmas! ~Kat
Hi Cindy, on the UV resin, when it cures, how brittle it is – is there some flexibility so to speak or will it shatter if struck or dropped? or just a small dent? Thanks – love your tutorials – am enjoying them so much and am looking forward to hibernating this winter and playing with clay!
Janet
You are so right girls about polymer clay being the good kind of addition. No rehab needed!! :-)
@Jocelyn: Sounds gorgeous! Can’t wait until you can post some of your work on Facebook. I think Ken may have used PYMII on his Hydrangea Petal he embedded in UV Resin but you will have to check with him to be sure.
@Janet Mundziak: Terry’s UV resin is really strong, flexible and won’t chip. I put some UV Resin on a piece of fabric I had polymerized and you can bend it back and forth without any chipping or cracking at all. I suppose you could possibly mark it if you scratched it with nail or hit it with a hammer, but with normal wear it would be difficult to harm.
Just finished this process for the first time, YAY!!! No bubbles. It is a beautiful finish that domed up perfectly.
I did use Cindy’s video to the letter, and purchased all products used through Terry. Thanks to you both.
Cannot wait for spring, imbedding epoxied wild flowers in silicone mold bezels will be my passion.
Also checked on the dried stuff (pansies) sprayed thoroughly with PYM preservative spray, original colors are still clean and fresh. Has anyone used the spray on products they later successfully imbedded in Terry’s expoxy yet?
Carolyn, get better soon, because I’ll be coming back to you for more of the fixative spray soon.
That’s what I keepp telling my husband. I don’t drink, smoke or spend the day shoe shopping. My hobbies are my additction. Unfortunately, I do have quite a few. But, hey, everyone benefits from my hobbies because I give most of what I make away!
I’m so excited!! I just went to Terry’s site and bought myself a UV Resin Christmas!! I got the 36watt oven (Merry Christmas Sale), resin and all the fixins and I even got myself the micro mesh pads. After reading all of the comments, I can’t wait to try these! WooHoo!!
@Laura Z: Hi! I’m glad you’re excited! I guess Christmas comes early at your house! Just to warn you: this can be addicting!! And there is no known cure!!! :)
@catalina: That’s ok, I have lots of flat beads/pendants just waiting to be “domed”. Is that a word? LOL) Good thing I bought the big bottle of resin. Hmmnnn….there are “worse” things I could be addicted to, right?
Special Offer From EpoxyJewelry.com …
I just wanted to announce that Terry Morris (the resin guy) has let me know about a special offer he has for you guys. His Jewelry Glazing oven used for curing UV Resin is on sale for $49.00 ($20.00 savings) only until December 10th. I’ve got one myself and love it! So if this item is on your wish list, now would be a great time to get it. (Maybe you can tell Santa about this one since Christmas is just around the corner!)
To get this special deal you need to go to epoxyjewelry.com, then scroll down to the very bottom of the home page and click on the box that says “Merry Christmas” to get to the sales page.
BTW… I will be demonstrating another new product from Terry in this weeks Friday video tutorial, that I think you will all be very excited about… so stay tuned for that. The sneak peak video will get post on Thursday Dec 2 here at the blog. And the full video tutorial will be published in the members library on Friday Dec 3.
Hi Cindy
Just purchased and watched the UV epoxy video and I have one question. I assume that the piece can just be turned over and the process repeated when you want to epoxy both sides? And what about the sides of the piece? How do you apply the epoxy there? Do you just push it over the edge? Wouldn’t there be a danger of it ‘pooling’?
Love your videos. I’m trying to buy a few, but having trouble with PayPal…
Isabel
@Ken H: @Bonnie Blasingame: Thanks for the support you two!
@Isabel: Thanks! I’m glad you’re enjoying the videos It is so great having you as part of our clay family! You are right in assuming that you can do one side, cure it then do the other side and cure. As far as the sides go, unfortunately the resin is too thin to coat the sides with. For that,either sand and buff to a high shine or just use a glossy finish such as Future or Studio by Sculpey Glossy Glaze. This will tie in nicely with the resin finish.
*For any issues you may be having with PayPal make sure to email me and we’ll get that straightened out.
@ Bonnie B – welcome, your input is welcome here, on Tuesday there is a “Preview” of what the next tutorial video will be on Friday, there is usually an equipment list at the end of the post, so tomorrow you will get a sneek peek at the topic for Friday and the suggested items needed to clay along with Cindy on Friday. Again Welcome to the Family.
Hi Ken….Thanks for the info and thanks for the welcome. Gonna love it I know. Cindy is excellent and teaching, showing and doing….I am thrilled. BonnieB
Thanks for the reply. I will probably be a regular on this blog….is this a blog? LOL. I love watching the videos….I have watched EVERYONE of them just because I wanted to see it all…boy did I do that! Had no idea I would be able to learn to do the wire work! What a huge blessing! I can hardly wait to get the next tutorial. Also, how can I get whatever it is to know what the next turtorial is so I can have all supplies set out and just it do it “right along with the teacher”!!!! Yea I can hardly wait. Glad to see from Ken that I can re-resin and put under the light. I have a good uv lamp, but I also have beautiful sunshine where I can do MANY at one time…..lot to be said about “Music City USA” but this is really good. Gonna stop…I tend to write novels……Blessings, Bonnie
@ Amy – Yes you can put resined peices under the UV lights multiple times. I just completed a resin cabochon with a pressed flower embeded in it which was under the UV lights three times.
turning back to the rounded beads, do you think it’s possible to aply UV resin in several times? can I get a 3D bead covered by resin part to part. can I expose the resin several times to the UV light without problems? maybe using something as an edge?
thank you and regards
First of all I love my purchase of the entire set of back issue videos! What a joy to have a “tutor” instead of flying by the seat of my pants, wasting time, money and some pretty cool things that never got finished like I wanted….I mean really finished. Now, here is the question? Probably deemed silly by most, but I want to do it right. With this UV Resin, do you put it on both sides and the edge, curing between each step, or do you just do the one side and then sand and polish the rest. Thanks for any help here. Blessings, Bonnie
@Bonnie Blasingame: Hi Bonnie, so glad you bought all the back issues! It really is a joy having Cindy as a tutor, isn’t it? I still have a few more back issues to go until my collection’s complete, but I love them so much! Cindy’s videos are so informative, and they always inspire me…
Your resin question certainly isn’t silly! It’s great that you want to do things correctly…and a properly finished bead is very professional. How you apply the resin is entirely up to you…there’s no “right” way. You can do the top/front only, or cover the entire piece with resin. What’s important is that all sides of the piece are “properly finished”. That finish can be all resin, or sanded and buffed all over with resin on one side only.
Good luck, & have fun! :D ~Kat
@Amy: Hi Amy! Cindy answered that question in the comments above, on May 21 (4th paragraph of her reply.) I haven’t seen anything further about using resin on round beads — from Cindy or anyone else. I was hoping that someone might have some tips for using a thicker resin like Magic Glos, but nothing yet…