Using Alcohol Inks To Tint Liquid Polymer Clay
Video #743: Pinata Alcohol Inks mixed with Sculpey Liquid Bakeable Clay, Kato Liquid Polyclay, Fimo Liquid Gel and TLS.
More...

IN THIS POST: — alcohol inks — liquid polymer clay — translucent — translucent liquid sculpey — tls — kato polyclay — fimo liquid — (Topics marked with an asterick* are discussed in the Comments Section below).
The reason I thought to do this testing is that Sculpey recently sent my a sample of their newest Sculpey Liquid Bakeable Clay – Pearl, which is one of their new products for 2016. You may be familiar with the Gold and Silver version of liquid Sculpey that came out last year.
Now I was thinking… since they have Gold and Silver, I thought it would be fun to have a bunch of different colors in the Pearly clay, so I experimented by mixing alcohol inks into the Sculpey Liquid Pearl.
Then I compared those mixes with the other brands of liquid polymer clay.
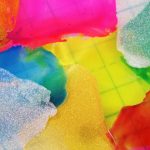
In the video, I show baked examples of Pinata Alcohol ink in the colors Senorita Magenta, Sapphire Blue and Sunbright Yellow… mixed into each of the following brands/types of liquid polymer clay… Kato Liquid Polyclay (Clear), Fimo Liquid Gel, Translucent Liquid Sculpey (TLS), Sculpey Liquid Bakeable Clay (Pearl), Sculpey Liquid Bakeable Clay (Silver) and Sculpey Liquid Bakeable Clay (Gold).
The samples were made using a pea sized ball of liquid clay and one drop of alcohol ink, that were mixed thoroughly and spread as thin as possible onto a glass tile to bake. Make sure to mix the liquid clay and alcohol ink before the ink dries, or the clay will look speckled.
Each sample was baked at 275F (135C) for 1 hour. Note that the label suggests Fimo Liquid Gel should be baked at 265F (130C), but that it will be more translucent at a higher temperature. So I baked it at 275F with the rest of the samples and saw no adverse affect.
From my tests, all the different brands tinted beautifully, though I noticed that the Kato Liquid Polyclay and the Senorita Magenta seemed to darken quite a bit. The colors with the biggest difference were the colors mixed with the Sculpey Liquid Gold, which makes sense, because the Gold particles in the clay added to the color tint. The Magenta turned it Coral, the Blue turned it teal and the Yellow made it very bright Gold.
The baked liquid clay kept it’s clarity and strength. Other than the color tinting the properties stayed the same as it was before tinting.
I also did some samples where I mixed the Yellow and the Blue together in the liquid clay’s… which basically shows that the color mixing possibilities are endless, when you start combining colors.
So go ahead and mix up a rainbow of Liquid Polymer Clay in clear or the new Pearly colors. You’re not limited to plain old translucent liquid clay anymore!
00:00:03 –> 00:00:08 Hi Guys! This is Cindy Lietz, your Polymer Clay Tutor and today in the PcT Test Lab,
00:00:08 –> 00:00:15 I’m gonna show you how to tint liquid polymer clay with alcohol ink. Now, the reason why
00:00:15 –> 00:00:24 I thought of this was that Sculpey just sent me a brand new bottle of Liquid Bakeable Clay
00:00:24 –> 00:00:30 in Pearl and this is one of their new launches for this year. And you may be familiar with
00:00:30 –> 00:00:35 the gold and silver they launched before. And I have videos on that so you wanna check
00:00:35 –> 00:00:39 that out. But I was thinking, since I have gold and silver, wouldn’t it be fun to have
00:00:39 –> 00:00:44 a bunch of different colors of the Pearly Clay so I thought I’d start experimenting
00:00:44 –> 00:00:49 with mixing alcohol inks in. Then I kinda went crazy and I start mixing with all the
00:00:49 –> 00:00:55 different brands of liquid polymer clay just to see how they would compare. So, these are
00:00:55 –> 00:01:02 the results that I have. Now, the different clays–different liquid clays that I have
00:01:02 –> 00:01:09 mixed alcohol inks into are and I’ll just kinda go in the row here. I’ve got Kato Liquid
00:01:09 –> 00:01:16 Polyclay in Clear. Now, Kato Polyclay liquid also comes in some color blends, I’m just
00:01:16 –> 00:01:25 using the clear here. I also have Staedtler Fimo Liquid Gel and that’s clear as well.
00:01:25 –> 00:01:30 I don’t think they have any other tinted ones. This is Translucent Liquid Sculpey. Now, they
00:01:30 –> 00:01:38 have changed their name to Sculpey Liquid Bakeable Clay. Now, we used to call Translucent
00:01:38 –> 00:01:46 Liquid Sculpey, TLS but I don’t think I really want to call this as SLBC. It seems too hard.
00:01:46 –> 00:01:53 So, we’ll just call it Liquid Sculpey. And this is the Pearl, this is the Liquid Sculpey
00:01:53 –> 00:02:00 Silver and Liquid Sculpey Gold. Now, I’ve kind of put all the different brands in a
00:02:00 –> 00:02:05 line straight down from the bottle there so you’ll know which ones I’ve mixed them with.
00:02:05 –> 00:02:12 And then the alcohol ink that I mixed them with is some of the alcohol inks that Jacquard
00:02:12 –> 00:02:18 sent me from their Pinata line. Now, Pinata has a ton of different colors and they’re
00:02:18 –> 00:02:24 really fun. I just thought I would keep this pretty simple by just using three basic colors
00:02:24 –> 00:02:37 and then doing mix at the end. The colors I chose were Senorita Magenta, Sapphire Blue,
00:02:37 –> 00:02:43 and Sunbright Yellow and then I took the Sapphire Blue and the Sunbright Yellow and mixed them
00:02:43 –> 00:02:49 together to make this green color. So I’ll just show you quickly how I did it and then
00:02:49 –> 00:02:53 I will show you how they ended up. These are all baked samples here but I’ll show you how
00:02:53 –> 00:03:00 I mixed them together and I’ve got a glass tile here, it doesn’t have to be orange, I
00:03:00 –> 00:03:04 just happened to have an orange one. It’s nice and smooth so it’s a nice thing to bake
00:03:04 –> 00:03:09 something like this on and that you can just peel it right up off after. I’ll just set
00:03:09 –> 00:03:17 that to the side. And all I did was–and I’ll do the new Pearl to show you what it’s like.
00:03:17 –> 00:03:23 All I did was take a pea size drop of the liquid clay and I did the same thing for each
00:03:23 –> 00:03:34 of the colors. And then I put one drop of the alcohol ink in. So here’s the one drop
00:03:34 –> 00:03:40 of the Senorita Magenta. Now, the funny thing that kinda happened when I mixed them into
00:03:40 –> 00:03:49 these into the clay is that it turned almost electric-colored. Like very fluorescent. And
00:03:49 –> 00:03:54 it doesn’t do that always when you’re using it but all I did was just mix it with a little
00:03:54 –> 00:04:02 knife. Now, notice that I mixed that one right away. If you let the alcohol ink dry a little
00:04:02 –> 00:04:07 before you start mixing it into the clay, you’ll get speckles in it and I’ll show you
00:04:07 –> 00:04:12 that in one of the samples up here where I figured that out–by messing up. Then all
00:04:12 –> 00:04:19 I did was I just scrape of this little amount and spread it on our tile to bake and I try
00:04:19 –> 00:04:25 to make it nice and thin so that we can see if it was transparent or not. I also, for
00:04:25 –> 00:04:32 some of the colors, just wipe that off. This cleans up really nicely with a baby wipe or
00:04:32 –> 00:04:36 with a paper towel and rubbing alcohol so if you’re wondering how to clean all that
00:04:36 –> 00:04:49 up. That’s a good one to do. OK, so I baked all of these samples at 275 Fahrenheit which
00:04:49 –> 00:04:55 is 130 Celsius. All of these brands except for the Fimo, so these are the brands–the
00:04:55 –> 00:05:05 Sculpey and the Kato Polyclay–they all say to bake at 275 Fahrenheit and the Fimo says
00:05:05 –> 00:05:12 to bake at 265. It’s so close and liquid polymer clays tend to like to bake a little hotter
00:05:12 –> 00:05:17 anyways. They make them more translucent so I just baked them all at 275 and I didn’t
00:05:17 –> 00:05:23 see any harm to the Fimo liquid and it was just gonna be easier for me and I baked them
00:05:23 –> 00:05:28 all for one hour. I really wanted them to be nice and clear and as strong as possible.
00:05:28 –> 00:05:37 I wanted to see how they would–whether the alcohol ink would change their color and whether
00:05:37 –> 00:05:42 they would change their consistency or anything once they were baked. So these are all the
00:05:42 –> 00:05:48 samples of the clay up here baked with no alcohol ink in them. So I’ll just kinda lift
00:05:48 –> 00:05:56 them up from the surface ’cause they’re quite clear. This is the Kato liquid clay, it is
00:05:56 –> 00:06:06 slightly yellower but it’s very very clear and very shiny. Here is the Fimo liquid. Now,
00:06:06 –> 00:06:17 it is the most clear. It is like cellophane this stuff. It is super clear and super white
00:06:17 –> 00:06:27 and not quite as shiny as the Kato but it’s really quite clear and you’ll find that if
00:06:27 –> 00:06:33 you bake on a glass–shiny, glass tile, the back side is super shiny. And the top side
00:06:33 –> 00:06:38 is a little bit more matte on all of these ones especially the Sculpey liquids. OK, so
00:06:38 –> 00:06:46 here’s the TLS, translucent Sculpey. It isn’t quite as clear as the other two but it is
00:06:46 –> 00:06:52 quite translucent. It’s super shiny on the back side but a little bit matte on the front
00:06:52 –> 00:07:02 side. Now, here’s the new Pearl. It is really pretty and sparkly. Hopefully, the camera
00:07:02 –> 00:07:06 picks that on that. It’s just got a real nice shimmer. It looks like it’s got PearlEx powder
00:07:06 –> 00:07:13 in there and something very similar and the Pearl is quite neutral, it doesn’t have–it’s
00:07:13 –> 00:07:21 neutral, it doesn’t have real color to it. It’s just pearly kind of tint to it. Now here
00:07:21 –> 00:07:27 is the Silver, it’s pretty similar to the Pearl, only it has a silvery gray kind of
00:07:27 –> 00:07:33 tint to it. Now, these are still quite translucent so they basically just taken the Translucent
00:07:33 –> 00:07:41 Liquid Sculpey and added Mica powder to it. Now, here is the gold and it is obviously
00:07:41 –> 00:07:49 more gold than the rest so you can see it when you mix in the alcohol inks that the
00:07:49 –> 00:07:56 gold one is affected by the–it does shift in color. OK, so here are all the colors baked
00:07:56 –> 00:08:05 up. I did notice that the Kato liquid clay in the pinks changed color slightly. It looks
00:08:05 –> 00:08:12 a little darker. These other ones like the Fimo liquid almost–it is still clear but
00:08:12 –> 00:08:18 when you hold it in an angle, it’s quite orange, kind of fluorescent. I’m hoping the camera
00:08:18 –> 00:08:26 picks that up too. When you see it at an angle, it has a very cool look to it. The liquid
00:08:26 –> 00:08:33 Sculpey, same thing. Look at how it looks with that Senorita Magenta in there. It has
00:08:33 –> 00:08:41 a very fluorescent kinda cool look to it. Now with the–it is very pretty with the Pearl
00:08:41 –> 00:08:49 as well. It gets a little bit darker with the Silver and then it goes a little bit more
00:08:49 –> 00:08:53 coral. Now the camera, I don’t know if you’re gonna be able to see any of that but it looks
00:08:53 –> 00:08:58 a little bit more coral mixed with the gold which makes total sense with all the gold
00:08:58 –> 00:09:05 particles in it. Now, here’s the blue line here. It might be fairly obvious to see the–I
00:09:05 –> 00:09:14 don’t wanna go through too picky. The Gold looks fairly teal when it’s mixed with the
00:09:14 –> 00:09:21 blue so it got quite a bit darker. Now here is the–I’ll go back over here to the Fimo,
00:09:21 –> 00:09:28 let’s put this up. The Fimo, here’s the one where I didn’t, I mixed it after it got a
00:09:28 –> 00:09:35 little too dry and see the dry particles of the alcohol ink still stayed quite speckled.
00:09:35 –> 00:09:42 It has a very cool look but it isn’t quite what I meant to do and you’ll see that it
00:09:42 –> 00:09:49 isn’t a Fimo thing, it’s just a “me” thing because the yellow here is really really clear.
00:09:49 –> 00:09:54 There’s no problem, I mixed that one a little faster than I mixed the other ones. I thought
00:09:54 –> 00:10:00 I was being smart by putting drops all the way along and obviously, not. Now this one
00:10:00 –> 00:10:05 here, you’ll see, is quite a bit different color. I think that was user error. I think
00:10:05 –> 00:10:11 that what I did was maybe put a bigger drop of the blue and a smaller drop of the yellow
00:10:11 –> 00:10:16 on this one because I can see bits of the other color green in here that’s much more
00:10:16 –> 00:10:23 similar to this. So kind of ignore the color shift there. And then all these other colors,
00:10:23 –> 00:10:32 the Pearl and the Silver look pretty close here but it looks a lot yellower here with
00:10:32 –> 00:10:43 the Gold. Oh and here’s one big difference. This particular one, I added the yellow ink
00:10:43 –> 00:10:49 to the gold, it really got a nice, bright, rich gold color so that was very effective.
00:10:49 –> 00:10:55 I really like that. Now, let me just show you quickly–I made a little bit of thicker
00:10:55 –> 00:11:01 versions of these with the Pearl clay because this is what I was testing in the first place
00:11:01 –> 00:11:11 and when it’s in a thicker amount, it looks more pearlescent and less translucent so you
00:11:11 –> 00:11:17 can use this in a lot of really cool ways and I’ve done another video with the Gold
00:11:17 –> 00:11:22 and Silver liquid polymer clay where I’ve used it in molds and stuff and it’s quite
00:11:22 –> 00:11:28 cool. So you can use these in lots of different ways. We also got a video on comparing the
00:11:28 –> 00:11:33 different liquid or the translucent liquids so you may wanna check that one out as well.
00:11:33 –> 00:11:38 So I hope that was interesting for you that you learned a lot. Go ahead and go out there
00:11:38 –> 00:11:46 and make, make all kinds of really cool tinted liquid polymer clays with your alcohol ink
00:11:46 –> 00:11:50 and as you can see, you can mix colors as well so you don’t even have to be limited
00:11:50 –> 00:11:56 to the number of alcohol inks that you have. So you are going to make a beautiful rainbow
00:11:56 –> 00:12:03 of lovely lovely liquid colors, alright? So I hope you enjoyed that and if you did, do
00:12:03 –> 00:12:08 let us know if you like this video. If you’ve got a suggestion for a product you’d like
00:12:08 –> 00:12:13 me to test, a book you’d like me to review, a technique you don’t know how to do, make
00:12:13 –> 00:12:18 sure to leave those in the comment section below and don’t forget to check out the rest
00:12:18 –> 00:12:23 of our videos. We have tons and tons of them that may have the answer for your polymer
00:12:23 –> 00:12:26 clay question. Alright? We’ll see you next time and bye for now!
Our goal is to translate these videos into as many languages as possible. If you are interested in helping with this initiative, then please do contact us and we will figure out a way to make it worth your while :)
Resource Links:
- Related Video: Gold And Silver Tinted Liquid Sculpey
- Related Video: Comparing Sculpey, Kato and Fimo Liquid Polymer Clays
- Related Article: Liquid Sculpey vs Studio by Sculpey Bake and Bond
- Related Video: New 2016 Sculpey Souffle Colors
Resources marked with a double ** asterisk are affiliate links. If you click on them and decide to buy something, we may receive some compensation. This does not affect the price you pay in any way. What it does do, however, is helps us to continue providing free videos for you, here at the PcT website. Using our links to purchase your tools and supplies, is always greatly appreciated.
Sponsored Ads & Special Promotions
Shareable Images


To share this full blog post anywhere on the web that allows links in comments, here's a shortened url to copy and paste...
>> https://mypct.ca/v743 <<
Want to chat about today’s post? That’s what the comment section below is for. Scroll Down… We’d love to hear from you!
Or... if you would like to request a topic for a future post, here is the link to do that… PcT Suggestion Box
I’m slowly moving my brand over from FIMO to Sculpey only because I find that for some reason Sculpey is the way to go in Canada compared to FIMO which was popular to use in Australia so I am figuring it’s something to do with the climate. I had a stash of FIMO that I brought over with me in the shipping container!
Atleast the kids are all happy to work with my FIMO stash stock but not so happy conditioning it in their little hands ..mum to the rescue tho – LOL!
I’ve been wanting to create with Alcohol inks too… so thanks so much for posting your tute on this…
I am thinking it probably has more to do with the fact that Sculpey is an American company so most of us artists here in North America have been using it for years and are used to the properties. It’s color mixing system is much easier, since it is based on artist colors. Also, Premo doesn’t stain your hands as badly so it doesn’t transfer the colors to one another as easily either. They are both good clays though and make beautiful things. I am glad you are enjoying the tutorials Lolla! :)
Thank you Cindy that is great info! Will translate it to send to my French fiends.
Hello Hermine – If you are creating a text transcript of the video that fairly closely matches Cindy’s voice track, we could probably figure out a way to convert your translation into French subtitles. Then your friends who don’t speak English, could select the French subtitles as an option to show right on the video while it is playing.