How To Get Shiny Polymer Clay Using Renaissance Wax
Video #456: Roadtrip #2-05 (WA): “Just Like Butter” (to the touch)… is the reaction you want to hear.
More...

IN THIS POST: — finishes — varnishes — sprays — glaze — sealers — wax — paste — rubs — sanding — abrasives — buffing — finishing — polishing — buttery — (Topics marked with an asterisk* are discussed in the Comments Section below).
Topics Covered In This Video:
- In today’s PcT Roadtrip video, we visit with KaronKay Cowger again, in Spokane, Washington.
- When we arrived at Karon’s place, I asked if there was anything she could use a little help with. “I’m having trouble getting any shine from my Renaissance Wax,” she said. “It’s just flat!”
- So in today’s video I explain to Karonkay, how Renaissance Wax works and the reason why she wasn’t getting any shine on her polymer clay beads.
- Here are links to a couple of other videos as well, that you will also find helpful… Renaissance Wax For Finishing Polymer Clay and JoolTool Buffing Polymer Clay
- When you are using any kind of wax type finish on your polymer clay pieces, you want to make sure that your piece is well sanded and fairly shiny before adding the wax.
- Now, Karon had had done a good job with the sanding and buffing, so her pieces did feel nice and smooth. But… she was still having difficulty getting a high shine when she was applying the wax and doing the final buffing.
Watch the video to find out how we got to the bottom of this mystery…
00:00:03 –> 00:00:07 Hi guys, its Cindy Lietz, your Polymer Clay Tutor, and today’s Mini Tute, we are gonna
00:00:07 –> 00:00:11 do a little demonstration with some Renaissance Wax.
00:00:11 –> 00:00:16 I did a full product demo on this a little while ago, but we’re gonna show you a couple
00:00:16 –> 00:00:17 of things.
00:00:17 –> 00:00:24 I am here with Karon Cowger, we’re in Spokane, and we’re still in the PcT Road Trip, this
00:00:24 –> 00:00:29 is our second Road Trip, and Karon was saying… when I got here I asked her if there was anything
00:00:29 –> 00:00:34 that she could use a little bit of help with, and you were saying you couldn’t get the
00:00:34 –> 00:00:36 Renaissance Wax to show much of a…
00:00:36 –> 00:00:37 (KC) Shine.
00:00:37 –> 00:00:38 (CL) a shine.
00:00:38 –> 00:00:40 (KC)It doesn’t shine, it’s just flat.
00:00:40 –> 00:00:47 (CL)And the reason for that is…first of all, what you wanna do when you’re using
00:00:47 –> 00:00:54 any kind of wax type finish for on top of your Polymer clay, you wanna make sure that
00:00:54 –> 00:01:01 the base that you have is already fairly shiny, like you’ve sanded and buffed it quite well.
00:01:01 –> 00:01:05 Now she has sanded these pieces very well, but then you also had another issue, you said
00:01:05 –> 00:01:08 you couldn’t get it to shine at all, (KC) Right.
00:01:08 –> 00:01:14 (CL) and I’m not really sure why, but what I’m gonna do is take a couple…she’s
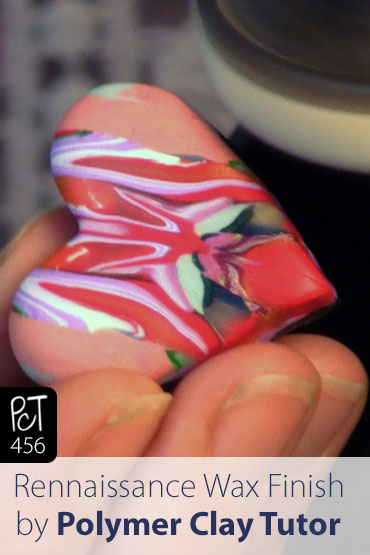
00:01:14 –> 00:01:19 got a couple of little sample hearts here, with some…it looks like a Natasha bead technique.
00:01:19 –> 00:01:22 (KC) It is, that is what it is.
00:01:22 –> 00:01:26 (CL)That’s what it is, and they feel really smooth, so they should be bringing up a shine,
00:01:26 –> 00:01:31 I’m gonna see if…I’m gonna use my…I’m gonna use my JOOLtool felt wheel here, and
00:01:31 –> 00:01:36 see if I can bring up a shine, and then we’ll put the Renaissance Wax and see if we can
00:01:36 –> 00:01:39 get something going on here for you, we need to solve this mystery.
00:01:39 –> 00:01:40 Now…what’s that?
00:01:40 –> 00:01:42 (KC)You’ll do it…I know it.
00:01:42 –> 00:01:44 (CL)You’re pretty sure?
00:01:44 –> 00:01:49 Alright, so I’m just gonna…this, like I said in another video, this is not where
00:01:49 –> 00:01:54 you’d put a JOOLtool, you’d put it on a lower table so that this wheel was just
00:01:54 –> 00:02:00 down below you and not sitting up here by your face, but this is the way it is in this
00:02:00 –> 00:02:02 particular spot we’re filming.
00:02:02 –> 00:02:07 So, I’m just gonna show you, I’m gonna bring up the speed a little bit and we’ll
00:02:07 –> 00:02:11 see if we can get a shine on here, ‘cause you did sand it through all the grits, oh
00:02:11 –> 00:02:12 yeah…see?
00:02:12 –> 00:02:13 (KC) I did.
00:02:13 –> 00:02:14 (CL)With only a few seconds.
00:02:14 –> 00:02:15 (KC) As simple as that.
00:02:15 –> 00:02:19 (CL)So maybe…I don’t know, what were you using to buff it…by hand?
00:02:19 –> 00:02:20 (KC)Yes.
00:02:20 –> 00:02:25 (CL)By hand, okay well I guess you’re not moving your hand as fast as this…you’re
00:02:25 –> 00:02:28 moving your hand a little slower.
00:02:28 –> 00:02:34 Yeah, no I can get a shine on here, so I’m getting a shine with…can you see that Doug
00:02:34 –> 00:02:35 at all?
00:02:35 –> 00:02:37 Is it picking up?
00:02:37 –> 00:02:43 Okay, so just a little bit of shine here, we’ll get on here, the smoother this piece
00:02:43 –> 00:02:48 is before you put the wax on, the higher the shine you can get the wax to do.
00:02:48 –> 00:03:00 And what wax does is it fills all those little micro pores and micro scratches in the surface,
00:03:00 –> 00:03:06 and then what it does is it makes the light reflect off of that, right?
00:03:06 –> 00:03:10 So shine is only coming because the light’s coming and bouncing off the surface, so if
00:03:10 –> 00:03:16 you have a bunch of little cracks and crevices in something, it’ll be more matte, the light
00:03:16 –> 00:03:19 will sort of get lost in the little crevices.
00:03:19 –> 00:03:24 So that’s how that works…you know, that’s my layman’s terms for science, non-scientific
00:03:24 –> 00:03:25 science.
00:03:25 –> 00:03:28 (KC) Makes sense to me.
00:03:28 –> 00:03:33 (CL)Now I’ve got some of this Renaissance Wax, a nice cotton cloth will work, I’ve
00:03:33 –> 00:03:37 also got a little piece of paper towel, you need almost nothing as far as the wax goes.
00:03:37 –> 00:03:45 I just love this wax, as you can see, in fact, I almost wanna put a moratorium on all sloppy
00:03:45 –> 00:03:54 glazes, I want that to be banned, because when you properly sand and buff or wax your
00:03:54 –> 00:03:56 pieces, it feels amazing, doesn’t it?
00:03:56 –> 00:03:57 (KC) It does.
00:03:57 –> 00:04:02 (CL) Okay, so I’ve got a little bit of wax on here, in fact I should probably get you
00:04:02 –> 00:04:03 to do one alongside here.
00:04:03 –> 00:04:08 (KC)That’s okay…this one’s not that good.
00:04:08 –> 00:04:12 (CL)Okay, so we’re gonna let this dry a second, and then just put it under the buffing
00:04:12 –> 00:04:19 wheel again, but you could also just do…can you see, it’s even gonna do it by hand here,
00:04:19 –> 00:04:22 if I just buff this by hand now.
00:04:22 –> 00:04:23 (KC) Amazing.
00:04:23 –> 00:04:24 (CL)It’s working right?
00:04:24 –> 00:04:25 (KC)Oh, I wanna see that do it.
00:04:25 –> 00:04:26 (CL)You wanna see it?
00:04:26 –> 00:04:29 (KC)Only because I put it in a corner and now it’s out.
00:04:29 –> 00:04:36 (CL)Now you’re excited about it, it is a super neat tool, I love it because it’s…well,
00:04:36 –> 00:04:41 it works, it’s quiet…it doesn’t take up much space…now I’m sounding like that
00:04:41 –> 00:04:47 Sham wow guy, and it slices and dices…okay, now it doesn’t slice and dice as far as
00:04:47 –> 00:04:48 I know.
00:04:48 –> 00:04:55 Okay, ooh, look at that…see…do you see that?
00:04:55 –> 00:05:02 Okay, so you have all of the…what you need now, you just have to get a felt wheel for
00:05:02 –> 00:05:07 it (KC) Uh huh (CL)But you have the tool now, and the right wax, and you’re going to have…
00:05:07 –> 00:05:08 (KC) Oh, my.
00:05:08 –> 00:05:12 (CL) with almost no effort… you see that?
00:05:12 –> 00:05:14 Not that it didn’t take you effort to get here in the first place, (KC) Oh, my (CL)
00:05:14 –> 00:05:17 But see how…and how does it feel?
00:05:17 –> 00:05:21 (KC)Just like butter, just as smooth as…
00:05:21 –> 00:05:26 (CL)Now, one thing I wanted to bring up with you guys…customers…if you’re selling
00:05:26 –> 00:05:31 your pieces at all, or giving them away as gifts, people feel your work, they can’t
00:05:31 –> 00:05:32 help it.
00:05:32 –> 00:05:37 Anything that’s smooth or…people are…well a big percentage of people are tactile.
00:05:37 –> 00:05:43 So if they run their hand across your piece and it feels gritty and kinda…the quality,
00:05:43 –> 00:05:48 it mentally will go back, even if it looks gorgeous, so it should feel good.
00:05:48 –> 00:05:53 Now every surface doesn’t need to be glossy and smooth, that isn’t the point, it should
00:05:53 –> 00:05:59 just feel good, like if it’s meant to be bumpy and have some texture to it, it shouldn’t
00:05:59 –> 00:06:02 feel like there’s… it’s dirty or gritty.
00:06:02 –> 00:06:04 (KC)Yeah, yeah, (CL) and…
00:06:04 –> 00:06:05 (KC) Turtle.
00:06:05 –> 00:06:06 (CL)What’s that?
00:06:06 –> 00:06:07 (KC)Turtle.
00:06:07 –> 00:06:10 (CL)Yeah, now, your little turtle…she’s got a turtle here that she’s been working
00:06:10 –> 00:06:11 on…oh, it’s so cute.
00:06:11 –> 00:06:14 (KC)He is cute, he’s not done.
00:06:14 –> 00:06:15 (CL)He’s not done.
00:06:15 –> 00:06:20 (KC)Yet (CL) Yet, so when it’s unfinished… like it’s not finished yet, we did play
00:06:20 –> 00:06:24 around with it a little bit with some of these other buffing wheels and stuff, you can feel
00:06:24 –> 00:06:29 there’s…it’s not quite finished, and what I think a lot of people do, is they don’t
00:06:29 –> 00:06:31 go far enough.
00:06:31 –> 00:06:38 They go 95%, 98% but they don’t take that just a little bit extra time to finish it
00:06:38 –> 00:06:39 off.
00:06:39 –> 00:06:45 And your pricing, your value, your…the quality that… you’ve given it away to your friend,
00:06:45 –> 00:06:52 your family or something, the value just goes way up if it feels amazing.
00:06:52 –> 00:06:57 And you’re just about there, you just… you’ve got a great design, a cute little
00:06:57 –> 00:07:02 guy here, when you finish him up with the sanding, and the buffing and the waxing, it’ll
00:07:02 –> 00:07:03 be…
00:07:03 –> 00:07:04 (KC)Hurry Cindy, hurry.
00:07:04 –> 00:07:08 (CL)Yeah, I’m figuring out the right kits for Polymer clay so that it’ll be perfect
00:07:08 –> 00:07:13 for all of us to use, it is a little on the pricey side, so not everyone will be able
00:07:13 –> 00:07:17 to get this, but for anyone that’s doing a lot of work…
00:07:17 –> 00:07:20 (KC) Yep (CL) it will make a big difference.
00:07:20 –> 00:07:24 So, now have you got the…is the Renaissance Wax issue dealt with?
00:07:24 –> 00:07:26 (KC)I’m good, uh, huh, I’m…
00:07:26 –> 00:07:30 (CL)So if you put it in a matte surface and it’s not shiny, it will stay kind of matte,
00:07:30 –> 00:07:35 (KC)Okay (CL) you can get a bit of a sheen, like a satin sheen, but you can’t get that
00:07:35 –> 00:07:41 high gloss unless it’s glossy underneath…unless its shiny and smooth underneath, because otherwise
00:07:41 –> 00:07:46 that wax is just gonna sit in those little crevices and the light won’t bounce off
00:07:46 –> 00:07:47 right.
00:07:47 –> 00:07:49 (KC) Right…I need one of those.
00:07:49 –> 00:07:50 (CL)You got that?
00:07:50 –> 00:07:53 Alright, so I hope that was helpful for you, and if it was, make sure to press that like
00:07:53 –> 00:07:55 button that would be great.
00:07:55 –> 00:08:01 And my question for you today is, have you tried using a finish like Renaissance Wax,
00:08:01 –> 00:08:06 and had issues with it…and it wasn’t as shiny as you thought, and do you think this
00:08:06 –> 00:08:08 will be a helpful tip for you.
00:08:08 –> 00:08:13 Leave your comment in the comment section below, that would be great.
00:08:13 –> 00:08:17 And don’t forget to subscribe, we have new videos that come out every week and you’re
00:08:17 –> 00:08:18 not gonna wanna miss a thing.
00:08:18 –> 00:08:20 So, it was great having you here.
00:08:20 –> 00:08:22 (KC)Thanks for coming.
00:08:22 –> 00:08:23 (CL)See you next time, bye for now.
00:08:23 –> 00:08:24 (KC)Bye.
Our goal is to translate these videos into as many languages as possible. If you are interested in helping with this initiative, then please do contact us and we will figure out a way to make it worth your while :)
Resource Links:
- Related Video: Renaissance Wax For Finishing Polymer Clay
- Related Video: JoolTool Buffing Polymer Clay
- Amazon: Renaissance Wax **
Resources marked with a double ** asterisk are affiliate links. If you click on them and decide to buy something, we may receive some compensation. This does not affect the price you pay in any way. What it does do, however, is helps us to continue providing free videos for you, here at the PcT website. Using our links to purchase your tools and supplies, is always greatly appreciated.
Sponsored Ads & Special Promotions
Shareable Images


To share this full blog post anywhere on the web that allows links in comments, here's a shortened url to copy and paste...
>> https://mypct.ca/v456 <<
Want to chat about today’s post? That’s what the comment section below is for. Scroll Down… We’d love to hear from you!
Or... if you would like to request a topic for a future post, here is the link to do that… PcT Suggestion Box
Hi Cindy. I think I heard you say that you should sand/buff everything you make to give it that finished feel. Can you tell me how to do that on, say, something like a figurine? It has texture that I don’t want to file off, but if I don’t sand/buff, it looks and feels unfinished……very unprofessional. :-/
Hi Brenda, not everything has to be sanded and buffed to look good, just anything that was meant to be smooth and/or shiny. And of course the finish should not be filled with flaws like fingerprints, nail marks, lint, dirt, rough edges (unless you want them there). Sculptures are a little harder but you can use something like the JoolTool with the Flexshaft attachment and brushes to get into the small spaces and clean up your work. We are currently working on a launch for the JoolTool that contains training on using it for sculptural pieces as well, so stay tuned for that. Other than that, doing an excellent job of having the finish as perfect as possible before you bake, will really help later on with the finishing.
I’m intrigued by Renaissance wax and must order some to try it out. Thanks for the tips (found this site while googling renaissance wax and polymer clay)
Does it harden to a relatively permanent finish? When I hear “wax” I think of of soft, scuffable surfaces that wear off with, well, wear! How’s the lasting quality of this finish?
Hi Melanie, Ren Wax dries very well to a hard finish that is never soft or sticky. (That is if you apply it in thin coats and not a thick one.) The surface is very durable and was created for Museums. You will love this product on polymer clay and any other material you would like to add it to. I highly recommend it!
Hi Cindy,
I just love your tutes on you-tube. I enjoy listening to all your videos, I’m just going to start getting into clay. I have done a few simple beads etc, and now I’m collecting clay and tools. And about to purchase your beginners course. I was wondering what on-line stores you purchase clay from if any. I found the polymer clay superstore and have been looking at it, just curious what sources you use. The only place we have here in Prince George (BC) is Micheal’s.
Laurie
Hi Laurie, welcome to our happy clay family! You are going to love working with polymer clay! The Beginner’s Course will help you to quickly get off to a great start and will prevent you from having to learn by making a lot of mistakes. (Much cheaper in the long run!) As far as good places to buy polymer clay supplies, you’re in luck! Michaels is perfect. Every six weeks or so they have a sale on polymer clay. Buy Premo clay then and you can’t buy it cheaper anywhere else, even at Wholesale. Then use your 40% off coupons (sign up online if you don’t get the flyer) and you’re good to go. I have a Michaels close by and buy most of my supplies there. If I do buy something online for a tutorial or something, I will let you know where to get it. The places I regularly buy from is Rings & Things, FireMountainGems (they now have a $5 flat rate shipping to Canada), OttoFrei, Contenti and WireSculpture.com. I have bought some large blocks of clay at PolymerClaySuperstore and lots of people love PolymerClayExpress. That should be plenty for now! :) I look forward to having you around!
Hi Cindy – I really enjoyed your course. It was extremely thorough and helpful. Even though I knew some of the things in the course, it clarified a lot of the subject matter. Some of the little tips should have been common sense, but it’s like a little light bulb went on and I wanted to slap myself on the side of my head (V-8 style) and say ‘why didn’t I think of that myself?’ LOL I don’t think you need to change or add anything other than changing your title to ‘The Polymer Clay Goddess’! You are so amazing and generous sharing your knowledge with us. Take care.
Hi Cindy,
I used the sanding method you showed using the rock tumbler and plastic polishing substrate and the Renaissance wax on my round beads and they turned out GREAT; BEST EVER!!!! Thanks for all the tips.
That is excellent news Sandra! Thanks for reporting back and letting us know!
Hi, All!
Ren Wax is all I ever use since I started using it this summer. Frankly, I do not ever have to sand very much as my pieces always come out smooth. And I put on a coat, buff it out with a cotton cloth, let it sit for a few hours or a day. Then, I do another coat the same way and it comes out gorgeous. It is not like a vanish or coating, but that is what I most prefer about it. I can only say great things about the product.
The video would only play about 1/3 of the way through and then stop, couldn’t get it to finish so didn’t get to see the rest of it. I love Ren wax and have been using it now for almost 2 yrs. It does make a huge difference in how you sand your piece. I will go all the way to a 1500 to 2000 fine grit on a lot of my pieces if I am not going to apply any type of glaze. Hand rubbing it is okay but you will never get the shine that a rotary tool will give it whether it’s a buffing machine, dremel or Jool Tool. It the high speed that really puts the shine on. I have buffed after only using 800 grit and then buffed after using up to and including 2000. The difference is enormous. The wax alone will not make up the difference in the shine from the difference in using these grits. The Ren wax only “enhances” what is already there and I think Cindys video clearly shows that.
Hi Dixie Ann… sounds like your web browser has had a hiccup. If you watch the video using a different web browser, it will very likely work for you. If not let me know.
You were right Cindy. I normally use Firefox but can never get through a video. I switched to IE and got to watch them all the way through. Thanks so much for the tip.
I loved the ‘stroke’ that Karen gave her Jool-Tool after Cindy used her jooltool with the buffing. Yep have trouble getting a shine on pieces that i have sanded and buffed. i’ve gone back and resanded them to see if that helps too. I use premo clay so i don’t think it is the clay. I use ren was too and it has the same effect. I will go back and try again now after seeing this video. Thanks guys.
I thought that was sweet too, Sandra! It was like it was one of her pets that she was feeling tender towards. :) Let us know how your buffing goes. Maybe spend a little more time with the finer grits of sandpaper, so that your buffing is a little more effective. That should help if you are doing your buffing by hand.