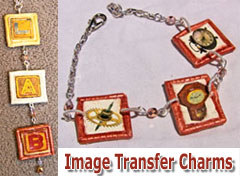
Making Charms Using Polymer Clay Image Transfers – by Laurel
Inspiration From A New Library Member Who Just Got Started With Polymer Clay:
More...
In yesterday’s blog post I talked about how wonderful it is to receive all of your polymer clay bead making success stories. It’s the kind of feedback that makes a teacher beam with pride!
Well today I want to share a special feature (and lesson) just submitted by Laurel. She is a relatively new student to the Polymer Clay Tutorials… and she’s doing a fine job of having fun with her new-found knowledge of polymer clay. Here’s her story…
Thanks so much, Laurel for sending this in. I love it that you combined several different techniques into one project… image transfers, extruded bezels, liquid clay and pearl ex powders.
It’s also great to see that you have your polymer clay projects posted on your web site for sale. Very exciting! Looking forward to hearing more from you as your beads and beading skills continue to progress.
Hopefully your charm making story will be an inspiration to others that are also just getting started with polymer clay.
Sponsored Ads & Special Promotions


Want to chat about today’s post? That’s what the comment section below is for. Scroll Down… We’d love to hear from you!
Or... if you would like to request a topic for a future post, here is the link to do that… PcT Suggestion Box

Thanks Josie. They were all pretty easy. And I am sure yours look good already. Check back to my site in a week or so though, I came up with a really awesome new design. I call it “Snakeskin”. Don’t know if anyone else has ever done it but I haven’t seen it yet. I just need to get the pictures taken and downloaded. Seems like that is the hardest part of all of this. LOL
WOW beautiful work just love your Pearl Swirl. Maybe in a few weeks Mine might look like that. Cindy really is a fab teacher.
Jocelyn:
Thanks for the nice comment and support.
Since I just ordered a Makins clay extruder this week, the tutorial in # 7 will be just in time. I have a Sculpey brand extruder, but it is smaller and getting harder to push the clay through. So I figured it was time for a step up. Especially since you have given me so many good new ways to use one. Now all I need to do is make a place to work with my clay until my studio is done. It seems to be taking FOREVER! XOXO
Laurel, these are gorgeous! I love your choice of colors, they pop!
@aims: There is definitely hope for you! Just keep making stuff. You’ll see!
@Arlene: Thank you! I too wish there were more hours in a day!
@Laurel: You are very welcome! I love it that you sent in your projects! It is wonderful to see people are learning from the information. Can’t wait to see how far you go! You go girl!
Cindy:
Thank you for your kind words and encouragement. I sure hope it does encourage other “newbies” because they will have so much fun exploring the clay world. I was thrilled that you thought my charms were good enough to feature on your blog. Stay tuned because I plan to get better and better. If you want to follow my exploits in the polymer clay/jewelry world you can follow my blog. And when I become famous from my jewelry and beads I will say “I owe it all to Cindy Lietz.” Well, most of it anyway. And thanks for the kind words aims. There IS hope for us all. :)
I think this is just about the best advertisement you could get Cindy! I agree with Laurel that I have learned so much from your lessons. I haven’t tried the image transfer yet but have all the materials to do it. Now if I could just figure out how to add a few more hours to my day…
Love it!
That is really impressive for a newbie! There’s hope for me yet!