Two Cindy’s Making Natasha Beads in the Dark
Video #453: Roadtrip #2-02 (OR): The sun went down… but we kept going… Polymer Clay Camping.
More...

IN THIS POST: — cane slicing — cutting — reducing — conditioning — scraps — waste — scrap clay — health — wellness — therapy — disabilities — disorders — conditions — natasha beads — mirror images — (Topics marked with an asterisk* are discussed in the Comments Section below).
Topics Covered In This Video:
- In Part 1 of this PcT Roadtrip Series, we met with community member Cindy Peterson, and discussed what she had been up to over the past year. She described how her attention to detail, with the finishing of her pieces, has significantly improved.
- Here is the link to the first video if you have not yet seen it… Polymer Jewelry Artist Cindy Peterson
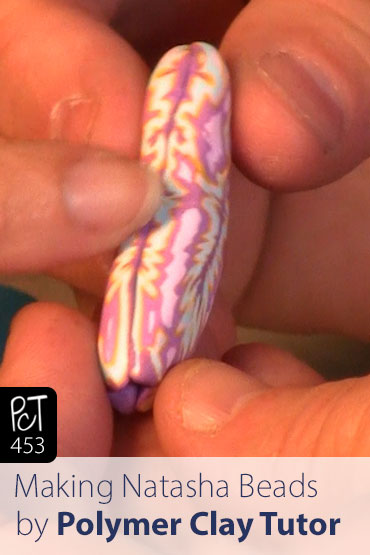
- In today’s Part 2 video, Cindy Peterson and I are still at the RV Park picnic table after several hours of talking about the clay business and looking at her jewelry. It is now dark… thank goodness for the filming lights that Doug brought along.
- In this segment, Cindy-P asked me to help her with a challenge that she is having with making Natasha beads.
- I’ve done a mini tutorial on Making Natasha Beads Using Scrap Polymer Canes, but Cindy P was having trouble making them, so I gave her a one-on-one lesson, to help her along.
- There is even a very unexpected jump-ring cameo appearance that came as quite a surprise. Be sure to watch the whole video to see what I am talking about...
00:00:03 –> 00:00:09 Hi guys, its Cindy Lietz, your Polymer Clay Tutor, and we are on the PcT Road Trip Number
00:00:09 –> 00:00:16 2, and we are with Cindy Peterson, crafting…or claying in the dark, we’re at a campsite
00:00:16 –> 00:00:20 and we’re still here playing with our Polymer clay.
00:00:20 –> 00:00:24 Now one of the things that she said she was having trouble with was making Natasha beads.
00:00:24 –> 00:00:30 Now, I’ve done a full tutorial on it before, but I wanted to show you…if Doug can get
00:00:30 –> 00:00:38 a bit of a close up, she’s got a couple of Natasha beads that are a little off, and
00:00:38 –> 00:00:43 just so you know, Cindy is blind or mostly blind, so some of you would have challenges
00:00:43 –> 00:00:51 lining up stuff and things anyways, but I’m gonna just show you here quickly, her pattern
00:00:51 –> 00:00:59 has gotten a little bit off center, and partly… there’s a couple of reasons why this has
00:00:59 –> 00:01:05 happened, partly because the clay was probably just a little bit too soft, and another challenge
00:01:05 –> 00:01:10 could be that, when she was putting the piece together, the edges weren’t very square,
00:01:10 –> 00:01:15 so I’m just gonna show her how to do that again, and then see if we can help her with
00:01:15 –> 00:01:17 her challenge.
00:01:17 –> 00:01:24 Now, here’s one of the canes that she’s made, this is a bit of a bull’s eye cane
00:01:24 –> 00:01:29 that she shaped into a teardrop, and in the tutorial, I showed you how to make a… how
00:01:29 –> 00:01:35 to turn a cane into a Natasha bead, so I’ll just show you that quickly.
00:01:35 –> 00:01:40 We’ll take half of it…and we can do this together if you want, you can take the other
00:01:40 –> 00:01:42 half; do you mind using up the whole cane?
00:01:42 –> 00:01:44 (CP)No, I have more at home.
00:01:44 –> 00:01:47 (CL) Oh okay, alright, so what we’re gonna do is we’re going to roll it out a little
00:01:47 –> 00:01:57 bit thinner, and then we’re going to start twisting it, this also helps warm it up, get
00:01:57 –> 00:02:04 it a little bit ready for being anipulated, just twist it up, and then we’ll just take
00:02:04 –> 00:02:11 the ends here and squash it together, can you see that?
00:02:11 –> 00:02:17 Cindy can see through like a little straw kinda size, so if I keep it there, she should
00:02:17 –> 00:02:18 be able to see.
00:02:18 –> 00:02:23 Okay, so I’ve squashed it up and then we’re gonna roll it out again a little bit, and
00:02:23 –> 00:02:28 we’re gonna twist it again, what’s happening is, when we twist it we take all those little
00:02:28 –> 00:02:35 lines that are inside the cane and we distort them and twist them and reshape them, so we’re
00:02:35 –> 00:02:41 gonna twist it and then squash it end to end again, shorten it up a bit.
00:02:41 –> 00:02:48 Now, this is where I think you had trouble, we’ll round it out first, now what a lot
00:02:48 –> 00:02:53 of people do is they just go ahead now and cut it.
00:02:53 –> 00:02:54 (CP) That’s what I did.
00:02:54 –> 00:02:55 (CL) That’s what you did, right?
00:02:55 –> 00:02:57 Yeah, that’s what I thought.
00:02:57 –> 00:03:01 Now if the clay is too soft, what you could do is pop it into the fridge, but we’re
00:03:01 –> 00:03:02 not gonna do that.
00:03:02 –> 00:03:06 I thought I brought a roller with me into the trailer but I didn’t, so we’re gonna
00:03:06 –> 00:03:13 have to just use my little jar of Renaissance Wax as my clay roller, and I’m just going
00:03:13 –> 00:03:18 to try to…maybe this is a better angle for Doug, I’m going to try to roll it flat on
00:03:18 –> 00:03:25 the top…actually, I’ll give you this glue stick, you can roll yours, we just wanna roll
00:03:25 –> 00:03:31 it flat on the top, and then turn it to the side, and we’re trying to square this up
00:03:31 –> 00:03:41 a bit, so that those edges are square, more, so that when we cut it in half, it can match
00:03:41 –> 00:03:44 up a little bit better, so yeah, you’re doing good there, perfect.
00:03:44 –> 00:03:46 (CP)So do I need to do more?
00:03:46 –> 00:03:50 (CL) Oh, no, it’s probably…now make sure it’s straight and not all twisted or wonky
00:03:50 –> 00:03:55 or anything, that looks pretty good…flatten that out a bit.
00:03:55 –> 00:04:03 Okay, now what we’re gonna do is I’m gonna cut it down the center…can’t see very
00:04:03 –> 00:04:08 good here, but…good thing Doug brought his lights along, otherwise we wouldn’t be able
00:04:08 –> 00:04:10 to see at all.
00:04:10 –> 00:04:15 Now, I’m gonna cut it down the center, so you can cut yours down the center there, can
00:04:15 –> 00:04:17 you see that?
00:04:17 –> 00:04:25 Yeah, that’s pretty good, like that, then what we’re gonna do is open it up…ooh,
00:04:25 –> 00:04:27 it’s so cool isn’t it?
00:04:27 –> 00:04:28 (CP) It’s pretty.
00:04:28 –> 00:04:33 (CL)So that’s gonna match up, but we won’t put it together too much…we’ll put it
00:04:33 –> 00:04:36 together but we won’t turn it yet.
00:04:36 –> 00:04:41 Then what we’re gonna do…now yours looks more even than mine, I’m on a wonky spot
00:04:41 –> 00:04:48 here, I’m gonna take this half and cut it in half…it’s easier if you can see straight
00:04:48 –> 00:04:56 up above…I can’t see very good here, and we’re gonna take this other half and cut
00:04:56 –> 00:05:10 it in half…so I’ll give you the blade in a second here, that’s pretty good, it’s
00:05:10 –> 00:05:16 a little tricky, it works best if you can get it really down the center, but that can
00:05:16 –> 00:05:21 take a little bit of practice, okay, good, now…
00:05:21 –> 00:05:27 (CP) This is where I have my problems.
00:05:27 –> 00:05:32 (CL)Now, this is where you have trouble, okay, so make sure…I’m gonna take my two halves
00:05:32 –> 00:05:41 first and make sure that that center one is really matched up, you have to really kinda
00:05:41 –> 00:05:47 make sure your picture’s flat and matched up as best as possible, you’ve got your
00:05:47 –> 00:05:55 center one, then you take one of the outside ones and turn it, trying to keep its side…
00:05:55 –> 00:05:57 (CP) I’m turning it…okay I’m here?
00:05:57 –> 00:06:00 So turn it this way?
00:06:00 –> 00:06:03 (CL)Yes, like that, that’s right…that’s right.
00:06:03 –> 00:06:04 (CP) and this matches up right here?
00:06:04 –> 00:06:21 (CL) It matches on that side, and then your remaining piece on the other side, we’ll
00:06:21 –> 00:06:29 turn…you’ll see the picture will be the same if you got it oriented right.
00:06:29 –> 00:06:31 (CP)This is where I’m…
00:06:31 –> 00:06:39 (CL) Okay so I’m getting mine straightened out here, the square was on the back which
00:06:39 –> 00:06:40 is tricky to do.
00:06:40 –> 00:06:42 (CP)So this part goes on the back.
00:06:42 –> 00:06:48 (CL)That goes in the inside center, yeah, so is that matching, yeah, so that will match,
00:06:48 –> 00:06:57 see how that picture is matching there…should all match up if you’ve got them all straight…yup,
00:06:57 –> 00:07:06 you’re getting it, yup, so that’s working.
00:07:06 –> 00:07:10 (CP)Okay, so now what do I do with this…this is where I really get…
00:07:10 –> 00:07:16 (CL)So what you can do is kinda ease those edges together and get that little corner,
00:07:16 –> 00:07:22 it can be a little bit tricky, it’ll end up…if your points… if you don’t have
00:07:22 –> 00:07:26 a really square end, it’ll become a point more at the end here.
00:07:26 –> 00:07:32 (CP) Okay (CL) So you can just work it and make sure it’s flat, but just sorta gently
00:07:32 –> 00:07:35 work it with your fingers, make sure everything is sorta matching up.
00:07:35 –> 00:07:38 (CP)So this is how it’s supposed to be?
00:07:38 –> 00:07:42 (CL)Yes, now it’s because that edge was a little bit rounded and not quite square.
00:07:42 –> 00:07:44 (CP) why I’m showing more Purple?
00:07:44 –> 00:07:45 (CL)Yes, why you’re showing more Purple.
00:07:45 –> 00:07:52 (CP) Okay (CL) So but…the more square it is, and the more even you cut it, the better
00:07:52 –> 00:07:58 ends you’ll get on the ends, and then you’ll have a… you can pierce it down the center
00:07:58 –> 00:08:04 and all that, see now that’s much straighter…can we get a bit of a close up on that Doug?
00:08:04 –> 00:08:09 See her lines are much straighter now, and she actually has a pattern that’s matching
00:08:09 –> 00:08:10 up quite well.
00:08:10 –> 00:08:11 (CP)On all sides.
00:08:11 –> 00:08:13 (CL)Yeah, on all your sides, (CP) I don’t know what that is.
00:08:13 –> 00:08:14 (CL) What is that?
00:08:14 –> 00:08:15 (CP) It’s a piece of metal.
00:08:15 –> 00:08:23 (CL) I don’t know, it looks like a jump ring in there, oh no, we have a random piece
00:08:23 –> 00:08:27 of metal in there, was that inside your cane?
00:08:27 –> 00:08:28 (CP)Apparently.
00:08:28 –> 00:08:35 (CL)Oops, looks like she’s got this stray jump ring…
00:08:35 –> 00:08:40 (CP) Oops, well that will wreck the pattern…can’t smooth it out with metal…
00:08:40 –> 00:08:45 (CL) No, that’s so funny…oh, well actually it’s not too bad.
00:08:45 –> 00:08:46 (CP)No it’s not.
00:08:46 –> 00:08:51 (CL) So that worked pretty good you can practice that one on your own, but I think you got
00:08:51 –> 00:08:52 it now right?
00:08:52 –> 00:08:56 (CP) Yeah (CL)If you were to roll that nice and square, cut it as straight as possible,
00:08:56 –> 00:08:57 your lines will match up much better.
00:08:57 –> 00:08:59 (CP)So that was… that’s my problem?
00:08:59 –> 00:09:06 (CL)Yeah, and then when you’re done, you can roll it again, so try to square it up
00:09:06 –> 00:09:08 and make it… if you want it square, and it’ll look much cleaner and you can erase
00:09:08 –> 00:09:13 any of those lines and it’ll look much better, alright, so that’s a big improvement over
00:09:13 –> 00:09:14 that guy.
00:09:14 –> 00:09:18 (CP) Oh yeah, this…yeah (CL) Do you think you got it now?
00:09:18 –> 00:09:23 (CP)Yeah, yeah, thank you, thank you (CL)You’re welcome, (CP) Jump ring and all.
00:09:23 –> 00:09:30 (CL)So I hope that that was helpful for you, it’s…hopefully it was helpful for Cindy,
00:09:30 –> 00:09:34 and if it was, make sure to click that like button that would be great.
00:09:34 –> 00:09:39 And my question for you is, have you had a challenge with the Natasha beads, and do you
00:09:39 –> 00:09:41 think this would help you?
00:09:41 –> 00:09:44 Make sure to leave your comment in the comment section below.
00:09:44 –> 00:09:49 And don’t forget to subscribe, we have new videos that come out every week and you’re
00:09:49 –> 00:09:51 not gonna wanna miss a thing.
00:09:51 –> 00:09:56 So we will see you next time bye for now.
Our goal is to translate these videos into as many languages as possible. If you are interested in helping with this initiative, then please do contact us and we will figure out a way to make it worth your while :)
Resource Links:
- Related Video: Polymer Jewelry Artist Cindy Peterson
- Related Video: Making Natasha Beads Using Scrap Polymer Canes
Resources marked with a double ** asterisk are affiliate links. If you click on them and decide to buy something, we may receive some compensation. This does not affect the price you pay in any way. What it does do, however, is helps us to continue providing free videos for you, here at the PcT website. Using our links to purchase your tools and supplies, is always greatly appreciated.
Sponsored Ads & Special Promotions
Shareable Images


To share this full blog post anywhere on the web that allows links in comments, here's a shortened url to copy and paste...
>> https://mypct.ca/v453 <<
Want to chat about today’s post? That’s what the comment section below is for. Scroll Down… We’d love to hear from you!
Or... if you would like to request a topic for a future post, here is the link to do that… PcT Suggestion Box
The videos are inspiring others Cindy Lietz. I am now friends with Anne in Belgium who has a little more vision than I but is working with polymer. I am very blessed to have met you Cindy and love all you do. You have helped me a lot and I am sharing what works for me and eye issues with someone over the pond. The biggest thing and my two best friends are magnifiers in different strengths and my special glasses for close up work. Good lighting and lots of contrast around is always good too.
WOW! Love the video was a great help thank you for sharing! Liz x
She’s the cutest lady! Think back was there a time when you said…where did that jump ring go? Lol. You’re also very lucky to have met Cindy and Doug. Rock on Ms Peterson!
I am very blessed to have met the Lietz’s. They are so kind and I can not wait to see them again.
I love it when I drop something and I am scanning a lot and my very supportive husband Duane says “Well it is right here!” Sometimes I wonder if he really gets the eye issues I have. I guess it is hard for anyone to truly understand as I can still see but just a very small area at a time. So I can scan with added blind spots in the center vision still miss something. What I Love about Polymer is that it is so forgiving. If I mess up well I can use a veneer over it, paint it, use swellegant to make it look like a piece of metal. Or I could just say this is how I saw it as an artist. LOL Now if I could just find the mouse arrow so I can post this, LOL
I just watched this yesterday. Very well done. I learned a lot.
Thank you Polymer Clay Tutor for all your excellent videos, your fun and upbeat attitude, and that precious Canadian accent. I am excited to see what you have to say each time I see a new message in my inbox
This was cute to watch! I thought you were making “magic” Natasha Beads! I always lose my jump rings. I never find mine!! You are lucky! Good luck making more. Having a one-on-one with Cindy must have been special.
Having one on one with Cindy is very special. And reaching out with the videos with others who have sight issues is also very special. I know there are many legally blind people with more vision than I have who just give up and their love of art. And it has touched me deeply that I have made an impact on 4 others now.
Natasha beads are my new favorite thing right now, and your tip about flattening the edges should really help me keep everything straight. Thanks!
Fascinating and very helpful. My favorite PC techniques involved abstract patterns rather than florals or birds. This adds to my abstraction ;)
Anna
So cool to watch you two work together on Nastasja Beads at nite, and so wish I could have been sitting there watching, but the video is a great substitute.
Since I’ve been obsessed with mirror canes since Cindy’s tute, here are two tricks I found that helped. The first is one I learned online from a YouTube tute, where the instructor leaves a slight little bit left when she makes the cut. As a result of leaving that little last piece uncut is that when you fold the image back, you can immediately see the dual image and it is a lot less work lining it up.
The second is working on the graph squared index cards. They help me do everything better because I have straight lines to work with when lining up or making the cuts equal. They also help making equal sized shapes, because you can see immediately which part of the design is unequal and needs tweaking.
Once I am happy with the symmetry and design, I leave the work on the card, pop it on a tile, add another index card on top, another tile, then tent to bake. My work comes out much less wonky.
Cindy P, if the light blue graph pattern is hard to see, you can just use a ruler and some ink that shows well to go over the graph pattern so you can see it well.
Hope you find it helpful.
Thank you I have to do this as the light blue lines are not for me anymore. I use a 20/20 pen that for some reason is actually made for vision impaired people and is darker than a sharpie. Thank you so much for the tips
loved the video- such fun!
-yes it helped a great deal with the natasha bead- thank you
That’s amazing she is amazing because she is somewhat blind and she can do all of these things shout out to Cindy
It is called ” never giving up” 4 members of my family are legally blind and we all still try to do the arts we love.
My Dad uses a scroll saw for his woodworking and carvings. That he uses a power tool with a blade scares me. But his work is amazing.
My Twin sister has been a sewer since she was a teen,
( I sew too, but she is better) She is making quilts and even matches the seams ( I don’t match very well and I clip thru the seams LOL)
And the youngest my Nephew who is 34yrs wants to take photography and has enrolled in college and he is doing great with his new found artistic talent.
We all get our love of art and crafts from my Dad and that we keep on keeping on even with our different stages of blindness.
Now none of us have big house and when the 4 of us are all in one house, well all I can say for the sighted ones is LOOK OUT! LOL
what a nice feeling – it was like I was there claying with you two:)
when I was 1st making a lot of Natasha Beads I’d make a line 1st w/ my blade move the blade and look to see if it was centered then cut
also having a lined cutting surface helped me
but the best tip is the one Cindy already said – about where your head needs to be
Cindys, this was an awesome eye opener on Natasha beads., Thanks so much to both of you. After watching you it finally dawned on me what I was
doing wrong and why I couldn’t get my design to match up. Bless you both.
I am glad that I am not the only one with that problem
no matter how i do it, i cannot get a lovely pattern out of my canes. I may be twisting too much, I don’t know. I’ve also had trouble lining them up, this was a big help in that aspect, I will have to have another go.
I was glad to see you didn’t cut your Natasha bead exactly down the middle because all of mine are like that no matter how hard I try to get it in the middle.
Glad to see you did another road trip.