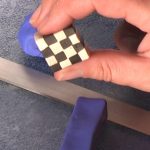
Making Polymer Clay Canes with the Checkerboard Cane Pattern
Video #34: The checkerboard pattern, an easy to do beginner polymer cane project.
More...

IN THIS POST: — checkerboard cane — striped cane — cutting blade — slab method — beginner polymer clay cane — simple canes — canework — millifiori — (Topics marked with an asterisk* are discussed in the Comments Section below).
There’s a quick way to increase the number of checkers in any checkerboard cane. Simply cut your original cane into 4 shorter pieces that are roughly the same length. Then combine these four shorter lengths together so that the cross section of the new cane has 4 times the number of checkers showing. Finally, reduce and lengthen the new cane as required.
Transcript not available for this video.
Our goal is to translate these videos into as many languages as possible. If you are interested in helping with this initiative, then please do contact us and we will figure out a way to make it worth your while :)
Resource Links:
- Related Video: How To Slice Round Polymer Canes Without Distortion
- Related Video: Reducing a Polymer Clay Cane From Start To Finish
- Related Video: Polymer Clay Zinnia Flower Cane Mini Tutorial
- Related Video: Rose Brain Cane Tutorial (Intro)
- Related Video: Polymer Clay Cane Tools Supplied by Tiny Pandora
- Amazon: Polyform Sculpey Super Slicer **
Resources marked with a double ** asterisk are affiliate links. If you click on them and decide to buy something, we may receive some compensation. This does not affect the price you pay in any way. What it does do, however, is helps us to continue providing free videos for you, here at the PcT website. Using our links to purchase your tools and supplies, is always greatly appreciated.
Sponsored Ads & Special Promotions
Shareable Images
To share this full blog post anywhere on the web that allows links in comments, here's a shortened url to copy and paste...
>> https://mypct.ca/v34 <<
Want to chat about today’s post? That’s what the comment section below is for. Scroll Down… We’d love to hear from you!
Or... if you would like to request a topic for a future post, here is the link to do that… PcT Suggestion Box
Thank you for taking the time to share your opinion about the course Carolyn. I really appreciate it!
In regards to your question about re-conditioning clay… it depends on how long your conditioned piece has been sitting around. If it’s only been a day or two, then ‘warming’ it up is fine. If it’s been a year, then start over and re-condition it from the beginning. The second video in the course (How To Condition Clay Properly) provides you with tips on how to tell for yourself if your clay is conditioned well enough.
As you found out with your checkerboard cane, there are always ways to transform projects that don’t go quite as planned, into something useful and pretty. How you responded in this situation is perfect! With your sharper, thinner blade and your growing knowledge of this wonderful medium, I’m sure your second checkerboard cane will turn out looking like… well… a checkerboard :-)
Keep up the great work Carolyn. It’s great to have you as part of the community.
Cindy – I have already recommended your ‘Beginners Course’ to others! It is a great foundation on which to build. I like the way you have it set up so one video flows right into the next – very user friendly. I just sat and watched the videos, until you got to the cane making. Then I took the time to make the canes right along with you. Thank you for sharing your own learning experiences with us. It has cut my learning curve way down! With your videos I feel I can tackle just about anything you present. Your course, and the weekly videos, are worth every penny I have spent for them.
One question that was not answered: Does polymer clay stay conditioned. What I mean is, after it is once conditioned and then is allowed to sit around, does it just need ‘warming up’ in order to be fully usable again? Or do we have to go through the whole conditioning process again?
I did have trouble with the checkerboard cane. Now that I have a sharper, thinner blade maybe the sections will slice better. Or I might chill them first. Mine got all squished and I just couldn’t seen to get them to form a checkerboard. I ended up using that ‘failed’ attempt to make some very pretty and unusual beads. This is one art form where there truly is no waste.
Thank you for the comment Lindy! The checkerboard is a classic which has many uses and yes it is pretty too!
Cindy Lietz’s last blog post..Faux Turquoise Jewelry Bracelet – Polymer Clay Bead Making Projects
The checkerboard cane has to be the prettiest simple cane that cane be made – so distintive!
If you haven’t yet seen the video on making a striped cane, you will need to watch it first: Striped Cane – An Easy Polymer Clay Cane Project For Beginners
Also note that the slices from the striped cane should be about the same thickness as the width of the stripes if you want the squares to line up geometrically on your checkerboard pattern. But then again if you want a more random look, cut the slices into whatever thicknesses you desire.
As you can see, there is a lot of flexibility in working with polymer clay. You can make a lot of your own rules based on what you like.
Cindy’s last post..Lentil Beads From Scrap Polymer Clay will Suprise You Everytime