Using A Paper Planner To Track Your Studio Supplies
Video #718: A system to help you become a super smart shopper when stocking up on your arts and craft supplies.
More...

IN THIS POST: — art supply inventory system — studio supplies — paper planner — organization — art supply binder — art materials — supply tracker — (Topics marked with an asterick* are discussed in the Comments Section below).
In this video I show you how to set up an art supply inventory system that you can use in your paper planner. I also show how to adapt these ideas if you just want to have a small booklet that can easily fit in you purse.
In a previous video I demonstrated how to set up a planner for your studio, to help you stay organized with your projects. In that video I promise to share more info about my inventory system, so here it is.
When you have a lot of art supplies, like pencils, glues, paints, markers, inks, etc, it can get hard to know exactly what you already have in your stash, unless you have a way to keep track of everything. An inventory book or planner is a great way to avoid double purchasing the same items, instead of spending your hard earned dollars on other supplies that you don’t yet own.
My first system utilized a small blank journal, in which I put color swatches of different products, identified by the appropriate brand name. That system is simple and works quite nicely, as you will see in the video.
When I switched over to an A5 sized planner, I wanted to include the color swatches in to the planner using pocket pages and printed color charts. Now I am able to list products that I do have, which in tern helps me to also see what I don’t have yet.
Below this video I provide a long list of products I used for my inventory system and the links to the printable charts that I have found online. Feel free to add your own suggestions for color chart resources in the comment for this post.
00:00:03 –> 00:00:04 Hi Guys!
00:00:04 –> 00:00:09 This is Cindy Lietz, your Polymer Clay Tutor in today’s Studio Tip, I’m going to show you
00:00:09 –> 00:00:14 how to set up an Art Supply Inventory System for your planner.
00:00:14 –> 00:00:21 Now, a little bit ago, I talked about setting up a planner for your crafting studio and
00:00:21 –> 00:00:26 in the back part, I showed you how I inventory all my different supplies and I’m going to
00:00:26 –> 00:00:31 show you that today too but one of the things that happens if you have a lot of art supplies
00:00:31 –> 00:00:37 like I do, it takes– once they start piling up it– it’s a little bit hard to remember
00:00:37 –> 00:00:43 which colors you have, which particular supplies you have and so keeping track of it is a really
00:00:43 –> 00:00:49 good idea and as I have just a little sampling of some of the pencils and inks and things
00:00:49 –> 00:00:57 that I have and it would be very hard to remember which particular blue you had of any particular
00:00:57 –> 00:00:58 brand.
00:00:58 –> 00:01:05 So, the first thing I did quite a while ago, as I started off with as– a system like this
00:01:05 –> 00:01:11 and this is a really good one if you are want to have something small and something quite
00:01:11 –> 00:01:21 simple and all I have is just a blank little booklet where I have just put in different
00:01:21 –> 00:01:26 samples of the different paints that I have and the different pencils.
00:01:26 –> 00:01:32 All I would do is just put a blotch of the paint ,the– the name of the brand and then
00:01:32 –> 00:01:38 the color name and I did this for a whole bunch of different pages so I had sections
00:01:38 –> 00:01:46 for watercolor pencils, sections for other types of art pencils.
00:01:46 –> 00:01:52 Here’s my Prismacolors, I have a lot more than that now and that’s kind of a real simple
00:01:52 –> 00:01:57 system that you can set up for all the different kinds of paints, pencils, that kind of thing
00:01:57 –> 00:02:05 here’s my Gelato Pen Crayons, that kind of thing but then when I went to a planner system,
00:02:05 –> 00:02:12 I decided to add planner pages and started hunting down different sections of–or different
00:02:12 –> 00:02:14 printable things online.
00:02:14 –> 00:02:18 Now, I’ve already talked about how I’ve got my planner set up and everything but in the
00:02:18 –> 00:02:25 back part here is where I have my supplies and actually, it’s not taking up that much
00:02:25 –> 00:02:27 room yet.
00:02:27 –> 00:02:33 I don’t have the inventory set up for every single brand or a type of pencil but I’m working
00:02:33 –> 00:02:37 on my way and I just want to show you how I’ve got that set up.
00:02:37 –> 00:02:44 So in a supply section in the back here, I’ve got my sections divided with these little
00:02:44 –> 00:02:51 Journaling Cards and this planner here is an A5 size which is a pretty standard, little
00:02:51 –> 00:02:56 bit larger sized planner, there are smaller ones, there’s bigger ones.
00:02:56 –> 00:03:02 You could do this in any size that you like and I just made these little dividers so I’ve
00:03:02 –> 00:03:10 got my colored pencil divider here this one says watercolor pencils and I’ve got little
00:03:10 –> 00:03:17 pocket pages with different printed out charts that I found online.
00:03:17 –> 00:03:24 Now I’m going to– on our blog at polymerclaytutor.com, I’m going to give you the links to all the
00:03:24 –> 00:03:29 different printables that I found online so make sure to go there if you want to figure
00:03:29 –> 00:03:33 out– find out which particular ones that I have here.
00:03:33 –> 00:03:41 Now, you can make your own charts if you like, but some of the companies have made up charts
00:03:41 –> 00:03:42 that you can find online.
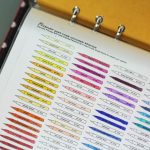
00:03:42 –> 00:03:50 So for example, I’ll just pull this one out here, this one is the Prismacolor chart that
00:03:50 –> 00:03:54 they have for their soft core color pencils.
00:03:54 –> 00:03:59 So these are the Prismacolor pencils pencil crayons that you would find in Michaels or
00:03:59 –> 00:04:06 just about any art store and this is a blank chart and you can see the colors that I haven’t
00:04:06 –> 00:04:13 got yet are just white still and every time I buy a new pencil, I just sharpen it up and
00:04:13 –> 00:04:15 color in the right section.
00:04:15 –> 00:04:22 Then every time I go into Michaels and I want to buy a few pencils, all I do is I pull out
00:04:22 –> 00:04:27 my chart because I bring my planner with me and I just see which colors I don’t have yet.
00:04:27 –> 00:04:32 Now, it turns out I’ve got all the ones that Michaels carries so in order to find the rest
00:04:32 –> 00:04:35 of these, I’m going to have to go look somewhere else.
00:04:35 –> 00:04:42 But this is a really great way and in Prismacolor is very clever, they’ve got a chart for every
00:04:42 –> 00:04:49 type of pencil, their crayons, their markers, their chalks and everything.
00:04:49 –> 00:04:54 Now, some of the companies are not that smart as far as I’m concerned.
00:04:54 –> 00:05:03 If you’ve got a whole line of colored pencils, it is very wise of you to make a blank color
00:05:03 –> 00:05:04 chart.
00:05:04 –> 00:05:12 Now, some companies do have like a colored charts like for example, Derwent Watercolor,
00:05:12 –> 00:05:17 now I printed this in black and white but Derwent Watercolors have you know, the– their
00:05:17 –> 00:05:23 color charts, these all look great here but they would be the proper colors if I had printed
00:05:23 –> 00:05:28 on a colored printer but they’re smarter if they would have a blank one that you could
00:05:28 –> 00:05:31 color out but it’ll still work.
00:05:31 –> 00:05:39 This one for example, what I did is just printed out their chart, their color line and then
00:05:39 –> 00:05:48 I just colored over top of the the– the names where I happen to have those particular colors.
00:05:48 –> 00:05:53 Now, it– with a watercolor pencil the pencil can look a little bit different it– when
00:05:53 –> 00:06:00 it’s when you use water on top of it so I did use my little water brush and put water
00:06:00 –> 00:06:06 on top of those spots so that i could see what the color looks like when it was wet.
00:06:06 –> 00:06:13 Now, some companies don’t have charts at all and some handy bloggers have made their own
00:06:13 –> 00:06:19 charts and that’s what this particular chart looks it has was done by some blogger.
00:06:19 –> 00:06:23 This blogger wasn’t very smart because they didn’t put the name on it so I’m not sure
00:06:23 –> 00:06:27 which one this is I probably have it written down somewhere and I can add that to the list
00:06:27 –> 00:06:29 if I’ve got it.
00:06:29 –> 00:06:37 Now, there are charts for markers so these are the Spectrum Noir Markers, they’ve got
00:06:37 –> 00:06:48 kind of a neat little hexagon chart online and Copic markers, Copic doesn’t have blank
00:06:48 –> 00:06:55 charts that I could find, this was actually done by a blogger and this one was at paperfections.com
00:06:55 –> 00:06:57 I’ll give a link for that one too.
00:06:57 –> 00:07:04 This one was a– to the Copic has so many markers, I mean and this was this one was
00:07:04 –> 00:07:12 done in 2012 but it looks to be quite current to what their line is now anyways so and that
00:07:12 –> 00:07:17 was the most recent chart that I could find.
00:07:17 –> 00:07:22 There are– oh here’s another one here for the Prismacolor markers and see how in this
00:07:22 –> 00:07:29 case these ones look like little marker shapes which was is quite cute neat thing to do.
00:07:29 –> 00:07:34 Faber Castell isn’t very good at making charts.
00:07:34 –> 00:07:39 I may go ahead and start making some of my own charts but I haven’t gotten around to
00:07:39 –> 00:07:40 that yet.
00:07:40 –> 00:07:45 A great company that has done some nice charts.
00:07:45 –> 00:07:52 This was this done privately no, I think this one was done by the Colorbox chalking guys
00:07:52 –> 00:07:59 but one of the things I wanted to show you is you can make your own little stamps for
00:07:59 –> 00:08:07 stamping in your chalks I mean your– your inks and things like that.
00:08:07 –> 00:08:12 So what I’ve done is I’ve got a little an acrylic block that use for sticking, you know,
00:08:12 –> 00:08:19 the clear rubber stamps too and all I’ve done is I’ve cut out a little square around in
00:08:19 –> 00:08:24 this case there’s a little rectangular piece and I’ve got one on each side and I’ll explain
00:08:24 –> 00:08:30 that in a second but this rectangular piece was just cut off of a piece of craft foam.
00:08:30 –> 00:08:34 Obviously, the color doesn’t matter and I just have a bunch of scraps so you can cut
00:08:34 –> 00:08:38 out to whatever shape you want and you could cut a large one or you could cut a small one
00:08:38 –> 00:08:44 or whatever you want but I just got a little rectangle and then I just stuck it to my acrylic
00:08:44 –> 00:08:46 block with some double-stick tape.
00:08:46 –> 00:08:51 You could always remove it later, scrape it off and clean it with some rubbing alcohol
00:08:51 –> 00:08:57 if I didn’t want it on there anymore but that’s what I did, I cut a little swatch shape and
00:08:57 –> 00:09:04 then I would take my ink added on and then stamp it onto the blocks that I had of the
00:09:04 –> 00:09:07 different kinds of ink.
00:09:07 –> 00:09:16 Now, sometimes you’ll get a company that has a whole bunch of colors and sometimes their
00:09:16 –> 00:09:23 colors like, for example this one here this is the pigment ink, so that’s how– I found
00:09:23 –> 00:09:29 some charts for the pigment inks here well they had quite a few colors but not all the
00:09:29 –> 00:09:31 colors I could find on the chart.
00:09:31 –> 00:09:35 So I just added a few from here.
00:09:35 –> 00:09:40 I had to look up the names of these colors online, it was a bit of a pain but I found
00:09:40 –> 00:09:43 them and I stamp them onto the thing there.
00:09:43 –> 00:09:49 Now, in this case here for the Brilliance Ink, the Dew Drops and the Versa Magic and
00:09:49 –> 00:09:57 that kind of thing, in my head, I always remember them as these teardrop-shaped ink pads and
00:09:57 –> 00:10:04 so I thought it would be kind of neat to make teardrop shape stamps to put into those spots.
00:10:04 –> 00:10:11 So I just took a piece of that fun foam, cut it in the shape of a teardrop and when I stamped
00:10:11 –> 00:10:15 all my teardrop shaped ink pads, I just did with a teardrop.
00:10:15 –> 00:10:20 Now you wouldn’t have to use the colors you wouldn’t have to make a swatch thing like
00:10:20 –> 00:10:26 this, it’s just kind of handy to do if you like, you could just use a rubber stamp or
00:10:26 –> 00:10:30 something but it gives a real good solid impression.
00:10:30 –> 00:10:33 You get a good impression of what the colors look like.
00:10:33 –> 00:10:41 Now, with the alcohol inks, They bleed out really fast, I printed out the chart and then
00:10:41 –> 00:10:47 I put a drop of ink on it– it just bled out really quickly so if you’re going to do that,
00:10:47 –> 00:10:50 you have to be quite careful.
00:10:50 –> 00:10:56 I could have put some alcohol ink on my glass mat here and then used stamp like this instead
00:10:56 –> 00:10:59 that would have been a little bit more controlled.
00:10:59 –> 00:11:03 One company I found is just brilliant is Ranger.
00:11:03 –> 00:11:10 Now Ranger has a really wide range of different products like the Adirondack Inks, the Archival
00:11:10 –> 00:11:18 Inks, Vintaj Patina Inks and look at they did they made charts, blank charts a whole
00:11:18 –> 00:11:24 bunch of them, all the Tim Holtz Distress Ink, the Distress Stain and so all I had to
00:11:24 –> 00:11:30 do is go to one spot on the Ranger site and find all those printables.
00:11:30 –> 00:11:37 He even has them for the Distressed Paint and I found, I printed them up but I haven’t
00:11:37 –> 00:11:42 needed them yet so I didn’t want to fill up my planner but the– they have the ones for
00:11:42 –> 00:11:52 Dina Wakeley media paints, the Wendy Vecchi embossing powders for Stickles, for Delusion
00:11:52 –> 00:11:56 Paints, the Ink Sprays that Adirondack Color Wash.
00:11:56 –> 00:12:01 These guys are smart and they’ve got all, so you can see their branding and everything
00:12:01 –> 00:12:05 and all the colors and so you don’t have to look them up you don’t have to write them
00:12:05 –> 00:12:07 down, you can just print them out.
00:12:07 –> 00:12:13 Now, usually their– when you find a color chart online, when you print it out it’s going
00:12:13 –> 00:12:23 to land as an 8 1/2 by 11 size this is in fact the same Copic color sheet just to the
00:12:23 –> 00:12:29 8 1/2 by 11 so I had to size it down for my planner when I had put it in here.
00:12:29 –> 00:12:36 I’ll flip back to it so you can see the difference, here’s the size here.
00:12:36 –> 00:12:41 My particular printer, you can just choose an A5 size and then that will fit into these
00:12:41 –> 00:12:43 pocket pages quite nicely.
00:12:43 –> 00:12:54 I also found out that in A5 size is approximately seventy three percent so if you print your
00:12:54 –> 00:12:59 page seventy-three percent, you’re going to get this shrunk down to that size that works
00:12:59 –> 00:13:07 just great and so as far as the pocket pages and things, if you want to women pocket pages
00:13:07 –> 00:13:16 in a planner, there’s a couple of companies that do the 6×8 size pocket pages there’s
00:13:16 –> 00:13:20 the Snap! or the Simple Stories Snap!
00:13:20 –> 00:13:25 Pockets and the Project Life pockets.
00:13:25 –> 00:13:33 They both fit in an A5 planner though they’re slightly wider than the A5 size so they’re
00:13:33 –> 00:13:40 6×8, they’ll work just fine, you will have to probably punch extra holes to put in here
00:13:40 –> 00:13:47 but the– those ones both of those pocket pages have these two holes line up perfectly
00:13:47 –> 00:13:51 and then you just have to punch the outer two on each set.
00:13:51 –> 00:13:57 So it’s real doable and you can do– put them in there no problem, you just have to hand
00:13:57 –> 00:14:06 punch them out and then another thing I just recently did was I made a sampler sheet for
00:14:06 –> 00:14:11 my Washi tape and Washi tape is another one of those things where you can have a whole
00:14:11 –> 00:14:16 bunch of different patterns and sometimes, it goes on sale and then you think oh do I
00:14:16 –> 00:14:17 have any of that?
00:14:17 –> 00:14:22 And you don’t want more of the same one unless it was a total favorite so I just got ripped
00:14:22 –> 00:14:27 off I put out my first of all I took a piece of card stock cut it the size to fit my pocket
00:14:27 –> 00:14:35 page put a cute little colorful label at the top and then I just ripped out little sections
00:14:35 –> 00:14:38 of Washi tape and stuck them on there on both sides.
00:14:38 –> 00:14:45 And the cool thing about Washi tape is it’s it’s very repositionable so if I run out of
00:14:45 –> 00:14:49 this particular color, I can just take it off of there and then I know that I don’t
00:14:49 –> 00:14:54 have that tape anymore or I could move this to a spot worse and you know I just desperately
00:14:54 –> 00:14:57 need more of that particular one.
00:14:57 –> 00:15:02 So that’s a nice thing about Washi Tape, we can make these little cards.
00:15:02 –> 00:15:09 Now, I couldn’t find a printout sheets online and I haven’t had time to make some charts
00:15:09 –> 00:15:17 of myself so there are going to be a bunch of products that I don’t have printouts for
00:15:17 –> 00:15:22 yet like the Glimmer Mists this so I just hand wrote the amount just that I wouldn’t
00:15:22 –> 00:15:29 double by them and of course I’ve got walls of product and all kinds of glue all kinds
00:15:29 –> 00:15:39 of paints and pens and / PealEx powders and glues and glitters so eventually I can put
00:15:39 –> 00:15:46 it all into the system now if I have everything I owned in a binder I may just have to have
00:15:46 –> 00:15:52 his zipper binder all together and not included in my planner or have some that I swapped
00:15:52 –> 00:15:57 out– in and out but I thought you would enjoy seeing that how I’ve got things set up for
00:15:57 –> 00:16:03 myself and maybe it’ll work for you you can modify it however you like do it in a great
00:16:03 –> 00:16:09 big three ring binder if you want or just have a little tiny booklet that you can throw
00:16:09 –> 00:16:14 into your purse that you’ve just written down all of your different pens and inks and colors
00:16:14 –> 00:16:18 and things like that that way you’re not wasting your money buying stuff that you already have.
00:16:18 –> 00:16:19 Alright?
00:16:19 –> 00:16:24 So I hope that was helpful for you and if it was do let us know if you like this video
00:16:24 –> 00:16:28 and if you’ve got any cool tips or things that you would like to share make sure to
00:16:28 –> 00:16:34 leave those in the comment section below and if there is something you don’t know yet and
00:16:34 –> 00:16:38 you’ve looked through all of our videos and we don’t have a video on it yet but we do
00:16:38 –> 00:16:44 have tons so make sure to check those you can leave your comment or suggestion or whatever
00:16:44 –> 00:16:46 you want in the comments section below.
00:16:46 –> 00:16:47 Alright?
00:16:47 –> 00:16:50 So we’ll see you next time and bye for now
Our goal is to translate these videos into as many languages as possible. If you are interested in helping with this initiative, then please do contact us and we will figure out a way to make it worth your while :)
Resource Links:
- Amazon: Carpe Diem A5 Planner **
- Amazon: Simple Stories Plastic Pocket Pages **
- Amazon: Project Life Plastic Pocket Pages **
- Amazon: 6 Hole Punch for A5 Planners **
- Amazon: Prismacolor Premier Soft Core Pencils **
- Amazon: Copic Markers **
- Amazon: Clearsnap Colorbox Paint Box Ink **
- Related Video: Carpe Diem Paper Planner
- Related Video: How I Organize By Zones in My Polymer Clay Studio
- Related Video: Favorite 2015 Polymer Clay Tools And Supplies
- Related Article: Organizing And Storing Polymer Clay
Links To Free Printable Art Supply Color Charts:
- Prismacolor: Premier Colored Pencil Blank Color Chart
- Prismacolor: Premier Nupastel Blank Color Chart (PDF Download)
- Prismacolor: Premier Art Markers Blank Color Chart (PDF Download)
- Paperfections: Copic Marker Blank Color Chart
- Staedtler: Karat Aqua Colored Pencils Blank Color Chart by Ywana
- Ranger Products: Printable Blank Color Charts (multiple brands)
- Derwent: Watercolor Color Chart (PDF Download)
- Spectrum Noir: Marker Color Charts
Resources marked with a double ** asterisk are affiliate links. If you click on them and decide to buy something, we may receive some compensation. This does not affect the price you pay in any way. What it does do, however, is helps us to continue providing free videos for you, here at the PcT website. Using our links to purchase your tools and supplies, is always greatly appreciated.
Sponsored Ads & Special Promotions
Shareable Images


To share this full blog post anywhere on the web that allows links in comments, here's a shortened url to copy and paste...
>> https://mypct.ca/v718 <<
Want to chat about today’s post? That’s what the comment section below is for. Scroll Down… We’d love to hear from you!
Or... if you would like to request a topic for a future post, here is the link to do that… PcT Suggestion Box
Hi Cindy, I have a question about your planner. I got looking through all my stuff and I have a bunch of SNAP items that are 2 hole punched and are 6×8 size. I am wondering if they will fit in your binder being that it has 6 rings? I hate to not use them if the two holes line up with 2 of them in that binder and the rest I can punch. Center hole to center hole it measures 4 and 5/16″ or 11cm thereabouts. Do any of the holes in your binder line up to that measurement.?
Hi Dixie Anne, yes those 6×8 pages from your SNAP binders will fit into the A5 Carpe Diem Planner as well. You just need to punch the extra holes. In the video I mention the pocket pages only having two holes (They are from the same binder system that the SNAP system is from all made by Simple Stories.) Anyway, you will see the the video that the two holes line up perfectly with the center holes in each set of three binder rings, so by punching matching holes on either side of the two holes, you’ll have the six holes that you need.
It was because of this that I bought the Carpe Diem planner, because I too had pages that I wanted to transfer over to the new binder, so that I wouldn’t waste them. The 6 x 8 pages are the same size as the pocket pages I showed in the video, so they are larger than the A5 pages in width, but they still fit in this planner quite well. The only issue I had was with the dividers that were next to the snap strap, got bent over when the planner was snapped up, but that is because the dividers stick out even further than the pages. The whole cover is large enough for the pages and the dividers though, so if you don’t mind a couple of the tabs getting pushed over, than it will work fine for you until you eventually change over to the new planner pages… that is if you want to.
Hopefully that made sense. From what I can tell the Carpe Diem Planner has been such a huge hit that they will most likely add a lot more accessories with the six holes including pocket pages and stuff in the future. I don’t think this trend is going away any time soon.
Thank you so much Cindy, it looks like everyone is out of these planners they are so popular. I watched the YouTube video for it and it was really extensive. Some places are selling it for $35 but are out of stock. Hopefully I can get one soon. :)
All are excellent ideas. Love the inventory sheets. Does anyone have a link to the polymer clay sheets for premo, fimo, kato etc; Thats my biggest problem, knowing how many I have and of each color!
G’day Dixie Ann,
Like you I have a problem remembering how much clay I have especially when I have supplies in two countries so I built a small Excel spreadsheet to keep track of it. It’s programmable for individual needs with formulae built in so you can see what needs to be bought to keep stock levels up.
I think I have linked a copy to my Dropbox account but I’m not entirely sure of that so please excuse me if I don’t get this right first time! If anyone else reads this please feel free to download it and edit the numbers to suit your needs.
It does not have the newest Premo colours or any Souffle at all as it hadn’t been on the market when I first built it. If there are enough people interested I will create another workbook for Souffle. Feel free to adapt it to Fimo or Kato clays or any other brands.
Cheers,
Chrissie
Thanks Chrissie, I really don’t want another excel spread sheet. I like the new inventory sheets with the actual color or package showing for a planner. I know some of the companies have color lists just don’t know where to find them.
Thanks Chrissie for this idea – personally I’d rather have a list that I can scan quickly rather than samples. (Using the names alone isn’t perfect but it is at least fast!)
Nice job, Chrissie!
Thank you so much Chrissie for doing this chart for the community! You are a tremendous person and it will be very helpful to many people.
Cindy, what a great idea. I have made up this type of thing for my polymer clay to know exactly what I have bit I do admit to having doubled up on supplies a few times now so this is a perfect idea.
This would also be useful when you purchase texture stamps, stencils, moles and silkscreens.
I have purchased a few of the textures from cool tools and do need to check I do not double up.
And you are right, this will help to only purchase what we do not have. Thank you.
Hi Cindy!
I just made a quick and dirty Pinata Alcohol Inks Chart for myself, which other people may find useful as well :)
thanks Molly, that sure will help.
Excellent Molly! I have printed one up, added my new Pinata Inks I just got this week and have already put it in my planner. Thank you so much!
I loved the video and the chart are so helpful. Now my supplies will be way better organized and no more double purchases of some product. Thank you Cindy!
Cindy, I think this whole idea of getting [creatively] organized around your creative works and supplies is great! I am having fun just thinking about it. I am an organizer from way back, but what I have used so far for my clay stuff is coil-bound notebooks, which quickly become frustrating for so many reasons. So I am scouting around looking at some kind of loose-leaf system that appeals.
I have a question about the Project Life planners. When I went on line to look at them, the description said the capacity for the binder is 35 pages. I am pretty sure this is the pink one you show in the studio cam videos. Number one, 35 pages does not seem very much/enough to me, and number two, it looks like you have a whole lot more in yours. What’s the skinny?
Thanks as ever,
Fran
Hi Fran, the planner I have is the Carpe Diem Planner by Simple Stories. It will hold a lot more than 35 pages. I currently have 127 pages in mine (I counted because I was curious). Some are regular paper, some are dividers and some are the pocket pages with two pages in them. Plus there is a large pocket with stickers in it and the zipper pocket. There is still room for more pages yet, so unless the binder you found is way thinner, then I don’t really understand why they would say it only held 35 pages. Of course if you put really thick items in the pockets it would take up more room, but you should be able to figure out something that will work well for you.
I love this! It is so organized yet seems fairly simple with some prep work. Of course I’d actually have to follow through with adding the colors I bought as I went, but I just love the idea of having the information with me when I’m out at the store in case I see something on sale or something catches my eye or whatever.
Once you have it set up, adding the new stuff is fun. It isn’t a big deal to add one or two new colors and it makes you feel like you’re completing something… like sticking those stickers onto the Safeway card to get the glassware or something. It does help you when you’re in the store to not buy something you have or choose a color, too similar to what you already have. Sometimes it also prevents you from buying too much. When you flip out that page of washi tape and see how many you really have, you think maybe you really don’t need any more of those for awhile! ;)