
Polymer Clay Tutorial | Sew Your Own Dremel Buffing Wheel and Save
Polishing Polymer Clay Beads With Homemade Sewn Fabric Wheels:
More...

The other day I talked about how a Dremel rotary buffing tool is a super Christmas gift idea for anyone who wants to make polymer clay beads shine. I also provided direct links to a couple of video tutorials on how to use a Dremel rotary tool for buffing safely and effectively. Here’s the link to that article if you would like to catch up:
The Dremel… A Perfect Gift for Bead Crafters
Now, if you are going to use a Dremel tool to buff your beads, you may want to consider sewing your own buffing wheels. It’s quite easy to do and can save you a lot of money over time. Plus… no more worries of having to race out to pick up new ones when they wear out.
Although simple to make, there are a few things to keep in mind when making homemade polishing wheels for your Dremel or any other brand of rotary tool:
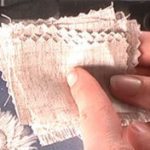
- Always use natural or un-dyed fabric. The dye in a fabric will transfer to the beads while buffing if you use a colored fabric. Linen, heavy cotton, white denim or canvas are good choices.
- Stack several sheets of fabric squares (as many as your machine can handle sewing through) and sew a spiral starting from the center and working your way out. Punch a small hole in the center for putting the screw through from the collet for your buffing wheel. Trim squares into a circle no bigger than 1" diameter.
- Don’t try to save time by skipping over the spiral sewing part. The fabric will quickly fall apart, flinging threads all over the place. Keep the spiral fairly tight to avoid long strands from flying off while in use. A few short threads will come off the first time you use it but will stop after a couple of uses.
- Don’t try to make your buffing wheels last longer by making them bigger than 1" diameter. This will put too much torque on the machine and make it overheat. Trust me… been there done that!
If you would like to see a video on how to make your own Dremel buffing wheels for polishing polymer clay beads, then check out:
- Vol-005-3 Sewing Your Own Dremel Buffing Wheels
This Dremel Tool Tutorial has 4 other related videos:
- Vol-005-1 Adding Crackled Gold Leaf Onto Tube Beads
- Vol-005-2 Wrap Round Beads With Crackled Gold Leaf
- Vol-005-3 Sewing Your Own Dremel Buffing Wheels
- Vol-005-4 Using Rubbing Alcohol To Clean Dirty Clay
- Vol-005-5 Learning From A Burnt Clay Mistake
If you would like to first see a preview clip of the Vol-005-3 polymer clay tutorial video, you can do that here:
Sponsored Ads & Special Promotions
Want to chat about today’s post? That’s what the comment section below is for. Scroll Down… We’d love to hear from you!
Or... if you would like to request a topic for a future post, here is the link to do that… PcT Suggestion Box
Cindy,
I have to thank you for your information about making a polishing wheel for a Dremel. You are the ONLY person or website who said that making your polishing wheel too big will put excess torque on the Dremel & overheat the motor.
Yesterday I bought a corded Dremel, and was anxious to see results with my felt polishing wheel. Soon the Dremel started feeling very hot. When I shut it off, it was actually smoking!
I turned to the web to see if I could find some explanation, and started wondering if my new Dremel was defective. Then I saw your comments and knew that was my exact problem.
I trimmed down the felt wheel, and my poly clay shines like glass now.
If only I had found your words of wisdom before I ventured into polishing! Many thanks for your insight, as well as your fact finding experimentations.
Carol
Thanks Carol for your comment! I am happy to help you with that problem. When I made those large wheels I had not thought of the size being the issue, but when I talked to Doug, he had mentioned it could be the reason for the over heating. Then I read somewhere that you couldn’t exceed a certain diameter and knew for sure that was the issue.
This blog is filled with information that solves all kinds of issues… figured out from mistakes I have made myself, knowledge gained throughout the years and knowledge shared here by others experiences. The search box at the top of the page is a great place to start when you have any issues in regards to working with polymer lay, so always start there.
Happy to have you here!
Jeesh, I meant to write “Google Custom Search.” Sometimes my fingers arent’ engaged with my brain, LOL.
I see comments on buffing with the Dremel. What about the sanding. Can you sand with the Dremel (mini?). I am a novice to polymer and have not finished any beads so any help would be appreciated. Thanks.
@Nancy Boaz: Nancy, put “sanding” in the Google Customer Search box in the upper LEFT corner of this screen. It will give you many references to sanding discussions.
Did you sign up for Cindy’s free newsletter? If not, go to the upper RIGHT corner of this screen, where it says “Click Here.” Signing up will entitle you to view 3 free videos from Cindy, including the one on sanding.
If you want to make a “power tool” for sanding from a cheap toothbrush, click my name next to this post. It will bring you to a tutorial on my blog for making a battery-operated toothbrush sander.
Finally, if you’re a Member here, you probably know that tomorrow’s video will show us how to use sanding pads. If you’re not a Member, you should be!!!
Membership costs $3.32 per month. For that you get 4 videos and 8 color recipes per month.
If you are interested, there is more information about using rotary power tools to buff polymer beads at the link by my name above.
Synthetic craft felt in white, is also a good choice of fabric for making your buffing wheels. But wool felt seems to get too hot and melt the beads surface.