Review BeeSPutty Plastic Sculpting Clay
Video #729: A unique alternative to polymer clay, with much superior properties for fine-art sculpted projects and creations.
More...

IN THIS POST: — beesputty — sculpting — clay — putty — plastic medium — beeswax — review — oven hardening — bakable — stefan neihues-ellermann — germany — sculptor — polymer clay brands — sculpting clay — (Topics marked with an asterick* are discussed in the Comments Section below).
In today’s video I am going to demo a new product called BeeSPutty Plastic. It is a oven-hardened modeling putty that has the consistency of Beeswax for sculpting, but can be baked to a hard plastic for permanency.
It was invented by a German Sculptor by the name of Stefan Neihues-Ellermann, who found that sculpting with Epoxy Putty was too restrictive because of the short working time before it hardened up. And Polymer Clay isn’t the best for doing highly detailed sculpting. What he really wanted was a material that had the same properties as sculpting with soft beeswax, but the permanency of the hardening clays and putties. So he came up with a solution… BeeSPutty Plastic.
It is much different than any of the polymer clays I have worked with. The sticky pliable waxiness of this product is perfect for sculpting. It sticks to itself very well… raw clay to raw clay… as well as raw clay to baked.
BeeSPutty can be baked in stages and new clay can be added and rebaked as many times as you wish.
There are similarities to polymer clay in that you can mix colors… and it doesn’t dry out or air harden, so you can take as long as you need to finish the piece, before baking. You can carve, drill, sand and buff, much like polymer clay, though a unique feature is that once baked, you can easily buff with a soft brush or cloth to a high shine, without the sanding that is required for polymer clay. Also perfect for sculpting.
On the other hand, it is not the most ideal medium for certain polymer clay techniques. For example, BeeSPutty is too sticky for pasta machines, unless you are constantly cleaning the rollers. And it is way too soft for caning. I can see some uses for bead making… especially sculpted beads, since it is perfectly suited for sculpting. It also may be good for some of the faux techniques and other small projects like making fairy doors, miniatures and that kind of thing.
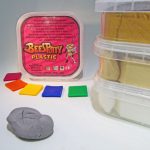
It comes in some basic sculpting formulas that are gray or gray-green in color, with 4 firmness levels… Regular (light gray), Firm (dark gray), Summer Firm for warmer temps (gray-green) and now a new one called Summer Firm Xtra (green-gray) which apparently bakes at a higher temp and is stronger.
There is also 2 opaque colors (White and Bone), 1 Metallic (Gold), and Translucent colors (Translucent, Skin, Black, Brown, Pink-magenta, Red, Orange, Yellow, Green, Blue and Purple). The Translucent is a lovely frosted White that shows NO signs of flaws or placquing. Nice!
The colors are easily mixable and seem to be based on the primary colors rather than artist pigments. The colors bake true and have very little to no color shift after baking.
I baked my samples at the recommended temperature of 115C (239F) for 30 minutes. However, I believe these numbers will need to be adjusted for optimal strength, because although the test samples in the video were nice and hard with flexibility on the thin pieces, they did snap quite easily when bent all the way. I have heard others speaking about the high strength of BeeSPutty, so I believe they either baked at a higher temperature, or they baked for a longer amount of time. Further testing will need to be done to determine which one, if not both, will be the case.
Overall, I find this clay to be an extremely interesting product that is especially suited for sculpting, rather than being an all purpose clay like Premo, Fimo or Kato Polyclay. I look forward to doing further testing and experimenting in the future
00:00:03 –> 00:00:08 Hi guys! It’s Cindy Lietz, your Polymer Clay Tutor in today’s PcT Product Demo. I’m going
00:00:08 –> 00:00:15 to show you all about a product called the BeeSPutty Plastic and it is an oven-hardening
00:00:15 –> 00:00:24 modeling putty that is meant for sculpting. Now, this is an unusual clay, the artist himself,
00:00:24 –> 00:00:33 he’s a sculptor his name is Stephan Nieheus Ellermann, sorry if I pronounced that wrong,
00:00:33 –> 00:00:39 he has a company called Studio Works and he is a sculptor and he– he lives in Germany
00:00:39 –> 00:00:47 and he’s designed a clay that will harden in the oven at a ver– a pretty low temperature
00:00:47 –> 00:00:52 actually, around the range that– that Fimo does but it has completely different properties.
00:00:52 –> 00:00:59 I’m going to show you a little bit about it, it has– it’s called BeeSPutty because it–
00:00:59 –> 00:01:08 it mimics it, it mimics beeswax so any of you that do sculpting– sculpting in bees
00:01:08 –> 00:01:15 wax, you’ll be able to be familiar with that– the type of property sits with it and it is–
00:01:15 –> 00:01:22 it’s a lot different than the polymer clays that I’ve ever worked with. It is stickier,
00:01:22 –> 00:01:28 it it had– it has it that a lot of different properties and let me just show you first
00:01:28 –> 00:01:35 how what it’s like in everything. OK, so he originally started off with some– with these
00:01:35 –> 00:01:42 kind of gray colors. They are– he’s got them in three different formulas and now he’s added
00:01:42 –> 00:01:51 a new one, one is the regular BeeSPutty and it is a gray color it is relatively soft once
00:01:51 –> 00:01:58 you start warming it up with your fingers. Then he’s got a firm version that is firmer
00:01:58 –> 00:02:06 and will hold a little bit finer detail and then he’s got a product called Summer Firm
00:02:06 –> 00:02:11 which will hold the pro–it’s even firmer and it will– even if your hands are really
00:02:11 –> 00:02:16 hot or the temperature that you’re working in is really hot, it doesn’t get too soft
00:02:16 –> 00:02:23 to work with so he’s got those three and those are typical for sculpting you know, all kinds
00:02:23 –> 00:02:27 of different sculptures. Let me just show you a picture first, I am NOT a sculptor myself–
00:02:27 –> 00:02:34 the most I’ve done in sculpting is with like sculpted flowers and sculpted beads and stuff
00:02:34 –> 00:02:44 but if you go to his website at beesputty.com, you can check out some of his pictures there
00:02:44 –> 00:02:50 but there’s a lot of these pieces were done by himself or by others and they’re highly-detailed
00:02:50 –> 00:02:59 sculptures of all kinds of faces and and different characters and things. It’s a very very neat
00:02:59 –> 00:03:07 plastic that I mean, putty that he’s–he’s designed here now he was doing his sculptures
00:03:07 –> 00:03:17 mostly in Epoxy Putty which is a two-part putty that you mix together to make your pieces,
00:03:17 –> 00:03:22 your armatures and and you’re different sculptures with but the problem with epoxies is that
00:03:22 –> 00:03:27 it hardens up rock hard and so you have to work with it really quickly and you can’t
00:03:27 –> 00:03:31 just leave your project sitting in there. Then he was also working with polymer clay,
00:03:31 –> 00:03:40 but polymer clay, when you sculpt with it, it doesn’t move the same way as working with
00:03:40 –> 00:03:44 beeswax. I guess beeswax is the nicest to work with, you can add layers, it’s sticky
00:03:44 –> 00:03:50 enough to add new pieces to it and to sculpt it and he just couldn’t get polymer clay to
00:03:50 –> 00:03:56 act that way. So he designed this product just for that and it’s really very neat. OK,
00:03:56 –> 00:04:03 so he has the three basic sculpting putties in the different forms then he has these other
00:04:03 –> 00:04:12 colors that he’s started to put together so he has three opaque colors: Opaque White,
00:04:12 –> 00:04:21 Bone and he’s got a new Gold clay and I wrote– I baked up all these different samples here
00:04:21 –> 00:04:27 and I rolled them out at different thicknesses so that we could see what it looked like and
00:04:27 –> 00:04:31 see the transparency of it. So here’s the white clay and you can see when it’s been
00:04:31 –> 00:04:36 baked up it doesn’t shift color at all and that’s partly because of the low– low temperature
00:04:36 –> 00:04:45 that is baked at which is a hundred and fifteen Celsius or 239 or 240 Fahrenheit. so that’s
00:04:45 –> 00:04:54 quite a low temperature but it bakes up quite firm, a little bit flexible here and I’ve
00:04:54 –> 00:05:00 got a sample we’ll test for actual strength in a minute but these colors here are–are
00:05:00 –> 00:05:06 very opaque so you can’t really see any light through them in their full dense rich colors.
00:05:06 –> 00:05:11 Now the bone here has a kind of little flexcksand stuff in it so if you’re working on a project
00:05:11 –> 00:05:17 that you really wanted to look like bone, it would be a great one to work with. Now,
00:05:17 –> 00:05:22 the gold here that they have has a lot of Mica in it and I don’t know if he’s going
00:05:22 –> 00:05:27 to be bringing in more colors with the metallics but it sure is beautiful it’s really rich
00:05:27 –> 00:05:39 and dense in the Opa–in the Pearl Metallic, Mica Powders and stuff then the rest of his
00:05:39 –> 00:05:46 color line is translucent. So, they’re all translucent based colors. Here is the white
00:05:46 –> 00:05:54 translucent, it is fantastic, it doesn’t– it doesn’t plaque at all if if you’re familiar
00:05:54 –> 00:06:00 with working with translucent clay is a lot of them will get what we call a plaquing or
00:06:00 –> 00:06:08 mooning where you get little marks in it where the– the clay kind of breaks away and flakes
00:06:08 –> 00:06:15 away on in the inside. So this, for the translucent clay here and also in the color that he’s
00:06:15 –> 00:06:21 got called Skin would make wonderful doll clay because it wouldn’t leave any little
00:06:21 –> 00:06:27 flaws in it. Also, I’m going to experiment more with it but it would make some of our
00:06:27 –> 00:06:31 Faux Stones and stuff would probably do very well with the translucent. I’ll just show
00:06:31 –> 00:06:37 you how thin– this is a very very thin piece here and we’ll just put on top of his print
00:06:37 –> 00:06:44 out here and you can see it’s quite translucent, it’s still quite frosted not totally clear
00:06:44 –> 00:06:48 like glass or anything but– but none of the polymer clay is that I’ve ever worked with
00:06:48 –> 00:06:54 are totally, totally clear but it’s really quite even and lovely looking. So he’s got
00:06:54 –> 00:07:01 a color here called Skin. Now you could tint your skin, obviously all skin isn’t the same
00:07:01 –> 00:07:06 color but you could attend to it using some of the Browns or the yellows or the whatever
00:07:06 –> 00:07:12 colors that you need to get your skin color. Here this color is called Brown, this one’s
00:07:12 –> 00:07:20 Black, this is called Pink, I would consider this one at magenta this is Red, Orange, Yellow,
00:07:20 –> 00:07:28 Green, Blue and Purple and they’re all just the basics and I did a quick little test to
00:07:28 –> 00:07:33 mix some of the colors together so i did one part of the Blue and one part of the Yellow
00:07:33 –> 00:07:38 and I got this really Dark Green color so the colors do mix really well so you can do
00:07:38 –> 00:07:45 lots of mixing and experimenting with it. You can see on some of these– some of these
00:07:45 –> 00:07:51 really thin colored pieces that they’re quite– quite translucent. I’ll hold it up to the
00:07:51 –> 00:07:56 light, hopefully you will be able to see you can see quite a bit of light through that.
00:07:56 –> 00:08:02 So you can get some very cool effects. I’m thinking that down this clay would work very
00:08:02 –> 00:08:11 nicely with doing flowers and sculpted pieces. Now, like I said, I’m not really a sculptor
00:08:11 –> 00:08:19 but I did make up just like a little branch here and baked it up it seems quite firm,
00:08:19 –> 00:08:26 it holds the detail quite well. I’ve got little lines on where the rings of the of the log
00:08:26 –> 00:08:31 are and you know, the little bark and stuff like that. So it holds it the detail really
00:08:31 –> 00:08:39 quite nicely and the neat thing about this clay is that it’s super sticky. For sculpting,
00:08:39 –> 00:08:47 that is a good feature because. Say you’re making a little tree or something and you
00:08:47 –> 00:08:53 want to add a new branch, you could, even after its baked, you can add another branch
00:08:53 –> 00:09:00 to it quite simply. I got pink out here so I wouldn’t normally put a pink branch on but
00:09:00 –> 00:09:07 why not. It sticks beautifully right to the to the baked clay to raw clay and you can
00:09:07 –> 00:09:15 add your pieces on really easily and it blends in really nicely and smoothly so it’s really
00:09:15 –> 00:09:23 neat to work with as far as adding pieces on. You can that– after its baked, so you
00:09:23 –> 00:09:28 can bake it as many times as you like so you can keep adding your features you could start
00:09:28 –> 00:09:35 off with an armature like a lot of sculptors do they have a wire armature you can cover
00:09:35 –> 00:09:43 it in your BeeSPutty, bake it and add new layers really really easily. Another thing
00:09:43 –> 00:09:51 is it, after it’s baked it you can carve it, you can drill it, you can sand it, it cuts
00:09:51 –> 00:09:58 really nicely with a knife so if you want to like remove parts of it or cut edges on
00:09:58 –> 00:10:06 it or carve at it you can do that really easily with a blade. So it’s got quite a nice density
00:10:06 –> 00:10:17 to it and another interesting feature is that it totally buffs up right after it’s been
00:10:17 –> 00:10:22 baked just with either a soft brush. He uses a like a to like a soft toothbrush to buff
00:10:22 –> 00:10:29 it up and get a shine on it but I actually found that a– just a cloth a piece of cloth
00:10:29 –> 00:10:36 or denim or anything will get a really nice shine on it really really quickly. So you–
00:10:36 –> 00:10:42 for your sculptures and things, all you need to do is you don’t even really have to finish
00:10:42 –> 00:10:48 it. All you need to do is just buff it, up get into the little detailed areas with with
00:10:48 –> 00:10:56 a brush and get a really neat waxy kind of shine to it. Now let’s just test for strength
00:10:56 –> 00:11:06 there I baked up a piece here at – what was it – 240 Fahrenheit so 115 Celsius and I baked
00:11:06 –> 00:11:15 it for the recommended half an hour and we’ve got up– it has broken they’re quite fairly
00:11:15 –> 00:11:21 easily, actually but he was telling me that if you bake it for longer so I’m going to
00:11:21 –> 00:11:27 have to bake it for longer than that to get some more strength with it, you will you can
00:11:27 –> 00:11:34 get more strength with it. He’s also got a new product that is baked at a slightly higher
00:11:34 –> 00:11:42 temperature, it’s called Summer Firm Extra I believe so extra firm and that one is supposed
00:11:42 –> 00:11:51 to be baked at 240 which is a little higher, I mean not 240, 140 Celsius so whatever that
00:11:51 –> 00:11:57 is Fahrenheit and apparently that is really very strong. We’ll try one of these thin pieces
00:11:57 –> 00:12:02 and see, oh yeah, that’s breaking – Oh too bad, maybe I should have big that when a little
00:12:02 –> 00:12:07 longer than 30 minutes but that’s something that I would have to test a little bit further
00:12:07 –> 00:12:14 to get a good handle on but any of you that are interested in sculpting and that kind
00:12:14 –> 00:12:21 of thing, this is a very unique product, it’s beautiful in the feel of it is really beautiful
00:12:21 –> 00:12:27 and I have enjoyed playing with it and getting to know it. Now, if you want to check out
00:12:27 –> 00:12:35 the product it is at beesputty.com and he’s in Germany he ships internationally and I
00:12:35 –> 00:12:40 think he has some distributors in other locations as well. So if you want to check that out.
00:12:40 –> 00:12:48 It is a little bit more expensive than regular polymer clay but it has the features that
00:12:48 –> 00:12:56 a sculptor would be very interested in. Alright, so I hope you found that helpful and if you
00:12:56 –> 00:13:02 did, do let us know if you liked this video and if you have a product you’d like me to
00:13:02 –> 00:13:08 test, something you’d like to learn more about do let me know in the comments section below
00:13:08 –> 00:13:14 and don’t forget we have absolutely tons and tons of videos where we’ve tested out products
00:13:14 –> 00:13:18 we’ve tried new things, done lots of different techniques that you may want to check out.
00:13:18 –> 00:13:27 Alright so we will see you in the next–in another time. Alright, bye for now.
Our goal is to translate these videos into as many languages as possible. If you are interested in helping with this initiative, then please do contact us and we will figure out a way to make it worth your while :)
Resource Links:
- BeeSPutty: Official BeeSPutty Product Website
- Related Video: The FIMO Professional True Color Mixing System
- Related Video: Seven Summer Tips For Working With Polymer Clay
- Related Video: Cymbidium Orchid Vol-075 Polymer Clay Tutorial
- Related Video: Sabertooth Tiger Beads Halloween Costume Jewelry
- Related Video: Comparing Translucent Polymer Clay Brands
Resources marked with a double ** asterisk are affiliate links. If you click on them and decide to buy something, we may receive some compensation. This does not affect the price you pay in any way. What it does do, however, is helps us to continue providing free videos for you, here at the PcT website. Using our links to purchase your tools and supplies, is always greatly appreciated.
Sponsored Ads & Special Promotions
Shareable Images


To share this full blog post anywhere on the web that allows links in comments, here's a shortened url to copy and paste...
>> https://mypct.ca/v729 <<
Want to chat about today’s post? That’s what the comment section below is for. Scroll Down… We’d love to hear from you!
Or... if you would like to request a topic for a future post, here is the link to do that… PcT Suggestion Box
Thanks, Cindy. Love hearing about all these new and related clay products, so exciting!
Thanks Jocelyn! Glad you liked the video!
Hi Cindy..
Is the finish on the Beespuddy one could wear against the skin, such as in jewelry, and not feel sticky or leave a residue? Could it, in your opinion, be used for jewelry making?
Hi Louise, the BeeSputty would be just fine for wearing against the skin… it doesn’t feel sticky or anything once it is baked. It would be great for jewelry as long as it was baked long enough to be strong. I still haven’t had the chance to test how long is the ideal time, but I am guessing an hour would probably do it.
Thanks Cindy,
I don’t plan to jump on the product right now, I’ll wait until you experiment with it a bit and see what you have to say about it later.
Thank you for all the products you introduce us to.
Louise
This looks like a really interesting product. I’d love to see what you come up with on other ways of using it.
Thanks again Team Lietz!