Reviving Old And Cracked Polymer Clay Canes
Video #359: Testing several different clay softening products on brittle polymer canes.
More...

IN THIS POST: — old canes — clay softeners — plastic wrap — cracking — hard clay — plasticizers — (Topics marked with an asterisk* are discussed in the Comments Section below).
Topics Covered In This Video:
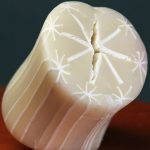
- Sections of an old and cracked Dandelion Fluff Cane were cut into sections and treated with several products in an attempt to re-introduce oils and plasticizers back into the clay.
- Cane sections were coated with the following products, and then wrapped with a sealing layer of Glad Cling Wrap so they could soak for 5 days.
– Sculpey Clay Softener
– TLS (Translucent Liquid Sculpey)
– Kato Liquid Polyclay
– Fimo Mix Quick
– Sculpey Mold Maker (Super Elasticlay) - Two additional samples were treated by warming them at low temperature for 5 minutes:
– One sat in hot tap water
– The other sat in oven set at under 150F - I then attempted to reduce all the above samples to see if the treatments were effective for reviving the old canes.
- The results were varied… the best being the warming of the clay using water or the oven, next successful was the TLS, then the Fimo Mix Quick. The other results were poor at best.
Would you bother trying to do any of these different things to revive your old canes? Or would you just skip it and use the old canes for scrap clay?
I look forward to hearing from you.
00:00:04 –> 00:00:08 Hi guys, its Cindy Lietz, your Polymer Clay Tutor, and today in the PCT test lab we are
00:00:09 –> 00:00:14 going to try a few different ways to revive old canes.
00:00:14 –> 00:00:20 Now I don’t know about you, but if you have some canes sitting around for a while, sometimes
00:00:20 –> 00:00:25 they can get hard and stiff and they’re hard to reduce.
00:00:25 –> 00:00:32 Here is a Dandelion Fluff Cane that I made…I don’t know when I did the tutorial, quite
00:00:32 –> 00:00:40 a long time ago, and I got it out to try to revive it and when I was reducing it, it got
00:00:40 –> 00:00:42 all cracked inside.
00:00:42 –> 00:00:47 And you may have discovered this before when you’re… you take a slice off of the cane,
00:00:47 –> 00:00:50 you try to roll it out and it all cracks.
00:00:50 –> 00:00:57 Sometimes you can revive them, and I’ve been handing out some ideas on how to revive it
00:00:57 –> 00:01:02 for a while, but you know what, I think since the formula has changed over the years in
00:01:02 –> 00:01:06 Polymer Clay, I wanted to go back and test some of these ideas and see if they still
00:01:06 –> 00:01:07 work.
00:01:07 –> 00:01:15 So I took a chunk off…took several chunks actually, off of the…this was quite a long
00:01:15 –> 00:01:23 cane, about that long, and I did several different things to them.This one here…and each one
00:01:23 –> 00:01:31 is wrapped in plastic wrap, and I did this last Thursday, so about 5 days ago or so,
00:01:31 –> 00:01:40 and what I did was I took a chunk of it and I added…on this one here, I put a layer
00:01:40 –> 00:01:47 of Sculpey softener, it’s a dilutant that you can use to soften clay, and what I did
00:01:47 –> 00:01:53 was I just rubbed a layer of this all on the outside and let it soak in, and wrapped it
00:01:53 –> 00:01:59 in…now this is a particular kind of plastic wrap, this is Saran Wrap…or Glad…Glad
00:01:59 –> 00:02:02 King…what is it?
00:02:02 –> 00:02:08 Which one…it’s this one, Glad Cling Wrap, you don’t wanna use the wrong one because
00:02:08 –> 00:02:18 wrong plastic wraps will eat away at your clay, so anyways, I digress.
00:02:18 –> 00:02:20 So I wrapped each one, this one I did…
00:02:20 –> 00:02:27 I put a layer of the dilutant on there, the Sculpey softener, this one I put a layer of
00:02:27 –> 00:02:37 TLS, so Sculpey Translucent Liquid Clay, and this one I can still feel it’s a little bit
00:02:37 –> 00:02:45 sticky, we’re gonna try to reduce those in a second, this one I put a layer of Kato Poly…Liquid
00:02:45 –> 00:02:53 Poly Clay, now these original canes were Premo, I only tested it with the liquid Kato to see
00:02:53 –> 00:02:59 if it would work, but it may or may not be compatible anyways, so we’ll just see, but
00:02:59 –> 00:03:01 since I had it, I might as well test it.
00:03:01 –> 00:03:12 This one here, it looks a little different because I covered it in a thin layer of Fimo
00:03:12 –> 00:03:19 Mix Quick, and this is a product that you can mix into clay as a softener, and it looks
00:03:19 –> 00:03:26 like a clay itself, and you kinda just roll it out, it’s a little stickier, and it has
00:03:26 –> 00:03:31 more plasticizers in it, so I put a layer of that on the outside of this cane.
00:03:31 –> 00:03:41 And on this one, I put a layer of Mold Maker, Sculpey Mold Maker, it is also known as Super
00:03:41 –> 00:03:46 Elastic Clay, now this can also be used as a clay softener.
00:03:46 –> 00:03:52 So all these tips here, all these different products I was using will soften clay normally,
00:03:52 –> 00:03:58 but I wanted to see if a layer on the outside would help absorb back into the cane and make
00:03:58 –> 00:04:03 it come back to life again, it used to be able to work but I don’t know if it’s gonna
00:04:03 –> 00:04:04 work this time.
00:04:04 –> 00:04:12 And then another 2 ways to do it, is to warm up the clay, so I’m gonna take my remaining
00:04:12 –> 00:04:19 cane and I’m gonna put one piece….I’m gonna cut it in half, and I’m gonna put one piece
00:04:19 –> 00:04:26 into a bowl of warm water and just let it warm up in there, so it was hot tap water.
00:04:26 –> 00:04:33 And then I’m gonna take the other piece and I’m going to set it in my oven, now I had
00:04:33 –> 00:04:41 this warmed up at the lowest setting I could get it, my thermometer is reading under the
00:04:41 –> 00:04:48 150 degrees Fahrenheit, so it’s really, really, really low, in fact it just feels warm to
00:04:48 –> 00:04:54 the touch, I’m gonna set this piece in here for 5 minutes or so while we’re just working
00:04:54 –> 00:04:55 with these other pieces.
00:04:55 –> 00:05:00 So those other 2 are warming up and then we’re gonna go back to these other pieces.
00:05:00 –> 00:05:09 Now I wanted to see if the…if it would reduce now, on the Sculpey Clay softener one, I can
00:05:09 –> 00:05:19 see all of the oil has gone into it, but it still feels really, really, really firm and
00:05:19 –> 00:05:24 I don’t know if I can get it to move at all, I’ll try.
00:05:24 –> 00:05:32 It doesn’t really want to move, oh and it’s cracking here, see that?
00:05:32 –> 00:05:35 So that doesn’t really work.
00:05:35 –> 00:05:45 Let’s try the next one, this is the TLS one, I can see on the surface of this one that
00:05:45 –> 00:05:54 there’s kind of a film on it, it’s dried out a bit, but it has sunk into the clay to a
00:05:54 –> 00:06:00 certain extent, so let me just see if I can get to reduce this, actually, this one feels
00:06:00 –> 00:06:07 a little bit softer, you can see I’m already getting it to move a bit, this one actually
00:06:07 –> 00:06:22 has a bit of potential, and oh yes, I think this one actually is going to work, it’s still
00:06:22 –> 00:06:29 pretty firm but it feels softer than the clay softener one did.
00:06:29 –> 00:06:37 I could keep going I guess, don’t have a ton of time here, this one looks like it’s actually
00:06:37 –> 00:06:41 gonna work and I don’t see any cracking or anything along the side here, it’s still quite
00:06:41 –> 00:06:46 firm but it looks like it’s working, okay?
00:06:46 –> 00:06:54 Now the next one is the Kato PolyClay one, it looks like it actually absorbed into there,
00:06:54 –> 00:07:09 it doesn’t feel quite as sticky as the liquid clay did…no, this one’s not working…well
00:07:09 –> 00:07:13 it’s doing something interesting, I’m not sure if the camera will pick up on it, but
00:07:13 –> 00:07:21 the surface is…has got kind of cracking on it, so it’s almost like the Kato Liquid
00:07:21 –> 00:07:26 crackled a bit and has dried out on there.
00:07:26 –> 00:07:32 Don’t know, it does feel softer than the clay softener one but it doesn’t feel quite right,
00:07:32 –> 00:07:38 it looks like it’s actually drying out the cane, and it’s probably just the compatibility
00:07:38 –> 00:07:45 issue, it’s not the same brand, so…yeah I don’t know if it’s gonna work or not, not
00:07:45 –> 00:07:49 super successfully anyways, it’s a little softer though.
00:07:49 –> 00:07:55 Let’s move to the next one, now this one’s the one with the Fimo Mix Quick, and of course
00:07:55 –> 00:08:02 what we’d have to do is, if we could get it to reduce, we’d have to trim off that layer
00:08:02 –> 00:08:09 of Fimo Quick Mix off of the outside after we reduced it.
00:08:09 –> 00:08:18 It feels…oh it’s pretty firm, but it does look like it’s moving, it was quite thin before
00:08:18 –> 00:08:26 and it does look like it’s mov ng, it feels pretty stiff but I don’t…well I don’t
00:08:26 –> 00:08:33 know, it’s difficult to tell, why don’t we cut it open a bit and see if it’s cracking
00:08:33 –> 00:08:36 on the inside there at all.
00:08:36 –> 00:08:44 No, actually it looks very good, so this actually will work, I used to use this on the older
00:08:44 –> 00:08:53 canes and it worked okay, so this one might work, with some work, it looks promising actually.
00:08:53 –> 00:09:02 Now… and then the Mold Maker, we’ll try that one, now this one feels quite a bit softer,
00:09:02 –> 00:09:09 but that could just be the outside of the clay, the Mold Maker…oh and underneath it
00:09:09 –> 00:09:15 feels really hard, and I don’t know if I can get it to move at all, let’s cut the front
00:09:15 –> 00:09:25 of that one off and see if there’s any cracking or anything, it looks about the same as the
00:09:25 –> 00:09:30 Fimo Mix Quick, but I’m really feeling… it’s really not moving at all, I can’t hardly
00:09:30 –> 00:09:36 get it to move, just the outside is moving, so I don’t think that will work very well.
00:09:36 –> 00:09:42 Then let’s try this one that’s been sitting in the oven, now you have to be super, super
00:09:42 –> 00:09:48 careful of anything in the oven, that you don’t let it get any warmer than like a 100F
00:09:48 –> 00:09:53 or 150F or so because otherwise you’re gonna start baking your piece and you don’t want
00:09:53 –> 00:09:54 that.
00:09:54 –> 00:10:02 So this one feels warmish, and this one feels good actually, this is the best of all of
00:10:02 –> 00:10:11 them so far and the cheapest, so this actually is very promising, you just have to be really
00:10:11 –> 00:10:20 careful not to…not to overdo it, otherwise you’ll bake your cane in there, okay so that
00:10:20 –> 00:10:25 one works, you’d have to keep going on that, but I’m not seeing… oh there is some slight
00:10:25 –> 00:10:30 cracking along the side, so maybe if you popped it back and forth, you would get some better
00:10:30 –> 00:10:33 results, but it is moving.
00:10:33 –> 00:10:39 And then let’s lastly try the one sitting in the water, I’m gonna dry it off and then
00:10:39 –> 00:10:46 try that one, ooh, and it feels good too, now you could use a warm rice bag or heat
00:10:46 –> 00:10:53 pack or something like that, and this one’s moving as well, though it doesn’t feel quite…the
00:10:53 –> 00:10:59 center feels a little firm, so this one would work as well and I think if I were you, I
00:10:59 –> 00:11:02 would start with the 2 warming methods first.
00:11:02 –> 00:11:10 The other methods, it looks like the TLS worked pretty good and the Mix Quick and the Mold
00:11:10 –> 00:11:17 Maker…mmm, the Mix Quick was a little better, so the TLS and the Mix Quick were better,
00:11:17 –> 00:11:20 and the very best ones I thought were just the warming it up.
00:11:20 –> 00:11:28 So I hope that was helpful for you, and you know if you can’t get the thing to move, the
00:11:28 –> 00:11:29 new…
00:11:29 –> 00:11:32 I mean your old canes to move or work and reduce; then chop them up and make them into
00:11:32 –> 00:11:39 just…you know, some scrap clay, and…or you can make some Natasha beads and all kinds
00:11:39 –> 00:11:41 of neat things with them.
00:11:41 –> 00:11:45 So I hope you learned something from that, if you liked it, make sure to press that like
00:11:45 –> 00:11:48 button, I really appreciate that.
00:11:48 –> 00:11:55 And my question for you is, would you bother trying to do all these different things to
00:11:55 –> 00:11:58 make that…revive that old cane?
00:11:58 –> 00:12:06 Or would you just skip it and go straight to using it as scrap clay.
00:12:06 –> 00:12:11 That’s all for me today and I enjoyed being with you, and I will see you next time.
00:12:11 –> 00:12:12 Bye for now.
Our goal is to translate these videos into as many languages as possible. If you are interested in helping with this initiative, then please do contact us and we will figure out a way to make it worth your while :)
Resource Links:
- Related Video: Dandelion Fluff Cane
- Related Video: Store Polymer Clay Canes Using Plastic Wrap
- Related Article: Reviving Old Hard Or Cracking Polymer Clay Canes
- Amazon: Sculpey Liquid Clay Softener **
- Amazon: Glad Cling Wrap **
- Amazon: Sculpey Translucent Liquid **
- Amazon: Kato Liquid Polyclay **
- Amazon: FIMO Mix Quick Clay Softener **
- Amazon: Sculpey Mold Maker **
Resources marked with a double ** asterisk are affiliate links. If you click on them and decide to buy something, we may receive some compensation. This does not affect the price you pay in any way. What it does do, however, is helps us to continue providing free videos for you, here at the PcT website. Using our links to purchase your tools and supplies, is always greatly appreciated.
Sponsored Ads & Special Promotions
Shareable Images


To share this full blog post anywhere on the web that allows links in comments, here's a shortened url to copy and paste...
>> https://mypct.ca/v359 <<
Want to chat about today’s post? That’s what the comment section below is for. Scroll Down… We’d love to hear from you!
Or... if you would like to request a topic for a future post, here is the link to do that… PcT Suggestion Box
Hi Cindy, I was just reading about renewing old canes on your site.
My situation that is driving me nuts because no one and I mean NO ONE has an answer or replies.
I made a ton (16 huge tiles – maybe 11×22″) of different colors of beautiful Mokume Gane. I then began working with PMC and the polymer was put aside for the moment.
It turns out, she said unhappily, that the Mokume dries out and I don’t know what to do. Throwing it away would be like killing a cat (which I would never do). I thought of using it with a project I have going using Sculpey Premo. The Mokume is made from Kato clay. Hmm. How could I apply some pieces of the Kato to the Sculpey and bake them appropriately? What temp and for how long? Donna Kato was vague but she said an hour. HUH?
Can you help me figure this out, it’s important to me to do this (I AM tenacious).
PLEASE! PLEASE! PLEASE help, I don’t want to lose the patterns, you know?
Thanx,
Betsy
Hi Betsy, as long as your clay has been stored properly and the oils haven’t been leached out of it, then you should be able to work with them again,even if they have been around for quite awhile. You need to wake them up a bit by warming them up a bit and lightly rolling over them to get the oils moving in them again or they will crack if you try and rush them. You can use many of the same tricks that I talk about for the canes above.
Donna Kato was right about baking for an hour. If you use the search box at the top of the page and do a search on baking, you will see that I recommend that you bake your pieces for an hour as well. Most of the professional artists do actually. It makes the pieces much stronger. DO follow the other baking advice I give as well for using an oven thermometer, tenting and insulating your piece, etc.
Spend as much time do research on this blog as you can and you will find that the answers are all pretty much here and that they are explained in a way that will make things clear for you. If you need more help there are paid tutorials and a basics course that will help as well. (Look for the link to the course at the top of the page as well.)
Good luck!
Jill, old clay also makes great scrap canes. you would be amazed at how gorgious some of them are. I’ve seen 20 yrs. old clay reconditioned back to new. So save every piece and never throw any of it out.
Thanks, Dixie Ann. I have an old cane whose colors I LOVE! I am going to see what I can do with that particular one.
Thank you Cindy, Elaine, and Hermine. Here is what I did. I put some clay softener on half of the scrap clay and left the other half as it was. I used an art sheet to cover the softened clay and the rolled mokume gane technique on the “as is” clay. (I had really conditioned the heck out of it anyway.) After curing, I don’t really see a difference. Happy ending! Thanks, ladies. for answering my question. I feel like the eternal newbie. (I had searched high and low on the Internet and could not find an answer.)
Yes it can be used as bead core but not in the condition you seem to have it now.Try conditionning it more . It should be as smooth as regular clay .Cracks now will give you cracks after curing. It pays to take the time.
Did you know that scrap clay can be used to make molds also?
Hey, community. I have a question about old clay. Can it be used as bead cores? I am conditioning some old clay with my pasta machine. I have it to the point that it only slightly cracks when I fold it over tightly after running through on the thickest setting. I do have clay softener if I need to use it. Can I use the clay for bead cores in the condition I have it now?
Hi Jill, that sounds fine. As long as the clay doesn’t crumble, it will make a great core for your beads.
Whoops!
Sorry Cindy, thought I would answer a few questions as know you are super busy so did not mean to disagree with your advice to Jill V.
Just giving my opinion to peeps that are new to polymer clay, as some brands can be tricky!!……………………cheers x……………………………
No problem Elaine! You brought up some excellent points!
Hi Jill V
You will probably trap air-pockets when you cover old clay that has not been conditioned well.
The old clay is ideal to use as bead cores BUT the new clay will not be happy if it has to cover old hard cracked clay. It would be like if you laid on rocks instead of a soft comfy bed!
. So make the effort to run it through your pasta machine at the next thinner setting, then roll it up by hand, flatten it so it will go through thickest setting again a few times. then carry on repeating at thinner settings until it is “good as new” and a lovely color of “mud”
This is not instant art , both old and new clay need to feel comfortable together and the end result will be worth all that effort. .Beautiful beads……………cheers
Hey Cindy,
I’m just beginning working with polymer clay and I must say your tutorials have been very helpful.
Next up I was planning on making a (square) cane that I will use to ‘brand’ my jewelry pieces with, some kind of a signature. Since this is a cane I will not use extensively I was wondering how long a cane would be useable. Hence I looked for some insights from you and this is why I attach my question to this tutorial.
There’s two aspects to it. It seems to me you store your canes in a size (width) bigger than you are planning to use. I assume that this is so that you can re-‘condition’ the clay before you actually use it. But, the amounts of the cane I’d need to use for a signature is small. In the end I’d only use a sliver of a, roughly a quarter inch in width, cane for each pedant, so having a can with even an inch width as a starting point, needing quite some thick slices to reduce them, would yield way to more than I’d actually need.
So, storing a cane already reduced to the width I need, sound better, but how would you recommend actually proceeding using slices of such a cane.
The second thing I’m wondering is: in this video you talk about ‘old’ cans. Now, in you experience, how old can a can get without running into the problems you’re describing here.
Both questions relate to a large extend to how big a cane I would optimally need to make for my purposes.
Cheers and thanks again for the effort of putting good info out there for us to enjoy and learn from !
Hi there Geert,
Good question! ( I am butting in here as Cindy is super busy)
If you reduce your signature cane in three or four sizes, then bake them for at least half an hour, they can be stored (forever).
What I then do is either heat the tiny cane ( I leave it in very hot water until it will bend without cracking or breaking). usually about five minuets. While still warm I wipe it dry with paper towel. then II slice it to the thickness I need using a safety razor blade, apply Kato Poly paste or Bake n Bond to the back and press it into my raw unbaked clay piece ready to bake for one hour at temperature printed on the packet
This works for me and I need a few different sizes so all my work is co-ordinated. I find that once they are part-baked and warmed a cane will not distort from it’s original design, but this is only my opinion. If you use two contrasting colors (one light and one dark) you will only need a very small amount of clay. Experimenting is fun. So the small amount (about one sixteenth of a 2oz block of each color), will not break the bank and you will only really learn if you do it yourself..
As to how long an unbaked cane can be stored, this depends on a lot of variables, so there is no standard answer as polymer clay storage differs from country to country, altitude, etc. etc.. So have fun and Go For It. …….. Welcome to our clay family………..
Cindy,
I have created snakes of polymer clay……..left them in baggies for a month or two only to come back and when I start to use the clay the clay “shreds”. It seems to shred usually from the middle of the snake. I can’t seem to find an answer as to why? Do you know why? If I’m not mistaken I think it is only with Fimo Soft clay. I don’t remember this with any of the other brands.
Thanks
Great Video!….What I have found to loosen up my “really old” canes is to set then under a light bulb! Not real close just close enough to get the warmth…..
Hi Cindy,
Thanks for the helpful tips! Love the new doo by the way !! Anyways, I have used the Sulpey Clay Softener and the TLS with great success ! As for measuring how much to use well I go by the amount of clay that I have that needs to be soften and add drops as I go along. As for old canes I just spread a thin coat all over the cane and massage it in until I get it to loosen up and keep adding the softener until it’s ready to reduce. This has been very helpful though.
Thank You Very Much !
Debra G.
Been doing some reorg, whoa do I have polymer clay stuff. Now, to get all the packed away stuff set up, especially the motorized.
Along the lines of this dry cane tutorial, I have a similiar problem I would like to see if you folks can solve.
With the exceptions of a few recent FIMO blessings, and I am looking at you Ms. Karonkay (with blessings and thanks to you both, will send you back that Japanese clay flower book as soon as I find a packing envelope big enough), most of my clay is over a decade old.
Doesn’t deter me in the least. Love reconstituting it all.
But sometimes, I question just how much liquid clay loosener or mix quick, or mineral oil, or transparent clay to add to a ball of crumply old clay. Then, occasionally, I overdo the softening, and then must leach the clays. They all must be the same for a cane to reduce properly.
Could you do a lab coat demo of how to do this, based on the best findings of you and the group? Would love to find the fastest solutions to both soften and leach clay until it matches the rest of the colors (in a group to make a cane), and be shown visually exactly what well reconstituted clay looks like, when to soften, and how much, then how to leach.
Most of your tutes are done using fresh new clay out of the wrapper, which is the ideal and great. But, getting the old stuff to work as well is a challenge I would love to master.
I would appreciate it so much.
One thing I have found really works best is to get one of the multi setting medical electrical heating pads at the pharmacy. Set it up flat on a heat proof surface, and set it on low. Cover the pad with an old towel, put your clay in a plastic bag within the towel, and check it every ten minutes. Nothing helps more than warmed clay, even if it’s ancient, lol.
You bring up an excellent point Jocelyn! I think it is a struggle for a lot of pole, just trying to figure out how to get the ‘right’ consistency to their clay, old or new. I will put some thought into how to teach that to everyone. I know there is lots of different posts on the subject but it may just help if there was a specific video on it. I will see what I can do.
Wooohoo, thanks! Us “poles” need to know, lol!
Ooops typing too fast again! lol
So glad you received the little package. I am still finding some that I will never use, so don’t be surprised if you get another small surprise one day. Just glad I have found someone who needs the errors in my purchasing sprees. Hugs Karonkay.
Karon, I do appreciate you putting me on the list for rejects, it means the world to me. Fixed income in an economic decline challenges you to pare down to the bare minimums, which I don’t mind, it’s a good challenge. It also might inspire me to improve my work with polymer clay so that it can become a source of income.
I love experimenting, and use every piece and variety of clay I can get my hands on, because I know from experience that if I warm it, whirl it in the food processor with thinners, beat it with mallets (:D), then run it through the motorized pasta machine, I get clay I can use, even if it just is the kind that goes inside to shape a piece and use poly fabric on the surface.
When I am working with polymer clay, I am totally and completely absorbed in that process. No worries about health, bills, pain….nothing intrudes. It is the ultimate stress reducer!!!
Back to you, can you give us a hint as to how much longer it will be until you can share all the results of your recent spectacular work reproducing flowers?
I pant to see the whole collection!!!!
Cindy, thanks for taking the time to show different steps. I have just used the warm up method.
I make natasha beads all the time but have never tried it with a cane. I will definitely try it very soon. Thank you for this suggestion.
OH MY GOSH! It arrived, I have tried it and I am IN love with R wax now!! And TWO coats are stunning!! Thank you Cindy.
Hi Cindy. Thank you for the good info in this tutorial. I never thought I would need to worry about this problem because I primarily use Sculpey III for my canes. And I have some that are 10 or even 15 years old that are still easily reduced and sliced. But since I have started using some Premo in a few canes (because I got some at an outrageously low price and to use some of your color recipes) I have had some issues with this happening. Especially with the translucents which are my favorites. What I have found works best for me is an electric lap blanket. (I usually have it on my lap anyway from the air conditioner running) So I just wrap them in cling wrap then lay them in my lap and fold a flap of the blanket over them. Then with the blanket on medium I work on some other projects for a while and they just warm right up. I use this to soften new blocks of clay before I condition them too. It sure saves my poor old hands. :)
Great tip Jamie, where can I buy an electric lap blanket as this sounds a great tip for softening new blocks before conditioning……cheers xx………
I agree, this is an awesome tip Jamie! So nice to hear from you. Hope you are well!
@ Elaine-Sorry so long to reply. I had a bunch of Easter clay orders come up and Ive been busy busy. My lap blanket was gotten at Wal-Mart. But it is a Sunbeam brand name so Im sure its readily available most places that sell that sort of thing. Especially this time of year you might even find them on sale. Happy hunting.
@ Cindy- Always glad to add my 2 cents when it can help someone. I am well and thank you for asking. Winter is a bit rough on my hands so claying is slow, but steady. And luckily, knock wood, so far no serious bugs have caught up to me this cold season. So I can handle a few aches and pains. hahaha. They let me know Im still here LOL.
PS I just found out the other day that the blanket works very well for old sheets of clay too! I had a few I needed to use but they were a few months old and wanted to crack. So into the saran wrap and onto the blanket they went. It worked great! Happy Easter and happy claying to all.
Great tips, Cindy. It would really depend on how much I like the cane. If I thought it was worth the effort to revive it then I would definitely give it a try.
Thanks Cindy. Good tips. I have the very same cane we made a couple of years ago! I will try warming it.
Hi Cindy
I really liked this video as I had some really small, old cane from a swap. I wanted to try some but when I went to slice the cane it basically just crumbled. After watching your video I tossed them all in a bowel with really warm water. Today I took them out of the bowl, rolled them just a tiny bit and sliced. They’re perfect! It’s small tips like that which I appreciate the most.
Thanks again and again,
JoAnne
Hi Cindy,
I have something I would be interested in seeing you discuss. I did a search on glues and adhesives and it looked like most of your discussions are a few years old. I know Weldbond is one of your favorites but would like it compared to others for different needs. Or, have you found another favorite? For example, how does E6000 compare? What’s best for adhering metal to clay, or fabric to clay, etc. I have some ideas involving mixed media but the issue of making lasting bonds has me hesitating. I’ve had a couple if things come apart though I used an adhesive that was supposed to work. Thanks!
(If I messed up my search and you have a recent tutorial, I would appreciate a link. Thanks again!)
That is an excellent suggestion Bertha! I will do some testing on that and put it on the list of future videos. Thanks for the request!
Hi Cindy, thanks for the research findings. I like that you found the cheapest methods were the best! I don’t have or make many canes but would always try to rescue and find ways to use them in my jewellery rather than as scrap clay. In fact I never seem to have enough scrap clay! so have to I end up using new clay as foundations for pieces that have thinner decorative layers overlaid on top. I have got a thing about not wasting or throwing away any clay so always try to find inventive ways of using up every last scrap of any colour batch. (‘Though I do have a small collection of little leftovers from my pasta machine stored with my canes and between those plastic page protectors I believe you once suggested as an excellent storage solution for sheets of clay.) And yes it is a very good haircut!
Many thanks for your cheery e-mails every week x
Thanks for giving me something to do at 3:00 in the morning when I couldn’t sleep! Hope this doesn’t become a habit ;) Thanks for all you do! Enjoying your tuts!
Hi Cindy,
thank you for so useful test. It’s very interesting for me, because I have a lot of old canes, some of its are three and more years old =))
I work with Fimo mostly, so when I know, that some cane I won’t use for long time, I apply thin layer of Fimo liquid on cane. It works good for fimo.
I like your post =)
Fruitensse
I have great success with mineral oil and it comes without that baby smell.
Hi. I really love your videos.. I love your enthusiasm & excitement and your dedication to helping other clayers. The ONLY thing that bothers me is..is maybe your nerves or trying to talk while you’re filming. All of the “UMs”. It you could just delete the ums and ands..your tutorials would be so perfect. Not trying to be mean. Trying to be helpful. I love this one especially!!! So helpful! thank you very much!
Thank you for your feedback 13floater. I agree I could get better at saying less Ums and Ahs (as well as not talking with my hands so much). I’m not nervous, I’m excited! Although it would be nice to remove the mistakes, we feel it would take away from what its like to sit down and learn with me. Just trying to keep? it real!
Cindy, it’s your excitement and natural delivery that comes through when watching your videos. Don’t ever worry about being over indulgent when using your hands, voice or whatever to deliver these wonderful videos. We know your excited, we know you just can’t wait to get the information out to us and we love you for it. It’s your excitement, drive and artistic ability that pumps us up and moves us to act on our own artistic values. Please don’t ever stop being you.! (((hugs)))
I second that Dixie………….Elaine xx………….
Thank you sweeties! She is right though. I have known this for a while but still struggle with it. I have a note by my filming set, where I do the monthly tutorials that says, “Fast mouth, slow hands”. But honestly my brain just can’t seem to handle those instructions! LOL The faster I talk, the faster my hands move. Like they’re directly attached with strings or something. It does help if I freeze my hands and then talk fast. In reverse, if I slow my hands down, I sound depressed or can’t say everything I planned to say in the allotted time. So you can see it has been a real challenge for me.
And as far as the Ums go… well I have been trying to work on that as well, for years. I prefer to work on the fly than by script. So when my brain starts searching for the correct word, it throws in some Umms and Ahs to fill the space until the right word comes to mind. I do better when I am not tired or stressed… worse when I am. So you know, that if the video is filled with them, I am probably in need of a break.
Thank you for allowing me my flaws. I have recently learned to embrace them. They make me who I am. I think it’s having kids and loving them so much no matter their weaknesses, has allowed me to accept my own. I also think by letting everyone see my lack of perfection, it makes others feel more comfortable with their own.
My screw-ups make others feel better about themselves… so actually it’s my way of building everyone else’ self-esteem! :)
Keep it real, Cindy. You are perfect just the way you are.
Oh Anna, on one of the most horrible weeks you really made me laugh so much I got hiccups and my little dog Jessica jumped on the bed to comfort me. Yep have put old cold pc in my br4a and also sat on it. Wonderful what a hot bot can do!
My pj’s are sea green with fuchia, burnt umber and white stars scattered over (very sexy) buttoned up to the neck. Thick snow outside comes up to Jessica’s shoulder.
Thanks Cindy my friend. When I first switched on my notepad I thought you were wearing white pj’s. Then I realied that Prof. Lietz was in research mode. With new Barnet (cockney slang) wonderful colour and even the serious glasses couldn’t hide that twinkle in your eyes. Lipgloss was preetty cool too. Excuse typo as fingers playing their own tune. Have used most of the methods tried and tested by Prof Lietz but think dunking in very hot water encased in pkasic bagt one of the easiest and cheapest methods. I will wait till water cools and if no joy put baby oil in bag and re-do in hotter H2O. Just typing this has left me exhausted so will say thanks again for the giggles they (who ever THEY are) say laughter is the best medicine so keep that thought and make me smile……………cheers xx…………………
Anna is funny isn’t she, Elaine! So happy to hear that she was able to make you feel better, even if only for awhile. I am thinking of you and hoping that you are healing well and will be ‘full of piss and vinegar’ (most likely an old English thing to say) before you know it. Take care sweetie!
Love the new hair !!! I have softened hard clay by wrapping it and plastic and putting it inside my bra !!! LOL-Yes, I really just admitted to that to the world. The amount of time? Ah…I usually forget about them find them while putting on my PJ’s. Oh, wondered what happened to that Fuchsia !!!
Will have this technique with old canes.
LOL :D
Bella and I watched this video (Bella is my Cat and she loves watching your videos, when she hears your voice she comes running and hops up on my lap and watches with me!) I have never tried to revive an old cane as I tend to use them up after I make them. However, this was such an informative video and we really enjoyed it. I am sure I will probably need this info in the years to come. Thanks again Cindy for your “test results”. Love the haircut, kinda sexy lookin’
Dixie that is so cute about your cat!
What a sweet story Dixie, I can just picture the two of you watching videos together!
Great video as always :) I have used baby oil in the past to soften sculpted clay.. curious if this would work for canes?
Hi Cindy, Baby oil will work pretty much the same as the Sculpey Clay Softener since they both are basically mineral oil plus or minus an ingredient or two. Try it. See what you think and let us know how it goes.
Interesting demo, thanks for sharing!
Hello, Cindy. Have You tried (after this experiment) cover round bead with slices from reduced canes? and if yes, it works (without crackling)?
Yes Tin, if you can revive the cane enough to be able to reduce it without it cracking, it will be able to be sliced and added to beads without cracking. If you can’t reduce it nicely, it won’t work on the beads either. Hope that helps!
thank You, Cindy:)
I was working away on an old cane the other day and finally after a while I got it to move, though I still had some cracking. I never once thought of trying anything like you just showed in this tut. Thanks for the information and the ideas. Your hair, btw, is sooooo super cute!!!!!!! I luv it. I gave one thumbs up on YouTube for the vid and two thumbs up for the new do. ;o)
Hi Cindy,
Thanks for doing this informative video. It will save me work if and when I decide to use an old old cane. I have a couple of old canes from Eileen Loring that I want to use. They must be over 7 years old. I will try the heat method first and the heating pad under the glass sounds good too.
BTW, great hair cut!
Thanks for showing this! Very helpful! Another issue that would be good to know about is: if you “over-leach” the clay (so that it just crumbles) … how not to over re-soften when trying to bring life back to it!?
When you are trying to re-soften clay that has been over leached, it is important to just add whatever agent you are using to soften (any of the products I used in the video will? work) in tiny amounts at a time so that you don’t over do it. Something oil based like Sculpey Clay softener or Baby Oil just needs 1 drop at a time. With liquid clays, try a dime sized drop and with the clay based softeners like Sculpey Mold Maker & Fimo Quick Mix just use a pea sized ball at a time. Hope that helps!
Thank you so much! After seeing your video yesterday about the revival of old canes… made me wonder if the same would work for over leached clay…. Thanks for responding! I will give that a try!
Very interesting, Cindy! :)
I’m not hugely into canes although I do have a small collection that I’ve made over the years. The oldest were made about 5 years ago.
If I wanted to use one of those old canes and it wasn’t cooperating, I’d probably try at least *something* to revive it unless it was very simple in design.
The oldest canes are pure Kato, and on the few occasions I’ve used them I haven’t had to do anything special except to take more time reducing them than normal, with probably the heat from my hands helping which would be consistent with your findings. That Kato clay would have been from a couple of formulations ago — not the current “soft” Kato, and not the previous phthalate-free tending-to-crumbly formulation, but the one before that that still had phthalates — and it retained its elasticity much better than more recent formulations. It was the best clay I’ve ever used and I wish it had never changed: ironically, I expect some of my newer-but-not-brand-new canes would require a lot more special treatment than those oldest canes, because of the changes in clay formulation and the impact on handling and ageing characteristics.
I have some other canes that are nearly as old which are mostly Kato but packed with Premo Frost. I have seen a bit of cracking on the external Premo Frost packing, so would probably go straight to one of your suggestions.
I’d probably also try coating them with either petroleum jelly or baby oil, just for curiosity’s sake. Those are two other products that are occasionally used to soften polymer clay, and while they can adversely affect the strength of the clay they also seemed to soften hard clay much more quickly than “official” clay softeners, so it would be interesting to see how they worked when applied to canes.
Probably would not bother UNLESS I really really had to have this cane.
Thanks for testing this. I was wondering which would work the best.
If there is more than an inch I would try to save it. I myself have taken some old canes and rub Kato liquid translucent on the outside parts of the cane and rub it in just like putting cream on my hands. Then I wrap it in plastic and leave it that way for a week. I have a heating pad on low that I sit under my piece of glass that I use while reducing my clay. Most of my canes are made with kato but some them are made with premo and I always use Kato liquid but like I said I leave it on at least 5-7 days then reduce on a warm working surface. Thanks for showing all the different tests. Once again I appreciate all you do for everyone in the polymer clay community. Thanks to both you and Doug.
Great tips Cindy :). Also wanted to point out your hair looks GREAT !! Love the new fresh look on you Cindy I’ll have to make sure and remember in future videos that you’ve previously recorded them and your hair isn’t growing at an incredibly fast rate LOL.
Thank you! It’s hard for me to find time to go get it cut. Thought it was about time? tho… was starting to look like a hobo. lol Have a couple videos that I shot before getting it cut that haven’t been shown yet, so don’t be too surprised when it is suddenly long again! :)
I would try to save something if it was an exceptional design. thanks always like the prof lab jacket. professor. lol
Thank you for the great tests and reviews! I would try the warming method before using the old canes as scrap.
Sounds great Louise! Let us know how it works for you!
Mine is that famous reply – It Depends. If I love the design and it would be time-consuming or nearly impossible to redo, I would give it at least a couple of tries. If it is a simple swirl or kaleidoscope then I would think scrap, Natasha, or Stroppel time.
But I am still learning how to deal with old and dry clay. I recently tried using Sculpey clay softener on some hard-from-the-package clay and it took more than I expected. So I wonder if part of the formula change is that you have to use more of certain products?
this was VERY helpful. Thanks Cindy for all you do for us.