How To Sand Polymer Clay Beads Using Drywall Sandpaper
Video #44: Drywall sandpaper works best for aggressive bead sanding jobs.
More...

IN THIS POST: — drywall sandpaper — sanding — coarse grit — cane slices — pendants — cutting blade — buffing — sealer — mica shift — (Topics marked with an asterisk* are discussed in the Comments Section below).
You may not have thought to look in the drywall and painting section of your local home improvement store for polymer clay bead sanding supplies. But now you will…
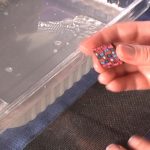
Drywall sandpaper has an open weave that can be used as the first stage in sanding beads that need something a little more aggressive than a 320 or 400 grit sandpaper.
Sometimes you need to remove more surface of your bead or pendant but don’t want the deep scratches that a regular coarse sandpaper would give you.
For example, you may need to ‘square up’ the edges of a pendant. Or you might want to smooth out the deep groove lines that often show up in between cane slices added to a bead surface. Or perhaps you made some mica shift or hidden magic beads and want to sand off the raised edges instead of slicing them off with a blade.
If you use regular coarse grit sandpaper (i.e.120 grit) to remove the top layer of clay, you’ll be creating some deep scratches that you will also have to remove.
With drywall sandpaper (sometimes called mesh), the weave is flat and open which allows for efficient clay removal without the deep scratches… resulting in a lot less sanding for you!
After you’re finished using the drywall mesh to do the aggressive sanding, you can continue on with wet/dry sandpaper ranging from 320 grit to 400/600/800/1200. Then finish up with a final buff and sealer coat if desired.
So go on, head off to the home improvement store and pick up some drywall supplies to add to your sanding kit… you’ll be glad you did!
Transcript not available for this video.
Our goal is to translate these videos into as many languages as possible. If you are interested in helping with this initiative, then please do contact us and we will figure out a way to make it worth your while :)
Resource Links:
- Related Video: How To Make Your Own Sanding Pads For Polymer Clay
- Related Video: Using Wet/Dry Sandpaper For Sanding Polymer Clay
- Related Article: Wet Sanding Polymer Clay Tutorial: Make Clay Jewelry and Beads Shine
- Related Article: Shiny Beads 6 Tips for Getting a Polymer Clay Gloss Finish
- Related Video: Sanding Polymer Clay with Drywall Sandpaper Means Less Gouging
- Amazon: 42 Pcs Wet Dry Sandpaper 120 to 3000 Grit Assortment **
Resources marked with a double ** asterisk are affiliate links. If you click on them and decide to buy something, we may receive some compensation. This does not affect the price you pay in any way. What it does do, however, is helps us to continue providing free videos for you, here at the PcT website. Using our links to purchase your tools and supplies, is always greatly appreciated.
Sponsored Ads & Special Promotions
Shareable Images
To share this full blog post anywhere on the web that allows links in comments, here's a shortened url to copy and paste...
>> https://mypct.ca/v44 <<
Want to chat about today’s post? That’s what the comment section below is for. Scroll Down… We’d love to hear from you!
Or... if you would like to request a topic for a future post, here is the link to do that… PcT Suggestion Box
I am wondering since we should not have polymer clay near where we eat and you said even the spoons and things that we cover should not come into contact with food what do we do with the water that we sand in? How do we safely dispose of it?
Hi Patricia, it is not that the clay is toxic or anything… it is actually rated to be non-toxic. It is more a case of the clay being porous and capable of trapping bacteria. So you don’t want it to be in contact with food and then going in your mouth. As far as disposing of the sanding water, there really isn’t that much material in the water to be concerned with especially since it is non-toxic. But if you were worried about putting it in the water, you could just pour off the top water after it had settled, and put the solids in the garbage instead.
When buying sandpaper there are different standards of grit designations. This page is refers to ISO/FEPA Grit designation which will be marked with a “P” such as #P600 grit. We bought #1500 at the auto parts store and it was really equal to P500 or the #600 grit we bought at the hobby store was equal to P1100. It can be confusing and will effect your results. Look at the grit number posted on the back of your sandpaper and there should be a “P” before the grit number.
Cindy,
After sanding the polymer item and it is wet…do you need to let the item thoroughly dry before buffing? I go directly from wet/dry sanding to buffing and always wonder if I should be letting the item dry well first.
I am new to polymer clay and really enjoy your videos!
Thank you
It is not necessary to dry your beads before buffing Brenda. You will find the bead dries pretty quick when buffing and so does the fast spinning buffing wheel!
Thanks Cindy, will have another look and keep sanding!
Have a question re the sanding process. if at the end of going thru all the grits you have the white powder on the beads, does this mean you need to keep sanding?
Thanks
@Sandra: Yes, that white powder is polymer dust sitting in tiny grooves on the surface of your bead. Make sure your paper is new and that you are sanding to a fine enough grit like 1000 or 1200 grit. Now that I am using Micro-Mesh Pads I almost never get that powder anymore since the pads just ‘plane’ the surface rather than scratch it. If you need to learn more about the Micro-Mesh Pads click the link by my name.
Thanks very much for the bonus videos. This site has turned out to be like a friend who shares my interests.
You’re welcome Girls!!
Thanks Cindy for the bonus videos.
Thanks, that clears it up for me!
Hugs to you! Cindy E.
The 120 is fine Cindy in the drywall paper and then switching to the 320 wet/dry paper and up like you normally do. If you really want to you can go from 120 drywall to 320 drywall then to 320 wet/dry, but you don’t have to.
And loved you are!!! Thanks so much for this video demonstration! I think this method will really be of help to me…now I can go back and fix some of my earliest mistakes…fingerprints, gouges and all.
I’m not completely clear…should we just use the 120 grit in this drywall sandpaper? Or should we get different grits, or strengths in it, like we do the regular wet/dry sandpaper?
Thanks again, Cindy
Thanks Kim! It’s nice to be loved!
Cindy Lietz’s last blog post..Making Handmade Jewelry from Polymer Clay
Cindy, YOU ARE MY HERO!!!!! I am forever needing to get out those deep grooves you decribe between canes.
When you go to pick up some drywall sandpaper at the home improvement store, be sure to get the right stuff. I say this because drywall mesh can also refer to the mesh tape that builders use to cover the joints between sheets of drywall before the drywall mud is applied. Ask for help and/or read the directions on the packaging. You want the stuff that looks and feels like black, mesh sand paper… not the roll of white meshed tape.
Cindy Lietz’s last blog post..Making Polymer Clay Molds – Inspiration From the Sea