Vol-072 Shoreline Bracelet PcT Tutorial (Intro)
Video #512: Turning colored bits of clay, into a unique ocean scene. Jewelry for those long walks on the beach.
More...

** This post is an introduction to one of our paid tutorials.
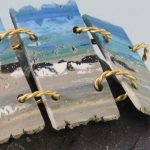
With Summer just around the corner, are you dreaming of long walks along a romantic shoreline? Well, this stunning bracelet will whisk you away to the shores of your favorite beach, even if it is only in your dreams!
I think you are going to love this project! It starts out with bits of colored clay, and ends up becoming a unique ocean landscape scene, with the sand the rocks, the tide, and the sky.
Each time you create this Shoreline Blend, you will be delighted with how unique and realistic each beach scene is. You’ll love it so much that you’ll keep coming back to the tutorial to create more one-of-a-kind shorelines, to make into bracelets, earrings, pendants and more!
I will also share with you how to create your own hand twisted wire jump rings and a cool wire clasp… skills that you can use in other jewelry making projects as well. So jump in… the water is fine!
“
Wow - Cindy, you did such a wonderful job showing how to cut sections apart. That is an important part of a good cane. TY for all your time and effort!!!
Lesley S
“
On the web there are thousands of videos and tutorials about claying, many of them free. I have watched lots of them, and still do to see different ways of doing things. But no one has ever come close to what you provide. Your videos are consistently good, and in a depth of detail rarely seen elsewhere.
Fran V
“
Hi Cindy :) I'm new to your web community and I only wish I had found you sooner! I've learned so much in the short time I've been here.
Karen S
Transcript coming soon...
Transcript coming soon...
Our goal is to translate these videos into as many languages as possible. If you are interested in helping with this initiative, then please do contact us and we will figure out a way to make it worth your while :)
Shareable Images


Want to chat about today’s post? That’s what the comment section below is for. Scroll Down… We’d love to hear from you!
Or... if you would like to request a topic for a future post, here is the link to do that… PcT Suggestion Box
Hi Cindy! I’m working on this bracelet and the blend turned out stellar! I’m having some problems getting the sharpie off my bracelet. I’m using rubbing alcohol, but it’s just not coming off. Any ideas? Thanks! And big hugs to you!
That is cool about your blend Eden! It is odd about the rubbing alcohol. What strength are you using? I use 99%, maybe yours is too weak? You could try soaking it for a bit… that might help. You could try acetone or nail polish remover too, but be gentle with that stuff, it kind of melts the surface.
Oh man this is SO cool! I think my blend got blended a bit far because my tiles didn’t turn out very rocky or cloudy, but I still love it a lot! A great beach to walk on barefoot :D As you can see I haven’t gone further than making the tiles yet tonight, but I’m so excited to do the twisted wire jump rings and that clasp.. The clasp is also going to save me on some other clay open bangles I made that don’t hold their shape well enough on a warm wrist. I’ve been searching for a way to make simple clasp for that that looks good. Instead I’m going to have a clasp that looks great! So so cool! I might even get crazy brave and try to hand sculpt some little shell or seahorse or orca beads for dangles. Love it!
Ooooh I just just feel the sand between my toes! You have created the perfect beach for walking on… not all beaches need rocks or clouds to be gorgeous! ;)
Those are beautiful, Katy!
Thanks to you both! Aren’t these fun? I just love it! Going to try a different shape tile cut too. Will post a pic of that when I do it.
Thank you Cindy, you’re awesome as usual : D
Cindy, where can I purchase the clear ruler like yours. I’ve never seen one with the holes in it for lining up lines. This would be very helpful.
Hi Christine, that is a Design Ruler by Tim Holtz. I got mine at Michaels, but here it is on Amazon if you can’t find it there.
I love the blue on your bracelet ; I think it’s the cobalt blue; I’m going to add a lot more cobalt and a bit more ultramarine. Also want to try one looking at my beach sunset pictures from my visit to India.
I posted a photo of the shoreline bracelet I made on the FB site. I think I need to leave some more vibrant colors – blend a little less.
You did great Cheryl! I left some advice for you on Facebook regarding the holes… but I like what you have done. Less blending would give more textural interest, but the soft blending is pretty too. Make more… you’ll love how different they turn out each time!
Thanks Cindy! I enjoyed making it.
Just complete a bracelet and earrings but i would like to do another one. i think I blended a bit too much. However, still looks pretty. Will post a photo.
Love this project. I’m a member but missed this tute so had to purchase as a back issue and it’s well worth it. You can use this same technique with different clays to get completely different effects.
Hi Cindy
This tutorial series is wonderful. I hope one day I will be as good or at least half as good as you are. I’m originally from the seaside (Scarborough, England) and this design brings the beach to life. I can’t wait to try it.
:) Rosie
Cindy, Thanks for the great tutorials each month. So far this Vol-072 Shoreline technique is my a favorite. I’ve added small shells to the sand area and put in some seagulls too. I even used the same technique to create flower fields. Great fun and so cool that it is always a different surprise with each batch. I work with two handicap individuals and it’s an easy and fun process for them too. I belong to a local clay guild and found many of our members subscribe to your site. I’ve pushed many of our members your way after they see a few of my beach earrings. Happy claying.
Hi Team Lietz! I had to come (belatedly) comment on this tutorial. These pieces are absolutely beautiful! Another gem of a design you’ve given us. I was in the middle of moving half way across the country back in May and am catching up on a lot I missed. Again, oh the possibilities!!
I wanted to make sure my clay got through the move okay so I packed it all up to put in the car. So hubby (6’3″), my youngest (15), our two dogs (65 lbs each), me and all the sundries to make it ’til the movers arrived (like the coffee maker) had to work our way into my Subaru around the boxes of clay. :-) One of the movers has a family member who works with polymer clay and he found another box of clay in my closet and let me know. Couldn’t fit anymore in the car, so I had to trust it to him (LOL). It made it just fine by the way.
Thanks again!
Hi Guy’s,
I think I’ll start calling you “The Team” lol…I absolutely love this series, once more, I have everything to make it with! And once more you amaze me with your precision and creativity! Brilliant…Here’s a thought, A farm scene, blue sky, green pastures, red barns white fences…A cityscape, it’s really endless, of course who doesn’t love the beach!
I can’t wait to try it, right after my lentils are baked, already separated my beach colors, oooh, Lake Tahoe!!!
Thanks so much, what did I do before Cindy and Doug??? ;)
J
Hi! Thanks for your tutorial, I really enjoyed it a lot! I couldn’t understand just only a little thing, for how many time you baked the bracelet’s pieces. Can you tell me exactly? I’ve always had problems with baking times… :)
Thanks for your help! Bye!!
Manu
Hi Manu, glad you enjoyed the tutorial! I bake the clay pieces for 1 hour at 275F (130C). Make sure to use an oven thermometer. For more baking info, type “baking” into the search box at the top of the page. There is a lot there that will help you!
Hi Cindy
I have subscribed to your videos for over a year now I think, and I really love all the great information that you share. This is the first time that I have actually commented on anyone’s online site but I had to comment on this one. I have done the Shoreline Blend and have fallen in love with this technique. I have done this several times and am amazed each time at the results. I am always surprised at how each comes out. I got so excited about this technique that I have used the blend to make pendants of mini beach scenes. I have covered one of the pen kits you use in your Faux Burl Pen Tutorial in place of the burl wood look and I love that look as well. Thank you so much for all your work and help.
As I plan to post at least a couple of the items I made with this technique to my etsy site, I want to be sure to give credit for the Shoreline Blend Technique to you and your site. Is there any way you prefer that be done?
I love this!
Hi Nancy, thank you so much for your comment! Your words and support is very much appreciated. It is nice that you asked about giving credit. (It would be nice if everyone was as respectful as you.) In regards to how to do that, just say your piece was inspired by the Shoreline Tutorial or a Polymer Clay Tutor Tutorial. If you are writing a blog post or posting on another social media site, it would also be nice if you included a link to our site. Up until now our only advertising has been ‘word of mouth’ so the more people that spread the word, the longer we can keep bringing our information to you all. Thanks again! It makes me happy to know you are having so much fun with what you are learning!
Just another update – I have tried the technique to create a mountain look and it is really cool as well. I have cut out smaller pieces of the blends and put in bezels and have resin over the clay. They look great, I think anyway! Thanks
Nancy
Hi Nancy, your mountain escape beads sound wonderful! I sure would love to see pictures!
Hi Cindy,
I am new to membership and haven’t used polymer clay a whole lot, but I just loved this bracelet. It MADE ME have to become a member. I really enjoy all your YouTube tutorials. My “go of it” with the bracelet is on my blog. Thanks so much for the wonderful inspiration. I am soooo looking forward to future months of membership in this community.
Welcome to the community Maria. Beautiful job on the bracelet! Thanks for commenting :-)
Hi Cindy, What a fabulous tutorial and technique! I have only just found your tutorials but I am so glad I did.
On another cold wet “spring” day here in the UK your tutorial has transported me to a sunnier warmer place!
I’ve been working with polymer clay for about two years now and I am always playing with scrap clay and exploring new ways to use it up in ingenious ways but this is just something else completely! Truly inspiring – I am hooked. Thank you for sharing this with us.
So glad to hear this tutorial took you to warmer place Fiona. What a lovely sentiment! It’s great that you ended up finding us all here at the PcT community. Lots more fun stuff to come!
If you click on my link it will pop up the ocean inspired bracelet I made from this tutorial. A lot of people thought I painted it and could not believe it was only polymer. LOVE IT
Thanks the Other Cindy
Wow! That came out really cool! I have to try this! :)
Wow that is so cool! I pressive
Hi Cindy – just returned from a few days away to find your fabulous ‘sea-view’ video waiting! What a treat! You have such a wonderful imagination and so many other tips as well. I never cease to be amazed at the way you find new things to show us. I was particularly interested to see jump rings formed out of twisted wire. This is something I thought you had to buy, I never thought they could be produced so simply, and they look fantastic! Thank you again for all you share with us!
Marion
So happy to make you happy Marion!
I have a question regarding the pin vice you used to make the holes in the bracelet. I bought one, but it is too small to get a big enough drill bit in. Can you tell me what kind of bit you used and what size pin vice to get?
Hi Cindy A. try unscrewing your pin vise and seeing if the collet (the part the bit goes into) is reversible. My collet has two sizes that can be flipped around that should hold most drill bits out there. If not, take it into the hardware store and see if someone has one that will fit. Let us know if you get it figured out.
So….there I was having made five different blends (love em all). Head in the clouds, dreaming. Plugged in my transformer and switched on.
Flash Bang Wallop. Sparks flew from the back of my lovely American-made convection oven and all the lights went out. Wow must have plugged it into the wrong socket, (wasn’t concentrating.) Lucky I had candles nearby.
Managed to get the lights back working but too scared to go near the oven, so baked them all in my gas oven. Will have to wait till my nephew calls round to check it out
So today I will sand them all, rub Inca gold round the edges of one set and perhaps paint some tiny little birds flying across another set. But have used up all my 20g dead soft wire, so will have to wait till next delivery, Dang!
Glad I made you laugh Lesley I even laughed my self on reading it again this morning. Also looked out of the window and at last (after putting up some bird feeders last month) a sweet little Blue Tit was pecking at the peanut holder. Sure takes some time for those little guys to trust anything new that I put up in the back yard. Glad Cindy mentioned that they didn’t need Ren Wax to look good. Now have to look through my stash for some shells and pearls…….cheers xx…….
Elaine, that is crazy about your oven blowing the fuse! Hopefully your nephew gets it all figured out for you. I love your idea of using the inka gold on the edges and painting birds on your seascapes! I’ve had a couple of cases where the ‘birds’ just showed up on their own in the flecks of the sky, but I love the idea of putting them there, should they be reluctant to show on their own!
p.s. I just baked my first batch tonight, and everything came out great! I made a whole bunch of stuff today and also baked the things I made some time ago. I have a Hamilton Beach Toaster/Convection Oven, but it seems to stay at temp once adjusted. I am on my third batch now, woohoo! I wonder, is it normal to have different settings depending on if you tent your tray with cardstock and when you tent your bead rack? Just curious. Anyone got an answer for me?
Hi Marianne, that is so awesome about your shoreline project turning out so great, I’d love to see pictures What do you mean you have to change the temp depending on whether it is tented on a tray or in your bead rack? I’d love to help, but I’m not totally sure what you mean.
Cindy, so sorry, I just noticed that I wasn’t quite good about how to explain what I meant, my bad! I seemed to notice that my oven seems to be different depending on what I do. Was I supposed to tent the bead rack? I am not sure now. I found that just using my cardstock on a ceramic oven tray (you know, the kind they use for roasting pans that are black with white specks on them), was needing a different temp than when I used the rack with some beads on it. Does this make sense? Should I be using a non-stick tray instead? Please help. I was wondering, could it also be due to the fact that some of my clay was put away for a couple of months without baking, would that effect the temp variation? So many questions from this greenhorn! I would like to say that though my shoreline bracelet was nice, I think it would be nicer if I had some drier clay to work with. I can’t seem to get the rocks and all the special effects you did.
Hi Marianne, now I understand more what you mean. You are right about there being a possible difference in temp depending on the material you bake on. The oven thermometer measures the air temp so when you bake on a bead rack (tented of course) the temp is correct for the piece. But if you bake on a metal pan that amplifies the heat, you will find that your pieces can scorch on the bottom. That is why I like to line a metal pan with cardstock… to insulate the polymer clay from the hot pan. Glass, ceramic and aluminum are better than steel for holding a more even heat, but they too can get a little hot, so a thinner barrier of paper is just fine. A good rule is to get a thermometer and test bake samples on the different surfaces to see what works best at what setting and then try and stick to using those surfaces for all your pieces. That way you’ll have more success and less unhappy surprises!
Cindy,
Thank you, O great one, for your kindness and willingness to put up with those crazy newbie questions. Your wisdom once again shed a light on it on it all. ):
Wow! What a novel idea! I enjoyed my first attempt at this project, but I had to do it a second time. I didn’t quite use enough clay the first time around, but the second one came out great! Thank you ever so much Cindy (Doug too). I took a break from the tute watching while going to Silversmith classes, and now, I am going to use my new ‘skills’ to make the jump rings, clasp, etc… So happy for this tutorial, and just in time for Mother’s Day too! Have a great Mother’s Day in advance, and thanks again :)
I really love this beachy bracelet idea, it has sparked a few newer ideas in my head. Here on a coastal area the beachy look will make perfect gifts and even tourist attractants. I was wondering if the rings could be made of a fine rope? or a twine and the clasp with a shell bead ? Keep up the great work, I love to watch your videos, they are informative and inspiring. Thank you.
Hi Shanie, I am sure you could figure out some kind of twisted rope connections for your bracelet… perhaps maybe some macrame kind of thing would look cool? And a shell clasp would be awesome! Just let your brain take this project wherever it wants to go. Sounds like you have some excellent ideas for making it your own. Do show us what you come up with. Post pictures on our Facebook Page.
Cool tute. Looking fwd to some claying for healing once we get back from the states. We lost our 20 yr old son in a tragic accident on 19th April so things are tough at the moment. Our trip to the states is now a healing time for my family rather than “holiday” time
Hi Sandra, I wish you were coming up this far and I would give you a hug. I am so sorry to hear about the loss of your son. I can only imagine how difficult that would be. Please know I am sending you my love and healing thoughts for you and your family. Take care sweetie.
I cut a row of round buttons down the centre of the strip – all the same but different. Worked beautifully. Just be sure to make enough at once, because you will never be able to repeat the pattern (which is a good thing!)
Great idea Jan! This technique would make fantastic buttons!
While driving to the vet’s office yesterday, I found my self looking at the ”view” with this new technique in mind :)
I love this idea, will try it for sure.:)
The washing needs doing
There’s fluff on the rug
But oh! Cindy dear
I could give you a hug.
Dishes are starting to pile up in the sink
The lawn needs a’ mowing
But no. I’m not going
To stop, with my chopping and blending
I’m now on the brink.
These sky and sand colours
Are awesome to see
Sure Cindy’s new tute
Was made especially for me!
Now look very closely
Behind that big rock
I saw something moving
I’m sure it was moving
It gave me a shock.
Must go and look
To see what’s to find
But the tides coming in
(Think I’m losing my mind)
The sea’s changing colour
There’s black clouds in the sky
It’s gone very dark
(There’s a storm nearby)
So I’ll dust off the sand
(Just look at that SEA)
I’m not staying here
Going home to my Tea
…..Cheers Cindy you’ve done it again! xx……..
ha ha ha Elaine, that really made me laugh … could have been written for me! …. cos here I am, still in my pjs, lots of other stuff I should be doing …. chopping and blending like a madwoman and making a real old mess, but ……… ‘ooooooooh, love this one ….. just like a summer beach!!’ Fabulous tutorial!!!!
You said it best! :) I got two classes today otherwise I’d be playing myself. Post what you make.
ELAINE you are fantastic! As I read through each verse I kept saying ‘yup… me too’! The messy house, the unmown lawn, the working on clay, the insanity… I can totally relate!
My house and the surrounding yard is a complete disaster right now. Partially due to the clay of course, but also due to the fact that I have torn my calf muscle and have been on crutches for the past couple weeks and show no signs of healing. Oh well… I could just clay instead… the kids will take care of the house, right? LOL
Cindy: So sorry to hear about your injury. Have you figured out a way to bling out your crutches with glued-on polymer clay decorations? lol I guess you would have to use glue since I don’t think the crutches would fit in the oven. :)
Your injury sounds like it would be very painful. I’ve been on crutches many, many times–so I know it’s a real pain in the butt.
Hope you have a speedy recovery!
Mari
Thank yo for the kindness Mari! You know I have thought about dinging something with the crutches alright, but I’m hoping that i won’t need them much longer… plus with how slow I am getting around, I don’t have the time to do something fancy with them. You made me laugh with the picture of putting the crutches in the oven. I can just picture trying to figure that one out! :D
dinging? I clearly meant ‘doing’. Darn spell checker!
Poor you Cindy,
Yep, crutches sure slow you down. I stepped off the wrong side of a little step stool (the side with no steps) a few months ago and crunched my ankle (Just call me calamity Jane). Getting a lot better but have to use a walking stick if going out. But having to walk so much slower has it’s compensations. I get to smell the flowers, Hope it heals soon but these things take time,,,,,cheers xx…….
Oh Cindy -so sorry about your calf ! What a bother it is to be laid up. Gimping around is so tiring. Hope you heel soon. Big ole hugs!!
Elaine – I so look forward to you poems. You understand US so well.
Peggy – welcome back. We have missed you. Hope everything smooths out for you -soon.
Cherie – so sorry about your back. Been there and had nerve pain also. It is so not fun. Hope the pain leaves you very soon.. We have missed you too.
It is really a happy time when our friends return to this madness LOL
And THIS TUTE is an outstanding one, for sure………..Enjoy!!!!!!!!!!!
Cindy, I hope your leg is getting better. I know that can be tough to take. You know if you want to bling your crutches you bake your embelishments then GLUE them on :) (that way you don’t have to bake the whole crutch) :) I know you knew that ;) lol! If you do decide to decorate we would love to see it!! Get better soon!!
I love this, can’t wait to get started!!! I’ve been meaning to make some seaside jewellery for a long time, and this is just the kickstart I needed ….. lots of ideas bubbling up!
Cindy, I can honestly say I’ve learned more from you than from anyone else! … another great one!! Thanks to you both for great tutorials and excellent video quality! xxx
Thank you Lesley for saying that! It pleases me to hear you are learning a lot from your journey with us!
I grew up close to a beach in India. It’s my favorite place, a place I used to walk to whenever i felt down. I’ve had a very hard year and few months, starting with surgery on both my eyes, a broken back that still causes a lot of pain because of nerve damage and now losing my Mom. I planned to get back to making jewelry but was just not able to get down to it. I think this tutorial will help; the sand and the sea so soothing. Thanks Cindy & Doug!
I think of you often, Cheryl! You will enjoy good healing with this tute! I’m sure. This is very unique. I look forward to making this one, too!
Thanks Cat. I guess this one will be like painting a landscape or seascape.
Cherie I know this has been a tough year for you. My heart goes out to you. You have just a resilient and positive way of dealing with your struggles and you should be proud of yourself. So many people wallow around in their pain and misery and you have found ways to keep from being completely buried by it. It is sweet to hear that this tutorial has a soothing effect for you. Do get your hands in some clay. It will help to take you away from your sadness. Take care sweetie… we are all thinking of you!
We live just 2 hrs from the beach. I love the Oregon Coast and the beach is so peaceful. I am going to give this a try. I have painted this type of scene before with watercolors so this is something I love.
What a lovely bracelet. I can see where many colors can be used to represent different scenes. I have never made twisted chain before but you make it look easy Cindy and I love the jump ring effect. Fortunately I have just the wire from Wire Sculpture too! Am 3 or 4 tutorials behind due to so much illness this spring but look out when I get my strength back there will be no stopping me. There is something about being on a beach or next to the water that seems to lift one’s spirit.
Love the bracelet, Cindy!!! I just might have to try and make this one! Hugs, Dotty
OOOHHHHHHH -this tute will be so much fun. Such a versatile one……….. mountains,,,,,,,hmmmmm. I can hardly wwait to get started………..But first, I have to feed the hubby, unload the dishwasher, get dressed ( yes , I am in my nighty!) . THEN I CAN BEGIN!!!!!!!!!Yipee
Thank you and Doug so much for such an interesting and fun tute.!! LOVE LOVE LOVE
Hey Doug, you know how we used to be able to edit our post for 5 minutes after we hit the ‘submit comment’ button? Mine is not doing that, just wondering if this is new or is it all at my end—-Thanks
Unfortunately I had to get rid of that feature because it was really slowing down the web site in general. Sorry about that.
That’s cool-no sweat:)
Good Morning, Just had to come back here for a short minute and share something….
So I’m watching Cindy make the clay part of the bracelet on the 2nd video and you know how your heads says ”but what about…?” well a few seconds before the 12 minute mark she shows us (and my head) and I holler out loud Brilliant ….scared our little dog right out of bed and he came running just a barking :)
Well back to the tutorial – hope Buddy and I made you smile.
Cindy, I LOVE this tutorial! My brain is just spinning with ideas – sunsets, mountains, desert, pastures! Can’t wait to get started!
Thanks for all the work you put into these weekly tutorials – LOL – It’s not work when you love what you are doing, is it?
Hello Cindy and Doug, been awhile since I have been here. I have had a very rough year with my health but I haven’t forgotten everyone here. Hope to be around more over the summer.
I was so delighted when I found out what this tutorial was. I have wanted to do a landscape for a very long time. This one is just awesome and the perfect starting place. Know I won’t get a chance to try this for awhile but watching the video puts a smile on my face for now. I know this will be the first project I will work on as soon as I have the time and feel well enough to get back into my clay world.
Until next time thank you for your wonderful tute and filming. The two of you are still the best team out there and I feel so blessed to be a part of your journey.
Many Uuuggggs
Being raised on the eastern tip of L.I. N.Y. this really appeals to me.
Loving the FEEL of the pattern………..does that make sense ? After living on the gulf coast of Texas,I can relate to the patterns……… I have a daughter that would LOVE having a set of these. Do I really have to wait til tomorrow.?………..another sleepless night………….tee hee. You have a WINNER for sure!!!!!!!!!!!!!
Get a patent on that – quick! That is the coolest, prettiest, jewelry idea that I have seen in years – maybe ever – I am a beach/ocean lover – so naturally I would love those!
OK I found the link that says it’s part of volume 72, but I can’t actually find volume 72 anywhere. Frustrating.
Tessa – It’s great to see that you are so anxious to get access to the Vol-072 Videos. In the article above it says… “The rest of the 6 part video series will be posted tomorrow (Friday, May 2, 2014)” … so you will have to be patient for just one more day.
I would love to take this class but this is very confusing to me. I clicked over from Youtube but I can’t find how much it costs or even how to purchase.
Do I have to join something rather than just purchase this tutorial?
Hello Tessa – Welcome to the PcT Community. Yes you can purchase just the tutorial without having to become a subscribing member. That’s not a problem.
What a gorgeous project! Can’t wait to make this.
Wow Cindy,
On this wet wet grey day here in the UK you have taken me to my favorite place on this Earth. THE BEACH. Love the whole concept of this stunning tute. Just right to put some sunshine back in my life. The wire twists look so cool, Do not think I will be doing anything other than creating my own shoreline. LOVE how this looks. Clay at the ready, one two three……jump… the water is fffine but fffreezing……..cheers xx
Love this idea Cindy. Can’t wait to learn how to make that beautiful clasp and jump rings!!
Cindy this is the tutorial that finally convinced me to buy a pair of 6-step pliers – you get so much use out of yours — and I’m tired of not getting the same results each time with the regular round nose ones I have.