Smooth Rounded Edges on Flat Polymer Clay Cutouts
Video #620: All you need is some plastic wrap and a cookie cutter to get professional looking edges every time.
More...

IN THIS POST: — rounded — edges — beveled — cutters — cookie cutters — cutouts — shapes — glad cling wrap — plastic wrap — pendants — professional finish — (Topics marked with an asterisk* are discussed in the Comments Section below).
Topics Covered In This Video:
- I’m going to show you a super easy way to cut rounded edges on your polymer clay pieces, using cookie cutters and plastic wrap.
- Here is the difference between two polymer clay pieces cut out with a clay cutter… one is cut out normally and has straight or squared off edges.
- The other one was cutout using plastic wrap, and it has rounded or beveled edges.
- Both look cool… and both have their purpose.
- The rounded edged one has a special, pillow-y look to it.
- It works for larger cutters as well as small ones.
- Let me show you how easy it is to do.
- Those of you who have been around our blog for a while will already know this trick, but there are many new people coming every day that may not know it, so I thought I would share this tip with you today.
- Roll out a sheet of polymer clay any thickness. Mine was at the thickest setting of 8 playing cards thick and then doubled over the sheet of clay.
- It doesn’t matter what thickness you use, but the look will be more obvious on the thicker pieces.
- Smooth out the top of your clay sheet to remove any surface flaws or imperfections.
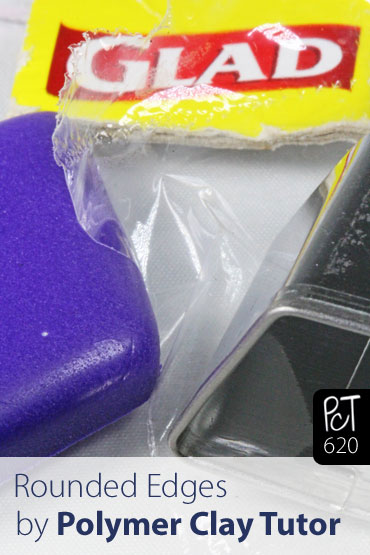
- Use a section of plastic wrap to cover the clay surface.
- I used Glad Cling Wrap because it is compatible with polymer clay, but since the wrap has such a short contact time with the clay, that compatibility issue is not too critical for this little trick.
- Some plastic wraps react badly with polymer clay and should not be used long term.
- Make sure your plastic wrap is pulled tightly on the surface of the clay, with no wrinkles or air pockets.
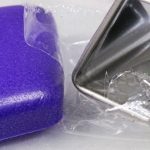
- Use cookie cutters or clay cutters to cut out the desired design, pushing down through plastic wrap and clay together, all in one downward motion.
- Plastic wrap will follow the edges of the cutter, and pull the clay down… rounding the edges.
- The plastic wrap also keeps the clay from sticking inside of cutters, which can be a problem, especially for the small cutters.
- Remove the cutter and pull off the plastic wrap from the surface of the clay, and Voilà!… A polymer clay cutout piece with perfectly rounded edges and a flawless surface. So easy!
00:00:03 –> 00:00:07 Hi guys, its Cindy Lietz, your Polymer Clay Tutor, and today’s Studio Tip, I’m gonna show
00:00:07 –> 00:00:15 you how you can cut rounded edges on your Polymer Clay really super easily using clay
00:00:15 –> 00:00:19 cutters and plastic wrap.
00:00:19 –> 00:00:24 So let me just show you the difference between just cutting out a piece of Polymer Clay with
00:00:24 –> 00:00:31 a regular…like cookie cutter type cutter, here it is cutout just normally, and here
00:00:31 –> 00:00:37 it is with the rounded edges, now both look neat, they both have their purposes, but this
00:00:37 –> 00:00:42 one has really quite a special look to it, it looks like it’s been rounded off and it
00:00:42 –> 00:00:48 has kind of a pillow-y look to it, it even works on the really small pieces as well.
00:00:48 –> 00:00:53 And these are unfinished, I haven’t done anything to them, so you can still kinda see the mark
00:00:53 –> 00:00:58 along the edge where the cutter is, but this is the very square edges and here is it when
00:00:58 –> 00:01:00 it’s quite rounded.
00:01:00 –> 00:01:06 Let me just show you how easy it is to do, now any of you that have been around my blog
00:01:06 –> 00:01:10 for a while already know this trick, but there’s a lot… there are a lot of new people that
00:01:10 –> 00:01:13 come all the time, so you may not know this trick.
00:01:13 –> 00:01:18 So I’m just gonna roll a sheet of clay out in the pasta machine at a nice thick setting,
00:01:18 –> 00:01:27 I’m gonna double it up just to really emphasize it, it doesn’t matter what thickness you have,
00:01:27 –> 00:01:30 but it shows a little more on the really thick pieces.
00:01:30 –> 00:01:35 I’m just gonna smooth it out on the top, and then I’m gonna get a piece of plastic
00:01:35 –> 00:01:38 wrap, now this particular brand…
00:01:38 –> 00:01:43 Glad Cling Wrap, is compatible with Polymer Clay, it won’t eat away at the Polymer Clay
00:01:43 –> 00:01:48 or do anything weird so I have it in the studio, but this particular technique… it doesn’t
00:01:48 –> 00:01:52 matter that much ‘cause it’s not gonna have a lot of contact with the clay, or not a very
00:01:52 –> 00:02:00 long contact, but some plastic wraps, if they spend a lot of time on Polymer Clay, they
00:02:00 –> 00:02:04 get all weird and sticky…and I’ll have to show that to you sometime, I’ll have
00:02:04 –> 00:02:08 to hunt down some bad plastic wrap for Polymer so I can show you.
00:02:08 –> 00:02:13 Now I’m just laying it on top, and I’m making sure it’s on there nice and tight and wrinkle
00:02:13 –> 00:02:18 free, you don’t want it all loose and baggy or bubbly or puckered up or anything, then
00:02:18 –> 00:02:26 you just use your cutter…whatever cutter that you want, and these happen to be the
00:02:26 –> 00:02:34 graduated diamond shape cutters from Polyform…they came out with them this year, and I’m just
00:02:34 –> 00:02:38 gonna cut right through, plastic wrap and all.
00:02:38 –> 00:02:45 And you’ll see that the edges pull right down, the plastic wrap just sorta pushes down with
00:02:45 –> 00:02:51 the cutter and rounds those edges right off…I’ll see if I’ve got room here to do a small one
00:02:51 –> 00:02:56 as well, and then I’ll lift this stuff away.
00:02:56 –> 00:02:59 And the neat thing when you’re cutting out small stuff is sometimes the clay gets stuck
00:02:59 –> 00:03:03 on the inside, well when the plastic wrap is on there, it won’t at all.
00:03:03 –> 00:03:10 So you just take the plastic wrap off… this cut through a little bit, there we go and
00:03:10 –> 00:03:18 you have nicely rounded pieces that are smooth and look quite cool, super easy.
00:03:18 –> 00:03:22 So I hope you liked that, if you did, do let me know if you like this video.
00:03:22 –> 00:03:28 And if you’ve got any tips or tricks or different things that you would like to learn more about,
00:03:28 –> 00:03:32 then leave those in the comment section below.
00:03:32 –> 00:03:37 And don’t forget, we have a great resource over at PolymerClayTutor.com where if you
00:03:37 –> 00:03:43 use the search box, you’ll be able to find answers to all of your Polymer Clay questions.
00:03:43 –> 00:03:47 We’ll see you next time and bye for now.
Our goal is to translate these videos into as many languages as possible. If you are interested in helping with this initiative, then please do contact us and we will figure out a way to make it worth your while :)
Resource Links:
- Related Video: How To Organize Your Polymer Clay Cutters
- Related Article: Five Creative Tips for Using Shaped Cutters
- Related Video: How To Make Pendants Out Of Polymer Clay Quick Tip
- Related Video: Cutie-Pie Cookie Cutter Canes Polymer Clay Tutorial
- Amazon: Polymer Clay Cutters **
Resources marked with a double ** asterisk are affiliate links. If you click on them and decide to buy something, we may receive some compensation. This does not affect the price you pay in any way. What it does do, however, is helps us to continue providing free videos for you, here at the PcT website. Using our links to purchase your tools and supplies, is always greatly appreciated.
Sponsored Ads & Special Promotions
Shareable Images


To share this full blog post anywhere on the web that allows links in comments, here's a shortened url to copy and paste...
>> https://mypct.ca/v620 <<
Want to chat about today’s post? That’s what the comment section below is for. Scroll Down… We’d love to hear from you!
Or... if you would like to request a topic for a future post, here is the link to do that… PcT Suggestion Box
fantastic tip, thank you :) I’ve been doing this & it’s awesome!! I laughed when you mentioned some types of Sarah wrap make it sticky etc. I have examples! I also found that fruit & veggie produce bags are awesome for wrapping clay & storing. I cut the bag to desired sz on side without ink and use.. So far it hasn’t made my clay funky.. Yay :)
I have used this technique and it is a good idea. My memory is such that if a tool isn’t right in front of me I forget to use it.
I have a general question: My oven only heats for 30 min. and then turns off. I don’t have it right next to me so I have to get up and turn it back on for another 30 min. Has anyone rigged their oven so it will go for an hour? I’ve thought about wedging something under the timer but thought I should wait in case someone else did it and it was a disaster. It’s not a huge problem but sometimes when I’m in the zone, just getting up and crossing the room is enough to trow me off. My only other alternative is to take a gift card I got for Xmas and add a few sheckels and get a toaster oven that has the feature that turns off the timer. I can always use my retired tablet as a timer.
That sounds like a total pain Peg! There probably is a way to disengage the timer but I don’t know how to do that. If you’re looking to get a new oven, I sure love my Kitchenaid Convection Oven! And it has a timer that goes for an whole hour! :)
Peg, I agree with Cindy. I would not try to mess with the timer, you could end up getting an electrical shock. Cindy and I both have a Kitchenaid Toaster oven and if you live in the states, bedbathandbeyond have the best deal on one with their 20% off coupon they put out often. Good Luck Sweetie.
Cindy,
I have been watching your videos for a while and always love your advice. I create heartpasses in memory of my mum and know this will help give me an even better finished heart. You are making a big difference in the Polymer Clay world. Thank you again!
I would love your address so I could send you a heart to pass on in kindness.
Have an awesome day!
Bonnie
Hi Bonnie, that sounds lovely, thank you! I just sent my mailing address to you via email.
I absolutely loved this and know the tip will come in handy. Thank you!
Bonnie
I have been searching for a tutorial on an Awareness Ribbon Cane. It would be great if you have such a tutorial. I work with families of children fighting Childhood cancers and they are always looking for awareness items to support their kids.
An awareness cane is a good idea Diane. I’ll see if I can add that to the list!
Hi Diane, you can make awareness ribbons without making a cane. Just cut strips of whatever color clay you want, form them into a ribbon, decorate and then bake. This way you can make any size or color you want. Hope that helps.
Good reminder Cindy, one of the best tips you taught us!