Starter Tool Kit For Polymer Clay Beginners
Video #731: If you are starting out with polymer clay, here are the tools that will get you going without spending a lot of money.
More...

IN THIS POST: — polymer clay tools — beginners — starter kit — work surface — acrylic roller — playing cards — clay blade — sculpting tools — baking pan — oven thermometer — ceramic tile — glass cutting mat — brayer — (Topics marked with an asterick* are discussed in the Comments Section below).
In today’s Studio Tip, I am going to talk about Polymer Clay Tools for Beginners.
Now I am a professional polymer clay instructor with a nice studio filled with all kinds of tools, supplies, paints, inks and that kind of thing… but that isn’t where I started out. I started out as a beginner… just like everyone else.
So, I wanted to share with you some of the things I learned and show you the real basic tools that will get you started working with polymer clay.
I dug around in my studio and found the very first polymer clay beads and canes that I ever made. I though you might like to see them.
A long time ago (probably 20 years now), I was watching the Carol Duvall Show on HGTV and Donna Kato (a well known polymer clay artist who has created the Kato Polyclay line of products), came on and made this polymer clay cane. I was absolutely fascinated with what she could do with that squishy block of plastic clay!
Now I had been a little bit familiar with Fimo… played with it as a kid and actually had a block or two, and some Sculpey III, in my craft stash. But I had no idea that you could make such cool things… until seeing Carol and Donna on that fateful day. Ever since, I’ve been hooked on polymer clay.
The very first thing I made was this flower cane that was all wonky (see video)… but I was so delighted with it. Just to show you how far I have come since then, here is an example of the Easter Lily Cane that I now teach people to make and is is so much more detailed and beautiful compared to my original quirky little flower cane.
I went on to make another cane, ended up combining it with the first cane, to make this cane here (see video). That was when I got really excited about the whole process. That you could take these wonky canes and end up with something that was super detailed.
Back then there wasn’t a lot of information on how to do things, so I had to figure out a lot of the stuff on my own. Over the years I have figured out the basic things that you will need to have success with working with polymer clay. And this is the advice that I give to beginners just starting out…
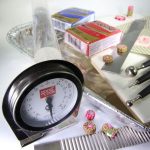
To be honest all you HAVE to have is a block of clay, your hands and an oven. But there are some things that will make the process a lot easier and I have broken it down into these five things…
(1) Work Surface: You need something to work on that is non-porous. I absolutely LOVE my We-R-Memory-Keepers glass cutting mat. But… a plastic place-mat; plastic or glass cutting board; smooth cermaic or glass tile; craft mat or other nonporous surface… will also work just fine. Polymer clay will leach oils into any porous surface like wood, bamboo, unsealed stone, etc., and will not only ruin the surface, but will also cause the clay to become stiffer when the oils leach out.
(2) Roller: You need something to roll your clay with. There are so many techniques that require a nice flat even sheet of polymer clay, that you will need to roll out. An Acrylic roller is perfect for this, because it is smooth, nonporous and nonreactive with polymer clay. Alternatives are acrylic brayers, some plastic kitchen rollers, a straight sided drinking glass, the side of a pen… but I like an 8? Acrylic Roller the best. Of course, as you advance, you will definitely want a pasta machine to roll out your sheets of polymer… but we are just talking about basic tools to start with.
(3) Clay Blade: You are going to need something to cut your clay with. Some people use an Exacto Knife or a razor blade, but my tool of choise is a clay blade. There are many out there including the Sculpey Super Slicer set of several blades and a set of handles. You will use this blade to cut strips, shapes, canes and to lift your clay sheets from your work surface. Without a clay blade these tasks are much more difficult to accomplish.
(4) Shaping Tools: If you want to sculpt or make anything that has some shape or detail to it, you will need some basic sculpting tools. This could be something as simple as a tooth pick or the side of a pen, but there are many great sculpting tool options out there. One set that I use very often, is the Sculpey Style and Detailing Set that has three different metal ball stylus’ on one end, and different shaped rubber tips on the other. You can use tools like these to ruffle the edges of flowers, create cups and rounded shapes, sculpt faces, draw on details etc. As you advance you will likely want to add even more sculpting tools to your collection as well.
(5) Baking Set-up: Once you have created your polymer clay masterpieces, you will need to bake them. It is important to do this properly, because under baked pieces will break, and pieces baked at too high a temp will scorch and discolor. You will need an oven thermometer, an insulated pan or tile, layered with paper, and a tent or foil pan lid to protect your pieces from the top element. See video for what to use and how to use it.
These are the basic things that you will need to have success, when getting started with polymer clay. In fact, if I had to move to a deserted island (with power of course), and could only take the bare minimum, the items I described in this video are what would be in my tool kit :-)
00:00:03 –> 00:00:04 Hi Guys! it’s Cindy Lietz
00:00:04 –> 00:00:07 your Polymer Clay Tutor and today’s Studio Tip.
00:00:07 –> 00:00:11 I’m going to talk about polymer clay tools for beginners.
00:00:11 –> 00:00:18 Now, I am a Professional Polymer Clay Instructor and I have a studio this filled with every
00:00:18 –> 00:00:25 kind of possible tools, supply and paint and everything but that isn’t where I started.
00:00:25 –> 00:00:30 I started out as a beginner just like everybody else and I wanted to talk to you about some
00:00:30 –> 00:00:38 of the things I’ve learned and show you the real basic tools that will get you started
00:00:38 –> 00:00:39 working with polymer clay.
00:00:39 –> 00:00:44 Now, one of the things I wanted to do was I dug around a bunch of my old beads and old
00:00:44 –> 00:00:50 stuff and I found the very first polymer clay beads and canes that I ever made so I wanted
00:00:50 –> 00:00:59 to show them to you and years and years ago I was about 20 years ago or 18 years ago something
00:00:59 –> 00:01:06 like that when I was watching HD TV and was watching The Carol Duvall show and Donna Kato
00:01:06 –> 00:01:12 who is a well-known polymer clay artist she actually is the one that has invented the
00:01:12 –> 00:01:15 Kato Poly Clay products.
00:01:15 –> 00:01:20 Anyways she came on to The Carol Duvall Show and she made this polymer clay cane and I
00:01:20 –> 00:01:30 was absolutely fascinated with what she could do with this squishy block of plastic clay.
00:01:30 –> 00:01:34 Now, I had been for a little bit familiar with Fimo, I’ve worked with it or played with
00:01:34 –> 00:01:40 it a little bit when I was a kid and had some– somewhere in my stash but I hadn’t really
00:01:40 –> 00:01:44 I had no idea you could do such cool things and I got hooked ever since.
00:01:44 –> 00:01:52 But the very first thing I went to make, was some canes and this is the one of the very
00:01:52 –> 00:02:00 first flower cane that I ever made and it’s all kind of wonky but I was so excited and
00:02:00 –> 00:02:02 delighted with it.
00:02:02 –> 00:02:08 Just to show you now what the difference between the kind of detail that I could do it in cane
00:02:08 –> 00:02:14 and show people how to do, here is the Easter Lily Cane that’s much fancier than this creaky
00:02:14 –> 00:02:21 little flower cane I made but I went on and made another cane here.
00:02:21 –> 00:02:31 Here’s in some of the similar colors and ended up combining the two into this cane and that’s
00:02:31 –> 00:02:36 when I started to get really excited about this whole process– that you could take these
00:02:36 –> 00:02:42 wonky looking canes and end up with something that looked super detailed.
00:02:42 –> 00:02:49 So, but back then there wasn’t a lot of information on what to do, what to buy, how to go about
00:02:49 –> 00:02:57 it and so I had to figure out a lot of stuff on my own and over the years, I’ve figured
00:02:57 –> 00:03:03 out things that you basically will need and this is the advice that I would give to someone
00:03:03 –> 00:03:05 starting out brand new.
00:03:05 –> 00:03:11 OK, so I mean in all fairness, you really only need three things you need some polymer
00:03:11 –> 00:03:15 clay, you need your hands, and an oven.
00:03:15 –> 00:03:19 If you don’t have an oven, you’re not going to be able to bake your clay and make it hard
00:03:19 –> 00:03:27 so you– you need those three things but there’s other things that will make your life a lot
00:03:27 –> 00:03:30 easier.
00:03:30 –> 00:03:36 So the basic things that you’re going to need is you’re going to need something to work
00:03:36 –> 00:03:43 on so a work surface, I’ll go into more details on that in a sec, you’re going to need something
00:03:43 –> 00:03:50 to roll the clay out with, something to cut it with, something to shape it with and something
00:03:50 –> 00:03:52 to bake it in.
00:03:52 –> 00:03:58 And those can be variety of different things depending on what you have available to you,
00:03:58 –> 00:04:04 what your budget is, whatever are you restrictions that kind of thing.
00:04:04 –> 00:04:09 So, I’ll start first with a work surface.
00:04:09 –> 00:04:15 Now, you need something to work on that is non-porous.
00:04:15 –> 00:04:21 Polymer Clay has a lot of oils in it and if you just lay it any old place the oils are
00:04:21 –> 00:04:25 going to leach out into the surface of wherever you set it.
00:04:25 –> 00:04:32 So if you have a little wooden desk or kitchen table or even some some counter tops that
00:04:32 –> 00:04:37 are stone that aren’t sealed, if you leave your clay laying there it’s going to leach
00:04:37 –> 00:04:45 to an oil stain and wreck your wooden surface or whatever you’re working on that’s porous.
00:04:45 –> 00:04:49 Also it will take the oils out of the clay and make it stiffer and stiffer and at some
00:04:49 –> 00:04:53 point actually becomes brittle if you take out too much of the oil.
00:04:53 –> 00:05:02 So, you want something to work on that is smooth, non-porous and right now, this is
00:05:02 –> 00:05:04 the thing that I love the very most.
00:05:04 –> 00:05:11 I got this fairly recently, in the last year or so and this is a We R Memory Keepers Glass
00:05:11 –> 00:05:17 Cutting Mat– it’s smooth, you can cut on it so you don’t have to worry about cutting
00:05:17 –> 00:05:24 into it, it’s got a grid on it, it looks nice it’s a good size, I love working on this but
00:05:24 –> 00:05:29 there are lots of other options so you can do something like I used to do.
00:05:29 –> 00:05:34 I have this old Place Plastic Place Mat.
00:05:34 –> 00:05:42 In fact it, was for putting under pet dishes and stuff and it’s non porous, it was smooth
00:05:42 –> 00:05:44 I could work on it.
00:05:44 –> 00:05:49 It’s a little vulnerable to getting cuts in it so eventually I ended up with marks on
00:05:49 –> 00:05:54 it that would end up on the back of the clay but it worked really just fine for when I
00:05:54 –> 00:05:55 was beginning.
00:05:55 –> 00:05:59 So this is a great super cheap option can probably find them at the dollar store.
00:05:59 –> 00:06:07 Now, a little bit more durable option would be to work on something like a ceramic tile
00:06:07 –> 00:06:09 or a glass tile.
00:06:09 –> 00:06:15 This happens to be a brightly colorful glass tile but it’s got a smooth surface.
00:06:15 –> 00:06:22 This is a ceramic tile, this surface is smooth as well and you want to make sure it’s not
00:06:22 –> 00:06:28 one of those unglazed tiles or some of the stones like I said like if there are porous
00:06:28 –> 00:06:29 or something.
00:06:29 –> 00:06:35 Some tiles of texture, you don’t want that, you want something you can work on, lay your
00:06:35 –> 00:06:39 clay on and not worry about it leaching out.
00:06:39 –> 00:06:43 Now, you can also bake on that but I’ll talk about that later.
00:06:43 –> 00:06:49 You can get tiles in all kinds of sizes four by– I think that’s three inch by three inch,
00:06:49 –> 00:06:55 you can go, you know, that yeah the way this is just a eight inches by four inches you
00:06:55 –> 00:06:59 can get one by one foot once there’s even a huge floor tiles.
00:06:59 –> 00:07:06 There’s lots of options for a work surface there are also things like Craft Mats and
00:07:06 –> 00:07:13 surface things like I have in behind here I have some lots of other videos on work surfaces,
00:07:13 –> 00:07:16 one on the mat– mats and this cutting board and all that kind of stuff.
00:07:16 –> 00:07:20 So there’s– there’s other information you can find out about that.
00:07:20 –> 00:07:25 So basically that is your work surface now the next thing you’re going to need is something
00:07:25 –> 00:07:28 to roll the clay with.
00:07:28 –> 00:07:33 There’s a lot of techniques where you want a flat sheet of clay or you’re making pendants
00:07:33 –> 00:07:36 or layering things.
00:07:36 –> 00:07:42 Rolling the clay out is going to be something you need to do.
00:07:42 –> 00:07:46 So my favorite tool for that is an Acrylic Rod.
00:07:46 –> 00:07:52 Now these are made by most of the polymer companies but I mean they– this is about
00:07:52 –> 00:07:59 eight inches long so it’s a nice size, a nice diameter for rolling out.
00:07:59 –> 00:08:05 The nice thing about acrylic is that it doesn’t react to the polymer clay so it– the– it’s
00:08:05 –> 00:08:11 not going to leach of the oils it won’t get stained, it’s super smooth, it’s nice to work
00:08:11 –> 00:08:15 with, you don’t want to use a wooden rolling pin.
00:08:15 –> 00:08:18 There’s certain plastics though, I think they’re changing most of the plastics now, but there’s
00:08:18 –> 00:08:25 certain plastics that will react with the polymer clay and will pit so you have to test
00:08:25 –> 00:08:29 it I mean I’ve even seen people use the side of a pen or a tool or something like that
00:08:29 –> 00:08:37 but I am– what– I bought one of these years and years ago and I use it regularly you can
00:08:37 –> 00:08:43 get them in a kind of a different form called a Brayer, which is handy you can roll across
00:08:43 –> 00:08:48 that way too but having a roller of some sort is something you’re going to need.
00:08:48 –> 00:08:56 Here’s a neat little tip, if you want a uniform thickness on when you’re rolling a sheet of
00:08:56 –> 00:09:02 clay out, use some playing cards so I’m I’ve got 4 playing cards in this side and four
00:09:02 –> 00:09:08 on that side you can just lay them down you can have whatever numbers of them that you
00:09:08 –> 00:09:15 want, you lay them on either side of your clay and then you just roll down until your
00:09:15 –> 00:09:27 roller is the same height as the cards and you’ll get a uniform sheet so you can just
00:09:27 –> 00:09:33 keep going and you can get and whenever I talk about thicknesses, I actually use playing
00:09:33 –> 00:09:36 cards even if I’m using my Pasta Machine.
00:09:36 –> 00:09:43 i use playing cards as the standard thickness level so it’s– it’s a very handy thing to
00:09:43 –> 00:09:46 use and you’re going to get a perfectly even sheet.
00:09:46 –> 00:09:54 Now, as you advance you will probably want to get a Pasta Machine but that’s not necessarily
00:09:54 –> 00:10:00 for beginners and it really depends on what types of things that you’re going to be using
00:10:00 –> 00:10:02 it for.
00:10:02 –> 00:10:05 So that’s the rolling out.
00:10:05 –> 00:10:08 The next thing you’re going to want to do is be able to cut your clay.
00:10:08 –> 00:10:17 Now, some people like to use Exacto Knives and Razor Blades but the best tool I found
00:10:17 –> 00:10:20 for working with polymer clay is a clay blade.
00:10:20 –> 00:10:25 Now, there’s a bunch of different kinds of them out there, this is a simple one made
00:10:25 –> 00:10:34 by Amaco the– this comes in a set called Super Slicers, they’re made by Sculpey.
00:10:34 –> 00:10:40 They have little handles for them, I actually only put one on one end so that I can leave
00:10:40 –> 00:10:49 the other end open for sliding through but a clay blade is way better than a razor blade
00:10:49 –> 00:10:54 or an Exacto Knife for cutting things like canes.
00:10:54 –> 00:10:58 Razor blades get in the way especially if they have a ridge on them and if you have
00:10:58 –> 00:11:05 a really large cane, they’re really difficult to cut unless you have at least a clay blade
00:11:05 –> 00:11:09 and so you would cut through your sheet.
00:11:09 –> 00:11:14 There, they come in different stiffnesses, this was a relatively stiff one there’s a
00:11:14 –> 00:11:21 super flexible one here which can be very handy if you want to cut curves and things
00:11:21 –> 00:11:24 like that.
00:11:24 –> 00:11:30 They have wavy blades in different thicknesses and things that– and I use them a lot for
00:11:30 –> 00:11:35 lifting the clay up off the– off the work surface and that kind of thing.
00:11:35 –> 00:11:41 I could not live without a clay blade of some stripe.
00:11:41 –> 00:11:47 Now, another thing you might want, it– depending on if you’re making– if you’re sculpting
00:11:47 –> 00:11:56 and and doing any kind of project that needs shaping, then you may want some sort of sculpting
00:11:56 –> 00:11:58 tools.
00:11:58 –> 00:12:04 Now I use this set a ton but there’s lots and lots of options out there.
00:12:04 –> 00:12:09 This is sent by Sculpey that’s called A Style and Detailing Set.
00:12:09 –> 00:12:17 It has three different ball of metal– ball styles styluses on each end in a nice size
00:12:17 –> 00:12:23 range: a really large one that’s great for making petals and things like on my earrings
00:12:23 –> 00:12:28 and any kind of thing where you need a shaped dome.
00:12:28 –> 00:12:33 Then there’s a smaller one here for making, you know if you’d like to make a little faces
00:12:33 –> 00:12:39 and animals and that kind of thing, these make great little eye sockets and stuff, and
00:12:39 –> 00:12:46 then there’s a tiny ball stylus that you can use for you know, poking holes, drawing on
00:12:46 –> 00:12:52 the surface, lots of different things can be used with these different styling tips.
00:12:52 –> 00:13:01 Now, on the other end, they have sort of rubberized tips that are used for shaping, smoothing,
00:13:01 –> 00:13:06 if you have a seam in your clay you can smooth it out with these little tips.
00:13:06 –> 00:13:16 Depending on how much sculpting you do, you may want to get other types of sculpting tools
00:13:16 –> 00:13:18 but these are a nice one to start off with.
00:13:18 –> 00:13:25 There are other options like in the cake decorating section, you will find out these ones are
00:13:25 –> 00:13:30 made for working with fondant and gum paste and that kind of thing.
00:13:30 –> 00:13:31 They’re made by Wilton.
00:13:31 –> 00:13:36 I’ve seen different knockoffs and things in the dollar store and and stuff like that.
00:13:36 –> 00:13:45 So there’s lots of shaping tools but you may want something to– to help shape your clay.
00:13:45 –> 00:13:49 Then you need something to bake in.
00:13:49 –> 00:13:59 Now, a lot of people just throw their–their clay piece onto a cookie sheet and wonder
00:13:59 –> 00:14:03 why it gets all scorched and warped on the bottom and everything else.
00:14:03 –> 00:14:11 The best way to bake your polymer clay is first of all, you need an oven thermometer.
00:14:11 –> 00:14:17 In fact, I could probably survive just fine with a block of clay, an oven and an oven
00:14:17 –> 00:14:25 thermometer but this is that important to me because most ovens are off –the dials
00:14:25 –> 00:14:31 are a little bit off some especially smaller ovens like toaster ovens and that kind of
00:14:31 –> 00:14:35 thing, they tend to heat up and cool down and get temperature spikes in different parts
00:14:35 –> 00:14:38 of the oven and having a oven thermometer.
00:14:38 –> 00:14:44 Now, I got this I think I just got this at Safeway somewhere in the in the aisle where
00:14:44 –> 00:14:51 the you know wooden spoons are and the baking foil baking pans and tin foil that kind of
00:14:51 –> 00:14:52 stuff.
00:14:52 –> 00:14:56 I think it was around five dollars so it’s not a big deal, it will save your butt and
00:14:56 –> 00:15:02 a lot of clay just by making sure that you are baking at the correct temperature for
00:15:02 –> 00:15:05 your brand of clay.
00:15:05 –> 00:15:10 Some, if you under baked it if the temperature isn’t high enough, your clay will be brittle
00:15:10 –> 00:15:12 and it will break.
00:15:12 –> 00:15:18 If it’s too high, it’s going to scorch and that is a big problem for beginners because
00:15:18 –> 00:15:24 they run into all kinds of issues with things getting burnt or breaking.
00:15:24 –> 00:15:27 So an oven thermometer is a big deal for that.
00:15:27 –> 00:15:30 Next, you need something to bake in.
00:15:30 –> 00:15:38 Now, like I said you could bake on a tile if you want because it’s nicely insulated
00:15:38 –> 00:15:44 it’s flat it can handle going into the oven but you’re going to want to protect it from
00:15:44 –> 00:15:51 underneath by placing a piece of paper on your tile and pretend this is something more
00:15:51 –> 00:15:55 interesting than a slab of clay.
00:15:55 –> 00:15:59 You lay it on the tile and a piece of paper and then you need to tent it.
00:15:59 –> 00:16:01 Now, I used to use a piece of card stock.
00:16:01 –> 00:16:07 In fact, I have a couple of videos on that, I did try I’m tin foil but the best thing
00:16:07 –> 00:16:17 I have found for tenting is to use an upside-down foil baking pan so here’s a little one this
00:16:17 –> 00:16:25 would work great on this tile and in this case, where I’m using a larger pan that I
00:16:25 –> 00:16:32 have lined with several layers of cardboard and paper.
00:16:32 –> 00:16:37 Now, a lot of you are our new to this probably and you’re thinking paper in the oven?
00:16:37 –> 00:16:44 Well polymer clay bakes at such low temperatures the paper is just fine in the oven as long
00:16:44 –> 00:16:49 as you have it protected, you’re not touching any elements of the paper because if you put
00:16:49 –> 00:16:53 paper up against burner it will catch fire so you don’t want that but inside here, there’s
00:16:53 –> 00:16:56 no issue.
00:16:56 –> 00:17:03 Here’s the previous layer I had where you can see the little spots where I had clay
00:17:03 –> 00:17:08 baking on there and what I do is just add a new sheet until I kind of have too many
00:17:08 –> 00:17:10 and then I’ll remove some.
00:17:10 –> 00:17:16 So it’s nice to have that paper and cardboard underneath here insulating the bottom of the
00:17:16 –> 00:17:22 pan so you don’t have any hot spots from the metal in the pan and you don’t end up scorching
00:17:22 –> 00:17:24 your piece from the underside.
00:17:24 –> 00:17:33 Then you use your– so throw this in here– then you’ve got your foil pan lid on top and
00:17:33 –> 00:17:36 this protects your piece from the upper elements.
00:17:36 –> 00:17:40 So that will keep it from scorching from the top side.
00:17:40 –> 00:17:43 So that is basically it.
00:17:43 –> 00:17:53 I do have lots more videos on tools and baking and all kinds of tips and tricks that will
00:17:53 –> 00:17:58 go more into depth but I really just wanted to give you a good overview.
00:17:58 –> 00:18:06 If I was going on a road trip or on a deserted island as long as the head power, these are
00:18:06 –> 00:18:08 the basic things that I would take with me every time.
00:18:08 –> 00:18:15 I would make sure that I had a clay roller, a clay blade, my baking pan with a lid on
00:18:15 –> 00:18:22 the top, my oven thermometer and a couple of little sculpting tools and I’d be good
00:18:22 –> 00:18:23 to go.
00:18:23 –> 00:18:29 Alright, so I hope that was helpful for you and if you like this video, do let us know
00:18:29 –> 00:18:36 and if you’ve got any topic you would like me to tell you more about or there’s a product
00:18:36 –> 00:18:42 you’d like me to test, a technique you don’t know how to do, then make sure to leave those
00:18:42 –> 00:18:46 suggestions in the comments section below and don’t forget we have tons and tons and
00:18:46 –> 00:18:53 tons of videos to check out so you can find out lots– all your answers to your polymer
00:18:53 –> 00:18:57 clay questions. Alright, so we’ll see you next time and bye for now!
Our goal is to translate these videos into as many languages as possible. If you are interested in helping with this initiative, then please do contact us and we will figure out a way to make it worth your while :)
Resource Links:
- Related Video: We-R Memory Keepers Glass Mat
- Related Video: The Acrylic Roller Polymer Clay Tool
- Related Video: Polymer Clay Cutting Blades
- Related Video: Polymer Clay Oven Thermometer
- Related Video: Foil Pans For Your Polymer Clay Oven
- Related Article: Style And Detail Sculpting Tools
Resources marked with a double ** asterisk are affiliate links. If you click on them and decide to buy something, we may receive some compensation. This does not affect the price you pay in any way. What it does do, however, is helps us to continue providing free videos for you, here at the PcT website. Using our links to purchase your tools and supplies, is always greatly appreciated.
Sponsored Ads & Special Promotions
Shareable Images


To share this full blog post anywhere on the web that allows links in comments, here's a shortened url to copy and paste...
>> https://mypct.ca/v731 <<
Want to chat about today’s post? That’s what the comment section below is for. Scroll Down… We’d love to hear from you!
Or... if you would like to request a topic for a future post, here is the link to do that… PcT Suggestion Box
I really like that you do not promote expensive tools as a requirement to be successful. You always have hi tech and low tech suggestions. The most inportant thing to having good results is not expensive clay tools/toys. It is making sure you condition the clay welll and be diligent about the temp. and baking time. Thanks Cindy, you are awesome.
Anna
Thank you for dropping by and commenting Anna. I really appreciate it. Although I do ‘love me some’ wonderful tools… I remember when I didn’t have ‘the right’ tools and got started anyway. It is about doing… with whatever you’ve got and going from there. I have talked to so many people who spend a year buying supplies and collecting tutorials, before every making a thing. That is one of the slowest and least productive ways to do any craft. If I could get it across to people that starting is the most important thing, then I have done the right thing by people. Once you’ve started, and you’ve made a few things, you’ll figure out pretty quick what you will need, in order to improve your skills. I am glad that you see it this way too! :)