Stepped Graduated Color Blend – Old School Gradients
Video #355: How color gradients were done before the Skinner Blend was invented by Judith.
More...

IN THIS POST: — teardrop blends — skinner blends — gradients — shifts — color mixing plus 1 — saturation — ombre – lietz blend — graduated blends — stepped blends — (Topics marked with an asterisk* are discussed in the Comments Section below).
Wait a second … Cindy’s hair is long again! How did that happen? And the video is #355 … wasn’t the last one #450?
No, you haven’t just entered the Twilight Zone. This clip, as well as the next one coming up on Thursday, were filmed while back. We were planning to use them for another project that got a bit derailed. So there was no point in letting them sit any longer.
Geez, it didn’t seem like that long ago when we shot this, but it was almost 100 videos ago. No wonder it seems a little awkward to me when I watch this now… I have had a bit more practice since then!
Topics Covered In This Video:
- Color blends are used in polymer clay projects for all sorts of neat things, including canes and other projects like my Sweet Pea Earrings.
- You may have heard of a Skinner Blend, which is basically a blend of polymer clay that gradually shifts from one color to another.
- Well originally, the way color blends were made was by manually measuring and mixing colors in graduated amounts so that individual colors were created in varying shades from one color to another, but it was very labor-intensive.
- I show in the video how this was originally done by cutting out squares of both Black and White polymer clay and mixing them by hand to create a stepped, graduated color blend.
- I also show how the strength or color saturation of each color used in the stepped blend can affect the over all result of the blend… you’ll have to watch the video to understand what I mean.
- So that was the old way of making graduated color blends. I will show you, in future videos, other faster ways of making them. But for today, I thought it would be fun to share with you some history of how things used to be done in polymer clay.
Have you ever made one of these graduated step blends? And can you see yourself using them in any way?
Looking forward to hearing from you!
00:00:04 –> 00:00:08 Hi guys, its Cindy Lietz, your Polymer Clay Tutor, and in today’s studio tip, I’m going
00:00:08 –> 00:00:13 to show you how to make a stepped, graduated color blend.
00:00:13 –> 00:00:19 Now Color Blends are used in Polymer Clay projects for all sorts of neat things, including
00:00:19 –> 00:00:23 canes and other projects.
00:00:23 –> 00:00:29 I have a pair of Sweet Pea earrings here that were made using a color blend.
00:00:29 –> 00:00:36 Now you may have heard of the Skinner Blend, and it is something like this, where the color
00:00:36 –> 00:00:41 will shift from one color to another color.
00:00:41 –> 00:00:49 Well originally the way it was done was in a measured out way, and I want to show you
00:00:49 –> 00:00:55 that method today so that you can have an idea where the whole color blending kinda
00:00:55 –> 00:00:57 idea started.
00:00:57 –> 00:01:02 Now I’ve rolled out… we’ve got some different color blends, we’ll just ignore the Yellow
00:01:02 –> 00:01:08 and Gold one here first, we’ll start off with the White and Black color blend.
00:01:08 –> 00:01:14 What I’ve done is I rolled out a sheet of Polymer Clay with my pasta machine, and originally,
00:01:14 –> 00:01:19 they would have rolled it out with a hand roller, ‘cause pasta machines…they only
00:01:19 –> 00:01:25 started using them for Polymer Clay somewhere in the 80’s or so.
00:01:25 –> 00:01:32 Anyways, what I’ve done is I took a little tiny square cutter, a little cookie cutter
00:01:32 –> 00:01:37 type tool, and I used those as my amounts of clay.
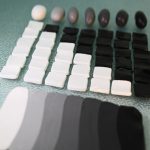
00:01:37 –> 00:01:47 Then what I did is I measured out 6 White squares and mixed it up to make this White
00:01:47 –> 00:01:50 ball… surprise, surprise.
00:01:50 –> 00:02:00 Then for the next blend, I did 5 White blocks and 1 Black, and I got this Gray color here.
00:02:00 –> 00:02:09 Next I went 2 Black and 4 White and so on all the way till I had 6 only of Black, each
00:02:09 –> 00:02:14 one I mixed by hand and got these little blocks of color.
00:02:14 –> 00:02:19 When I laid them next to each other, right here, you can see that they are basically
00:02:19 –> 00:02:26 a blend from White to Black, only it’s quite stepped, you can actually see the lines…differences
00:02:26 –> 00:02:28 here.
00:02:28 –> 00:02:33 Now if I had used smaller amounts and maybe more of them, I could have got those lines
00:02:33 –> 00:02:42 a little bit closer together and less of a step so to speak, but you can see it’s kind
00:02:42 –> 00:02:50 of quite a labor intensive type method.Now other things that come into play with doing
00:02:50 –> 00:02:56 this type of thing… well, mixing colors in any way, is saturation.
00:02:56 –> 00:03:03 Now the Black here is obviously a darker color than the White, so there’s a fair amount of
00:03:03 –> 00:03:12 dominance with the Black… there’s more Gray here, say you don’t…
00:03:12 –> 00:03:18 there’s not a lot of White strength across here, but it’s not too bad, it’s fairly even.
00:03:18 –> 00:03:22 In the case here, where I’ve gone from Gold…
00:03:22 –> 00:03:23 Premo!
00:03:23 –> 00:03:24 Gold to Premo!
00:03:24 –> 00:03:33 Cadmium Red, the Red has such a high saturation that it is much more dominant, and you can
00:03:33 –> 00:03:39 see that in the color blends here, especially coming down to this end, this one here, you
00:03:39 –> 00:03:45 can hardly tell that there’s any Gold in it at all, and then it isn’t until you get down
00:03:45 –> 00:03:52 to these other colors here where the Gold is strong enough to balance with the Red and
00:03:52 –> 00:03:55 get any sort of color shift.
00:03:55 –> 00:04:02 You can see it on this blend here, on the steps, most of them at the top end here are
00:04:02 –> 00:04:07 quite Orange and then you only start to see the shifts down to this lower end.
00:04:07 –> 00:04:14 So that is an issue when you’re doing any color blending to understand the saturation
00:04:14 –> 00:04:21 levels, and actually, this method here is a good way to see just how those saturation
00:04:21 –> 00:04:27 levels work.So that is the way that they used to do color blends, there are lots of other
00:04:27 –> 00:04:32 ways to do them, and I will go into that in another video.
00:04:32 –> 00:04:35 So I hope that was interesting for you.
00:04:35 –> 00:04:42 I wanted to ask you a question…is, have you ever made one of these graduated step
00:04:42 –> 00:04:43 blends?
00:04:43 –> 00:04:48 And can you see yourself using them in any way?
00:04:48 –> 00:04:54 Also, if you like this video, make sure to give it a…press that like button, that would
00:04:54 –> 00:04:55 be great.
00:04:55 –> 00:05:00 And if you have any questions yourself, you can leave those in the comment section below.
00:05:00 –> 00:05:04 So I will see you in another video and another time.
00:05:04 –> 00:05:05 Bye for now.
Our goal is to translate these videos into as many languages as possible. If you are interested in helping with this initiative, then please do contact us and we will figure out a way to make it worth your while :)
Resource Links:
- Related Video: Sweet Pea Earrings
- Related Video: Polymer Clay Skinner Blend Instructions
- Related Video: Square Polymer Clay Rainbow Cane Skinner Blend Plug
- Related Video: The Skinner Blend Plug Technique
- Related Video: A Basic Skinner Blend Polymer Clay Cane Project
- Related Video: Rainbow Teardrop Blend Multicolored Skinner Blend
- Related Video: Easy Polymer Clay Zipper Cane Tutorial
Resources marked with a double ** asterisk are affiliate links. If you click on them and decide to buy something, we may receive some compensation. This does not affect the price you pay in any way. What it does do, however, is helps us to continue providing free videos for you, here at the PcT website. Using our links to purchase your tools and supplies, is always greatly appreciated.
Sponsored Ads & Special Promotions
Shareable Images


To share this full blog post anywhere on the web that allows links in comments, here's a shortened url to copy and paste...
>> https://mypct.ca/v355 <<
Want to chat about today’s post? That’s what the comment section below is for. Scroll Down… We’d love to hear from you!
Or... if you would like to request a topic for a future post, here is the link to do that… PcT Suggestion Box
Hi Cindy
Like Dixie I have never used the skinner blend technique. It is easier to use your teardrop technique… Even my two granddaughters, Age 7 and 10, use it and have loads of fun. With me using this with their polymer clay…I never regret the day I found your site…. I love doing the lentil beads. Making them wonky gives them a different look… I let them cool in the frig and then cut them in half and have tow matching ones that I flatten slightly and place them on a diamond cut of a complementary color and make a pin … I also take the swirled lentil and make it into different shapes eg pyramid and make it into a pendant … So many great ways to use a simple lentil Beads we all love your imagination with your tuts ..keep them coming .. We all love you and Doug
Thanks for sharing this…it shows how the skinner blend came about as I could see the triangles of color very clearly in the stepped graduated method
Cindy,
I wanted to thank you for your speedy email response to my iPad question… and thank you for making such great tutorials, I’ve learnt so much from them.
Kindest regards
Nicola
Hi, All!
I have used the Skinner Blend ever since the beginning of my working with PC. And then, of course, I started experimenting with it myself as I went along. I have never done one of these stepped blends yet but am working on Lindly Haunani and Maggie Maggio’s fabulous book “Polymer Clay Color Inspirations” and use Julie Picarello’s book “Patterns in Polymer” all the time for blends and then customize them as I see fit.
I can see an immediate use for this stepped blending method in that you have
7 instant blends you can use from just 2 colors. I’m going to try this and make some color chips. I am always grateful for Judith Skinner’s method as it is so easy for me to use and manipulate. It is very clear now to see how she arrived at it. And the pasta machine makes it “oh!-so-easy”
I haven’t used this older technique… I’m new to the craft. BUT, I can see myself doing this in the near future… for the experience, if nothing else. I can see myself playing with three and four color blends and using the stepped graduated technique. Thanks for showing us this video!
Cindy, I am so grateful I don’t have to mix colors like this. I use your teardrop method whenever I want a nice blend. I entered the PC world after you introduce this method and have never looked back. I honestly can tell you I never have done a skinner blend and probably should do one just so I have the experience but I get too excited over the project I currently am planning and just don’t want to take the time. However, I do realize the importance that Judith brought to the PC world by sharing her methods. I also think your teardrop blend is equally important because you took it up a notch. Your tutorials, video tips and new techniques that you share have enhanced the lives of all of us in the PC world.
Hi Cindy! Very interesting video about Color Saturation. I Think knowing better CS can help us to gain more precise result in color blending. I imagine CS depends on colors and type of polymer clay (brand) chosen, so results may vary using kato or Fimo, Cernit, Premo! or Lucy Clay (have you ever heard about? Recently discovered it’s a czech brand of polymer clay available in europe) in particular it’s so exciting to hear about old techniques, old but I think useful today! <3 thanks for sharing!
I just might try this method! My Skinner blends leave much to be desired!
I just did this last week. It was labor intensive but I do like the outcome for certain things. Skinner blends are awesome, but there are some situations (canes) where this type of blend makes a nicer design.
Yes – I have used this method to get a certain color. I will use whatever to get the right color. I love playing with color -you learn to much. Some lovely -some mud!!
Maggie Maggio uses something similar even now. Thanks for broadening our horizons!!!
I think Marie Segal introduced the pasta machine (?) which made all those skinner blends easy.
Wow! thank goodness for Judith and even more so for Cindy’s method of color blending, although this method helps peeps understand how color blending works and the little tiles look kinda cute all set out in neat rows Makes me appreciate all the effort Cindy puts in making her color recipes. A BIG thank you Cindy.
Not long now, 9 days to wait till my trip across the pond, can’t wait to go shopping in all the stores you guys use. Whopee……..cheers xx
great history lesson…thanks
Cindy — I love your tutorials; thanks for taking the time to share your expertise.
Hi Cindy I love how you explained the saturation level of colors. I use your teardrop technique . Much easier!
Simply fabulous tute, Cindy, I learn more from you about color than I have anywhere else. Thank you so much!
Thanks I will keep watching for the new way. I am just learning how to do this.