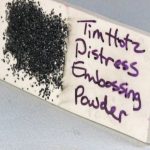
Test Tim Holtz Distress Embossing Powder on Polymer
Video #619: My test sample has sat for a few months now, without any polymer clay compatibility issues showing up.
More...

IN THIS POST: — tim holtz — ranger — distress — embossing powder — emboss — texture — powders — distress embossing powder — (Topics marked with an asterisk* are discussed in the Comments Section below).
Topics Covered In This Video:
- Testing Tim Holtz Distress Embossing Powder on Polymer Clay for compatibility.
- Distress Embossing Powder is a grainy powder meant for using in Scrapbooking. The embossing powder is sprinkled onto embossing ink, which holds it to the surface of the paper. The powder is then melted using a heat gun, which leaves a raised (embossed) surface design.
- When mixed into polymer clay, or placed onto polymer clay, you can get some cool effects.
- What’s unique about the Tim Holtz Distress brand of embossing powder, is that it contains some larger grains, which don’t melt.
- Some of the sandy grains then embed themselves into the melted embossing powder, leaving a gritty surface.
- And some of the grains fall off, giving a chipped and distressed look to the project.
- I have taken a sample of raw Premo polymer clay and placed a small pile of the distress embossing powder onto it, then baked for 1 hour at 275F (the recommended baking temperature for Premo).
- My test sample has sat for a few months now, without any issues showing up in regard to polymer clay compatibility.
- The baked sample has a very textural surface that feels very gritty to the touch, like sand or brick.
- When the melted powder is scratched, a few sand grains will come off, but the majority is very stuck-on and durable.
- I will be doing a tutorial soon that incorporates the distress embossing powder in the technique. It is a graffiti technique where the gritty texture gives the look of a cement wall.
- The Tim Holtz Distress Embossing Powder looks great mixed into translucent polymer clay for a cool stone like effect
00:00:03 –> 00:00:08 Hi guys, its Cindy Lietz, your Polymer Clay Tutor, and today in the PcT Test Lab, we are
00:00:08 –> 00:00:15 testing Tim Holtz’s Distress Embossing Powder on Polymer Clay.
00:00:15 –> 00:00:19 Now, as you know, I like to test different products on Polymer Clay to see if they’re
00:00:19 –> 00:00:26 compatible, and this is one of the ones I wanted to try ‘cause I do really love using
00:00:26 –> 00:00:34 embossing powder with Polymer Clay, and Distress Embossing Powder is a type of powder that…here
00:00:34 –> 00:00:42 just let me open it up, it’s quite grainy, and it’s meant for scrapbooking, and it’s…you
00:00:42 –> 00:00:47 put it on like an embossing ink, the ink holds on to the powder and then when you use your
00:00:47 –> 00:00:54 heat gun, the embossing powder melts and then you get this neat embossed surface, and kind
00:00:54 –> 00:01:00 of like a textured raised-up surface on your scrapbooking, but if you mix it into Polymer
00:01:00 –> 00:01:04 Clay or onto Polymer Clay, it does something else, so it’s very cool.
00:01:04 –> 00:01:10 Now what’s different about the Tim Holtz Distress Embossing Powder is that it has these larger
00:01:10 –> 00:01:17 grains in it, and some of the grains are just sort of a grit and they’re not embossing powders
00:01:17 –> 00:01:22 so they don’t melt, so some of them stay kind of just grainy on the surface if there’s embedded
00:01:22 –> 00:01:28 in the melted embossing powder, or they flake off and it leaves this sort of distressed
00:01:28 –> 00:01:31 finish, which is unusual for an embossing powder.
00:01:31 –> 00:01:37 Now I have taken a sample of Premo!
00:01:37 –> 00:01:48 Polymer Clay and I put a little pile of this embossing powder onto the raw clay, and I
00:01:48 –> 00:01:55 baked it in the oven, now I did this a few months ago, I added it to raw clay and I did…
00:01:55 –> 00:02:02 baked it at 275 Fahrenheit for one hour, ‘cause that’s what I usually bake my Premo! at, and
00:02:02 –> 00:02:07 I wanted to see how it would survive, and you can see it’s on here, it has a very textural
00:02:07 –> 00:02:15 surface, and it feels very gritty, it feels like a brick or sand on there and it looks
00:02:15 –> 00:02:19 very cool, and like I said, if you scratch at it, some of the pieces will come off but
00:02:19 –> 00:02:21 it sticks on there very well.
00:02:21 –> 00:02:29 Now I’m going to be using it in an upcoming tutorial, I’ve got it on here, on this graffiti
00:02:29 –> 00:02:36 style piece, and it’s just in little spots in corners to give it the look of being on
00:02:36 –> 00:02:39 like a cement wall, that kind of thing.
00:02:39 –> 00:02:45 So it is compatible, it’s been on the clay for several months, it doesn’t do anything
00:02:45 –> 00:02:50 weird, I didn’t expect it to, but I wanted to see how tough it would be and it is very
00:02:50 –> 00:02:53 tough, and it works beautifully with Polymer Clay.
00:02:53 –> 00:02:58 It does a very cool thing too if you mix it into something like Translucent, I should
00:02:58 –> 00:03:04 have done a little sample for you, but you can get the idea, and it leaves kind of a
00:03:04 –> 00:03:08 grainy effect to it, so you can try that if you like, you can mix it into the clay or
00:03:08 –> 00:03:10 have it on top.
00:03:10 –> 00:03:15 So I hope that was helpful for you, if it was do let us know if you like this video.
00:03:15 –> 00:03:21 And if you have suggestions for products you’d like me to test here in the test lab or ideas
00:03:21 –> 00:03:27 that you don’t quite get, or you’re having issues with anything Polymer Clay related,
00:03:27 –> 00:03:31 make sure to leave those in the comment section below.
00:03:31 –> 00:03:36 And don’t forget we have a great resource over at PolymerClayTutor.com where, if you
00:03:36 –> 00:03:40 use the search box there, you can find answers to all of your Polymer Clay questions.
00:03:40 –> 00:03:43 We will see you next time and bye for now.
Our goal is to translate these videos into as many languages as possible. If you are interested in helping with this initiative, then please do contact us and we will figure out a way to make it worth your while :)
Resource Links:
- Related Video: UTEE Ultra Thick Embossing Enamel on Polymer Clay
- Related Article: Polymer Clay Faux Jade Technique
- Related Video: Anjou Pear Fruit Beads Polymer Clay Tutorial
- Amazon: Tim Holtz Distress Embossing Powder **
Resources marked with a double ** asterisk are affiliate links. If you click on them and decide to buy something, we may receive some compensation. This does not affect the price you pay in any way. What it does do, however, is helps us to continue providing free videos for you, here at the PcT website. Using our links to purchase your tools and supplies, is always greatly appreciated.
Sponsored Ads & Special Promotions
Shareable Images


To share this full blog post anywhere on the web that allows links in comments, here's a shortened url to copy and paste...
>> https://mypct.ca/v619 <<
Want to chat about today’s post? That’s what the comment section below is for. Scroll Down… We’d love to hear from you!
Or... if you would like to request a topic for a future post, here is the link to do that… PcT Suggestion Box
Hi Cindy, thank you for testing these powders. I have not used them as I have so many jars of embossing powders I bought from a gal who was in scrapbooking. Thanks so much for showing the difference between the two powders. They certainly have their place in our medium and now my interest is piqued enought to want to try them.
It has been fascinating testing all the endless products there are out there. (A list that will never get finished!) You’d think that something as simple as embossing powder would all be the same, but there are many different types and brands that have so many different ingredients and properties that you never know how it will behave with polymer clay until you test it. That is one thing that I LOVE about craft supplies. There is a new discovery around every corner!
I am making memory beads with rose petals using translucent clay. What can I use to add a slight sparkle to the clay?
Hi Pam, a little pearl clay will bring some sparkle to your beads.
Several years ago, I tried the Distress Powders mixed with transluscent clay. The results were amazing! One of my “mistakes” turned into a wonderful surprise. I was at a polishing class and we were covering eggs. I had some left over clays mixed with Distress EP with me and decided I’d try to do a Chrysanthemum cane with these clays wrapped in gold. Being transluscent clays, the results were not what I expected but I loved it! The egg ended up with a stone-like finish and the gold that got pushed into the cane looked like thorns! I called it my Crown of Thorns egg. Wish I could include a picture so you can see it!
Oh what a great story Gayle! I love it when accidents turn out to better than if you had planned it! Thanks for sharing!
Hi Cindy – re your invite for suggestions, there’s a new product out there called ‘Oozeq’ and I wondered if you’d considered showing this in your Friday tips section. Can be found here – used for polymer clay et al, blurb says it can be soaked and removed completely, sounds interesting. Have always wanted to make hollow balls rather than just lentil shaped beads and would love to see your take on it.
Thanks – Marion
I have some that I have been testing. It isn’t as simple to use as you would think, so I am working with them to come up with ways to make it more user friendly. I will get to a demo sometime, when I get something simple figured out.