Tips And Tricks For Using Your Sculpey Clay Extruder
Video #667: Since many of you may already own this tool, here is some information and ideas on how to put it to good use.
More...

IN THIS POST: — sculpey clay extruder — extruder — plunger — extruder dies — polyform — sculpey — caulking gun — kitchen wipes — baby wipes — sculpey souffle — soft clay — extrude — extruding — update — review — tips and tricks — tools — (Topics marked with an asterisk* are discussed in the Comments Section below).
Topics Covered In This Video:
Today I am going to do an update on the Sculpey Clay Extruder.
In a previous video, I did an Unboxing of the Sculpey Clay Extruder and I tried it out.
I had found it to be quite difficult to use. You need to be super strong to squeeze the clay out of the barrel.
Since I know that a lot of you may already have purchased a Sculpey Clay Extruder, I thought that I’d try and figure out some ways to make it easier to extrude using this readily available tool.
I figured out some little tips and tricks that should help you out.
Using the same Sculpey Souffle Clay we used in the previous video, so it is a fair comparison, I show you how to use a baby wipe or kitchen wipe and a caulking gun to assist in extruding the clay.
Key tips and tricks for easier clay extrusion are…
Clay should be soft and warm.
Clean and lubricate the barrel with a moist kitchen/baby wipe before adding clay.
Only fill barrel 2/3 full, to increase leverage.
Leave the wipe on the plunger to help fill the gap between the plunger and the barrel.
Use a caulking gun to help push out the clay.
Larger dies are easier to push out the clay.
00:00:03 –> 00:00:07 Hi guys, its Cindy Lietz, your Polymer Clay Tutor, and today’s Studio Tip, I’m gonna do
00:00:07 –> 00:00:11 an update on the Sculpey Clay Extruder.
00:00:11 –> 00:00:17 Now in a previous video, I unboxed the Sculpey Clay extruder and I used it and tried it out,
00:00:17 –> 00:00:23 I found it quite difficult to squeeze the clay out, so I thought I’d try to figure out
00:00:23 –> 00:00:28 some ways to make it a lot easier, ‘cause I know a lot of you already have this extruder,
00:00:28 –> 00:00:32 so I figured out some little tips and tricks that should help you, alright?
00:00:32 –> 00:00:38 Now I’m gonna use the same clay as I did the other demo in, and I’m gonna use the Sculpey
00:00:38 –> 00:00:44 Soufflé, which is a really nice clay, and I’m gonna make sure that it’s nice and soft,
00:00:44 –> 00:00:49 and I just wanted to make sure we’re doing a fair comparison to the other video, so you’re
00:00:49 –> 00:00:55 gonna really wanna make sure that the clay is super soft and warm, because pushing out
00:00:55 –> 00:00:58 cold hard clay is going to be a lot harder.
00:00:58 –> 00:01:06 Now another thing that… and I’ll also use the same little spaghetti die, I will show
00:01:06 –> 00:01:11 you a larger die to show you how much easier the larger ones are, but I will do the same
00:01:11 –> 00:01:17 one we did before, so that it’s fair to compare it, now I’ll screw that on to the end.
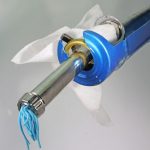
00:01:17 –> 00:01:25 Now one of the things that’s part of the problem is that there is quite a bit of space…I
00:01:25 –> 00:01:31 mean not huge amounts, but enough space between the end of this plunger and the hole…or
00:01:31 –> 00:01:39 the barrel size, that some of the clay will push up around the edges of the plunger and
00:01:39 –> 00:01:45 kinda get stuck in the barrel, so even just pushing the clay through makes it hard.
00:01:45 –> 00:01:46 So what we’re gonna do…
00:01:46 –> 00:01:53 I figured this out when I was cleaning out the extruder, I’m just gonna use some, these
00:01:53 –> 00:01:57 are like kitchen wipes, you could use baby wipes, something that has a lot of moisture
00:01:57 –> 00:02:04 to it, and the first thing I’m gonna do is put it on the end of my extruder and use it
00:02:04 –> 00:02:11 to push down inside the extruder, and lubricate the edges of the barrel there, so I’m pushing
00:02:11 –> 00:02:16 it right down to the very end and I’m just getting the inside all wet and slippery so
00:02:16 –> 00:02:20 that the clay can move through easier.
00:02:20 –> 00:02:26 I also only put in 2/3 of a barrel full of clay, and I’m just gonna make sure it’s nice
00:02:26 –> 00:02:33 and warm, we’re gonna pop that in there, now, when I was just explaining the clay coming
00:02:33 –> 00:02:41 up over the edge, I figured out if you leave the baby wipe or the kitchen wipe on the plunger,
00:02:41 –> 00:02:47 it fills up that gap around the barrel there and it keeps it from creeping up over the
00:02:47 –> 00:02:51 edge, and it makes it easier to push, believe or not.
00:02:51 –> 00:02:55 So it does make it a little bit easier to push, I can actually push some of it out,
00:02:55 –> 00:03:00 it’s still kinda hard to push out…I mean you have to be really, really strong, or push
00:03:00 –> 00:03:07 it against your desk or something to get it out, so I wanted to try the idea that a lot
00:03:07 –> 00:03:10 of people have for using a caulking gun.
00:03:10 –> 00:03:17 Now this caulking gun here is, you know, the regular kind you use for doing house repairs
00:03:17 –> 00:03:22 and stuff, you put the caulking tube in there and then you know, you go around the bathtub
00:03:22 –> 00:03:23 or whatever.
00:03:23 –> 00:03:30 But it has the nice space in here where you can put the gun part…I’ll just take this
00:03:30 –> 00:03:37 out first so you can see better, you can put the gun handles right in here, well this one…and
00:03:37 –> 00:03:42 I’ve seen the ones on Pinterest and things like that where they must have either a slightly
00:03:42 –> 00:03:48 larger one than I do, or they bent it or something…but I thought Doug might kill me if I try to bend
00:03:48 –> 00:03:56 his caulking gun, so…probably not dead kill me, but not be happy, so I thought…
00:03:56 –> 00:04:02 I mucked around in the studio to see if I could find something that would keep the piece
00:04:02 –> 00:04:06 from falling out, and I just happened to find this, this is actually a rubber ring…I mean
00:04:06 –> 00:04:12 not a rubber ring but a metal ring that has a little bit of a plastic coating on it, and
00:04:12 –> 00:04:19 it happens to fit in here, I can put the gun in here, and then it just keeps it from falling
00:04:19 –> 00:04:24 out, it just keeps it from…and I don’t have to have this handle going to the sides, so
00:04:24 –> 00:04:25 that works.
00:04:25 –> 00:04:30 If you were gonna do this a lot, you’d want something a lot more stable than that, and
00:04:30 –> 00:04:37 you can probably just cut a piece of wood or something else to fill that space or bend
00:04:37 –> 00:04:41 out the things, but this works okay.
00:04:41 –> 00:04:47 Now I’m gonna take this plunger and put it back in, and it still has the baby wipe, it’s
00:04:47 –> 00:04:57 all gonna be ugly, but that’s okay…just a sec here, I’ll push this back a bit, alright,
00:04:57 –> 00:05:04 here we go, put this in, we’ll get it out the way so you can see it better, now we’ve
00:05:04 –> 00:05:08 got this all in here and we’ve gotta push this up to the back.
00:05:08 –> 00:05:13 Now it’s a little slippery here ‘cause it’s metal against metal and they don’t fit perfectly,
00:05:13 –> 00:05:20 but if you start pushing on… or squeezing the handle on the gun, you can…it’ll start
00:05:20 –> 00:05:25 pushing it out, and in fact, it does it pretty well.
00:05:25 –> 00:05:32 It’s not the most beautiful setup ever, and it is a little on the hokey side, but man,
00:05:32 –> 00:05:41 could you make a lot of Soufflé hair with this little setup, so I thought I’d show you
00:05:41 –> 00:05:42 that.
00:05:42 –> 00:05:48 And quickly, before I move on, I’m gonna show you something similar using the larger disks
00:05:48 –> 00:05:54 here, just to show you that if it’s coming out of the larger disks it comes out a lot
00:05:54 –> 00:05:59 easier, alright, also with the baby wipes still being on there, it comes out perfectly
00:05:59 –> 00:06:01 clean, so you don’t have to clean it.
00:06:01 –> 00:06:11 Alright, so let’s just choose something larger and pop that disk in… the little popped
00:06:11 –> 00:06:19 out side, sits to the outside like that, screw it onto the end, this clay is all nice and
00:06:19 –> 00:06:25 soft, so we might as well throw that in there and we’ll see if we have enough strength,
00:06:25 –> 00:06:31 or if it’s easy enough to do it without the gun, it might be…oh, if this is nice and
00:06:31 –> 00:06:38 clean, first it’s easier, so I’m just gonna get it wet, pop this inside, so can you see
00:06:38 –> 00:06:40 that this is a little easier?
00:06:40 –> 00:06:45 Still not super easy, but if you have this machine, you might as well use it, okay, with
00:06:45 –> 00:06:52 my own hand strength, I can push out the larger die without too much of an issue, and I couldn’t
00:06:52 –> 00:06:59 push it out without the baby wipe there, it just was…the clay was grabbing in the barrel.
00:06:59 –> 00:07:04 And in that previous video, you might have even seen at the end there where I was just
00:07:04 –> 00:07:09 trying to pop out some extra clay and push the clay off with no disk and it was still
00:07:09 –> 00:07:11 having trouble pushing out.
00:07:11 –> 00:07:20 So I hope that was helpful for you, and if it was, do let us know if you liked this video.
00:07:20 –> 00:07:26 And if you have any tips or tricks that you’d like to share with us, do let us know about
00:07:26 –> 00:07:28 that, and I can maybe make a video on it.
00:07:28 –> 00:07:34 And if you’ve got things that you… special requests, if you’ve got ideas or problems
00:07:34 –> 00:07:40 that you’re having issues with, you never know, we may already have a video on it.
00:07:40 –> 00:07:45 Or when you leave a suggestion maybe I could make a video on it, so that you can get helped
00:07:45 –> 00:07:48 out in the future.Alright, so we’ll see you next time and bye for now.
Our goal is to translate these videos into as many languages as possible. If you are interested in helping with this initiative, then please do contact us and we will figure out a way to make it worth your while :)
Resource Links:
- Related Video: Review Lucy Clay CzeXtruder XXL HD
- Related Video: Sculpey Souffle Polymer Clay Product Review
- Related Video: How To Clean Your Polymer Clay Extruder
- Related Video: Baby Wipes In Your Polymer Clay Studio
- Amazon: Polymer Clay Extruders **
Resources marked with a double ** asterisk are affiliate links. If you click on them and decide to buy something, we may receive some compensation. This does not affect the price you pay in any way. What it does do, however, is helps us to continue providing free videos for you, here at the PcT website. Using our links to purchase your tools and supplies, is always greatly appreciated.
Sponsored Ads & Special Promotions
Shareable Images


To share this full blog post anywhere on the web that allows links in comments, here's a shortened url to copy and paste...
>> https://mypct.ca/v667 <<
Want to chat about today’s post? That’s what the comment section below is for. Scroll Down… We’d love to hear from you!
Or... if you would like to request a topic for a future post, here is the link to do that… PcT Suggestion Box
Hi Cindy,
I watched your video on the Sculpey clay extruder and realized that tool would not be the best for my work. I also watched your video for the CZEX HD XXL All in One and made the decision to buy it today (I think I’ll even get a box with mine). It has already shipped in just a few hours. It should arrive next week. Thank you very much for both videos. If I ever need a backup to my CZEX for some reason I’ll consider the caulking gun/kitchen wipe option. It does work, Thanks again. :-) Best wishes, Chris
Hi Cindy
thanks for your tips and tricks with this particular Extruder.
I did start off with one of these years ago, and told my students not to buy that one. and gave it away as I had always found it too hard to use,
so your tips are an eye opener, as I would never thought of the baby wipes trick. Great.
I did know about the caulking gun, but did not have one at the time.
I now use the Makins extruder, so am up with everything now. Thanks to this tut, a lot of clayers will be able to use that extruder better, as it is of course much cheaper than the Makins, and a not excy way for a beginner. As to the cleaning, isnt that a great idea, must try something like that on my Makins as that is always the worst part of the job.
I have made some great buttons using the designs I get from the extruder clays.
Thanks again. I must say it is nice to see” you” when you do your tuting
Bye ,
Love
Elizabeth K.
XX
Nice to see you too Elizabeth! Thanks for your input on this matter! :)
Oh my, thank you Cindy! Using my Sculpey extruder is SO hard on my hands, but I haven’t been able to bring myself to buy a more expensive one yet. Now to see if I can find a caulking gun…
Wonderful video, awesome idea
Unrelated question!
What make are your black plastic containers at the back of your desk, love the organization
Thanks
I just dug out my old one, which is similar, and I used it in the pottery studio. It was manufactured by Kemper Tools. .I still use the discs in my Walnut Hollow and Makins extruders and all 19 work fine in those extruders.
The Lucy Clay extruder is still on my bucket list. I will be seeing Diane (Van Island Jewels) at the Carol Simmons workshop so might pick one up then.
Oups forgot to tell you that I use hamburger patty paper around my clay before putting it in my plunger. The ends of the paper should not meet though to make it work properly. No cleaning to do after.
Too bad I never could get the clay out using that type of tool. My hand can not reach the extended part and press enough to make it work. I still stand by the press my hubby made me like your demo last week.
Good for you Cindy, workable solution. Years ago, folks sold plastic inserts that modified the caulking gun so that the extruder fit into the opening much like that you showed, I have one somewhere still in the plastic bag. Also some folks sold actual modified plastic tips that actually extruded the designs just using the caulking guns.
After helping me construct the wooden foot pump, I remember my Dad hauling out his heat gun, which we used to keep the clay warm while extruding. Caution here, easy to bake the clay.
Unfortunately, Glass Attic, my historically beloved go to site no longer has active links, but you can get an idea from this video, which used actual pottery clay:
Desiree McCrorey also showed this technique using the caulking gun, but, the instructions have been removed from her website.
Since these Sculpey Clay Extruders are cheap, and within the price realm of the beginner, think it’s wonderful of you to reactivate this method because it gives them a taste for the possibilities to save for future purchases. Straight out, your video of the LUCY Extruder convinced me that this is state of the art, and worth every penny.
Boy, fixed income is a b****, lol. Then again, if I was still working at my old salary, it kind of scares me how much I would be spending on new tools and products. No vacations. Right now, every penny is going towards a JoolTool.