Tent Polymer Clay While Baking To Avoid Scorching
Video #423: The tenting shields your beads from the direct heat of the oven elements.
More...

IN THIS POST: — tenting — baking — scorching — burning — discoloration — (Topics marked with an asterisk* are discussed in the Comments Section below).
Topics Covered In This Video:
- Tenting your polymer clay while baking, so it doesn’t scorch, burn or darken.
- Tenting is called tenting because the folded piece of cardstock you put over your clay, to protect it, looks like a little tent.
- Tenting your polymer, protects it from the direct heat from the elements in the oven.
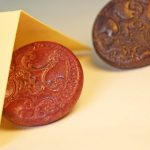
- I show two samples of the same color, sized and shaped polymer clay pieces. One baked under a paper tent and the other not. It is amazing the color differences between the two. One is the original color and the other is blackened all the way through the piece.
- Tenting is easy to do… just fold a piece of cardstock (I like to use file folders) down the center and open it like a tent. Place over your polymer clay pieces while baking. The hot air can still get inside, but tents offers protection from the direct heat.
- It works great on your bead rack too.
- Make sure that your tent isn’t too pointy. You don’t want it to get too close to the elements in your oven, or it will burn. This is especially important in small toaster ovens.
- The paper can handle going into the oven at the low temps that polymer clay is baked at. Just don’t let it touch the elements, and you will be fine.
00:00:03 –> 00:00:08 Hi guys, its Cindy Lietz, your Polymer Clay Tutor, and today’s Studio Tip is tenting your
00:00:08 –> 00:00:14 Polymer Clay while baking so that it doesn’t scorch or darken.
00:00:14 –> 00:00:19 Now, tenting is called tenting ‘cause it looks like a little tent, I’m using a little
00:00:19 –> 00:00:25 piece of folded card stock here, usually I use a much bigger one, but I’m using it to
00:00:25 –> 00:00:27 protect the piece inside.
00:00:27 –> 00:00:33 Now these 2 pieces were baked at the same time, one with this little tent and one without.
00:00:33 –> 00:00:41 Now, what the tent does is protect the piece from the direct heat of the element.
00:00:41 –> 00:00:46 Now it’s amazing the difference that will happen between the two, this one stayed the
00:00:46 –> 00:00:54 color it was supposed to be and this one completely blackened, the heat from the outside coming
00:00:54 –> 00:00:59 directly on it, darkened it, and in fact, it darkened it all the way through, so it
00:00:59 –> 00:01:02 makes an enormous difference to tent your pieces.
00:01:02 –> 00:01:08 And it’s easy to do, you just take a piece of card stock, fold it over… fold it down
00:01:08 –> 00:01:12 the center and make a little tent, you can protect the whole area, I’ve got mine baking
00:01:12 –> 00:01:19 on a piece… on a tile, this little tent… this particular size, works beautifully on
00:01:19 –> 00:01:20 my bead rack.
00:01:20 –> 00:01:25 So I’ve got a little bead here sitting on the rack, and then I just fold a piece of
00:01:25 –> 00:01:31 file folder and protect the piece inside, like that, the air can still get inside…
00:01:31 –> 00:01:36 the nice warm air, but the direct heat isn’t on top and it’ll protect them from scorching.
00:01:36 –> 00:01:42 Make sure that it isn’t too pointy, you want to… you don’t wanna get close to the element,
00:01:42 –> 00:01:46 especially if you’re using a small toaster oven or something like that, you don’t want
00:01:46 –> 00:01:50 it… the paper getting anywhere near the element or it will burn.
00:01:50 –> 00:01:54 So I hope that tip was helpful for you…
00:01:54 –> 00:01:59 oh yes, and don’t worry, the paper can handle the temperatures that we bake at, just as
00:01:59 –> 00:02:03 long as it doesn’t touch the element, just thought I’d point that out.
00:02:03 –> 00:02:08 If it was helpful for you, make sure to click that like button that would be great.
00:02:08 –> 00:02:13 And my question for you today is, do you have trouble with scorching your Polymer Clay?
00:02:13 –> 00:02:16 And do you thing this tenting trick will work for you?
00:02:16 –> 00:02:20 Please leave your answers in the comment section below, that would be great.
00:02:20 –> 00:02:24 And don’t forget to subscribe, we have new videos that come out every week and you’re
00:02:24 –> 00:02:25 not gonna wanna miss a thing.
00:02:25 –> 00:02:27 We’ll see you next time and bye for now.
Our goal is to translate these videos into as many languages as possible. If you are interested in helping with this initiative, then please do contact us and we will figure out a way to make it worth your while :)
Resource Links:
- Related Video: Foil Pan Lids Will Protect Your Polymer Clay In The Oven
- Related Video: Simple Tips To Avoid Burning Your Polymer Clay
- Related Video: Most Common Polymer Baking Questions… Answered
- Related Video: Essential Polymer Clay Tools Oven Thermometer
- Related Video: Ten Minutes NOT Long Enough to Bake Polymer Clay
- Amazon: Bead Baking Rack **
Resources marked with a double ** asterisk are affiliate links. If you click on them and decide to buy something, we may receive some compensation. This does not affect the price you pay in any way. What it does do, however, is helps us to continue providing free videos for you, here at the PcT website. Using our links to purchase your tools and supplies, is always greatly appreciated.
Sponsored Ads & Special Promotions
Shareable Images


To share this full blog post anywhere on the web that allows links in comments, here's a shortened url to copy and paste...
>> https://mypct.ca/v423 <<
Want to chat about today’s post? That’s what the comment section below is for. Scroll Down… We’d love to hear from you!
Or... if you would like to request a topic for a future post, here is the link to do that… PcT Suggestion Box
Which is better to cover your clay? Aluminum foil or cardstock? I heard both methods.
Hi Terri, as long as there is no risk of touching the elements, I prefer to use cardstock over tinfoil. Tinfoil is a little floppy and if it slides down and touches the clay during baking, it can leave a shiny spot or scorch mark where it touches. If car stock touches the clay it won’t leave a mark at all. Tinfoil will work instead though, if you’re worried that the paper might touch the burners. It is up to you.
Cindy, greetings from Olympia, WA. I check out your free videos every time you offer them. Am still claying and I especially appreciate the tenting tip. My projects almost always darken and this is SO helpful! Thank you!
All who is interested…..Michaels is having their $.99 cent sale on all Polymer Clay starting this Sunday Sept. 15th and running a week through next Sat. Just came out today. Time to take inventory!
Natalie: I do basically the same thing without the batting because I’m not doing beads right now. I bought two disposable cake pans at the dollar store and put one over the other, clipping them together. I put a tile in the bottom with a piece of parchment paper on it. I’ve only done this once, but the pieces didn’t darken at all and the two owls are still happy sitting serenely with the other pieces.
Hi
I found an alternative to the tenting
Here’s what I do for when I am doing a lot in my oven :
Using 2 cookie tins:
Place a large ceramic tile in one.. The a piece of parchment paper ….. Next a layer of batting….. Then I place all my beads on the batting as well as my bead rack… Then I cover everything with another layer of batting and lasy I place the other cookie sheet on top … This allows me to move the tray in and out of the oven easier….. I do preheat the oven at 265 …… This might seem like a lot to do but since I started doing this not a single thing has been burned and I can do about 50 or more beads of all different shapes at one time… I do a smaller version of this for the toaster oven… Let me know what you think of my method
Hi Natalie, good to hear you have found a baking technique that works for you. So glad to hear everything is working out for you!
Hi Nathalie, Like Dixie Ann said that is great you have found a baking system that works for you. I know a lot of people like to use batting as a place to bake beads, but any of the batting I have tried has left little fibers and markings on my beads. I prefer to use a bake rack where the bead is suspended in the air and nothing touches them. If I do have a bead that needs support, like a flower with large petals, I like to bake on a bed of cornstarch or baking soda. At least it is smooth and can be washed off after baking.
Short, sweet, helpful. Thanks so much!
Cindy thanks so much I am so far behind on your helpful videos and making pretty things but I chose this email to open and am so happy I did as cool temps arrive and gardens get shut down I will fold some card stock and get ready to bake some pretty beads and no longer be worried about them coming out just as I put them in. You do good work!
Thanks so much.
Eunice
I usually try to tent but there are times I need to tent with other items. In baking a translucent piece I actually placed it under a clear glass but allowed the oven to warm up and cool down with the piece in the oven first. It turned out perfect and no discoloring. I baked it at 275 degrees and of course it was Premo. To bake my sand dollars I placed them on large wooden balls that had a flat bottom and set them on a large tile. I then covered the whole thing with a stainless steel bowl. They also came out perfect, baking at 275 for 60 minutes. It’s fun finding different things to experiment with and use for baking. I have a 5 step process for baking. a) have the best oven you can afford for baking your clay. b) always tent or cover your items. c) always bake for 60 minutes. d) always use a thermometer e) always bake at the recommended temperature for the brand of clay you are using. It also doesn’t hurt to check your temperature periodically while you are baking to see if there are any temperature spikes. I check mine about every 20 minutes. If you haven’t had much luck in the past with baking, please, please don’t give up. Check out all the great tips here at the blog and try it again. We would love to hear about your successes. :)
Hi Dixie
I also check my clay every 20 minutes…. It makes me feel better to know that everything is ok …. Also I keep check of the temp… I have been using my convection house oven with no negative effects on my cooking afterwards
Hi again Dixie
I put a y of my work that contains translucent clay in an ice bath… I think that Cindy had mentioned this in one of her videos… But I could me mistaken …. I read so many website on polymer clay that it might have been someone else… Eitherway if works but I may try yours since a bake of nose with just regular clay a d have to leave them in the of to cool down…. It would eliminate one step
Thank you Dixie Ann for your wonderful and in depth explanation of the baking process! That is very helpful for everyone!
My polymer clay oven burned the last batch of items I baked – large lumps on it – even though the temp gauge read 65 degrees at 30 minutes. Now I’m afraid to use it. I want to bake in my regular oven and want to use two aluminum cake pans, one upended on the other to keep any fumes inside. Will the aluminum keep the pieces from darkening or will I need to cover with tent or parchment paper too?
Hi Freda, the pan idea should work for you fine, but metal can often create hot spots, so do make sure to line the bottom of your pan with paper or cardstock first. Your lid will make the paper tent unnecessary, as long as it doesn’t touch your pieces.
As far as your pieces burning, your oven dial may be off. You will want to use an oven thermometer. If you are already using one and you still have problems, it is possible that the thermometer isn’t reading right and you may need to try a different one.
There is tons of info here on the blog on baking, so make sure you use the search box on the top of the page. Between the info here and on the rest of the blog, you should be having no problems baking in no time. Good luck! Let us know how it goes!
I had No idea that scorching was so harsh on polymer clay in a toaster oven
–well I should have known do to the fact that my toaster oven burns half of our bread every night unless I stand there and move it around ;)
So I’m glad to be able to use my regular oven to bake my clay – But I still tent per Cindy’s advice :)
that visual aide on this video really opened my eyes though – when you said they were baked together I was amazed….hence this rambling lol — Have a Great week everyone!!
this was very helpful, my polymer clay creations always ended up looking darker when i baked it and i couldn’t find a way to stop that from happening. now its not a problem :)
I had given up on polymer clay because everything I made scorched. The only things that didn’t scorch were so under baked they fell apart after a week or two. I will pull my supplies out again and give this a try! :)