Using Oil to Condition Hard Polymer Clay – Tip #2
Video #477: How to turn a crumbly block of Fimo-Not-So-Soft, into something that is useable again.
More...

IN THIS POST: — hard polymer clay — softener — soft polymer clay — oil — baby oil — clay softener — mineral oil — sculpey clay softener — conditioning — hard — soft — leaching plasticizers — (Topics marked with an asterisk* are discussed in the Comments Section below).
Topics Covered In This Video:
- Hard, old and dry polymer clay that you might think is completely unusable, can be conditioned by adding oils.
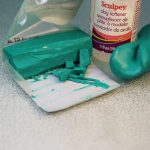
- Oils that can be added to soften many different brands of polymer clay, are Sculpey Clay Softener, Mineral Oil or Unscented Baby Oil.
- Mix crumbled clay in a Ziploc bag with 1 drop of oil until your clay is fully mixed, softened and workable. It will become very pliable in your fingers.
- Don’t add in too much oil, or your polymer clay will become sticky.
Clean hands (if necessary) with Kitchen Wipes or Baby Wipes.
00:00:03 –> 00:00:08 Hi guys, its Cindy Lietz, your Polymer Clay Tutor, and today’s Studio Tip, we are talking
00:00:08 –> 00:00:16 about Conditioning Hard Polymer Clay – Tip #2 Using Oil.Now, in a previous video I showed
00:00:16 –> 00:00:22 you how you could take some hard Polymer clay…like this old block of Fimo soft…how nice…I
00:00:22 –> 00:00:28 called it Fimo not so soft, but I showed you how you could use a hammer to condition it,
00:00:28 –> 00:00:33 in this one, I’m gonna show you something else, now this Fimo…I couldn’t find any
00:00:33 –> 00:00:38 Premo that was hard and dried up, ‘cause I use Premo quite a bit, but this old block
00:00:38 –> 00:00:47 of Fimo is just… just about like dust and it is very difficult to try to take that and
00:00:47 –> 00:00:51 run it through your pasta machine, or even work with it at all.So, one thing you can
00:00:51 –> 00:00:58 do is you can add a little bit of oil to it, now it doesn’t really matter that much what
00:00:58 –> 00:01:05 kind of oil you use, you can use the official Sculpey Clay Softener and it’s an oil-based
00:01:05 –> 00:01:12 softener, or you can use mineral oil, this is a very old bottle… it’s been around
00:01:12 –> 00:01:17 for a very long time, of mineral oil, or you can use baby oil…
00:01:17 –> 00:01:24 I haven’t had babies for a long time so this bottle is also old, but it’s an unscented
00:01:24 –> 00:01:28 one, so that you’re not putting a scent into your clay, but it doesn’t really matter
00:01:28 –> 00:01:33 what kind you use.It can be very messy if you just try to put it on top and mix it with
00:01:33 –> 00:01:39 your hands, so I’m gonna put it into a little Ziploc bag here and I’m gonna break it up
00:01:39 –> 00:01:48 a bit, so that it’s easier to work with, and we’re gonna add just one drop at a time
00:01:48 –> 00:01:55 of whatever oil we want to.I don’t know about the other oils like vegetable oils or
00:01:55 –> 00:02:01 things like that, it probably would work too, but I haven’t tested it, so I can’t tell
00:02:01 –> 00:02:06 you for sure.So I’m just gonna put one or two drops in…oops, that’s a little too
00:02:06 –> 00:02:13 much, so I’m gonna take a little of that out, there, alright, so now, what we’re
00:02:13 –> 00:02:20 gonna do is we’re gonna try to mix it up in the bag here, and get that oil working
00:02:20 –> 00:02:25 in…if I do this in my hands, it gets all…my hands will be looking like an alien in no
00:02:25 –> 00:02:32 time.Now, if you can’t get it to work, you can try squashing it up, and start breaking
00:02:32 –> 00:02:41 it up with something else, like this roller, and, it works pretty good, it’s messy like
00:02:41 –> 00:02:48 I said, but it works quite good to start incorporating that oil back into the clay, and you can see
00:02:48 –> 00:02:56 now, it’s not even as… quite as brittle as it was before.We’ll just keep working
00:02:56 –> 00:03:02 it in, if you have a lot of it, you can work with a bigger bag, now I’m gonna just bring
00:03:02 –> 00:03:07 it out on to my surface and work with my hands, of course they’re gonna turn Green but that’s
00:03:07 –> 00:03:23 alright.Let’s just take this outta here, there are lots of different ways, and I’ll
00:03:23 –> 00:03:27 be adding more and more tips on different ways to condition hard clay, this is just
00:03:27 –> 00:03:33 one of them.So I’m just gonna work it together… seemed a little… like it wasn’t moving
00:03:33 –> 00:03:40 very well in there, so once you get working…see what I mean by getting on your hands, once
00:03:40 –> 00:03:45 you get it worked in there…depending on the hardness of the clay, it could be easier
00:03:45 –> 00:03:53 or harder to do, you can actually get it right down to the point where it’s soft and pliable
00:03:53 –> 00:03:58 like this here.Now I’ve been working on this one for a little bit, and you can see
00:03:58 –> 00:04:05 it’s actually a workable block of clay to work with, you don’t wanna go too far, if
00:04:05 –> 00:04:10 you add too much oil, then you’re back to needing to leech it out, and it’s too soft,
00:04:10 –> 00:04:16 but, you can get this clay to just keep working it in.Now, as far as cleaning up your hands…
00:04:16 –> 00:04:21 ‘cause you’ll wanna do that if you ended up having to work with it, you can just use
00:04:21 –> 00:04:28 something like this, this is a cleaning…kitchen wipe, you could use baby wipes, they work
00:04:28 –> 00:04:32 great, and you can get it off your hands again really easily, see how easy that’s coming
00:04:32 –> 00:04:38 off, and then you can wipe up your surface.So, you don’t have to use the expensive softeners
00:04:38 –> 00:04:42 if you don’t want to, just some regular baby oil or mineral oil will work to soften
00:04:42 –> 00:04:48 up your clay.So I hope that was helpful for you, please let me know if you like this video.And
00:04:48 –> 00:04:55 also, if you have any requests or things that you would like me to teach you in a future
00:04:55 –> 00:05:00 video, make sure to let me know in the comment section below.We’ll see you next time and
00:05:00 –> 00:05:01 bye for now.
Our goal is to translate these videos into as many languages as possible. If you are interested in helping with this initiative, then please do contact us and we will figure out a way to make it worth your while :)
Resource Links:
- Related Video: Conditioning Hard Clay Tip #1 – Using a Hammer
- Related Video: Conditioning Hard Clay Tip #3 – Food Processor
- Amazon: Clay Softener **
Resources marked with a double ** asterisk are affiliate links. If you click on them and decide to buy something, we may receive some compensation. This does not affect the price you pay in any way. What it does do, however, is helps us to continue providing free videos for you, here at the PcT website. Using our links to purchase your tools and supplies, is always greatly appreciated.
Sponsored Ads & Special Promotions
Shareable Images


To share this full blog post anywhere on the web that allows links in comments, here's a shortened url to copy and paste...
>> https://mypct.ca/v477 <<
Want to chat about today’s post? That’s what the comment section below is for. Scroll Down… We’d love to hear from you!
Or... if you would like to request a topic for a future post, here is the link to do that… PcT Suggestion Box
Hi cindy
I want to know that can we add scented baby oil
Into polymer clay ? As iam not able to find unscented
One
Hi nits, you should be able to use scented baby oil in your polymer clay, but as always with something that is new… it is always best to test! Try it out on some clay you want to use for yourself and see how it turns out over time. If it is fine after a few months than you are good to go. Let us know how it turns out!
Hi Cindy,
i’m susmitha i am new to polymer clay crafts i started my first creation using premo sculpey and i was feeling that its too hard to mold i have tried some softening tricks that i watched in your tutorials but nothing worked please help me from this.
i have tried this oil conditioning and hammers tips but nothing works on my polymer clay what to do know.
Hi Susmitha, Hopefully you have watched all the videos because there are several different ways to soften clay. But if you have and nothing has worked than it is most likely that your clay is partially baked by being stored in a hot place. There isn’t much you can do about that except chop or grate it up and add it to fresh clay to make faux stones or something similar. Good luck!
thank you cindy
i bought that clay from itsybitsy, an indian online site,
this happened because of their unproper packing.
Susmitha… if the climate is hot where you live in Indian, you need to be careful when purchasing clay online. Unless the package is insulated and kept cool with gel-packs (which no one does), there is a good chance that your clay will become partially baked in transit.
Tyoe “Summer Shipping” into the search box for more info.
Thanks for the video Cindy, a couple of days after watching I found an old package of fimo I had bought many moons ago and it was crumbly just like the one in your video. I took a small glass condiment dish and broke it up with one of my clay tools, the one that has the 6 or 8 fins on the end of it. Since I only needed a small amount it worked out perfect after adding 2 drops of baby oil.
I also want to remind everyone that if you don’t have a JoolTool, don’t forget about the plastic triangular media and polishing beads for the tumbler, especially if you have a lot of beads to do at one time. I just did a large batch and followed through with each grit and the beads are so buttery smooth, I had no sanding to do at all and I had my doubts when I first started with them. I personally think this is the greatest idea Cindy has introduced us to and with the small investment to get all of the grits, it is well worth the cost since they will probably last forever. The nicest part about this technique is you can just toss them in the tumbler and then forget about them until the next day.
Thanks Dixie Ann for reminding everyone about the tumbler substrate! You are right about it being an excellent solution to spending hours sanding and finishing your beads by hand, and it can be done fairly economically. There are many ways to get the job done. it is great for everyone to remember that.
Hi Cindy, the softening clay with oil video was very helpful. I love it that you don’t have to run out to the store again to purchase an oil that surely we have in our household stash. Thanks for that!
I have noticed at times that a certain craft store, when you buy ‘on sale’ clay, it is usually hard, so again, the video was very helpful.
Hi Cindy, this is a great tip, thank you very much; we have had many problems with Fimo clay lately, I think many people will find your tip very useful, I’ll put a link to your website and video on my site for my French polymer clay mates.
Thanks Alabala! I really appreciate the share!
From experience, mineral oil works, as does baby oil and Vaseline. The clay will pick up the baby smell, though by the baking it goes away. I use a large Black and Decker food processor (I swear I could grind rocks in it), put in inch sized clay, and start pulsing. After see some breakage, add oil with eye dropper, until you see cottage cheese and the side of the bowl is warm.
I always save baggies and recyle by dumping processor contents into one, then starting the pressure roll with a rod while all enclosed. Before you know it, it’s all together and ready for the pasta machine. You can even leave it in the baggie to rip through the pasta machine at the widest setting, and/or work the bag around the ziplock top. I hate crumblies on the floor. Use a tagsale carpenters bench brush, and several old paint brushes to wipe all surfaces from dust, but, in a pinch blasting some canned air around where you work can be a life saver.
I put the “cottage cheese mix” in sealed Mason Jars and store from light at this stage. I get my special mixes predone so it is faster to get up to speed when I am ready. And when I open the door, they are a rainbow of premix waiting to go because I store the containers in the wire rack mounted on the inside. It’s old, tag saled it when full of old Mason Jars, and love the look.
Or leave it in a safe baggie and store you bulk colors in safe disposable baby wipe containers. Of course, the best alternative is to use fresh Premo, but……..
Hi Jocelyn
Reading your notes on using a food processor, I’ve tried this with great success but I cannot get the clay colour off the processor. I’ve tried everything, rubbing alcohol, baby wipes, soap, even sacrificed a piece of white clay. Is there a simple trick to getting the clay off so you can start with another different colour without it being tainted?
Thanks – Marion
Cindy, this video is much appreciated!! I keep notes on all of the tips that pertain to my particular needs. The economy has affected my sales but I’m still making and selling jewelry and see a reasonable return for my work. Thanks for keeping me on the email list. I view it with interest every week. Best wishes!
That is great to hear that you are making sales Jane! I am happy to hear that you have figured out a way to get a reasonable return for your work. It might not be what it was but, sometimes a shift in the economy just means that you must make a shift in what or how you sell your jewelry. People love to buy… they always will, but they sometimes they have to change how much they are spending or the types of things they are spending it on. As a jewelry designer, you just have to figure that out. Sounds like you are getting a handle on what will sell. Keep going. You’ll get where you want to go!
Okay, I have a somewhat unrelated question. Do you have any suggestions for getting liquid polymer clay out of a paint brush? Some times my liquid Sculpy is thick and globby so I thin it down a bit and use a bush to apply on large surfaces such as a journal cover. Liquid Sculpy is not easy to remove from hands or brushes with just soap and water. I tried cleaning my brushes by soaking them in rubbing alcohol and a couple drops for dishwashing detergent. Any other suggestions?
Hi Anna,
I think you had better give up and buy yourself some cheap brushes to use with liquid clay only, as it is near impossible to get brushes clean.
After I have used the liquid clay I wrap each brush in cling film (Glad Wrap). The brushes do not go hard and are re-usable. It also saves all that wasted time, unless anyone else comes up with a super easy cleaning tip just admit defeat gracefully and go buy yourself a set of cheap brushes. Good place is in the kiddies section….cheers..xx…..
dang Anna – I was thinking rubbing alcohol would have worked too:/
have you got any of that orange based cleaner- it’s the creamy kind?
oh btw I picked up some 90% rubbing alcohol by mistake but that might work a bit better that our normal 70%
Hi Anna, I have had no problem getting TLS out of my brushes with Rubbing Alcohol and then soap and water to rice the alcohol out… but I do use the 99% stuff. Maybe that’s the difference? I have never had a brush I couldn’t clean with the rubbing Alcohol. Even old dried up acrylic brushes will come clean… a little frazzled… but clean. Better than throwing out the brush.
Or maybe, since the clay breaks down with oil, maybe the liquid clay would too? You could try cleaning your brush with oil first then, rubbing alcohol, then soap and water.
Oh, in case you didn’t know, use a synthetic brush rather than a natural bristle brush for anything except oil paints. Water and other mixed media type materials are hard on the natural bristle brushes.
Let us know if you end up getting them clean!
Try spraying them with WD-40, then wrap over nite in foil or clear wrap. Use a very fine comb or a metal hair pic to pull the big stuff out, then give it another drenching and use paper towels. The brushes look OK to me post, but I am not a fine artist.
Sorry, another post. I just re-watched your video about reviving old canes. Would the techniques involved there be applicable? I could see using the warming method especially on your crumbles and trying to blend before adding anything.
Have you tried to make something from this oil-softened clay, and how durable were you creations?
I tried once (added unscented baby oil) and my small flower petals broke after baking. (temp and backing time were as usual). Now I use only Sculpey or Fimo softener.
So that is why I’m asking.
Hi Olga, I have made items with oil softened clay and haven’t seen any problems with durability, but I haven’t actually done a side by side comparison. That would make a great PcT Test Lab video. I will put it on the list!
Would glycerin be a good alternative to oil to be used in this fashion?
I don’t know if Glycerin would work or not Cherie. Is it oil based?
It isn’t. The internet had this to say about it: “No. Glycrin is classified by the FDA among the sugar alcohols as a caloric macronutrient. More info: it’s a colorless, odorless, viscous liquid.” But then I also found this: “Glycerin is an organic compound known more formally as glycerol. Its common sources are animal fat and vegetable oil.”
So perhaps err on the side of caution and not use it? Thoughts?
Is there any downside to using scented baby oil other than just getting a slight scent?
Fabulous instructive video for us die-hard poly clay recyclers, LOL!
You’re oh so welcome Jocelyn!
Some french girls use hand cream or vaseline
I haven’t tried but they have for a long time and swear by it.
have you tried.
I use a coffee grinder and mineral oil for big quantities and I find it less messy.
I am sure that would work Hermine but I do like the idea of using a simple oil more… just because you never know what other ingredients may be in a hand cream that could cause a reaction over time. It probably would be fine with Vaseline though, since it is pretty much just a jelly form of oil anyway. As far as the coffee grinder, I actually already shot the next video in this series and used a coffee grinder in that. So others will get the chance to see what you’re talking about first hand next week! Thanks for commenting!
Hi Cindy, I have been working with some really crumbly sculpy clay that was given to me. I watch your video’s, they were very helpful. I found that olive oil works