Cynthia Tinapple Polymer Clay Extruder Disks
Video #534: Product review and demo of how to make rainbow flower beads using a Makins Professional Ultimate Extruder.
More...

IN THIS POST: — cynthia Tinapple — extruder — disks — discs — dies — makins — walnut hollow — flower beads — extrusions — polka dot cane — rainbow — teardrop blend — skinner blend — polymer clay canes — (Topics marked with an asterisk* are discussed in the Comments Section below).
Topics Covered In This Video:
- Cynthia Tinapple, well known Polymer Clay Artist, Author and Publisher of the Polymer Clay Daily Blog.
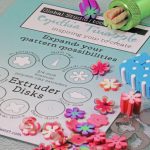
- Review and demo of a Cynthia’s exclusive polymer clay extruder disks kit.
- Disks are Made of Steel, 3/4 inch diameter.
- Fits most polymer clay extruders, including the Makins Professional Clay Extruder and the Walnut Hollow Clay Extruder.
- Designs include Polka Dots, Basic Dots, Holly Leaf, Bead Cap/Flower, Sun Ray, 5-Petal Blossom, Moroccan Tile and Basic Squares.
- The Dies (Disks) are packaged securely in a large steel circle holder.
- Simply twist each of the smaller extruder disks to remove them from the holder.
- I used the Polka Dot Dies for my Vol-073 Happy Camper Cane Tutorial.
Rainbow flower beads made using the flower disk were shown in a previous Rainbow Teardrop Blend video. - Moroccan Tile Dies fit together like a puzzle to create a more complex cane.
- The basic Squares disk is perfect for Gingham Cane or pixilated canes, where a more complex design can be created with less clay.
- Demonstration on how to make extruded Rainbow Flower Beads using a sheet of a Rainbow Teardrop Blend.
- Slicing extruded clay after it has been baked solves the distortion issue.
- ADDENDUM: Unfortunately, Cynthia no longer produces these extruder disks. You can however find some similar disk designs in the Lucy Clay Extruder Disk Sets. (See link below.)
00:00:03 –> 00:00:07 Hi guys, its Cindy Lietz, your Polymer Clay Tutor, and today’s PcT Product Demo, we’re
00:00:07 –> 00:00:11 talking about Cynthia Tinapple’s extruder disks.
00:00:11 –> 00:00:19 Now, Cynthia Tinapple is quite a well-known Polymer clay artist, and blogger, and author,
00:00:19 –> 00:00:28 she has a blog called Polymerclaydaily.com and she has come up with her own designs for
00:00:28 –> 00:00:30 using in an extruder.
00:00:30 –> 00:00:36 Now I’ve got her set here and it’s quite cool, I’ll show you all the different things
00:00:36 –> 00:00:38 we can do with it.
00:00:38 –> 00:00:47 It is a steel set of dies, these dies pop out of this disk here, and I’ve used some
00:00:47 –> 00:00:52 of them already, and I’ll just pop out another one, you just kind of twist it back and forth
00:00:52 –> 00:00:57 and you pop it out of the disk and then use it in your extruder, now, these ones will
00:00:57 –> 00:01:01 fit into most of the extruders that are out there right now.
00:01:01 –> 00:01:07 It’ll work in the Makins and in the Walnut Hollow extruders that I just showed you the
00:01:07 –> 00:01:16 other day, and they’ve got some unique designs to them, they probably show in here the best.
00:01:16 –> 00:01:21 The first one that I’m gonna show you is the Polka Dot one, it comes in two parts like
00:01:21 –> 00:01:28 this, you’ve got the base of the Polka Dot, and then the Dot itself, and here’s what
00:01:28 –> 00:01:32 it looks like here when it’s been extruded out and pieced together.
00:01:32 –> 00:01:41 I used this Polka Dot extrusions for my new cane called the Happy Camper cane, and you
00:01:41 –> 00:01:45 can see the Polka Dots were used in this top part of this cane.
00:01:45 –> 00:01:55 And there’s several other designs as well, you may have seen in one of my Rainbow Skinner…or
00:01:55 –> 00:02:01 Teardrop blend videos…I used…I have these Rainbow flower beads and I’ve got a big
00:02:01 –> 00:02:06 pile of them here on the table and I’m gonna show you actually how to make those in a second,
00:02:06 –> 00:02:14 but I actually used her flower disk here, and it’s really quite cool.
00:02:14 –> 00:02:19 You can…I’ve made a bunch of different little projects here with…using those extrusions
00:02:19 –> 00:02:26 of the little flowers, I used them on this Happy Camper bracelet, I’ve used them kinda
00:02:26 –> 00:02:31 sliced and stacked like this…they look a little bit like a flower lei, I think, when
00:02:31 –> 00:02:36 they’re used like this on this pair of earrings, and then I used a little Rainbow one here
00:02:36 –> 00:02:38 on this necklace.
00:02:38 –> 00:02:46 And there are several other designs, there’s one called Moroccan tile, and I’ve done
00:02:46 –> 00:02:52 it here in some sort of coppery type colors and what’s neat about this particular disk
00:02:52 –> 00:02:59 is that the…all the pieces sorta stick together quite well, they kinda lock together, and
00:02:59 –> 00:03:06 all the little notches from the one spot notch together, and you can get quite a detailed
00:03:06 –> 00:03:12 cane just by extruding it out of the extruder.
00:03:12 –> 00:03:18 Also she’s got a 5-petal blossom cane here, I’ve a long extrusion here and some other
00:03:18 –> 00:03:22 baked pieces here…I also did them in the Rainbow.
00:03:22 –> 00:03:29 I haven’t worked with the Sunray one yet, or the little Basic Square, this Basic Square
00:03:29 –> 00:03:35 can be used for some of the…like the little gingham canes and the pixilated canes, that
00:03:35 –> 00:03:40 kind of thing and it’s perfect ‘cause it’s so tiny, you can get a lot of detail
00:03:40 –> 00:03:44 in without having to use much clay.
00:03:44 –> 00:03:51 Now, let me just show you…I did promise I would show you how to use these disks, I’m
00:03:51 –> 00:03:57 gonna use the Flower cane (*disk) and a section of the Rainbow Teardrop blend that we made
00:03:57 –> 00:04:01 in a previous video, and what I’m gonna do is…I’m just going to…
00:04:01 –> 00:04:05 I’ve got the blend going up and down in this direction and I’m just gonna roll it
00:04:05 –> 00:04:14 up into a tight little log, and you want the log to be skinny enough to fit inside your
00:04:14 –> 00:04:18 extruder So, I’m just going to put…
00:04:18 –> 00:04:28 I’ve got my Makins extruder attached to my Walnut Hollow vise…you could use either
00:04:28 –> 00:04:33 extruder it doesn’t matter, and I’m just going to pop it in.
00:04:33 –> 00:04:41 If I pop it in this way, the dark end will stretch over the outside edge, if I do the
00:04:41 –> 00:04:45 lighter end, that color will stretch over, so it’ll have a different look either way…doesn’t
00:04:45 –> 00:04:51 matter too much, just make sure it’s all compact, no air pockets and we’ll pop that
00:04:51 –> 00:05:02 in the extruder, and then we will put in the little Flower disk inside the cap of the extruder
00:05:02 –> 00:05:07 and extrude away.
00:05:07 –> 00:05:16 Now, you can make these nice long snakes of the flowers, this is quite detailed with really
00:05:16 –> 00:05:21 neat little petals, as you see it starts to come out, and…
00:05:21 –> 00:05:28 I mean it would be very difficult to make this any other way than with the extruder.
00:05:28 –> 00:05:38 Now, I found that slicing the cane was a little bit tricky… if it was really, really thin,
00:05:38 –> 00:05:45 on these petalled canes, and I’ll explain that in a second, what happens is those little
00:05:45 –> 00:05:53 petals will fold over a little bit, so I’m just gonna show you what I’ll do here…do
00:05:53 –> 00:05:58 the full length, and as you can see, it’s shifting colors a bit and it’s so cool.
00:05:58 –> 00:06:07 We’ll just cut into it, now the first little part will always be solid color, that’s
00:06:07 –> 00:06:15 the way it works when you extrude a Skinner blend, but as you start to cut through it,
00:06:15 –> 00:06:21 the colors start to shift a little, and they shift more and more as you go through, see
00:06:21 –> 00:06:23 that?
00:06:23 –> 00:06:30 And you get these really neat, different colored Rainbow petals… little flowers.
00:06:30 –> 00:06:37 Now like I said if you were to cut this, it’s a little hard to cut them super thin, I find,
00:06:37 –> 00:06:46 when they’re raw, they squish up a little bit, but what I like to do is take this extruded
00:06:46 –> 00:06:51 section, and do it in…you know, fairly small sections like this, and then take a needle
00:06:51 –> 00:07:03 tool and pierce a hole down the center, and you start from one end and then do the same
00:07:03 –> 00:07:12 from the other end so that they match up, then you have either a large flower bead,
00:07:12 –> 00:07:18 or what you can do is you can pop this into the oven on the bead rack or it can stand
00:07:18 –> 00:07:24 on its end, you bake that and then you slice it after it has been baked.
00:07:24 –> 00:07:29 So let me just grab a section here, I’ve got some Flower petals here that have been
00:07:29 –> 00:07:35 baked, and if you just take a razor blade or something sharp, you can actually cut them
00:07:35 –> 00:07:40 quite thin, it’s easier to cut them when they’re warm from the oven, but I’ll cut
00:07:40 –> 00:07:48 a little bit thicker piece here and even though it’s cold, you can still cut it, and there
00:07:48 –> 00:07:55 you have a little flower bead, already with a hole in the center and it’s all ready
00:07:55 –> 00:07:56 to go.
00:07:56 –> 00:08:01 Now, if you do them in the Rainbow colors…let me just show you how cool they end up looking,
00:08:01 –> 00:08:10 every slice is slightly different, and they’re almost like little sequins, you can use them
00:08:10 –> 00:08:14 like I showed you on the bracelet, you could even sew them on to little projects if you
00:08:14 –> 00:08:20 want, but I just think they are the funkiest and the neatest way to use that flower disk.
00:08:20 –> 00:08:24 I think there’s lots of different designs and cool things that you can do with this
00:08:24 –> 00:08:28 set, and I think you would really enjoy it.
00:08:28 –> 00:08:37 So, if you like this video, let me know, and if you’ve got any suggestions or maybe some
00:08:37 –> 00:08:43 designs that you’d like to see shown in future disk sets like this, maybe you can
00:08:43 –> 00:08:48 give Cynthia some ideas there, or you can give me ideas on what you’d like to see
00:08:48 –> 00:08:51 demonstrated in a future video, alright.?
00:08:51 –> 00:08:53 So we’ll see you next time and bye for now.
Our goal is to translate these videos into as many languages as possible. If you are interested in helping with this initiative, then please do contact us and we will figure out a way to make it worth your while :)
Resource Links:
- Amazon: Lucy Clay Extruder Disks **
- Cynthia Tinapple: Cynthia Tinapple’s Polymer Clay Daily Blog
- Related Video: Makins vs. Walnut Hollow Polymer Clay Extruders
- Related Video: Polka Dots used in Happy Camper Cane Tutorial
- Related Video: Rainbow Teardrop Blend (Multicolored Skinner Blend)
- Related Video: Gingham Cane Tutorial
- Related Video: Makins Professional Ultimate Clay Extruder
Resources marked with a double ** asterisk are affiliate links. If you click on them and decide to buy something, we may receive some compensation. This does not affect the price you pay in any way. What it does do, however, is helps us to continue providing free videos for you, here at the PcT website. Using our links to purchase your tools and supplies, is always greatly appreciated.
Sponsored Ads & Special Promotions
Shareable Images


To share this full blog post anywhere on the web that allows links in comments, here's a shortened url to copy and paste...
>> https://mypct.ca/v534 <<
Want to chat about today’s post? That’s what the comment section below is for. Scroll Down… We’d love to hear from you!
Or... if you would like to request a topic for a future post, here is the link to do that… PcT Suggestion Box
Here’s a great deal, I’m not sure about other Michael’s craft stores, but I recently got the Walnut Hollow extruder Vice in the clearance section for $9.99 CDN and the large extruder discs with adaptor for $3.99 CDN. What a deal!!! Check out your local Michael’s store clearance section, you’ll never know what you will find!!!
Thanks for a great review of Cynthia Tinapple’s disk set! I love your reviews!
What type of vise is holding your Makin’s extruder? I’m having a lot of trouble finding it?
Thanks,
Nancy
Hi Nancy, Cindy has a Hobbit Multi-Angle Vice and it is available on Amazon.com or you might want to call your local Hobby Shop or hardware store. Hope that helps.
The vice Cindy mentioned is called a Walnut Hollow Clay Extruder Table Clamp.
Dremel also makes a similar vise. A Google search should find you one real quick!
Thank you so much Cindy for showing us Cynthia’s extruder discs. I’m especially delighted with the tiny square as I’d had trouble reducing the dog’s tooth cane without distorting. I think I wrote to you about this just a few weeks ago saying how a tiny square would be a real boon and here you are demonstrating it! I shall be ordering it straight away!
Can I also thank you and Doug for a fantastic website, with so much information at our finger tips, lists of categories, search functions and so much more! It’s just incredible. As a website writer myself I am in awe.
Marion
Thank you Marion for saying that! Both Doug and I really appreciate your kind words about our site. It is a lot of work and we we need to constantly be improving, but we are proud of what we have been able to accomplish so far. We hope to be doing this for many more years to come!
Glad that the tiny square will be helpful for you. I wasn’t excited about it at all when I first saw it, but then realized that it would make a huge difference in the ability to make more detailed canes using less clay and having less distortion. Which of course is very exciting indeed!
Thank you that was great info.
Have you tried the Lucy clay ones? They have different dies too.
They are quite expensive and they have different lengths.
I wondered if the prices is too expensive( specially in Canada) or are they that great!
Hi Hermine, no I have not tried the Lucy clay ones yet. They are kind of pricey just to buy for testing, since I already have two in working order… if someone from LucyClay wants to send me one, I’d be happy to demo it for them. The quality looks to be excellent and I have heard good things about them. I love the dies they have too. Well thought out and perfect for making canes and jewelry projects!
Ah Cindy, another toy to play with. Was just getting ready to order these disks from PolyClayPlay when I decided to check out the blog and see if anything new had come up and there you were with the new disks from Cynthia!! What a great way to start the day. I am very excited about these new disks and how Cynthia designed them to work with each other to produce some wonderful designs.
Thank you so much for showing us all the possibilities with this new set, I can’t wait to get mine and try them out.
You’re welcome Dixie Ann! Let us know what you think of them.
I really enjoyed the happy camper lesson! Good to see such a complex cane done. It made me think about doing a face cane. I’d love to have a lesson on that, Cindy. LOVED how you made the polka dot cane with the new extruder disks! I had been wondering about a way to make a dot cane and this is way better than anything I’d come up with!
Hi Julia, I am so happy that you are enjoying the Happy Camper Cane Tutorial!! I too like the polka dot extrusions… way easier than the alternatives! I should think about doing a face cane sometime… though I don’t know if it would fit into the 6 video format… we’ll have to see. Thank you for the suggestion!