How To Make Same Sized and Graduated Round Beads
Video #547: To size your beads perfectly every time, all you need is a small cutter and a sheet of clay rolled to a specific thickness.
More...

IN THIS POST: — same sized beads — graduated beads — 8mm beads — round beads — cutters — bead rolling logs — tube beads — rollers — sizing — simple shapes — graduated sizes — base beads — cookie cutters — (Topics marked with an asterisk* are discussed in the Comments Section below).
Topics Covered In This Video:
- The other day, someone asked me how to make an 8 mm polymer clay bead.
- I show a strand of jade beads that are 8 mm in diameter for reference.
- There is a simple way to measure the same sized beads.
- Using different sized cutters and/or different thickness’ of clay.
- The shape of cutter you use, really does not matter that much.
- The size of bead created can be adjusted by changing the thickness of clay, the size of the cutter, or the number of cut pieces used to make each of your beads.
00:00:03 –> 00:00:07 Hi guys, its Cindy Lietz, your Polymer Clay Tutor, and today’s Studio Tip is how to
00:00:08 –> 00:00:11 make same sized Polymer clay beads.
00:00:11 –> 00:00:18 Now the other day, someone asked me how to make an 8 millimeter sized bead, and you know,
00:00:18 –> 00:00:23 there’s some really easy ways you can do that…if you don’t know what size an 8
00:00:23 –> 00:00:29 millimeter size bead is, here’s a strand of jade beads that happen to be 8 millimeters
00:00:29 –> 00:00:35 in size, and it doesn’t matter which size bead you’re trying to make, if you’re
00:00:35 –> 00:00:38 trying to make it a certain size, you can control it, and I’ll show you this neat
00:00:38 –> 00:00:39 little trick.
00:00:39 –> 00:00:44 First of all, you need some clay, and I’m just gonna run it through this pasta machine
00:00:44 –> 00:00:50 so I have a sheet of clay that’s all the same thickness, now this was the largest setting
00:00:50 –> 00:00:54 so it happened to be 8 playing cards thick.
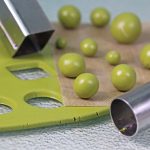
00:00:54 –> 00:01:02 Now, it depends on…here, what we’re gonna do is we’re gonna use a cutter… and I’ve
00:01:02 –> 00:01:07 got a whole bunch of different sizes and shapes here, and we’re gonna use it to get a piece
00:01:07 –> 00:01:09 of clay that is the same size.
00:01:09 –> 00:01:10 Hi guys, its Cindy Lietz, your Polymer Clay Tutor, and today’s Studio Tip is how to
00:01:10 –> 00:01:11 make same sized Polymer clay beads. Now the other day, someone asked me how to make an
00:01:11 –> 00:01:12 8 millimeter sized bead, and you know, there’s some really easy ways you can do that…if
00:01:12 –> 00:01:13 you don’t know what size an 8 millimeter size bead is, here’s a strand of jade beads
00:01:13 –> 00:01:14 that happen to be 8 millimeters in size, and it doesn’t matter which size bead you’re
00:01:14 –> 00:01:15 trying to make, if you’re trying to make it a certain size, you can control it, and
00:01:15 –> 00:01:16 I’ll show you this neat little trick. First of all, you need some clay, and I’m just
00:01:16 –> 00:01:17 gonna run it through this pasta machine so I have a sheet of clay that’s all the same
00:01:17 –> 00:01:18 thickness, now this was the largest setting so it happened to be 8 playing cards thick.
00:01:18 –> 00:01:19 Now, it depends on…here, what we’re gonna do is we’re gonna use a cutter… and I’ve
00:01:19 –> 00:01:20 got a whole bunch of different sizes and shapes here, and we’re gonna use it to get a piece
00:01:20 –> 00:01:21 of clay that is the same size. So if I’ve got this round… this small round cutter,
00:01:21 –> 00:01:22 it’s about a ½ an inch in width, and I cut a bunch of pieces with it, at the same
00:01:22 –> 00:01:28 thickness with the same shaped cutter, when I roll these pieces of clay into a ball, each
00:01:28 –> 00:01:36 of these beads are gonna be the same size. Now as it turns out, I was sitting here rolling
00:01:36 –> 00:01:44 these out, and these actually ended up being about 8 millimeters in size. But you can see,
00:01:44 –> 00:01:49 these beads are the same size, and if you’ve never rolled a hand…hand rolled a round
00:01:49 –> 00:01:54 bead before I’ve got a video on that, so check that out, and you see, these beads would
00:01:54 –> 00:02:05 all be the same size. Now if you wanted to have…say you have your strand of beads here,
00:02:05 –> 00:02:10 and say you thought that they were just a little bit too big, you could either get a
00:02:10 –> 00:02:17 smaller cutter or you could roll your sheet of clay down to a thinner setting. So what
00:02:17 –> 00:02:21 you’re gonna wanna do is make sure that you keep track of it if you’re trying to
00:02:21 –> 00:02:27 do a project that has several beads in it, this one…this next setting is actually 6
00:02:27 –> 00:02:35 playing cards thick, so when I go to roll this ball of clay out, it’s going to be
00:02:35 –> 00:02:42 smaller, you’ll see that when it’s right beside it. Now you can control… continue
00:02:42 –> 00:02:49 going thinner in the sheet of clay, or you can control it by doing something like this,
00:02:49 –> 00:02:57 you can take… say we’ll take 2 balls…or 2 layers together, and that would make this
00:02:57 –> 00:03:03 size ball, the next one would be a little bit smaller…pretend I did a better job of
00:03:03 –> 00:03:12 rolling them out, and then the next one, what we can do is just take 1 piece and cut it
00:03:12 –> 00:03:23 in half, and that one’s gonna be smaller, yet. So you can control the amount of clay
00:03:23 –> 00:03:31 that you’ve got, either by the thickness of the clay, or the number of pieces you’re
00:03:31 –> 00:03:36 using with the cutter, or the size of the cutter. It doesn’t matter if it’s a heart
00:03:36 –> 00:03:44 shaped cutter…I mean, heart shaped, a flower shaped cutter, ‘cause that’s going to
00:03:44 –> 00:03:51 roll into a ball no matter what shape it is, it can be squares…squares are easy to divide
00:03:51 –> 00:03:58 into smaller amounts if you’re doing a graduated set. But you can see here, I’ve got a little
00:03:58 –> 00:04:05 set of…that gets smaller, and smaller, and smaller, and that’s how you can make all
00:04:05 –> 00:04:11 your beads the same size, or in a graduated size. So I hope that was helpful for you,
00:04:11 –> 00:04:16 if it was, let me know if you liked this video. And if you’ve got any challenges that you
00:04:16 –> 00:04:21 need help with, or products you’d like me to test in a future video, let me know in
00:04:21 –> 00:04:26 the comment section below, alright? So we’ll see you next time and bye for now.
Our goal is to translate these videos into as many languages as possible. If you are interested in helping with this initiative, then please do contact us and we will figure out a way to make it worth your while :)
Resource Links:
- Related Video: Rolling Round Polymer Clay Beads By Hand
- Related Video: How to Make a perfectly Round Bead By Hand
Resources marked with a double ** asterisk are affiliate links. If you click on them and decide to buy something, we may receive some compensation. This does not affect the price you pay in any way. What it does do, however, is helps us to continue providing free videos for you, here at the PcT website. Using our links to purchase your tools and supplies, is always greatly appreciated.
Sponsored Ads & Special Promotions
Shareable Images


To share this full blog post anywhere on the web that allows links in comments, here's a shortened url to copy and paste...
>> https://mypct.ca/v547 <<
Want to chat about today’s post? That’s what the comment section below is for. Scroll Down… We’d love to hear from you!
Or... if you would like to request a topic for a future post, here is the link to do that… PcT Suggestion Box
That’s great, thanks for replying x
Yes, I’ve heard about just leaving it but I don’t know if the finish would be as nice – as there are lots of raised parts on the handle, sanding isn’t an option . I may have a go with polyurethane.
Thanks again,
Emma x
Hi Cindy,
I’m Emma, from the UK and firstly I want to say a big thank you! In the past 6 months I have discovered polymer clay and your you tube videos have been a god send!
I am having some trouble with a project of mine and I was really hoping you could help.
I’m trying to make some cutlery for my sons, maybe to sell if they’re good enough. Basically I cover the handle and add extra pieces of clay to the pc base.
The thing is, as its cutlery and therefore, it will come into contact with water fairly often, can I glaze thematic? But the water will ruin the glaze surely? As there are raised pieces on the handles it would be a nightmare to sand.
I am totally stuck! Can you help me please Cindy?
Many thanks,
Emma
Thanks for your kind words Emma! Well I’m afraid your cracking issue is mostly due to the fact that you are using SculpeyIII. It is notorious for breaking. Switching to Premo Clay will make all the difference in the world. As far as glaze that can handle water, maybe the Minwax Polyurethane (oil based) would be a good choice? or perhaps nothing? Polymer clay doesn’t need to be sealed. It is plastic and is waterproof by nature. Hopefully that helps!
Ooops disregard the Sculpey III cracking part of my answer. Must have read your question and someone else’s and got the two mixed up. The last part is right though…
Love your necklace in this one!
Thank you Harriet. That is from the Reptile Hollow Lentil Bead Neckwire Tutorial if you want to make it yourself!
Wow, great…thanks!
You make these beads so easily! All your tips and tricks are so helpful, especially to newbies. Thanks for taking the time to teach a very good way to make beads. Happy claying……………
Hi, Cindy! Love your videos and they are really helpful. I saw you were using a tin box with cutters, where can I buy one of those? Thanks. Great work!
Katiamar
Hi Katiamar, I bought two tins with small cutters in them from Makins some time ago. They had some extra room in them, so I put more cutters from other sets in them by putting the larger ones in first, and graduating down until I could fit anymore in. A shallow cookie tin or lid would work just as well. I’ll have to do a video on that so people can see better what I did. Thanks for noticing!
Hi Cindy – I have a question. We’ve just got back from S.France where I found some beautiful earrings with the dangle part made from a circle of metal with a sort of stencil effect of a rose with leaves. I immediately thought how great it would be if I could use this as a ‘mould’ to make a Sutton Slice. However, on watching videos on this topic I notice that the mould – which is usually rubber – has to be carefully folded back to check that the clay has been embedded and of course I can’t do this with metal. So I wondered if it’s possible to make a mould from the metal earring and if so what would be the best way of achieving this?
Many thanks – Marion
Hi Marion, being in the South of France sounds lovely! Wish I could go there right now!
Any way, you can make a mold of your earring if you like (see the search box to find info on making molds.) You would probably have to make a double mold though, in order to do the Sutton slice technique you are referring to.
What I mean by that is first you’d have to make a mold of the earring, then make another mold of the mold, otherwise the indents would be where the raised areas should be and vice versa. You may lose a fair amount of the detail, making a mold of a mold, but the concept should work.
Let us know if you attempt it and how it turns out! Good luck!
Thank you so much Cindy, yes I will definitely try this and let you know how it goes. The metal disc has quite tiny cut areas so the ‘rose and leaf’ is made of many tiny holes. But I will try to make a mold of a mold, as you say, perhaps with thin polyclay first as I think the moldmaker stuff might be too thick and less ‘sensitive’ to the tiny holes. Thanks again – I’ll keep you posted!
Grateful thanks for this and EVERYTHING you do! Marion
PS – S.France is always fabulous, food esp., if you haven’t been there yet you should make a point of doing so. Cannes is our fave. Fabulous beaches, two of them free, plus if you want to go further a day’s ‘Rover’ train ticket is 12 Euros pp and you can tour all the coastal resorts and up into the mountains all day. The kids would love it. M