Mixing Polymer Clay Colors – How To Instructions
Video #15: Learn to mix up custom colors that can recreated any time, using measuring cutters and tested recipes.
More...

IN THIS POST: — mixing polymer clay colors — polymer clay color recipes — polymer clay cutters — (Topics marked with an asterisk* are discussed in the Comments Section below).
Make sure to work with the colors you love. There is an infinite number of color mixing possibilities, so there’s no reason to be playing around with ones that you’re not absolutely crazy about.
Also, when you make your color sample chips or sample “pills” as I like to do, be sure to sand, buff and clear coat them like you would any other bead. This will give you a better idea of how the various color shades and blends will look on your finished jewelry pieces and projects.
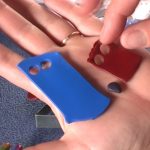
In This “Primer in Mixing Colors” Video… Learn to mix custom color, polymer clay recipes using measuring cutters. This technique will allow you to make a series of color sample chips or pills that you can reference over and over again as an invaluable color sample guide.
Transcript not available for this video.
Our goal is to translate these videos into as many languages as possible. If you are interested in helping with this initiative, then please do contact us and we will figure out a way to make it worth your while :)
Resource Links:
- Related Video:How To Mix Polymer Clay Tutor Color Recipes
- Related Video: Color Plus 1 Polymer Clay Color Mixing Trick
- Related Video: Polymer Clay Color Mixing Color Saturation
- Related Video: Understanding Polymer Clay Color by Making Mud
- Related Video: Learning About Polymer Clay Color Mixing Maggie Maggio Style
- Amazon: Geometric Shapes Cutters in Graduated Sizes **
Resources marked with a double ** asterisk are affiliate links. If you click on them and decide to buy something, we may receive some compensation. This does not affect the price you pay in any way. What it does do, however, is helps us to continue providing free videos for you, here at the PcT website. Using our links to purchase your tools and supplies, is always greatly appreciated.
Sponsored Ads & Special Promotions
Shareable Images
To share this full blog post anywhere on the web that allows links in comments, here's a shortened url to copy and paste...
>> https://mypct.ca/v15 <<
Want to chat about today’s post? That’s what the comment section below is for. Scroll Down… We’d love to hear from you!
Or... if you would like to request a topic for a future post, here is the link to do that… PcT Suggestion Box
OK Carole… you get the “made-my-day-award” for today :-). Thank you so much for taking the time to write those very kind words. Sharing feedback like this really gives others great insight about what they can expect from the video tutorials. I truly appreciate your help.
Very much looking forward to hearing more about how your beads and jewelry are coming along. Be sure to share your stories and/or ask questions here at the blog if you need assistance with anything.
~Cindy
Cindy,
I’d like to share my thoughts about the Beginners Course. Bear in mind I haven’t actually done anything with the clay yet. Firstly, the videos got me really excited about polymer clay, in a way that the books I have, never did. Secondly, I wish I’d seen your videos before I purchased all of the Sculpey I have lying around from years past. I had some Premo but a lot more Sculpey. Also, I liked your tip about buying just a few colors and mixing my own, since space is at a premium in my studio. The video tips have allowed me to purchase just what I need to get started, without wasting a lot of time and money on trying various products for myself.
I like your emphasis on a quality product. I think that’s what’s been missing from the experience I’ve had with polymer clay, whether in books or pieces I’ve seen. I have high standards for my jewelry and I think that the lengthy sanding is where most people don’t seem to go.
I’ll have more feedback for you once I actually start playing. My glass cutting board arrived yesterday (btw, very hard to find. I had to order it online and even then, the surface isn’t smooth. I’m going to have to use the underside, and probably cut off the little feet).
Carole Carlson
@Katina: Cool idea! I think they would make very fun beads! Cute as earrings too, for a doctor, nurse or other medical professional!
@Valarie: What you could do is make thin sheets of each color you want to use in your camo. Then either tear or cut the sheets into random shapes. Put these pieces onto base beads or another sheet of clay to get a camouflage look. Alternatively, you could take odd shaped logs of your colors and gather them into one big log to make a camouflage cane. Whatever works best for you.
How do I make clay to look like camouflage?
I love the idea of the color “pills”, especially since I’m in the medical profession!!
I also think the little “pills” would make cool beads themselves and could be used in fun projects.
Has anyone out there made anything with the “pills”?
Here’s a few other of my Beads and Beading titles that will give you more information about color mixing techniques and instructions:
Polymer Clay Colors – Which Ones to Start With?
Gold Polymer Clay as a Base for Mixing Custom Colors
Red Polymer Clay Color Mixing Tips… A Riveting Story About Saturation
…and don’t forget to check out the polymer clay color recipes section too!