Columbia River Oregon – Glittery Sparkly Black Sand
Video #570: Roadtrip #3-02 (OR): Bring something home from your travels to work into a polymer clay project… creating memories.
More...

IN THIS POST: — black sand — oregon — roadtrip — columbia river — washington — inclusions — glitter — faux turquoise — micro mosaic — grout — driftwood — travel — vacation — inspiration — texture — sand — rocks — pebbles — stones — beach — fort stevens state park — camping — rv — (Topics marked with an asterisk* are discussed in the Comments Section below).
Topics Covered In This Video:
- On the spit, Fort Stevens State Park, Oregon at the mouth of the mighty Columbia River.
- The Columbia River is the dividing line between the State of Oregon on the South bank and Washington to the North.
- Just had a picnic on the beach and found some cool inspiration along the shoreline / river bank.
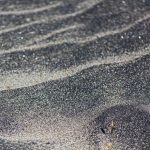
- Pitch black sand on the beach in ripples and patches alongside regular tan colored sand.
- With some later research, I discovered that this type of black sand is actually a combination of minerals from placer deposits that are heavy, glossy and partly magnetic. This partial kind of black sand often contains minerals such as rare earth elements, thorium, titanium, tungsten, zirconium and gemstones like garnet, topaz, ruby, sapphire and diamond. Hence, the magnetic qualities and the gorgeous sparkle! Because it is heavier than regular silica sand, it only gets thrown up into the beach in heavy waves and then stays behind as the water retreats. That was why it was collected in little pockets and in ripples on the beach. How cool is that!?
- You can mix sand into translucent clay as an inclusion.
- This black sand would look cool on the outside of a polymer clay bead.
- It could be mixed with liquid polymer clay (TLS) to make a realistic grout for Micro Mosaic Polymer Pins.
- Would be great added to the paint in the Faux Turquoise Technique.
- When you are out on a vacation or enjoying yourself out there in the world, see if you can bring back something from the trip to use in your polymer clay creations.
- Driftwood, sand, pebbles, beach glass, are great mementos and additions to your polymer clay projects.
00:00:03 –> 00:00:08 Hi guys, its Cindy Lietz, your Polymer Clay Tutor, and today on the PcT Road Trip, we’re
00:00:08 –> 00:00:13 still at Fort Steven’s State Park in Oregon, but we’re on the beach at the end of the
00:00:13 –> 00:00:21 Spit, which is right at the mouth of the Columbia river, and right across from us is Washington,
00:00:21 –> 00:00:26 so the river is like the divide between Oregon and Washington.
00:00:26 –> 00:00:32 And we’re having a beautiful time, we just finished having lunch, but I wanted to show
00:00:32 –> 00:00:38 you, or just sorta let you know that…well first of all, when I got here, the sand was
00:00:38 –> 00:00:43 like pitch black and I’ve never seen sand like that before, ours is quite a bit lighter,
00:00:43 –> 00:00:48 and actually they have two kinds of sand here, the light and the dark.
00:00:48 –> 00:00:53 And one thing that you can do with something like this is mix it into some Translucent
00:00:53 –> 00:00:58 clay, I’m also thinking with how dark this is and how sparkly it is…it’s just like
00:00:58 –> 00:01:06 black glitter really, that it might look really cool on the outside of a bead.
00:01:06 –> 00:01:12 You could also mix it in with some Liquid Polymer clay and make a really convincing
00:01:12 –> 00:01:19 looking dark grout for like the Micro Mosaics for Polymer clay.
00:01:19 –> 00:01:25 You could also use it if you’re making some faux Turquoise, you could use it in your outside
00:01:25 –> 00:01:29 layer and sprinkle it in with the black paint and stuff, and it would really give a cool
00:01:29 –> 00:01:30 look.
00:01:30 –> 00:01:36 So when you’re out on a vacation, or you’re enjoying yourself out there, see if you can
00:01:36 –> 00:01:42 bring back something from the trip and use it in your Polymer clay creations, whether
00:01:42 –> 00:01:48 it’s a piece of drift wood, some sand, some pebbles and rocks, that kinda thing, and you’ll
00:01:48 –> 00:01:54 have a memento from when you were last there, and something cool for your Polymer clay projects,
00:01:54 –> 00:01:55 alright?
00:01:55 –> 00:02:00 So I hope you enjoyed that, and if you did, do let me know if you liked this video.
00:02:00 –> 00:02:06 And if you have any comments, questions, products you’d like me to demo, ideas, that kinda
00:02:06 –> 00:02:09 thing, make sure to leave those in the comment section below.
00:02:09 –> 00:02:15 And don’t forget about a really great resource at polymerclaytutor.com, and that’s where
00:02:15 –> 00:02:21 you can use the search box and find all your answers to your Polymer clay questions.
00:02:21 –> 00:02:22 We’ll see you next time, bye for now.
Our goal is to translate these videos into as many languages as possible. If you are interested in helping with this initiative, then please do contact us and we will figure out a way to make it worth your while :)
Resource Links:
- Related Video: Fort Stevens State Park Rustic Texture Inpiration
- Related Video: Micro Mosaic Pins Polymer Clay Tutorial
- Related Video: Polymer Clay Tutorial Faux Turquoise Beads
- Related Video: Polymer Clay Faux Pebble Beads and Beach Jewelry Projects
Resources marked with a double ** asterisk are affiliate links. If you click on them and decide to buy something, we may receive some compensation. This does not affect the price you pay in any way. What it does do, however, is helps us to continue providing free videos for you, here at the PcT website. Using our links to purchase your tools and supplies, is always greatly appreciated.
Sponsored Ads & Special Promotions
Shareable Images


To share this full blog post anywhere on the web that allows links in comments, here's a shortened url to copy and paste...
>> https://mypct.ca/v570 <<
Want to chat about today’s post? That’s what the comment section below is for. Scroll Down… We’d love to hear from you!
Or... if you would like to request a topic for a future post, here is the link to do that… PcT Suggestion Box
Oh my gracious yes!
I’ve JARS and jars of sand from all my trips to the Caribbean, but haven’t been even THINKING about what I can utilize it with when coupled with polymer!
I feel so foolish, and so INSPIRED!
Thank you Cindy!
(and just in time, my honeymoon is in Oregon no less! XD )
Hi Cindy…
I have made a few projects and am learning more and more through your
tutorials. I have a question. I don’t know if I’m baking long enought or
what. I bake my clay items at appx 265-275F for about an hour and ten
minutes. Is it typical, after sanding/polishing/glazing, for the
finished project to be easy to make a fingernail dent in the clay? Does
is never get rock hard? If not, is there a way to make it harder? I
think I saw you touch on this in a video, but I don’t remember which
one. I searched through your search box, but probably am not using the
right wording. I have made some cabochons for ring mounts that I can
sculpt really well. But after sanding and polishing and glazing, they are
still susceptible to marks. Help!!!!
Regards,
Janice Armistead
Hi Janice – This video will helpful for you…
Should Polymer Clay Still Bend After It’s Been Baked?
.
I’m thinking about having a chess set made of polymer clay. Will the pieces hold up with a lot of use and also would they break easy
Thanks
Hi Diane, it depends on who makes it, what brand of polymer clay they use and how they bake the piece, as to whether or not it would be durable. If the piece is made with Premo, Fimo or Kato clay, is made so that any appendages are well adhered and is fully cured for a full hour (40 min for Kato) then it should be plenty strong enough to last you for years.
Love that sand and all your ideas. As an East Coast ocean girl, a couple of cautions.
Dark sand may contain organic inclusions that might give off an odor later on, make sure you rinse it thoroughly in bleach, even soak it a couple of days, before you add to poly clay.
Dark sand here contains magnetite. Thomas Edison tried to start a recovery operation here, since all you need to do is drag a magnet through the darker sand, and it comes up with magnetite (iron) clumped all over it.
Never be tempted to use an acrylic roller or your pasta machine to run through sand mixed into poly clay. It scratches and might gum up the works of the machine.