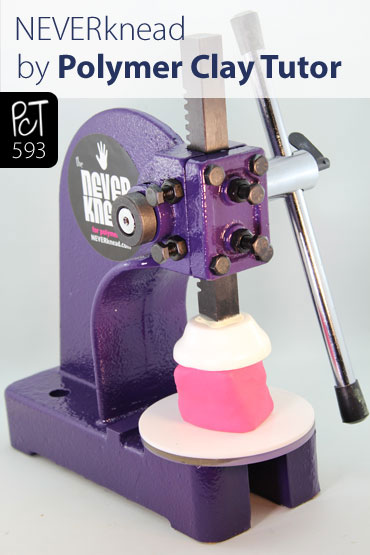
Unboxing NEVER Knead Tool Polymer Clay Conditioning
Video #593: If you have hand mobility issues, or if you process lots of clay, this machine could be a real life saver for you.
More...

IN THIS POST: — neverknead — nk2 — conditioning — kneading — stamping — press — debra ann jaffe — arthritis — ms — multiple sclerosis — carpal tunnel syndrome — pain — pain-free — cindy purple — hard clay — softening hard polymer clay — (Topics marked with an asterick* are discussed in the Comments Section below).
- Unboxing my new NEVERKnead Machine for conditioning polymer clay.
- This machine takes the hard work and pain out of conditioning polymer clay.
- Although it is not for everyone, for some people it will be a real lifesaver.
- Perfect for people doing large batches of polymer clay.
- Pain-free polymer clay conditioning for those with hand mobility/strength issues such as arthritis, carpal tunnel syndrome and MS (Multiple Sclerosis).
- Some minor assembly required, instructions included.
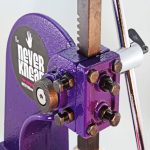
- Install handle with round black ring and Allen key.
- Due to some baseplates getting broken during shipping, all NEVERKnead Machines will now be shipped with the baseplate wrapped separately, and you will need to install it. You simply slip the bolt on the back of the baseplate through the hole in the machine base and thread on the bolt to secure. It is also recommended that you glue in the baseplate with Weldbond, E6000 or 2-part Epoxy.
- Can be bolted to work surface through two holes at back of machine.
- Clean with baby wipe or damp paper towel to remove any machine oil, dirt or clay (after you’ve used it).
- The machine arm applies 1000 lbs pressure on clay, to knead it quickly and easily.
- The NEVERKnead squeezes the clay, so it doesn’t introduce air to the clay, like pasta machines do.
- Large amounts of clay can be conditioned at the same time.
- Has potential to be used for stamping, embossing, cane reducing, and more.
00:00:03 –> 00:00:08 Hi guys, its Cindy Lietz, your Polymer Clay Tutor, and today’s PCT Product Demo, I am
00:00:08 –> 00:00:15 unboxing and demo-ing my new NEVERknead machine which is for conditioning Polymer Clay.
00:00:15 –> 00:00:23 Now this is a really cool machine invented by a Polymer Clay Artist named Deborah Anne,
00:00:23 –> 00:00:30 and she’s… it’s a machine for conditioning Polymer Clay, let me just open up the box
00:00:30 –> 00:00:34 and then we’ll take a look at it and you’ll see what it’s all about.
00:00:34 –> 00:00:40 Now, this machine won’t be for everybody but for some people, it’s gonna be a complete
00:00:40 –> 00:00:49 life saver, it has all this strength in it that you can’t get with your hands alone,
00:00:49 –> 00:00:52 so it’ll all make sense in a second here.
00:00:52 –> 00:01:03 Alright, I’m quite excited about this, and it’s heavy, heavy, heavy.
00:01:03 –> 00:01:13 Alright, we’ll just get some of…there’s some marketing material in here, and in the
00:01:13 –> 00:01:23 lid, I see…just a sec. here, the handle is in here and the little tool… the little
00:01:23 –> 00:01:31 Allen Key for attaching the handle, I’ll show it to you in a second here.
00:01:31 –> 00:01:44 Okay, so here’s the handle, we have to attach it…now, here’s the handle and then here’s
00:01:44 –> 00:01:53 the Allen Key here for attaching it, and then there’s a ring that we have to attach the
00:01:53 –> 00:01:56 handle on with as well.
00:01:56 –> 00:02:08 Now, she had a bit of an issue with the product getting cracked when it gets shipped, so what
00:02:08 –> 00:02:13 she’s done now is she’s got this plate separated, and you’ll have to add that too, but I’ll
00:02:13 –> 00:02:14 explain that in a minute.
00:02:14 –> 00:02:25 Okay, let’s see if I can lift this out…I’ve got some packing here…very heavy.
00:02:25 –> 00:02:31 And mine is a cool color, I had her paint it a dusty Purple color which she is calling
00:02:31 –> 00:02:38 Cindy Purple, and let’s see what it looks like in a second here.
00:02:38 –> 00:02:48 Okay, I got the lid off…looks good, so I’ll lift it out and I’ll show it to you properly
00:02:48 –> 00:02:50 here.
00:02:50 –> 00:02:59 Look what’s in here, isn’t that funny, I wonder if that was supposed to be in there,
00:02:59 –> 00:03:01 just something fun for me.
00:03:01 –> 00:03:09 Alright, let’s take a look at this, look at this pretty Cindy Purple Machine.
00:03:09 –> 00:03:18 Okay, now like I was saying, she’s changed it now so that… this base plate was getting
00:03:18 –> 00:03:23 some pressure put on it during shipping and was cracking, so when you get yours, your
00:03:23 –> 00:03:29 base plate won’t be attached, you’ll have to attach it yourself and it’s super easy
00:03:29 –> 00:03:39 to do, there’s a little bolt underneath here, you’ll just put it into the slot, tighten
00:03:39 –> 00:03:48 up the bolt and you’ll also put a little bit of E6000 glue between the plate and the
00:03:48 –> 00:03:50 machine here.
00:03:50 –> 00:03:57 Now, here I’ll just add the handle, it will go in here on this side, and it’ll make this
00:03:57 –> 00:04:03 go up and down, now to keep this from falling out, there is this Black ring here and it
00:04:03 –> 00:04:10 has a little nut on the side there that will tighten up with the Allen Key, so just attach
00:04:10 –> 00:04:22 it to this side, make sure it’s pushed all the way in, and…so we’ll just attach the
00:04:22 –> 00:04:31 Allen Key by tightening up this little nut here, so it’s on there tightly and then we
00:04:31 –> 00:04:35 can turn the handle up and down nice.
00:04:35 –> 00:04:42 Now you can loosen up this nut here, and move this wherever you need it to go ‘cause you’ll
00:04:42 –> 00:04:46 get more leverage…the longer it is, the more leverage you’ll get, so you’ll have
00:04:46 –> 00:04:49 to just adjust that to how you need it.
00:04:49 –> 00:04:54 And let’s try it, alright, so I’ll probably wanna just wipe it down first just in case
00:04:54 –> 00:04:59 there’s any kind of machine oil or dirt or dust, ‘cause we don’t wanna get our clay
00:04:59 –> 00:05:04 all dirty, I’ll just use a wipe.
00:05:04 –> 00:05:13 Now this has got an acrylic plate here and an acrylic plate here, and this will keep
00:05:13 –> 00:05:17 your clay nice and clean.
00:05:17 –> 00:05:23 Now I’ve got a big chunk of clay here that I would like to condition, normally what we’d
00:05:23 –> 00:05:27 have to do is we’d either have to break it off into smaller bits or try to warm it
00:05:27 –> 00:05:32 up in our hands, or like I’ve shown you in some previous videos where I’ve taken a hammer
00:05:32 –> 00:05:39 to it, or you take big slices off of it and run them through the pasta machine one at
00:05:39 –> 00:05:43 a time, which is quite time consuming.
00:05:43 –> 00:05:48 And you know it’s really hard on your hands, if you’ve got arthritis, we’ve got some members
00:05:48 –> 00:05:54 that have MS, we’ve got people that just aren’t strong, and even me…like I’ve had carpal
00:05:54 –> 00:06:00 tunnel surgery on both my hands, and although my hands have come back quite a bit in strength,
00:06:00 –> 00:06:04 they are not quite as strong as they used to be, and conditioning a big block of clay
00:06:04 –> 00:06:06 like this is a lot of work.
00:06:06 –> 00:06:14 So what I can do instead is I can put it inside here, and we can just use the pressure of
00:06:14 –> 00:06:21 this machine to warm up the clay, just like this.
00:06:21 –> 00:06:24 Now there’s a couple of holes at the back of this machine…here I’m gonna adjust this
00:06:24 –> 00:06:31 handle so that I have good leverage, there’s a couple of holes of the back of the machine,
00:06:31 –> 00:06:39 you can attach it down to your desk with… with a couple of bolts, so if you find it
00:06:39 –> 00:06:45 lifts up at all you can do that, I probably won’t end up doing that because I’m gonna
00:06:45 –> 00:06:54 need to take it down to my other studio where I do the tutorial filming, and I’m gonna need
00:06:54 –> 00:06:55 to move this around.
00:06:55 –> 00:07:00 So see how you just do that, you just press right down and I can feel that it’s already
00:07:00 –> 00:07:08 loosening right up, its way stronger than me, now apparently it has a thousand pounds
00:07:08 –> 00:07:12 of pressure, oh look at that.
00:07:12 –> 00:07:17 Alright, it’s softening right up already, I can feel it, and you just go back and forth,
00:07:17 –> 00:07:24 if you go… push down too far, it gets too tall if you have a big chunk.
00:07:24 –> 00:07:31 Now I have a bunch of other ideas for using this machine, I think we can use it as a press,
00:07:31 –> 00:07:34 put texture plates and things like that with it.
00:07:34 –> 00:07:43 I’m wondering if it’ll even reduce… like a square cane or something, there’s probably
00:07:43 –> 00:07:45 all sorts of things we can do with it.
00:07:45 –> 00:07:49 Anyways, like I said you know for some people…you know if you’re just making little charms and
00:07:49 –> 00:07:54 use tiny amounts of clay, this is kind of overkill for you, but if you are doing lots
00:07:54 –> 00:08:00 of big projects, sculptures, if your hands are really weak, then this will save you a
00:08:00 –> 00:08:03 lot of time and do a beautiful job for you.
00:08:03 –> 00:08:09 And the upside to this style of conditioning is you’re going to… you’re not going to
00:08:09 –> 00:08:14 trap air into the clay the same way as you do with the pasta machine with the sheets
00:08:14 –> 00:08:19 being run through and then folded over and over, this way you’re actually just squashing
00:08:19 –> 00:08:25 it down and waking up all those particles and you’re not trapping air in it at all.
00:08:25 –> 00:08:32 So I’m quite excited about it, I love this Cindy Purple color, and for some of you, you’re
00:08:32 –> 00:08:36 just going to love having a machine like this, so you might wanna go check it out.
00:08:36 –> 00:08:45 Now Deborah sells them at neverknead.com, so go check that out at her site, and let
00:08:45 –> 00:08:48 her know that you saw it here on the video.
00:08:48 –> 00:08:53 Now I hope you love this video, if you did do let us know.
00:08:53 –> 00:08:59 And if you have any suggestions for future videos, let us know that in the comment section
00:08:59 –> 00:09:00 below.
00:09:00 –> 00:09:05 And don’t forget we have a great resource over at PolymerClayTutor.com where you can
00:09:05 –> 00:09:11 use the search box to find all your answers to all of your polymer clay questions.
00:09:11 –> 00:09:14 We’ll see you next time and bye for now.
00:09:14 –> 00:09:25 Okay, let’s check this guy out, I haven’t played with one of these since I was a kid…woo,
00:09:25 –> 00:09:27 that was fun.
Our goal is to translate these videos into as many languages as possible. If you are interested in helping with this initiative, then please do contact us and we will figure out a way to make it worth your while :)
Resource Links:
- Amazon: The Never Knead Tool **
- Amazon: DIY Never Knead Arbor Press Conversion Kit **
- Related Video: Conditioning Hard Polymer Clay Tip #1 Using a Hammer
- Related Article: Conditioning Polymer Clay Tools Techniques Tips
- Related Article: Conditioning Polymer Clay without Trapping Air Bubbles
- Related Article: Polymer Clay Pasta Machine Motors
Resources marked with a double ** asterisk are affiliate links. If you click on them and decide to buy something, we may receive some compensation. This does not affect the price you pay in any way. What it does do, however, is helps us to continue providing free videos for you, here at the PcT website. Using our links to purchase your tools and supplies, is always greatly appreciated.
Sponsored Ads & Special Promotions
Shareable Images


To share this full blog post anywhere on the web that allows links in comments, here's a shortened url to copy and paste...
>> https://mypct.ca/v593 <<
Want to chat about today’s post? That’s what the comment section below is for. Scroll Down… We’d love to hear from you!
Or... if you would like to request a topic for a future post, here is the link to do that… PcT Suggestion Box
PR Newswire NeverKnead News Release
Congrats, Cindy. Nice article.
J, this link is dead.
The link is all fixed now Dixie Ann.
Thanks Doug, am so glad they mentioned Cindy!
Have you try using this machine to reduce cane yet? did it work?
Thanks :)
Hi Carolyn, it will wake up a cane quite nicely and it will reduce square canes… just as long as they are small enough to get under the top plate.
Cindy have you tried reducing a cane with the Neverknead? It doesn’t do that great a job because of such a small area you have to work with. I finally ended up finishing it by hand. It’s just not the same and forget round canes. The hand roller actually does a better job on square canes and if someone invents a tool to reduce round canes or either one I will be the first in line to get it. :) Happy Easter Doll!
Yes I have Dixie Ann… it works pretty good for waking up an old cane… you can put pressure on it from end to end to warm it up. It will also work ok on large but short canes… as long as they fit unto the top plate… but you are right… it won’t do a good job the whole way through.
I didn’t get a toy at all. WAH!!! And I used sugru to hold my machine down. Works great. It doesn’t move at all and if I decide to move it the sugru can be taken out.
I didn’t bolt my NeverKnead down – wasn’t exactly sure where it was going to work best, and didn’t want to drill holes in my bench. Instead, what I did was get ONE good C clamp at a big box hardware store. Lined my NeverKnead up along the overhanging edge of the bench -my dad built it, so it is over engineered :) – and applied the clamp to the back portion of the machine. I can reef and lever, and it doesn’t move. Now if I decide to rearrange my jewelry studio, I can move my wonderful NeverKnead with no problems.
Agree Noreen, clamps are the bomb. Without them, I could not function. I use them for the pasta machine, the light/magnifier, the vice to hold the drill/extruder and hopefully, after the JoolTool investment, soon the NeverKnead.
My favorite source online is Harbor Freight.
They are having a sale on some models today. Plenty of C-clamps and lots of others. I use the big spring clamps.
2 in. Steel Spring Clamp
Item # 39529
Only: $2.99 Sale: $1.99
Oh joy! I got my machine today. I put it together and squished a piece of Katoclay and I’m ready to play. My husband was grumbling about “another damned clay thing”, until I handed the clay and told him to get it soft using just his hands, I knew he couldn’t do it because he has diabetic neuropathy and his hands are pretty weak. then I demonstrated the machine for him and he thinks it was a good decision. Thanks for this video. I’d never know about some of these things w/o you.
Peg, you made me laugh when I read your response. Some guys just don’t understand what we all have to go through to follow our creative passions. God bless.
I have the motor that you can attach to the pasta machine and love it, but I am wanting this new toy too. I have had surgeries on both my hands also and think this is a really good idea. Thank you Cindy for showing us new ways and breaking it down to show us the easiest way of doing things. I see this in my near future. :)
What a good idea for the machine. I ,too have “ARTHUR” in all my joints/ This will be a God-Send for those who need ( pun) it. My hubby gave me his bench press, so that is what I will use. The pressure it creates makes “duck soup” out of hard clay.
Thank goodness there are folks who think up these things………….great job with the demo. TY
I saw a You Tube Video on this and still have the same impression. It looks and bulky big, especially if you have a smaller for area It also looks like you could get the same results by stepping on your clay a few times. It moves a lot unless it is bolted down and then you have a fairly large footprint for a machine with limited uses. If my clay was as hard as the You Tube Demo, I would use a food processor and deal with the trapped air later. The main reason I would not buy it is the size. I would think you could do the a press bought from Harbor Freight.
Thanks for the demo.
Anna, I thought the same thing until I got mine and used it. It takes up very little space on my table and sits right next to me and the computer, 5″ wide by 10″ Long. I put mine on a knee pad which is about an 1″ thick I bought at the dollar store and it does not move around being on a rubberized piece. I have tried stomping on a package of clay and it just hurt my feet. It has to be a little heavy in order to bring a 1000 lbs. of pressure down on a block of clay. Thank God I don’t have to use my body or hands anymore to knead that dang clay.
I didn’t think I would need it that much either , but now I’ve been using it every day. It is great for waking up your clay before rolling it through the pasta machine. And large batches don’t need that lengthy process of taking slices and rolling them through the pasta machine one at a time until they are soft enough to make a sheet. I can even squish it down flat enough to go through the thickest setting on my pasta machine with no problems. Although I probably would live if I was without it, I would be wishing I had it back!
Cindy your suggestion on using texture plates is a great idea! I already have another plate made up for the second machine so I could actually use it and sandwich it on top of the other base plate with my Clay and texture sheet in between. That would allow me to use the larger textures also. In fact anyone could use another piece of plastic or hard material to use as another pressure plate as long as it was about the same size as the base plate. Hmmmmm, my ole brain is charging up again! LOL, let us know if you come up with anymore great tips! Thank you ever so much! :)
Hi,
Quick question,
if you have someone who can make the plates have you considered selling them as possible add ons. I would love to have one of these machines, but it is just too costly to even consider right now. But I could swing one of the harbor freight ones. I haven’t asked the designer if she would sell just those parts, but depending on your feedback, I might. Thanks
Hi Cheryl, I really can’t help you with this question. You’ll have to check with Deb at NeverKnead (you can click the ad at the top of the page and go straight to her page) to see if something like that would be an option for you.
I am so jealous of your purple color! when I bought mine I opted for the standard gray since she was selling them for $99 right after the Blue Bottle showed them on Facebook. The first one she shipped was immersed in peanuts which melted on some of the metal parts because of the heat. The thin plastic plate broke in two with my first downward stroke on the clay. I was in tears because I had waited three weeks to get it. This wonderful lady immediately shipped me a second machine and the same thing happened. Well I could really see the potential in the NeverKnead and really wanted this thing to succeed. I got ahold of my neighbor who was a mechanical Engineer and together we figured out how to make the plate thicker to withstand the pressure and how to attach it to the base without glue but with a screw and nut. We sent her the instructions, the diagrams and photos of what we had done. She was extremely grateful and immediately launched into Version 2
which is what you have received and I guarantee it is 200% better. I now have 2 machines since she told me to just keep the other one as it was too costly to ship back and I could use it for parts. I will always be proud that I helped her in improving her product even though few people know the story, I’m sure she will always be grateful too. I absolutely love my NeverKnead and could never get along without it now!
What a cool story! Well, a great ending anyway. My dad ordered mine for me. He called her number and talked to her on the phone. He said she was super nice.
That is a very cool story Dixie Ann, I had no idea. Deb benefited greatly from your innovation. Now I would like to see some add-ons like texture plates and other ideas. I am thinking that there could be more than one thing a machine like this can do.
Great video. I really like my NeverKnead. A minor cool thing about it – is that it makes it easy to get the clay in a good square shape for my little storage drawers. I think I will bolt mine down eventually – just still haven’t decided exactly where yet.
And, I got the same toy in a different color. Have had lots of fun playing with it. What a fun little extra (: