Drilling Holes in Raw Polymer Clay Vs Baked Clay
Video #617: If you want your beads to look professional, then it is usually best to drill holes after your polymer has been baked.
More...

IN THIS POST: — holes — beads — drilling — piercing — drill bits — raw clay — baked clay — drills — drilled — drill — (Topics marked with an asterisk* are discussed in the Comments Section below).
Topics Covered In This Video:
- I’m going to show you the difference between drilling holes in polymer clay when the clay is raw versus when it is baked.
- Often you will see on the internet where someone who is making a polymer clay pendant or flat charm, just take a skewer and make a hole in the clay when it is raw.
- There are several problems that can happen when piercing holes in raw polymer clay.
- First is that the piece will tend to distort… the clay gets pushed to the sides of the hole and can distort the piece out of shape.
- The hole gets uneven and puckered up around the edges.
- A hole made in clay by swirling a pointed tool generally looks very unprofessional.
- A much cleaner and better looking hole can be made after the polymer clay has been baked, using a drill bit.
- Drilling in baked polymer clay is super easy to do.
- By holding off on adding holes to your polymer clay beads until after they are baked… gives you more options.
- You may change your mind on where you want to drill the hole, how many holes you want to add or if you want to add a bail instead. If the hole is already there, you can’t do much about it.
- All you need is some inexpensive drill bits made for wood, since polymer clay is soft and easy to drill through.
- You can find drill bits in the hardware store or even the dollar store.
- Purchases the sizes of drill bits that you will need.
- Support your polymer clay piece from behind, using scrap wood or a plastic block.
- I used to make a polymer clay handle for my drill bits, but found that the bits they came loose if the bit was not bent on the end (which is very difficult to do).
- So now I just use a pin vise to hold my drill bits.
- You can find single and double ended pin vises, which screw apart for adding any size of drill bit that is required.
- Most Exacto Blade handles will accommodate small drill bits as well.
- Press a small dent in the clay where you want to drill the hole, so the bit doesn’t slide around on the surface.
- Using light pressure, drill into the polymer clay with a piece of wood behind it as a backstop, and you should get a pretty clean hole.
- Drill from the back as well as the front, to clear any burrs along the edges of the hole.
- Resin coated polymer clay pendants can also be drilled after baking. You will notice that they need a little more pressure and time, but it is easily done by hand.
- I also like to use a tapered drill bit or a tapered burr bit (made for Dremel Tools), for getting holes started or cleaning burrs around the edge of holes.
- Drilling your polymer clay after it is baked will give you a nice clean professional looking hole… much better than the dorky, puckered up, uneven holes that you squish in when the clay was raw! :)
00:00:03 –> 00:00:08 Hi guys, its Cindy Lietz, your Polymer Clay Tutor, and today’s Studio Tip, I’m gonna show
00:00:08 –> 00:00:15 you the difference between drilling holes in Polymer Clay when it’s raw versus when
00:00:15 –> 00:00:16 it is baked.
00:00:16 –> 00:00:23 Now, lot of times I see somebody on the internet or wherever, they’re cutting out… they cut
00:00:23 –> 00:00:29 out their pendants or whatever piece…they’ve done something fancy to it, they cut it out,
00:00:29 –> 00:00:36 and then they go and they put a hole in the top by just taking some sort of skewer, a
00:00:36 –> 00:00:42 needle tool or something, and they just make their hole like this when it’s raw, and the
00:00:42 –> 00:00:47 problem with that…and depending on the size that you do it, there’s a few problems with
00:00:47 –> 00:00:49 doing it that way.
00:00:49 –> 00:00:55 First of all…I don’t know if the camera will pick up on it too much, but you can get
00:00:55 –> 00:01:03 a fair amount of distortion right in the area where it bulges out, this clay has to move
00:01:03 –> 00:01:10 somewhere, so when you’re stretching it around like that, it’ll bulge out sometimes here…it’s
00:01:10 –> 00:01:17 pretty subtle on this piece but it can, depending on where it’s at, and then the hole is uneven,
00:01:17 –> 00:01:22 it’s puckered up in the center and it just generally doesn’t look that professional.
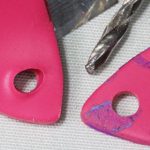
00:01:22 –> 00:01:30 A much cleaner and better looking hole in your bead is when you have drilled it after
00:01:30 –> 00:01:36 it’s been baked, and these are just sample slices of clay that have been cut out, but
00:01:36 –> 00:01:40 you can see here, this is a much, much cleaner hole.
00:01:40 –> 00:01:48 Now it’s super easy to do, it also gives you a much…it gives you more of an option, so
00:01:48 –> 00:01:56 say you’ve baked up a bunch of different pieces and partway through you… you’re thinking
00:01:56 –> 00:02:01 well maybe I’d like to drill two holes in it, maybe I want a hole on this side and this
00:02:01 –> 00:02:05 side, or maybe I just want a hole here, or maybe I don’t want a hole at all and I wanna
00:02:05 –> 00:02:07 put a bale on the back.
00:02:07 –> 00:02:12 So if you’ve…when you bake it, if you don’t pre-put a hole in it, then you’ve got more
00:02:12 –> 00:02:14 choices afterwards.
00:02:14 –> 00:02:19 But say you decide that you do want a hole in the top of it, all you need to do is take
00:02:19 –> 00:02:26 a piece of wood or a chunk of plastic or something to have behind your piece, and then you can
00:02:26 –> 00:02:31 drill right in it by hand, and in fact that is the easiest and safest way to go about
00:02:31 –> 00:02:38 it, is to just use a drill bit and drill it by hand.
00:02:38 –> 00:02:45 Now, I’ve got a few…you know this is what typical drill bits look like, you buy them…you
00:02:45 –> 00:02:49 can buy them anywhere, at the hardware store, even at the dollar store, if you’re lucky
00:02:49 –> 00:02:55 to find them there, you don’t need good quality drill bits you just need ones that are good
00:02:55 –> 00:03:01 enough for wood, because Polymer Clay is super soft, and then you also just need whatever
00:03:01 –> 00:03:03 size that you want.
00:03:03 –> 00:03:08 So sometimes, you’re gonna have to look harder if you want like a really small one like that,
00:03:08 –> 00:03:12 or a little bit larger hole.
00:03:12 –> 00:03:18 I used to put them in a handle of Polymer Clay, and you can certainly do that if you
00:03:18 –> 00:03:25 want to, but there are some…I found that they can kinda break loose from the Polymer
00:03:25 –> 00:03:31 Clay unless you bend a little L in the drill bit first which is really quite difficult
00:03:31 –> 00:03:39 to do, so I prefer to just use something else, and they’re usually called a pin vise.
00:03:39 –> 00:03:45 Now here’s a typical pin vise here, this is a double ended one, and it just is a little…
00:03:45 –> 00:03:50 you just untwist the end and you can slide your drill bits in, this one I’ve got 2 ends,
00:03:50 –> 00:03:52 so I’ve got 2 different sizes which is great.
00:03:52 –> 00:03:59 But these will also work as well, these are actually just Exacto Knife holders, and you
00:03:59 –> 00:04:05 can see… so for example, here’s the Exacto one with the blade in it, if I removed the
00:04:05 –> 00:04:13 blade from it, they usually have like a little round hole in the end that can be expanded
00:04:13 –> 00:04:19 and stretched out and you can put any of the smaller drill bits into it.
00:04:19 –> 00:04:27 This one here actually was more…it had a larger…it’s called a Collet, but it had
00:04:27 –> 00:04:33 a larger Collet that I could fit this fatter drill bit into, but this one was an Exacto
00:04:33 –> 00:04:34 Blade.
00:04:34 –> 00:04:41 Anyways, before I go on too much about that, you can just drill right into the clay, let
00:04:41 –> 00:04:48 me start with this size here, that’d be fine, and you just make a little mark where you
00:04:48 –> 00:04:50 want the hole to go.
00:04:50 –> 00:04:56 So if you wanted to, you could measure it out, and if you just sorta push into the clay
00:04:56 –> 00:05:02 first, it’ll leave a dent, and then I’m just going to twist my drill bit right into the
00:05:02 –> 00:05:04 clay.
00:05:04 –> 00:05:11 Now if you have the wood in behind, it will support it and usually make a nice clean hole
00:05:11 –> 00:05:20 for you, and instead of distorting the clay, it just…you just…the clay just comes up
00:05:20 –> 00:05:26 in little spirals, and that comes right out, then you can come from the back side if you
00:05:26 –> 00:05:32 want and then just clean it out that way, and that will give you a really nice clean
00:05:32 –> 00:05:33 hole.
00:05:33 –> 00:05:38 You can even drill through resin… if you’ve already put resin on your piece, and you’ve
00:05:38 –> 00:05:45 decided now that you want to put a hole in it, you can do that as well, so I’m just gonna
00:05:45 –> 00:06:02 kinda press a little spot into it.
00:06:02 –> 00:06:09 Now this is a tapered drill bit, sometimes they are called tapered burs, this one is…you
00:06:09 –> 00:06:12 can find them sometimes…
00:06:12 –> 00:06:19 Dremel carries them, and they’re a great little tapered drill bit that you can use, really
00:06:19 –> 00:06:25 pointy on one end, and they just get wider and wider.
00:06:25 –> 00:06:30 So I’m just gonna show you that you can just drill right through the resin, it’s a little
00:06:30 –> 00:06:36 bit harder, you have to push down a little bit harder, but you can still get right through
00:06:36 –> 00:06:42 it, and then when you get to the Polymer Clay side, it goes through quite easily.
00:06:42 –> 00:06:50 Now if you had a hand drill, you could use that, there are some little hand drills that
00:06:50 –> 00:06:59 work on a kind of a screw system where you push up and down…I forget what that’s
00:06:59 –> 00:07:00 called, that works great too.
00:07:00 –> 00:07:07 Here, I’m just getting through the resin layer, there we go right through the clay, you can
00:07:07 –> 00:07:13 see the Pink’s coming up, and then I can come from the backside to clean that hole
00:07:13 –> 00:07:20 right up, and you can see, that is a nice clean, professional looking hole much better
00:07:20 –> 00:07:27 than those dorky, puckered up, uneven holes that you squished in when the clay was raw.
00:07:27 –> 00:07:33 So I hope that was helpful for you, if it was, do let us know.
00:07:33 –> 00:07:39 And if you have any comments, suggestions, ideas for future videos, make sure to leave
00:07:39 –> 00:07:42 those in the comment section below.
00:07:42 –> 00:07:48 And don’t forget, we have a great resource over at PolymerClayTutor.com where you can
00:07:48 –> 00:07:51 find the answers to all of your Polymer Clay questions.
00:07:51 –> 00:07:54 We’ll see you next time and bye for now.
Our goal is to translate these videos into as many languages as possible. If you are interested in helping with this initiative, then please do contact us and we will figure out a way to make it worth your while :)
Resource Links:
- Related Video: Drilling Holes In Your Polymer Clay Beads
- Related Article: Polymer Clay Bead Holes
- Related Article: How To Make Pretty Handles for Your Drill Bits
- Related Video: Applying Ultradome UV Epoxy Resin To Polymer Clay
- Amazon: Hand Drill for Polymer Clay **
Resources marked with a double ** asterisk are affiliate links. If you click on them and decide to buy something, we may receive some compensation. This does not affect the price you pay in any way. What it does do, however, is helps us to continue providing free videos for you, here at the PcT website. Using our links to purchase your tools and supplies, is always greatly appreciated.
Sponsored Ads & Special Promotions
Shareable Images


To share this full blog post anywhere on the web that allows links in comments, here's a shortened url to copy and paste...
>> https://mypct.ca/v617 <<
Want to chat about today’s post? That’s what the comment section below is for. Scroll Down… We’d love to hear from you!
Or... if you would like to request a topic for a future post, here is the link to do that… PcT Suggestion Box
Love yur work… And it’s an AMAZING volume of work…
I had to mention, loving tools & instruments of ALL KINDS… ( I am also a Registered Dental Hygienist with 3 licenses ) that you may want to Try out a Cordless Dremel.
Working in Jewelry & Pottery, I have one in my Truck, one in each Studio.
Yes, I love hand pin vises and have one in all my tool bags, but let me tell Yu, Yu can build a HOUSE With the newer 12 Volt, 8200. Cordless is beautiful, but this is a mighty tool, I recommend highly using a hand piece if u use often.
Possibly even a vice for desk work. Yes, ur almost to a flex shaft at this point then! You will love it if you do not have one or two already (no idea how old this vid is).
I am quite impressed by yur talent range and ability to MAKE it All Happen.
Well Done.
I just wanted to know if you could drill through the Lisa Pavelka Magic gloss once it was cured like you can through resin?
Many Thanks
Tracey Jones
Hi Tracey, yes you can drill through the Pavelka Magic Glos in the same way I did the resin. There are very similar products and are a similar hardness, so the effort and the results will be the same.
I just opened my Etsy store the other day. I’m really not ready to sell but liked the n ame I chose and didn’t want anyone else to take it. And maybe nobody would want it. Anyway Etsy sent me some links and the first one was titled “Finishing Your Polymer Clay Like A Professional”. It costs $10.00. Not a terrible price, but I said to myself, “Self! Cindy has already taught you that. Go buy anothr back issue from Cindy.” So, that’s where I’m going. Thanks, Cindy & Doug.
Thanks Peg for coming in here to say that! I hope to see some listings in your Etsy shop real soon. Good luck and much success!