Miniature Beauty And The Beast Enchanted Rose
Video #739: Although it takes over 4 hours to make… finishing a project like this definitely gives you something to feel proud of.
More...

IN THIS POST: — beauty and the beast — enchanted rose — disney — movie trailer — miniatures — bell jar — flowers — miniature rose — (Topics marked with an asterick* are discussed in the Comments Section below).
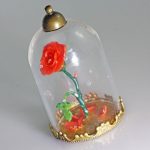
Today’s video features a Show & Tell of this realistic miniature Enchanted Rose I made from Polymer Clay.
It was inspired by the new Beauty and the Beast Movie coming out in March 2017.
Disney is doing a live action version of Beauty and the Beast starring Emma Watson as Belle. Emma is the actress that played Hermine in the Harry Potter Movies.
I got really excited when I saw the trailer (posted below)… it looks like it’s going to be a beautiful movie.
My kids watched the original animated version lots when they were little, so I know the story well.
You may already know that I’m not really a Princess-y type of girl, but I really loved Belle as a character. She always had her head in the clouds (in books actually) and was brave, kind and stood up to the Beast. I admired her for all those things.
After finding some neat miniature bell jar pendants from Tim Holtz in my Michaels store, I thought it would be super fun to see if I could make a really tiny, realistic looking Enchanted Rose to put inside.
There are some polymer clay Enchanted Roses showing up on Etsy and other web sites, but the ones I’ve seen are much too clunky looking (imo). I really wanted to see if I could make my rose look real… which is tricky to do in a miniature scale.
It turned out to be WAY harder than I expected. Rose petals are pretty thin and dainty when they are full size… so they have to be ultra thin to get them to look real in miniature.
In the video I explained the process of how the rose was created, along with a description of the supplies used. I haven’t decided if I will do a full tutorial yet, just because it is such a tricky project to make. However, if there is enough interest, I may consider doing a full series.
The supplies used were very simple. Just a tiny pinch of Premo White Translucent, some Pinata alcohol inks, liquid clay, a small piece of floral wire, a little glitter and the miniature bell jar.
It took me about 3 or 4 hours to make, but I loved the process! Finishing a project like this definitely gives you something to feel proud of.
It would make a wonderful tiny prop for a dollhouse, or a charm on a necklace.
I plan to make a few more… would like to tweak the colors a bit and would like to make a slightly larger version for the other larger (but still mini) bell jar that I have. It would make a great cake topper for a wedding or bridal shower, because it is the symbol of such a romantic story.
I do hope you enjoyed this look at my teeny, tiny, enchanted rose.
00:00:03 –> 00:00:08 Hi Guys! This is Cindy Lietz, your Polymer Clay Tutor and today, I’m gonna do a little
00:00:08 –> 00:00:16 show and tell on a miniature enchanted rose that I made out of polymer clay, that was
00:00:16 –> 00:00:21 inspired by the new Beauty and the Beast movie that’s coming out. You may have heard of the
00:00:21 –> 00:00:27 new movie coming out–Beauty and the Beast. They’re doing a live action version of it.
00:00:27 –> 00:00:34 It’s actually gonna star Emma Watson, who was Hermione in Harry Potter. I got really
00:00:34 –> 00:00:39 excited when I saw the trailer because it looks like it’s gonna be a beautiful movie.
00:00:39 –> 00:00:46 The kids watched it a lot when they were little and if you’ve watched any of my videos, you’ll
00:00:46 –> 00:00:53 know I’m not really a princess-y kind of girl, but I did really love Beauty and the Beast
00:00:53 –> 00:00:59 when the kids watched it because Belle was such a neat character. She had a mind of her
00:00:59 –> 00:01:05 own, she was always off another little world. She always stood up to the beast and she was
00:01:05 –> 00:01:10 just a cute girl and I really admired her. So I liked the movie and when the new movie
00:01:10 –> 00:01:22 came out, and I happened to go into Michael’s and I saw this little tiny miniature domes
00:01:22 –> 00:01:27 by Tim Holtz. They’re called Decorative Domes and they look exactly like the little bell
00:01:27 –> 00:01:34 jars. I thought It would be super fun to see if I could make a miniature, realistic-looking
00:01:34 –> 00:01:39 enchanted rose. I’ve seen a few out there that have been made out of polymer clay that
00:01:39 –> 00:01:44 are tiny, this size but they’re not very realistic-looking. They’re quite chunky and I wanted to see if
00:01:44 –> 00:01:53 I could really make it look real. That’s what I’ve done and it was way harder than I thought.
00:01:53 –> 00:01:58 Just because it’s so tiny, when you’re working with something miniature, it’s important to
00:01:58 –> 00:02:06 think of the scale, not only in the size and the shape of things but also in the thinness
00:02:06 –> 00:02:12 of the petals. That’s where it was quite hard to do. I’m gonna show you what I ended up
00:02:12 –> 00:02:17 making here and I didn’t glue down the lid because I wanted to open it up and show it
00:02:17 –> 00:02:24 to you but I did it just like a little bell jar here, put the rose inside. There are a
00:02:24 –> 00:02:29 little sparkles on the glass. I used some larger glitter for that. I’ll just open it
00:02:29 –> 00:02:37 up and show it to you. It was a very fun project to make but it took me a ton of time. It took
00:02:37 –> 00:02:43 me about three to four hours to actually make this little rose. It was because of the tiny
00:02:43 –> 00:02:51 little petals and here, I’ll get a little pointer here. Even the little tiny things–look
00:02:51 –> 00:03:05 at this little tiny thorn and just the little tiny leaf, and all the little calyxes underneath.
00:03:05 –> 00:03:15 The petals are super thin and they were fun to make. The way I did it was I took the little
00:03:15 –> 00:03:22 dome here and I did a sketch of it first. I thought it was the only way I can get the
00:03:22 –> 00:03:29 scale right. So I just traced around on a piece of paper the size of the dome. Then
00:03:29 –> 00:03:38 I used some florist wire, it’s a thin, gauge wire that’s kind of wrapped in a green thread.
00:03:38 –> 00:03:43 I used that and bent it to the shape of the rose, I figured it was about the only way
00:03:43 –> 00:03:52 I was going to be able to get something strong to mount to the bottom of the little plate
00:03:52 –> 00:04:00 for the bottom of this little bell jar here. I bent it to the correct shape and then started
00:04:00 –> 00:04:09 building the rose on to there. The rose was made out of translucent clay. I used some
00:04:09 –> 00:04:14 Premo white translucent and I used the white rather than the regular translucent because
00:04:14 –> 00:04:20 it’s whiter and it doesn’t turn yellow. The regular translucent is a little bit more yellow.
00:04:20 –> 00:04:28 Then I used some Pinata Inks, alcohol inks to tint some polymer clay. I’ve shown that
00:04:28 –> 00:04:35 before–how you can tint translucent clay with it. So I made this super, super fine
00:04:35 –> 00:04:47 sheet of translucent and then I cut out tiny little circles using a drinking straw actually.
00:04:47 –> 00:05:08 That is the base of each petal, so I take each tiny petal and pick it up and use that as each petal
00:05:08 –> 00:05:14 for the rose but if I just cut it like that and use it as is, the edges are still too
00:05:14 –> 00:05:20 thick believe it or not. I want it to look delicate and realistic so I used the ball
00:05:20 –> 00:05:30 tool and just really stretched out those edges and got them really ruffled, built each little
00:05:30 –> 00:05:39 petals, stretch it out and built it under this tiny little rose. Then the green calyx
00:05:39 –> 00:05:45 stuff was made with white translucent clay tinted with a little big of green alcohol
00:05:45 –> 00:05:54 Pinata Ink and then that, I built up underneath. Each stage, because it’s so delicate, I had
00:05:54 –> 00:06:00 to bake each stage to start off with just with the heat gun to kind of get it heat-set
00:06:00 –> 00:06:06 so that I wouldn’t crush each little area as I was trying to add it on. My fingers–I
00:06:06 –> 00:06:16 have these big, thick fingers and it’s tricky to build something like that tiny without
00:06:16 –> 00:06:23 wrecking it. So I did heat-set it with a heat gun after each layer of adding different petals
00:06:23 –> 00:06:32 and different things. The stem itself, I used some liquid polymer clay and mixed it with
00:06:32 –> 00:06:38 the alcohol ink and painted it over the wire, so it gives something to hold on to. Also,
00:06:38 –> 00:06:45 it acted as a glue to stick on the world’s tiniest little thorn. I think that was probably
00:06:45 –> 00:06:51 the hardest part to do there–getting that thorn small enough and then sticking that
00:06:51 –> 00:07:01 on that liquid clay. The little leaf here was done, I kind of made a little tiny leaf
00:07:01 –> 00:07:07 and baked it over the side of one of my little wooden tools. Here, I’ll grab that. I used
00:07:07 –> 00:07:12 the heat gun and baked that little leaf that was flopped over the edge with a heat gun
00:07:12 –> 00:07:21 and then held on to that and stuck it on some liquid glue. I used a little bit of gold liquid
00:07:21 –> 00:07:28 polymer clay in the bottom here so that I’d have a base to attach the wire to. Then the
00:07:28 –> 00:07:35 whole thing got baked for an hour. There’s tiny little petals in there, little bits of
00:07:35 –> 00:07:44 glitter, a little bit more alcohol ink for added shading but it was quite tricky. Like
00:07:44 –> 00:07:50 I said, it took about four hours to build but I loved it. It was one of those projects
00:07:50 –> 00:07:57 that was super fun to do. I think it would make a great little prop in a doll house,
00:07:57 –> 00:08:01 a great necklace ’cause this one happens to have a little hole on the top of it. It will
00:08:01 –> 00:08:07 make a great charm but I haven’t quite decided whether or not I’ll do a tutorial because
00:08:07 –> 00:08:11 it’s quite a bit tricky to do and probably, a little bit advanced. But if there’s enough
00:08:11 –> 00:08:18 interest, I may just do that. So, I hope you enjoyed checking that out. I wanna make up
00:08:18 –> 00:08:22 some more samples of it and I wanna tweak some of the colors and try making it in a
00:08:22 –> 00:08:29 little bit larger dome. I think one about this size would make a wonderful cake topper
00:08:29 –> 00:08:36 for wedding or a wedding shower, something like that ’cause it’s such a romantic story.
00:08:36 –> 00:08:40 I’m really looking forward to when the movie comes out, it looks like it’s going to be
00:08:40 –> 00:08:45 beautiful and I think a lot of people are gonna enjoy that. I think it’s gonna be at
00:08:45 –> 00:08:55 March 2017. It’s a bit of a ways away but it’s something to look forward to. So we’ll
00:08:55 –> 00:09:02 see you next time and do let us know if you liked this video and if you got any suggestions,
00:09:02 –> 00:09:08 ideas for future tutorials, products you’d like me to test, anything you haven’t seen
00:09:08 –> 00:09:12 already in the videos that we’ve made and you would like me to make a video on it, make
00:09:12 –> 00:09:17 sure to leave those in the comment section below. Alright, so we’ll see you next time
00:09:17 –> 00:09:18 and bye for now!
Our goal is to translate these videos into as many languages as possible. If you are interested in helping with this initiative, then please do contact us and we will figure out a way to make it worth your while :)
Resource Links:
- YouTube: Beauty and the Beast Official US Teaser Trailer
- Related Video: Tinting Polymer Clay With Pinata Inks
- Related Video: Comparing Liquid Polymer Clay Brands
- Related Video: Curing Polymer Clay With A Heat Gun
- Related Video: Gold & Silver Tinted Liquid Polymer Clay
Resources marked with a double ** asterisk are affiliate links. If you click on them and decide to buy something, we may receive some compensation. This does not affect the price you pay in any way. What it does do, however, is helps us to continue providing free videos for you, here at the PcT website. Using our links to purchase your tools and supplies, is always greatly appreciated.
Sponsored Ads & Special Promotions
Shareable Images


To share this full blog post anywhere on the web that allows links in comments, here's a shortened url to copy and paste...
>> https://mypct.ca/v739 <<
Want to chat about today’s post? That’s what the comment section below is for. Scroll Down… We’d love to hear from you!
Or... if you would like to request a topic for a future post, here is the link to do that… PcT Suggestion Box
WOW~what a challenge! Such patience. Your rose is adorable ! You showed, again, what a wonderful teacher you are..
At tute would be greatl -the hard core makers and the beginners would love this kind of challenge!! Bring it on………..
Thanks for the vote of confidence Patt! We’ll see what we can do!
My kids also watched Beauty and the Beast when they were little (and they were all boys!). I even watched it a time or two during nap time on my own. :-) I’m also interested in a tutorial if you decide to do one. I’m sure it will be chock full of all kinds of tips and tricks valuable for any project!
Yeah this movie is just as entertaining for boys as it is girls… I think anyway. I am looking forward to how they will recreate this in live action. Looks like they spared no expense. Just those chandeliers in the beginning scene of the trailer are stunning enough! I am positive that I will have many other minis to sculpt after I have seen more of this movie. Thank you for your interest in a tutorial. I’ll seriously consider it!
Oh! Mrs. Potts, Chip and Lumiere!
I am sooo curious as to how they are going to do those characters. Will they look real with faces embedded in them? Or will they look like some sort of animated character with realistic finishes? The trailer didn’t allude to how they would look.
Hi Cindy!
That is beautiful !! I would love to have a tutorial of this :) count me in
Thank you
Thanks Ginny, will do!
Turned out wonderful!
I am a miniaturist and to make something like this it is harder than a full size let alone 1″ size!
No one understands what goes into making something so small.
But you sure explain how difficult it is!
You did an amazing job!
Shows why hand made miniatures cost so much.
I am very interested to see a how to video if your taking votes :)
Just LOVED seeing this!
Thank you Edie for the kind words. You are right about the fact tht people don’t often understand what goes into making such tiny objects. When I see some of the amazing miniatures that some people make for dollhouses I often wonder how long it actually took them to build them. I will consider doing a tutorial on how this project was made. Thank you for your vote! :)
I saw that rose in your Bargello mini tut last week. I wondered where it came from. Thanks for sharing. Looking forward to the new movie.
You’re welcome Anna! Yeah I think there will be all sorts of inspiration that will come from the movie when it comes out. It should be beautiful if the trailer is any indication!
Yep Cindy that’s really tiny and awesome, my fingers are too fat to do anything that delicate, I’d be all fingers and thumbs as they say, Well done.
I can relate about the big fingers! LOL It can be tricky to get the tiny details, but I used the magnifying glass on my OttLite which definitely helped!
Oh Cindy the rose is just adorable. That must have been such a painstaking time creating it but I must say it looks so real and fits inside the dome perfectly! Kudos to you for all that hard work.
Thanks Dixie Ann! It took awhile alright, but it was fun!
I adore this miniature! If others are looking for Christmas gifts for young grandchildren, I’d suggest a similar bell jar treatment for Ariel the Mermaid. Beloved classic.
Thanks Jocelyn! I am glad you liked this tiny enchanted rose. Ariel would be a wonderful thing to sculpt in miniature… though I am not sure she would appreciate being put under glass! ;)
Love the idea of Ariel.
Ariel would be lovely wouldn’t she?