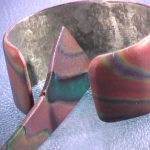
Vol-033-3 Adding Clay To Bracelet Blanks PcT Tutorial (Intro)
Video #192: “Cindy I was wondering if you would do a video on how to apply polymer clay to cuff bracelet blanks?” ~Ariti
More...

** This post is an introduction to one of our paid tutorials.
In the Vol-033-2 tutorial, I showed how to make your own custom Hammered Metal Bracelet Blanks, in any size and with any type of metal.
Now in this Vol-033-3 tutorial, I am going to address questions that have come in the past, about how to add polymer to the metal blanks.
“I was wondering, when using the handcrafted bracelet blanks, do you recommend using Bake & Bond to adhere the clay on before baking it? I am worried that when trying to put the cuff on that the slightest bend will pop it loose from the blank. Does this make sense?” ~Brenda-M
“Cindy, I have learned so much from watching your videos. I was wondering if you would do a video on how to apply polymer clay to cuff bracelet blanks? Also, how to sand and buff it. I’m trying to teach myself but I know you would have an easier way. Thank You.” ~Ariti
“Hi, I have some metal bracelet blanks I was going to form, put a layer of polymer clay on then use cane slices to finish off the bracelet. I thought about using Weldbond (PVA) glue on the metal before putting the first layer of clay on. Any suggestions or does this sound ok? Thanks.” ~Peggy-B
“I’m sure Cindy will be teaching us how to add clay to the bracelet blanks pretty soon (since she’s been teasing us with her pretty creations!)” ~Phaedrakat
“
Thanks Cindy, that is very helpful! I hadn't looked at the lessons in a while, and just today decided it was time.... and guess what... I was just about to order bracelet blanks when I saw this lesson - worth the cost to have it when I needed it most. Thanks again for such wonderful tips.
Evelyn C
“
What a neat tute. I will be making lots of bracelets... yum, yum.
Patt W
“
Cindy - Loved the tutorial. You made it so easy getting the clay to fit.
Cheryl H
Transcript coming soon...
Transcript coming soon...
Our goal is to translate these videos into as many languages as possible. If you are interested in helping with this initiative, then please do contact us and we will figure out a way to make it worth your while :)
Shareable Images


Want to chat about today’s post? That’s what the comment section below is for. Scroll Down… We’d love to hear from you!
Or... if you would like to request a topic for a future post, here is the link to do that… PcT Suggestion Box
Hi Cindy,
Wanting to know more about baking polymer clay on metal objects. How thin can I go in mm.
My wife and I are going into an E-cigarette business in 8 months and looking into encasing products (which are made out of metal) with various polymer clay designs…. leaning heavily on wood veneer look.
Any videos other than your pen making would be great….and any advice.
.
Hi Brian, you can usually go pretty thin with your polymer clay layer (1mm – 2mm) if you have a nice solid base underneath and your piece is properly baked. The strength isn’t so much about thickness, as it is about proper curing. Though it is nice to have some thickness to the piece so that you have room for a good sanding. Too thin and you may sand right through it.
The idea for putting polymer clay designs on E-cigarettes sounds very interesting and should work, though you may have to do a little experimenting with what looks and works the best for you, since I have not added polymer to that product before.
Here is a list of other tutorials that may be of interest for you since they either deal with adding thin sheets of clay to metal or they are are patterns that make great veneers:
Faux Abalone Cuff Tutorial
Faux Wood Cane Tutorial
Faux Bone Tutorial
Ink and Crackled Gold Leaf Tutorial
.
Thanks Cindy – your great! Very helpful.
Cindy, I subscribe to your site and LOVE it! You are the QUEEN! lol
I have looked and looked and can’t find this answer. I have tons of supplies ready to make your bangles but I want TO COVER the inside and can’t find any tips anywhere. I like how you made them with the weldbond and have purchased that.
should I make the bangle as you show, bake it and then fill in the inside and bake it again????? I really don’t want the metal to show…….
I have some orders for these but don’t know the best way…..could you help me or refer to something on your site I am missing on how to do this??????
Thanks bunches,
Hugs,
sheila
Thank you for the kind words Sheila! Nice to feel like a Queen every once in awhile! :) I have been thinking of doing a tutorial where we cover the whole base including the inside, but until then, you may want to try and do it in stages. First do the outside, then bake. Peel off and glue down with Bake and Bond, bake for a short while (10 min or so) then add inside and bake. Peel off the inside only if not attached in some way to the outside, add more bake and bond and bake again. Bake the last stage for an hour. This would give the whole thing lot of strength and durability.
Another option is the one Linda suggested above in this thread.
One concern I have it that you are taking orders for projects that you have not made before. This is a little dangerous to do, since you don’t know how well your pieces will wear, without properly testing them, which could damage your reputation.
If these orders are from family members or close friends, you could let them know that your design is new and you are not positive how they are going to stand up, so you would appreciate them letting you know if they have any problems with your pieces that can be improved. If it is for paying customers however, I wouldn’t risk it unless you don’t mind the possibility of losing a customer should the quality not be up to par with your usual work.
Hope you understand what I am saying. I just want you to have the most success possible.
I purchased two very cute and small pewter arrows that I want to turn into earrings. I want to make three little polymer clay heart beads to place in the middle of the arrow, between the top and bottom part. Can I bake these two things (polymer clay and pewter) together?
Yes Rena, it should be fine to bake your arrows with your hearts. Most things can handle the low heat that we bake at, except for a few plastics. You can always do a test bake with any item you would like to combine with the polymer clay, to see if it is indeed heat safe. If it doesn’t melt, than you can bake it with your polymer clay!
Hello Cindy,
I am glad I rejoined as this cuff bracelet was on time. I don’t do a lot of the tutorials, mainly not what I am doing but this worked out perfectly. I did have one question (I read the previous ones to see if I could find the answer) Ironically the last response you gave addressed the issue but no answer… what gauge galvanized steel were you using? And if you don’t know what gauge would you suggest?
Thanks,
Evelyn
Hi Evelyn, I am glad you rejoined too! I just bought a wire and sheet gauge so I could finally start measuring metals and wire that didn’t state the gauge they were. I just checked the metal stash I have and believe the one I used in the tutorial was 26 gauge galvanized steel. You can go fairly thin with steel since it is so hard. If you want to go with a softer metal like aluminum or copper, I would suggest a little thicker gauge like 24g.
Thanks Cindy, that is very helpful! I hadn’t looked at the lessons in months and just today decided it was time…. and guess what I was just about to order bracelet blanks when I saw this lesson. Since I rarely look at the lessons I was shocked to see that one – worth the fee to have it when I needed it most. Thanks again for such wonderful tips.
Dear Cindy,
First of all I love the videos! I have learned so much from them. I have a question about the covered cuffs. Can both sides of the cuff be covered or will it cause problems?
Thanks
Lucy Terpenny
Hi Lucy, sorry to take so long to get back to you… always so busy around here! As far as your question, can both sides of the bracelet blank be covered, the answer is yes. You can cover the whole thing at once and bake it, or you can do one side at a time and do multiple bakings. Whatever works best for you. Watch for air pockets and make sure that everything is smoothed down well, and everything should work fine. Good luck. Let us know how it goes.
Hello, clay bloggers, this is my first here. I took the beginner’s course and have recently signed up for some of the back issue videos teaching various techniques. Maybe somebody can help me with a couple of problems I’ve had with the hammered metal cuff bracelets: first, the Weldbond didn’t hold the clay to the cuff… I glued my clay piece to the metal cuff but the next morning it popped off. Also, a friend tried wearing the bracelet for me (after I added SuperGlue) and the bracelet gradually opened on her wrist so that it was easy to fall off. I guess the metal sheets come in various strengths? I wasn’t able to get a smooth edge on the clay covering the cuff; does this come with more practice? Any suggestions would be greatly appreciated!
Hi Jane, I am wondering if your metal was clean? If it had any oils or other contaminants on it, it could have caused the clay not to stick. It is a good idea to clean your metal with rubbing alcohol, before using any glues on it.
Another possibility is that there was not enough glue or the glue dried too much, before you added your clay. The surface of hammered metal is very bumpy and the glue may have been sitting in the crevices and not having much contact with the polymer clay. With the right amount of Weldbond, it will stick beautifully, even if it flexes a little as you are wearing it.
As far as the metal stretching during wear, you’re right, metal does have many different strengths. There are many different gauges (thicknesses) and many different hardness’. Hammering the metal will harden the metal considerably. It is also possible that you would need to make the bracelet smaller so there wasn’t as much gap in the first place, to keep it from falling off.
It is tricky to give you too much advice without seeing your bracelet.
You are right about things getting better with practice. When you are new, there are many things your brain is trying to remember, so it is easy to make a small mistake and not be sure where you went wrong. Keep watching the videos and learning along side them. Before you know it, you will be a pro at making polymer clay jewelry!
Hope that helped!
Cindy, thanks so much! I will take your suggestions to heart and try again. I’m doing my best to learn as much as I can from the tutorials…..so many super things to try! I do appreciate you very much, and the ladies on the blog.
oh wow! I love these!!!! I am super excited about these.
Tried baking bangles on a bottle of wine once….
Oh…that’s how you do it…..boy, I was in trouble doing my commando experiments kemosabe.
I LOVE these cuff bracelets! I can’t wait to make some!
Thanks so much to everyone for sharing. This is such a generous community and I appreciate it.
I’ve been away from the blog for a few days while hosting my daughter and family. Imagine my joy to open the blog and find posts from Ritzs. Welcome back once again, my friend. I wish we could figure a way to condition clay for you-if we could, I know you would have all of our hands working away to get you supplied.
I want to echo what others have said, it’s so good that you’re obviously feeling better Ritzs!
As for bangle forms, I’ve made the “circular” type bangles using a soda can. I extruded some scrap clay using the biggest circle die for my Makins extruder, covered the log with a decorative sheet. Wrapped it around the can overlapping the ends, and cut on the diagonal (makes the join more secure). Smoothed the ends together to join the bangle (some bake and bond would help with strength as well) and bake right on the can.
You can also do pretty much the same thing with thick strips of clay to make flat circular bangles, and you can do three or 4 on each can if you like.
Hope that helps.
I was wondering……I looked for galvanized steel flashing today and the cheapest I could find was $20 for a roll. I really don’t want that much. My husband had some smaller pieces of aluminum flashing. Can I use this? What about rust or discoloration?
@Kathy G: Kathy, I just did a Google search and found that galvanized steel has a layer of zinc fused to it and that should protect it from rust and corrosion. It’s not plated…instead the zinc actually becomes a part of the steel.
Aluminum doesn’t rust like iron or steel, but it will oxidize and corrode. I couldn’t find much information on galvanized aluminum, but I have to assume that the zinc protects the aluminum from corrosion as well.
I purchased a $5 sheet of galvanized aluminum at Home Depot. I don’t have it in front of me now, but I think it’s about 10 inches by 18 inches.
@Kathy G: Have you tried Ace Hardware? They are so helpful when you need to find something. I’ve discovered their inventory varies a little from store to store, so you may have to get involved with a salesperson (and end up getting “the look” when you ask for help, LOL.) But it’s worth it…they really know what they have and the price is very low. I got small sheets of galvanized steel for 75 cents, or something like that. Hope that helps…
Becky, I wonder if there might be a wine bottle just my size and taste…!!!
@Koolbraider: gosh…now we’re hitting home depot AND the liquer store…..isn’t claying fun ?
@pollyanna: Sounds like a plan!
@Everyone: To tell you the truth, I haven’t made a polymer-only bracelet or one where the metal blank has been completely encased with clay. I like the look and strength of the metal and didn’t have the time to figure it all out at this time. Maybe later. Besides, the info provided by Sue F, Penny Vingoe and Becky should be helpful for those of you who want to go in that direction. A Big THANKS to you girls for sharing your knowledge! That is what is so cool about this community… lots of helpful and friendly advice.
@Koolbraider: I am late in seeing your comment, but it gave me a laugh this early morning! I would be tempted to just buy different sizes of wine bottles to try–and try the wine inside at the same time, lolol. Could get in trouble that way! But, fun!
Yes bangles can be made without the metal blanks. I made one on a course with Donna Kato – she uses a cardboard ring as a base for the bangle, so you can have it as wide as you like as a complete circle. But using Kato! And bake the base, then put on an edge and bake again, then put on the pattern and bake again – the key to kato (and strong bangles) is baking and baking and baking
Hi Cindy:
This is such a cool technique. I’m wondering though, for people like me who are allergic to most metals, would it be possible to eliminate the metal blank? Do you think that the bracelet would crack after some time of use? I also wondered if a bangle could be made that was, say 1 – 1.5 inches wide in a complete circle with no metal structure, would it eventually break? Does anyone have any experience trying this?
@Carol Cooper: In addition to a cardboard form, you can just use a can or glass bottle that is the correct diameter to fit your wrist. I found an old bottle containing rice wine vinegar in my cupboard that was ancient and it was the perfect diameter for my wrist. Of course, I emptied it before baking, lol.
Cindy, you’ve really outdone yourself with the last few videos. I need to make a donation for the local Teen Center’s silent auction and the bangles seem like a perfect project.
@ Ritzs: it’s so good to see you back here!
@ pattw: I’d like to cover the metal on the inside as well. I’ve spent the past week thinking about ways to accomplish this and this morning it hit me… polymerized cloth would be perfect because it’s thin and can be cut to fit. I like the idea of having a surpise design on the inside of the cuff in colors that complement the outside.
@Linda K.: Dah!!! I NEVER would have thought of that ! You are a genius (teehee). What a pretty idea…thanks
@ Ritz – So glad to have you back with us!
@ Cindy – Loved the tutorial. I have some pieces I’m working on at the moment but I hope i can get to the bracelet soon. You made it so easy getting the clay to fit.
Actually now that I’ve thought about it, I think the hardest thing in encasing a bracelet would be the bending it would go through – it would be hard to control for the cracks and air bubbles, I believe…
How nice to hear from Ritz again! We missed you!
I just want to echo my sentiments – Catalina, I was going through ALL of the tutorials Cindy has made – it really is overwhelming – I guess, the idea is that one should do the tute the week it comes out, but I procrastinate – now there’s so much I want to do…all at once!
Pattw – I also thought about encasing the blank with clay – I think it can be done, just a little tricky in keeping it smooth both inside and out…
What a neat tute. I do have one question though -I would like to put clay on both sides. Do you do this a separate step, or all at once?I sure do like this. I will be making lots of bracelets…………..yum,yum…………
Yep, you did it again! Great tips on putting the clay on the blanks! Now that I have my Micro Mesh pads I’m going to try the Aurora Technique with this tute!
P.S. Cindy, I have a slight problem. You have made so many cool tutes that I have a hard time putting one down to start another! Can you work your magic on getting us more time in the day so we can have our cake and eat it too? Or should I say: Have our clay and play with it too! :)
Ritz – its Penny here again. Guess what – I can tell you where to get one, mail order, in the UK – and it doesn’t cost a lot. You go to nisbets.co.uk . The down side is that it only fits their pasta machines so you will have to buy a pasta machine as well – but they are very inexpensive. Sooooooo glad you are claying again!
@Penny Vingoe: Thank you Penny for the link I will go have a look. I am not claying yet but I have done a little Resin work on some old pendants so if i get a motor I will be back to it, making that beutifull cuff, Thank you all for being so kind It brings a lump to my throat to no I have such friends around the world and a special thanks to Cindy and Doug. Ritzs
@Ritzs: Ritz a BIG WELCOME BACK !!!!!! We have all missed you so much here. it is so nice to see that cute smile. If you can’t get a good machine over there let me know and I will check to see what I have. Had it for 3-4 years and it still works good and has never failed me. I do wish it had a reverse though. Love you Ritz sorry so late with greetings but I have been gone myself in the hospital with infections. Home now and better.
Cindy, Love the tute worth a lot more than what you are charging for it. Thanks to you and Doug for all you do for us for so very little. Can’t get this kind of quality tute for this kind of money anywhere else and we should have to pay more, even here.
Many Uuuuggggggggss, Peggy
@Peggy Barnes: Sorry to hear you have been ill Peggy. Make sure you are taking good care of yourself. A million Uuuuuuuuuuggggggggggggss ~ Cindy
As most of you no I have not been claying for a good time, but really want to get back into it. I no this has nothing to do with the cuff tut but can anyone tell me if they have a motor for their pasta machine if so do they work good, I have been thinking of getting one to help with the conditioning of the clay as I cant do it now by hand.( btw I have an Atlas pasta machine).Regards to all Ritzs
@Ritzs: Hi, there! glad to see you here again! I don’t have a motor but it would probably be a nice tool for you. I hear a lot of good things about them and they really can save your hands. I would get one if I were you. I hope everything is getting back to normal for you. You have been missed!
Thanks guys! I think you’re going to have fun with this one. I see many polymer clay cuffs and bracelets in your futures!
@Ritzs: I don’t use a motor myself, but others here do and they may be able to help you better with the best choice for your particular machine. But there is actually a fair amount of chat on this blog about pasta machine motors. In case you did not know, there is a search box at the top of the page that is really helpful in being able to find quick answers to many questions like this.
I have linked to an article where I suggest a pasta machine motor is not necessary… Of course your situation is completely different and a motorized machine would be very helpful for you. You can click the link by my name to read that article. Be sure to also scan through the comments below the article for tons of helpful advice. And when you come across a particularly long comment thread, the “CTRL-F” feature in your web browser is very useful for easily jumping to specific keywords on the page.
Hope that helps! It sure is nice having you back around. I know it has been very difficult for you to lose the use of your hands, but just the fact that you are here again, means that things are improving greatly. You are such a lovely and brave woman. I for one am extremely proud to know you!
@Ritzs: Hi Ritz,
Welcome back!
I also have problems with strength, so about at year ago I bought a motor for my 150 Atlas from Italy gioiadellacasa.it/eng/articolo.asp?IDprod=AtlasMotor (good service – speak English)
Works like a dream – easy to mount – easy to get the clay conditioned – robust – but it is loud ;-( ! But who cares as long as you get to play with your clay, right? :-))))
@Ritzs: SO GLAD YOU ARE BACK !!! Such a pleasant surprise. Your pc family wanted you to return – and you did. HOPE YOU GET YOUR MOTOR !
Same here…all set and ready to go!!
Can’t wait to watch it!
Anticipation is making me wait………hmmmmmmmmmthink that’s a song. But it fits the bill. Made my blank and am ready
Can’t wait!!!
I love the use of bracelet blanks such as these. Bead work can also be applied on them.