Vol-040-4 Bead Cones For Multi-strand Jewelry PcT Tutorial (Intro)
Video #223: “I also hope you are going to give us a few hints on how to use the components that hold and hide all the many wire ends.” ~Tantesherry
More...

** This post is an introduction to one of our paid tutorials.
Following the Faux Coral Heishi Bead Tute, several of you requested that I show some tips on how to use Bead Cones in multi-strand jewelry projects.
The following topics are included in this week’s Tutorial about Using Bead Cones with Multi-strand Jewelry Projects:
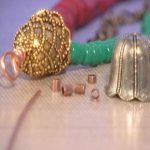
- See examples of bead cones and how they are used to create, stunning multi-strand jewelry designs.
- Discussion of the tools, materials and techniques needed to use these useful components in a professionally finished manner.
- Find out how simple it is to use these special findings to make a clean finish for necklaces, bracelets, earrings and tassels that combine many strands of a variety of stringing materials.
- Learn cool tricks for wiring bead cones so that there are no stray ends and everything fits together perfectly and stays that way for many years to come!
- Plus, with some creativity and ingenuity, there are many ways to come up with other unique designs of your own.
“
This is a great tute, it helped me with the challenges I have taking my beads and turning them into beautiful pieces. Your technique and Doug's filming... fantastic combo, I am in awe.
Peggy B
“
Cindy, outstanding tutorial! I've used bead cones with multiple strands in the past, so I knew most of what you taught. But it was nice to see that I'm doing it correctly. And you did teach me the benefit of doing a few things in a different order. The best thing about the video for me was the tip about the wire loop. Perfect!
Linda K
“
Hi, Linda! I agree with you. I always find something new even if I 'knew' how to do something. About the Bead Board... I always make the inner strands shorter as they go in. Usually about 1/2" to an 1" shorter. This way they will drape correctly. But, Cindy's way is a great double check.
Catalina L
Transcript coming soon...
Transcript coming soon...
Our goal is to translate these videos into as many languages as possible. If you are interested in helping with this initiative, then please do contact us and we will figure out a way to make it worth your while :)
Shareable Images


Want to chat about today’s post? That’s what the comment section below is for. Scroll Down… We’d love to hear from you!
Or... if you would like to request a topic for a future post, here is the link to do that… PcT Suggestion Box
Hi everyone, a quick note here– I posted a reply on the faux raku pt 2 page w/ word that I’d finished a necklace of red and black raku beads… (but I’m not seeing it on the most resent comments)
I just wanted to say that I didn’t have that weird ‘can I — can’t I’ feeling when I decided to make the necklace a dbl stranded one by using bead cones. It is so wonderful to know how to do a technique and have the confidence to go about it. So once again Cindy :) Thank You !!
ps-posted 2 pics at our FB page:
1) Faux Raku Necklace
2) Faux Raku Close Up
ps2-got to use the edit button hehe :)
Hey Doug that’s pretty cool how you did that w/ the blue and all -thanks, sherry :)
Hey Cindy: I actually make my own polymer clay bead cones. I do Viking Knit which pretty much always requires a bead cone/cap at the end of it. I got tired of always paying high prices for them and now that I make my own, I can also custom design them to go with the jewelry I make. Let me know if you want me to show you or anyone else how. They are a little trick, especially at first but well worth it. :) I could do a guest tutorial for you if you like.
Laurel
Sure Laurel that would be great if you like to share some ideas on how you make your bead caps using polymer clay. I’m sure there are many here that would really appreciate the information. I have made only a couple myself and don’t have a tutorial ready at the moment, so it is perfect timing.
You can go ahead and post your information right in this comment thread. If you have photos, just email them to me and I’ll get Doug to add them for you.
That sounds great! Look foward to seeing your ideas on bead cones!
Would love to see how you do this. Bead cones and caps can be quite expensive
Thank you to everyone who answered my questions, appreciate it.
Thank you, Cindy, for this tute. It was very helpful to see it being done. Doug does a great job with the filming. I was able to see what you were doing so clearly that I felt like I was in the room with you and looking over your shoulder. And seeing how you worked that crimper – it was pure magic. I can tell you’ve done it many times before.
Cindy the bead cone tute was excellent. This is something I really had no idea how to do and one of the reason I didn’t want to deal with multi strand necklaces. I really like the bell caps you showed in the tute. Can you tell us where you got them? I loved the way you put the strands in order and how nice they lay.
Just finished the butterfly pendant but didn’t have the Studio Ginko Cutter set. I printed out one of my embroidery designs of a Ginko leaf and layed it on the blended clay and uses a pin to poke holes all the way around the paper design and then cut it out with an exacto knife. I used the same tool to make all the lines on the wing and then rubbed very fine varigated glitter into the clay. I smoothed out all the edges and it turned out just gorgeous! I am going to post it on my blog later on if you have time to look. Since I have hundreds of printable embroidery designs I think I have found a veritable treasure trove of ideas that I can use in claying! Thanks again for another great tute! Dixie
I like that idea – very creative use of ‘other’ craft materials.
I’ve been looking at my quilt patterns for cane ideas. I’m not speaking of the block patterns but the line patterns we quilt into the quilt after it’s all sewn together. I have a treasure trove of line patterns that would make beautiful cane designs.
The embroidery design you used – is it the kind that goes with an embroidery sewing machine? That really would be a wonderful resource. I don’t have that kind of machine but I’ve seen a lot of the patterns. Wow, are you going to be busy if you use those for claying :)
What a neat tip on how to transfer from paper to clay Dixie, could we see your picture at Cindy’s FB photo page too please, sound very pretty :)
Hi Dixie, the bead cones I used in the tutorial I got from Shipwreck Beads, but you can find them all over the place. Just keep an eye out for them. They come in tons of different styles.
AS an old time ( read 76 here) beader, this tute bought back the proper order to string things. That is a BIG plus, especially for new beaders. The tute is magical, right ? My mind is skipping all around, trying all sort of combos!!!! Isn’t it great to have a happy mind ? This always happens on Friday mornings LOL. We are so lucky to be members of such a inspiring site…………
Jewelry and PC combine so well together. A Perfect match. The color choices are out there – you just have to grab what you like. Love it, love it, love it ……………………………………………………..
We really are lucky to be members of such an inspiring site. These videos are definitely a highlight of my Fridays!
Awesome! Might just have to try to up my skill level and attempt some multi-strand necklaces. I’ve just never been successful at getting them to lay right but I now see some of what I’ve been doing wrong. Mostly, I haven’t been taking the time I need to hang and adjust the draping. Thanks for sharing the ratio you use, Diana. It will give me a better starting point.
Great tute as usual. Many good ideas and I liked how you explained the gravity question. Sometimes the simplest things give me the hardest times……lol.
Wow this tutorial is jam-packed with new and ingenious ideas and cool products.
As of now I’m using the ‘tornado’ crimps because the other type usually brought me to tears (of frustration). They are kind of expensive being ss and all, but if I invested $20 of my bead selling money in this magic crimper tool it would probley work out better money wise, in the end.
Ooops had to do a pre-edit, its hard to tell you what all I’m thankful for you showing on this tute w/o giving away the secrets— just know that you answered all my ?’s — and best of all you answered ones I didn’t know to ask :)
Cindy, this is an outstanding tutorial. I’ve already used bead cones with multiple strands of beads in the past, so I knew most of what you taught. It was nice to see that I’m doing it correctly, but you did teach me the benefit to doing a few things in a different order.
The best thing about the video for me was the tip about the wire loop. Perfect!
Hi, Linda! I agree with you. I always find something new even if I “knew” how to do something. About the Bead Board, I always make the inner strands shorter as they go in. Usually about 1/2″ to an 1″ shorter. This way they will drap correctly. But, Cindy’s way is a great double check. Well, gotta go look at new funiture. I hate shopping for furniture. I rather have an empty room – easier to clean! LOL!!
I need to change the subject for this comment so I am hoping Friday’s are still open discussion. My grandaughter has request a faux zebra purse for herself and her doll. I did a search on flexible clay. Unfortunately I still have some questions. I know Kato clay can be sewn and hold up. If I remember right and this is from way back on the Carol Duvall show, after the item is made you put a layer of liquid clay on it, bake again and this keeps the clay soft and somewhat flexible. Does anyone remember this at all. I also thought maybe I should add some Fimo quick mix or Bake and Bend to the Kato. Also does anyone have any suggestions on mixing with the Kato and what ratio, maybe 3/4 Kato to 1/4 quick mix. I have no idea this is not in my comfort zone at all. I really would like to try to make it for her out of clay and not material. I appreciate any and all help offered. Any ideas at all please send my way and I will be very grateful for your time.
Many Uuuuugs
Also Cindy to your long list of wanted tutes. I saw a beautiful I think they call them landscape canes. Is this something you could offer us someday. Please and Thank you
Yes Peggy, Friday’s are a great time for an open discussion. I don’t really have any suggestions for you for your purse, I’d have to think about that since I haven’t tried to make one before. Maybe someone else here has some ideas for you?
As far as suggesting a landscape cane, I do have that on the list. Just trying to come up with a design that is different than what others have done. Need to play around with that a bit. It is a good idea though and I know others want a tute on it too. So hopefully I can come up with something soon.
You are awesome Cindy. Haven’t read through the rest of the comments yet but I just answered my own question. It was Judy Belcher who made the eye glass case on the Carol Duval show and she has some great instructions in her book – POLYMER CLAY CREATIVE TRADITIONS – Guess my memory isn’t as bad as I thought it was. :) Can’t wait to try this. Go to pages 68-69 in the book then wala YES!!!! I still have a few questions so I will email Judy some questions. Now to read the rest to see if anyone else has suggestions. I am so excited. Yippeeeeeeeee!!!!! Zebra pattern purse here we come Liberty Mae.
Many many many Uuuuuuggs everyone!!!
Will definitely be using this tute often in the future. Cindy you are always thinking of ways to help us bring our jewelry to a professional level. With all your easy to understand details and Doug’s talented filming we can’t help but sore with loads of confidence. I always look forward to each and every tutorial knowing the 2 of you give it your all and more every lesson. We are all so blessed to have the 2 of you share your artistic talents with us. I have so much to do the next couple of days but somehow I will find time to put this tute to good use.
Thank you both for being you.
Wishing you and your family a wonderful weekend.
Many many Uuuugggs
Hi Cindy. Me again – please forgive me for hogging up so much space/time today. I guess it’s just one of those days.
I purchased 3 of the back issues, and try as I might, I haven’t been able to find the B-color recipes for these issues. Can you point me in the right direction?
Thank you so much and I’ll try to leave you alone now :)
Hi Angela,
Your paid subscription, and any back issues that you purchase, includes 24/7 access to the weekly videos and A-series color recipes.
For the complimentary B-series color recipes, currently you must download them to your computer when the email newsletters arrive in your inbox each Friday. But please note due to issues with digital theft, the links to the B-recipes in the email newsletters expire after a couple of weeks. So you need to be diligent about grabbing them while they are available.
That being said, we are working on setting up a secure archive section at the library, that will make it more convenient to access all of the recipe cards. However, this resource is not yet ready. So much to do, so little time :-)
Thanks for your patience.
Thanks for the info Doug! I was wondering on the availability of viewing the videos on the iPad? Any luck yet?
Hi Catalina,
The developers working on the video player tell me that the iPad compatibility issue is still being worked on. So the best I can tell you at this stage is to keep checking on your iPad to see if the videos start working for you again. It’s kind of frustrating because as you will remember from a while ago, the videos did in fact work on iPads when we first started using the player. This gives new meaning to the term “backwards compatibility” … lol!
Between you me and the bedpost (now there’s a saying that shows my age), I am looking at some Plan B options if the current developers don’t get their act together soon.
Hey! I’m not too sure how thrilled I am to hear you talking about bedposts with the female customers around here… you could make a wife a little jealous you know! LOL
… just a figure of speech honey ;-)
LOL!! You two are funny! Don’t want to get anyone in trouble :-) Hold on to your guy, Cindy! And if need be – use Weldbond to keep him in sight ;-) I hear that stuff works really good!
Tee Hee
I found the Magical Crimping Tool on-line, new, at $19.99. They said it only works for .19 wire and 2mm crimp beads. Does this sound like the right one? If so, I got an ad for Michael’s in the mail today and it has a 40% off coupon. Going to check my local store to see if they carry this so I can use the coupon.
I have a regular crimping tool – does this work with bead cones as well as the Magical Tool does? If I use the regular tool, will I have to do something different to the crimps for a nice result?
Can’t wait for the tute. My answers are probably going to be there, if I would just be a little bit patient :)
Hi Angela, the one you saw is the right one. The Magical Crimping tool is a “special” kind of crimper, in that it shapes the crimp into a perfect round ball. It makes the crimp look like a little round bead, instead of the usual folded-over type crimp (the kind you want to throw a crimp cover on!) I have the size you’re talking about…I believe it’s the “original” tool. It works beautifully, but you can only use the 2mm crimps & a small range of beading wire sizes. (Otherwise you won’t end up with the perfectly round result!.) They have a new smaller size tool now, though, if you work with smaller beading wire/crimps. They may have a larger one, now, too… Anyway, I’m pretty sure I’ve seen this tool at Michael’s (or perhaps that was JoAnn?) I know I saw them recently, and those are my two options here in Calif. LOL!
As for the 2nd part of your question, I’d better wait for the video (only about an hour now!) Cindy probably answered that question in it…she usually offers tips for those who can’t get their hands on specific tools/supplies, so “regular” crimpers will no doubt benefit, too… ;-)
I own both the regular size and mini crimpers. They’re great tools – the only issue I have with them is I get very confused what size wire/crimp beads to use with them as manufacturers don’t seem to have standard sizes.
A question for experienced beaders: if you make a mistake with your crimp and it gets “mushed” or you find you crimped in the wrong spot, there really is no way to remove it, right? I’ve tried to with little success in the past.
Hi Maria,
When I first attempted using crimps I had a very hard time. I would squeeze and squeeze those little things and they would usually end up breaking and I would have to use another one (or 10, lol). So you could just squeeze them to death :)
I don’t know if this helps and I know it’s isn’t how they are properly removed, but it does work.
Best of luck.
Maria, Angela makes a good point… one way to remove a crimp is to keep squashing it till it breaks. I have also used my wire cutters to ‘cut off’ a crimp but it has to be done very carefully so as to not cut the cable as well.
Just found bead cones at Michael’s—“Jewelry Essentials” brand. They come four to a package with two different designs per package.
Great! I got to go look for them! I tried to look for some last week for a customer and couldn’t find any. But we got a big truck this week so we might have more now. I know FireMountainGem is a good place to find bead cones, too.
Thanks for the heads-up on bead caps. I have been all over the net to try and find “Cindy’s” shape cones. With my 40% coupon – I’M on my way to Michaels !!!!
@Cherie — me, too!
I’ve been doing a lot with bead cones for months now with great results. (Besides clay, I do beadweaving/stitching, and work with seed beads quite a bit.) When you combine chain, cord, ribbon — and fabulous polymer clay beads! — to the mix, bead cones are perfect for hiding the “join” (aka ugly ends!) I feel pretty “accomplished” with my bead cone skills, but I feel confident Cindy will show us something new. She is definitely clever & creative, so my wish will probably come true! I admit I’m a tiny bit bummed there’s not a clay video this week, but it sounds like lots of people need this info for their projects. No one knows how to simplify a complicated subject like our Cindy! Besides, I just love to hear & watch my favorite tutor! :D
I’m so glad that making polymer clay bead cones was mentioned — I remember when Linda brought it up a year ago (on the Bead Cap Tutorial post.)
She was searching for the right “base” to use for baking, and lots of people chimed in with ideas. I had planned to try it myself, but forgot all about it. Wonder if Linda ever made them? (Did ya, Linda? he, he)
Anyway, looking forward to the video — happy Friday everyone! Only 7 hours to go… ;-)
I’m ashamed to say that I haven’t done it yet. I have too many things going on and I haven’t had a chance to work with my clay in a while :(
Hey Sister Kat! I loved that tute with the bead caps! I just made little pumpkins with green bead caps! I guess I’m on a charm kick!
I’ve done a lot of multistrand projects with bead cone ends and they really create a beautiful finish to the piece. I’m looking forward to the tutorial though because cindy always has some special tips. would love totry making the cones out of clay.
This is a great tute for me and all the challenges I have with taking my beads and turning them into something great. With your tute Cindy this is going to make it so even I can accomplish a beautiful piece. Your technique of teaching and Doug’s filming I am waiting in awe. Due to chronic fatigue I always get on my laptop Friday around 2-3 am. So hopefuly in about 15 hrs I will be spending time with You and Doug and the always FANTASTC TUTE!!!!!!!
Many Uuuggs
Christmas is coming -AND- I haven’t finished (even started) much yet. This tute is perfect for that hard to gift person- a multi necklace. Yeeha! (that’s a Texas expression). Gathering all my pretties to get ready for Friday. Can’t wait, as usual. Another great Friday…………………….
I am so excited about learning how to use these things. I remain jewelry making challenged and have not been terribly successful at creating professional looking multi strand pieces.
Oh, boy! I wish I could get caught up. I know I could use this tute! But, as some of you already know, I’m a BIG baseball fan. And guess what? My Detroit Tigers are in the Playoffs and I anticipate them going all the way!!!! With work, teaching jewelry classes at Michaels and playing with my clay I need more hours in my days! Plus, finished refinishing the hardwood floors upstairs and living in my Studio till all the painting is done. I, know, that is hard to take :-) I will like this technique to help make a multi-strand bracelet with cupcake charms, muffin charms and purse charms!! I even thought about making my own cones out of clay! Maybe, Cindy has a good idea how to do that! :-) Should I go paint the dinning room? It is quite dreary out and not very good light to paint by or should I hibernate in my studio and make more purse charms? :-)
Hibernate, of course :)
I’m thinking of a way to make bead cones myself too. I’ll be starting from scratch though because I haven’t yet purchased the end cap tute. This ought to be interesting!
So looking forward to tomorrow’s tute.
Angela, you convinced me! I’ll hibernate!! Hubby is off this weekend and will finish the job!! Any tute you can get here is worth the money!!
Diana,
Duh–is there any question here? The world can’t have enough cute purse charms. I am absolutely in love with these little beauties. Can the painting (no pun intended) and head for the studio.
Elizabeth, you make me laugh, too! I’m just glad no one is in a hurry. Sad thing not much designing going on. Once they sanded the floors the dust was everywhere. Very fine and just enough to have to clean everything! And you know dust and clay don’t mix. And I just got done completing my studio!
This will be great for me because I do a lot of beading. Cindy always has a better way of doing things. I was also thinking…..dangerous here…..lol. Why couldn’t I make my own bead cones using our bead cap tute and just elongating them? Oh,dear….another project…..lol. Happy claying everyone.
Pollyanna, I had the same thought back when that bead cap video came out. Great minds think alike!! I haven’t had a chance to try it out yet, but I think it will work.