Vol-052 Bohemian Beach Bracelet PcT Tutorial (Intro)
Video #282: A wrap style bracelet that is both casual and elegant at the same time.
More...

** This post is an introduction to one of our paid tutorials.
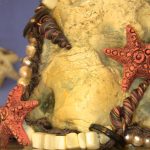
Bohemian Beach style is so hot right now, and there is good reason for it. It’s earthy relaxed feel gives off a unique eclectic vibe, but also manages to convey a sense of artistic luxury… as if you gathered together a collection of valuable treasures that washed up onto a secluded beach.
This wrap bracelet design looks great with a pair of jeans and a gauzy shirt, but would be just as beautiful and elegant for a Bohemian Beach Wedding. In fact, when deciding on a name for this piece, I discovered that Bohemian Weddings are a very popular choice for seaside nuptials. Here is a link to one of my Pinterest Boards, where you can browse through some Inspiring Bohemian Photos if you like.
In addition to the Starfish Beads, Spiral Cone Shells and Pearls used in this month’s Bohemian Bracelet project, there is also a sentimental component. It is a bit of a personal tribute to Doug’s Dad Erv who passed recently. I incorporated the color recipes from the White Rock Beach Palette… a place he loved dearly. Plus, the fiber in the bracelet was up-cycled from one of Erv’s classic Silk ties.
When creating your own Bohemian jewelry designs, you may want to add your own personal touch, by using materials that hold special meaning for you or a loved one.
“
I love the sea theme going here. The starfish and cone beads are gorgeous and so cute. The necklace though is what I really love. Thanks again Cindy for your awesome ideas especially those outside the box.
Sandra J
“
WOW is about all I can say during all of these videos. This is just wonderful! I just had to mention that I wanted to make the starfish so badly and did not have the sand paper so I used a stencil brush... it worked perfectly!!!! Just the best ever tutorial, so in depth and so much fun.
Linda C
“
I also made a spiral moon shell and beach glass using you Frosted Rainbow Beads tute. The puffy sponges look like Faux Stoneware, feathers from the Feather Cane tute and the Faux Pebble tute... a great deal for my money.
Jocelyn C
Transcript coming soon...
Transcript coming soon...
Our goal is to translate these videos into as many languages as possible. If you are interested in helping with this initiative, then please do contact us and we will figure out a way to make it worth your while :)
Shareable Images


Want to chat about today’s post? That’s what the comment section below is for. Scroll Down… We’d love to hear from you!
Or... if you would like to request a topic for a future post, here is the link to do that… PcT Suggestion Box
WOW is about all I could say during all of these videos. This is just wonderful. I just had to mention that I wanted to make the starfish so badly and did not have the sand paper so I used a stencil brush it worked perfectly!!!! Just a heads up for those who may not have that grit on hand but have some paint brushes around it worked. I am working on all of the components and will get one of these made. Just the best ever tutorial so in depth and so much fun.
Thanks for sharing your tips Linda! I am so happy that you have enjoyed this tutorial. Glad you are having so much fun with it!
WOW this is just the best ever– the possibilties are endless. Thank you for the wonderful instruction.
Hey Cindy,
Just wanted to let you know that I used one of the ‘starfish’ beads on a creation I made yesterday. It’s totally not what I was originally intending to use it for, but once a bead stasher, always a bead stasher. Of course it isn’t nearly as nice as yours, with the antiquing and so one, but it does have “star quality”. You can see it on the picture of ‘Ringo’ near the bottom of my recent blog post.
Thanks for your great tutorials. I have been thinking about making some of those beach scene bracelets, seeing as how I used to make light switch covers with beach scenes. But, somewhere in the world where there is TIME is not here.
Cheers,
Fishy
man oh man it is 10.30pm and i have been trying for a couple of hours to get the length right for the button and loop to match. first time it was too big, then i made it smaller and it was too small, then i accidently cut the wire so couldn;t make it bigger again. I didn’t want to restring again as it too took a while to string in the first place, so in despair i hung it around my neck and took a look in the mirror, and hey presto a mistake has turned into a pretty nice necklace, just have to put the starfish on and its done. Will post a pic when done.
Moral of the story is…. don;t work when tired! I will give it another go another day.
Very nice, very detailed and very “beachy”
Hi Cindy,
I just wanted to take this opportunity to say thank you for the great tutorial on the Bohemian Bracelet. I have done Bohemian work for some time and love the concept, but never thought of combining it with one of my other favorite techniques in clay… sculpting sea creatures. I know how much work and effort it is for you to produce these videos and the preparation must be immense. So… your work is much appreciated.
In the pictures I’ve attached, I am showing you the one bracelet I completed, with a few added elements. Of course the idea is yours and I had tons of silk ties. My mom used to collect them for making quilts (we have a king size one on our bed) and when she passed, of course I inherited the ties. (And added a few from a new source as well). I also tore up a dyed silk poncho-type blouse that will work perfectly for some lighter colors.
I am so glad you encouraged the use of the “messy” wrap as I am not great at wire…my fingers are quite big and it is difficult to manipulate the wire in some of the tight spaces, so “messy R us”.
In addition to the starfish, I included a fish, a snail and a little seahorse. I made several of each so I could mix and match them. Hope you can see them in the photos.
I did a couple things differently — I used a very long length of tie, cut into narrow strips, and after the bracelet was all assembled, I wove the leftover tie ends in to the jump rings and sort of braided the tie elements and then fastened the ends with a couple of stitches. Mine only wraps around my wrist twice, but it is plenty boho, thanks to all the doodads and attachments. I used different beads than you showed; mainly what I had around. I had to purchase a few, but think I have the components to make several now.
When selling these, I will acknowledge that the bracelet was inspired by your tutorial.
Merci encore…
Fishy
Wow Pat S
Just love your boho bracelet and great that you have taken CINDY’S idea and run away with it. I think your two wraps just show off all the different doodads and attachments to perfection. It is really great to see your photos, so a BIG thank you for posting it. Loved your cute sea horse, bet people will be queuing up to buy one of these. Would be interesting to know how long it took to complete and what value you would put on it…………………cheers xx……..
Hi,
Thanks for the nice words. I work pretty fast (haha) and have been making the seahorses, fish, and snails for many years, so they literally slide off my fingers. Including conditioning, sculpting, baking, and stringing (which for me takes the longest because I am not much of a beader) it probably takes me about three hours start to finish to complete one of the bracelets. I multitask and do several sculptings at a time, so it’s really hard to say the exact time. Also, since I didn’t have any copper headpins I had to make individual wires for each element and wrap those around glass beads (for headpins) and that for me took a little longer than it would take an experienced beader. Pliers and me…yikes.
I wore it to school on Monday and all the kids wanted to see all the little critters. It’s a great conversation piece.
As for selling price, I really have no idea. I will be in a sale in a couple of weeks and will confer with one of my jewellery friends and then set a price. I will only have a few for sale so I will have them carded and just have to write the price on when I am there. I can let you know after the event.
Have a great day and thanks again to Cindy and Doug for posting the story and pictures.
Cheers
Fishy
Pat, it is gorgeous! I love it!
oh my! so pretty, love the seahorse.
Hi Pat
Loving your boho bracelet !!
I just picked up 5 silk ties from the local Goodwill @ a dollar each
found some real pretty colors — you all can see them at Cindy’s FB page
btw your seahorse is Awesome :)
-Sherry
Cindy – I’m having fun making the sea shells and starfish. I have also started baking for an hour and using the tent method. Experiencing more with your colors. Thank you for providing such great videos. ~Cindy-P
Wow -43 comments, that’s a lot. This series of tutes is a total winner. Seems everyone has seen them and commented. Isn’t wonderful to be at Polymer Clay Tutor site? I for one, would never leave here!!! Welcome to all the newcomers – hope you enjoy it as much as the rest of us.
I’ve almost,finished the bracelet. I have to finish the beads and then- yeah- put it altogether !!!! This has been so much fun – with a learning curve too. Love the Boho style -reverting back to the 60’s I guess. Just my style……………..grin
Can’t wait to see pictures posted ………….
I finally had the chance to look through all of the videos for your Bohemian bracelet. Wow, that is quite a tutorial! Thanks for all your hard work.
I purchased some of the gilder’s paste over the weekend from a local metal shop and all of them except the Damson were just dry pellets inside the tin. The Damson was the complete opposite, very soupy. Do you have any suggestions on how to get it back to a normal state? The guy at the store said this stuff has a nearly infinite shelf life, but wasn’t very clear on how to make it come back to “normal.”
Thanks!
Chrissy
Hi Chrissy,
on the back of the tin of gilders paste it says to add paint thinner. I would add a tablespoon of paint thinner to the dryed out ones and let it set overnight.
That will help soften it up and then take a popsickle stick and stir it up very well until its like very stiff chocolate. For the the mushy one, you might just let it sit uncovered for a few days and see if that helps. If it were me I would have taken all of it back and gotten some fresher paste, but that’s just me. Good luck girl. Let us know how it turns out.
Ah, the backs of mine don’t have any labels or anything. Thanks, I’ll give that a try.
I would take them back normally, but the shop (only one semi-local, ~1.5 hours drive) is phasing them out of their regular stock for whatever reason, so I got them for really cheap. Really, really cheap….
If this doesn’t work, I’ll spend the money and get it online somewhere, but I am keeping my fingers crossed!
ah Chrissy, now you know why you got them so cheap. It should work hopefully, I added 2 teaspoons of thinner when my Blue Iris started drying out and it really made a difference. I also store each container along with the little rag I use in a plastic bag. Thats what we did years ago when everyone used shoe polish. Each color had it’s own little rag store seperately in its own little bag. Stuff lasted forever. ;)
Dixie Ann,
You are such a Gem with all your little nuggets of information. I too used the rag n bag method to store shoe polish and it helps with the Gilders Paste too. I am at present trying to re-organise my storage and somebody threw out a mini chest of drawers, about the size of a microwave oven. More shabby than chic but although tiny has one deep drawer and two shallow ones. Just figuring out the best possible use for it . Being wood (I love wood)
I might have to make it more chic than shabby and keep my wire in the deeper drawer and fav set of tools in top drawer and perhaps hand made torched and hammered findings in the centre one As am not lucky enough to have a studio so everything has to be packed away after a clay session (sigh) feel sorry for my DH as stuff has now managed to creep into the hall and he said he will soon have to erect the tent and sleep in the garden!!!!…..cheers xx……………
Hi Cindy – I love your new format and look forward to using what new things you have to teach. Thank you.
Hi Cindy. This is refreshingly different – I love it. And upcycling included. Best of all I am able to watch it without any screen interference – whatever Douglas is doing it is good. Angie
HOLY MOLY!!!
What a bunch of videos, Cindy!
First the sweet pea earrings, and now the bohemian beach bracelet!
Stunning!
Thanks for sharing!
Hugs,
Nettonya
Thank you Nettonya (and everyone else) for your kind words! I was really hoping I would be able to attend the Guild meeting today Nettonya, but the pile of work that was waiting for us after the Roadtrip is pretty enormous. On the subject of Roadtrip, Doug and I have been talking about doing something locally. Maybe one of the long weekends, taking the trailer to Golden Ears or something and having everyone one out to hang around the campfire and talk polymer clay. That would be fun! It would be nice to do before the winter if we could pull it off. Would you be up for something like that?
Thanks for the excellent video publication you provide. It’s nothing short of amazing considering you and Doug do it on your own! Truly.
For someone like me who isn’t into this style this is actually very very lovely. I will certainly give this a go. I think i will head down to my $2 store for those little marblely things (our kids call them dragon droppings, why? have no idea). Have finally ordered the gilders paste and in the meantime will have lots of fun making the starfish and cone shell beads. Thanks again Cindy for a wonderful tute.
Hi All,
Love, love, love this tute. Ideas are just clammering to see who gets top billing! The girls,
(Becca & Linda, 16 yr old twins) will be here for Thanksgiving so I’m hoping to get one done for each of them. Might try to build a Texas theme for one and this beach theme for the other will be good too. So, THANK YOU so much, Cindy for caring and sharing with all of us. You are over the top!
Dixie,
I have a brand new countertop oven to christen with my next project so want to “Thank You” also for sharing with Sherry and all of us your experiences with your ovens. I’m sure that this info will make this happen much easier.
So happy to hear that Joyce. I hope you enjoy your new oven and that it works really well for you. This is such a great place to share and solve our claying problems! Let us know how your new oven does and what brand you ended of purchasing.
is anyone else having trouble accessing the final video?
Sandra,
I did but after two more tries I backed out and came in again and accessed the last video with no problem.
yeah i ended up doing that too. worked great after that.
I’m not really a bohohemian fan but in saying that i love the sea theme going here. the starfish and cone beads are gorgeous and so cute. i will be making those. the necklace though is what i really love. thanks again Cindy for your awesome ideas especially those outside the box.
Hi guys, just finished watching all the videos on the Boho bracelet and I have noticed something since you have gone to the multiply video format that is very annoying in which the video runs for a minute or two then it stops like it was buffering and sometimes it takes 20 to 30 seconds for it to start up again. I had to start the last video over and watch it from the beginning because half way through it would not complete. Sometimes there are several stops within a few seconds and it makes the video appear to be jerky. All 8 videos were like this today. I have never experienced this problem with your old format. It was not too bad with your first series but this one was much worse. Is this because of the demand on the bandwidth? I waited much later to watch them so I was hoping not to run into that problem. Doug can you clue me in. Thanks so much.
Hi Dixie Ann,
Yes it is a bandwidth issue. One downside to posting multiple videos all at once (8 of them this week), is that there is 8x the demand on the server when so many members are accessing the videos all at the same time, on Friday’s.
Plus… by switching to the higher quality HD format, the size of the video files got significantly larger. In addition to the increased “Friday” demand on our servers as I explained above, it may also be that your internet connection speed is not quite as “capable” for HD video playback, as it was with the old SD (standard definition) clips.
One possible work around trick is to press pause right away after you press the video play button… and then wait a few minutes to let the video “cache” on your system. Then press the play button again. This works as a fix on some computers.
Or if you have the option to connect to your internet using a hard-wired cable plug instead of using wireless, that can sometimes help with bandwidth issues on your end.
Thanks Doug,
Now that I am sure that’s what the problem is I will follow your advice. I see that other members have mentioned this also. It is so hard to contain our patience and excitement when Cindy comes out with a new video. My son set me up on a wireless home network so the cord you mentioned does not reach the little box that the signal goes through as they are on different floors. I will try the pause technique you mentioned. By the way great job on the videos!
I was having the same problem with last month’s video and wrote to Cindy but we couldn’t figure it out. Since I’m new here, I thought it was me or my computer, even though it’s practically new, etc.. The older videos I bought were fine, but these two sets do exactly what Dixie Ann is describing.
Happy dance – just love this series of tutes! What a wonderful way to build you bracelet/necklace – can’t wait to get started. The sea stars look like so much fun to makes-maybe a larger one for a focal………..my mind is doing “a whirlwind of ideas”. Thanks for all your input. Cindy you are the greatest! Just love this format!!!!!!!! Ty-ty-ty-ty
WOW Cindy
You dear lady are Amazing (but we all knew that didn’t we)
Such care you take to make sure we understand every little aspect sets you at the Top:)
Loving the shell beads! Watching you turn that little bit of clay into an excellent starfish
that we can now make—-well it just makes me all happy inside
Thanks again for all you and Doug go through to make it ‘So Do-able’ for us!
I’ll just say here that this past couple of weeks:
I’ve saved all my blends, art sheets,and faux raku in a 3 ring binder
a much better way than the way I had them (all separated w/ plastic wrap and stacked on top
of each other)
The tech. you shared lets me SEE them All — I’d forgotten about many of them and it was nice
relive the memories that the different sheets brought back
Went way back and made some of your faux agates – such a freeing tutorial
Ah and speaking of freeing- the beads I made from your faux bone video fit nicely into that box- next week I’ll antique them and get busy making them into jewelry
But the ‘cherry on top’ was the sweet pea beads wow again
I made 2 pair yesterday :)
what I didn’t expect was how quickley they worked up :D
one more thing – now that I have a working keyboard again – and seeing as how I just found my list of items as a direct result of your tutorials…. well my ? is Do you guys still need them?
Sherry – Yes please do post your list of items. Here is the direct link to that thread where you can add your info. Glad to hear you are making all those tutes work for you.
Hi guys
Cindy the colors you talk about I have not seen at my local Michaels or ACMoore? Did yu get them there .. If yes I will as my local stores about it ….. On another note a Hobby Lobby is opening soon iny area in NJ … I am so excited about this. Because everyone has talked about this store …. I write more later… U am having a coughing fit … Got a bad summer cOld
Natalie
Hi Natalie, sorry I missed your question. I used the recipes from the White Rock Beach Palette for this tutorial, if that was what you are asking. The colors I used to mixed that palette I bought at my local Michaels store. You should be able to find them anywhere that sells Premo Clay.
Cindy and Doug
What a wonderful series of videos. Each is timed perfectly, and each segment builds. Love the super close ups Doug, and the clarity of the picture in the new HD format.
Just love this, a summer vacation memory bracelet for all of us who love our beaches and spend time tossing the wrack, lol. I dumped a jar of Matunuck/Charlestown beach findings, and the memories flooded back of the miles of beach I walked and picked while rehabbing. I would love to see Bohemian bracelets from each part of the country, showing the shells and wrack findings from that area.
For me, I already make the spiral moon shell, and can see improvements I can make on it from your tute. We get Irish moss, starfish and sea urchins, beach glass, feathers, fatter white spiral shells, rope, bits of old wooden fences, buffed metal can tops, puffy sponges, periwinkles, blue mussels, tiny molted red crab backs, oysters, scallops, and the most fabulous quahogs with pink to deep purple marked ridges. And jellies, lots and lots of jellies. Gorgeous sections of little uniform pebbles, they look like kidney beans.
I can make beach glass using the Frosted Rainbow Beads tute, the puffy sponges look like Faux Stonewear, feathers from the Feather Cane tute, of course, the Faux Pebble tute. Myself, cannot imagine it done without a few Polymer Bead Cones with copper tenacles. The Faux Wood tute and all the Texture tutes, too. To get flashes of metal, I’d also use some distressed Embossed Metal. And the Fossil Shell Bead tute mimics some shells, too.
Whew. Think that’s a pretty good deal for my money.
Whew, Jocelyn you have the items and inspiration for this and wore me out reading them. WOW you go girl. OK I don’t live by a beach, have visited quite a few but what is a quahogs. I feel a little silly asking but have never heard of them.
Cindy you have done it again and then some. Have watched all 8 but ready to start the 4th one. Thought I would take a break and let you know how great this is. I love the necklace you shared. That was my favorite. Not sure if the bracelet is for me, maybe better left for the younger gals but you can bet I will try it to make sure. If it isn’t my style I am positive my grandaughters from 9 to 20 will love them and have me making each of them at least 1. They do look like they are going to be a lot of fun creating with so many possibilities. Woo Hoo. Thank you and Doug both for getting those wonderful tutorials out to us in style. 1st class style. Love it, Love it. Thank you so very much!!!!!!
Better get back to the rest of the videos be back later.
Till then have a great weekend everyone and sending lots of Uuuuuggggs!
LOL, Peggy. Well, I had a table spread with beach findings I haven’t hauled out in awhile so I was inspired.
Also can see these lovely strings used as belts, drapery pull backs, doorway hangings, mirror drapes, etc.
Quahogs are the chowder meat I grew up on, and the babies are known as “little necks” eaten fresh. As a child, nothing was more satisfying than reaching down into the mud and pulling up a fist sized specimen for Mom. Mmmmm, I can smell and taste that pure broth chowder…..
The native American tribes made wampum beads from the shells. Though those with the deep purple edging were the most prized, the colors actually range from the palest pinks all the way to almost purple black.
Pounded by the waves, they break into shapes perfect for making large cabbage roses and other flowers. Great paperweights.
Oh wow! Love this series. I’m thinking of using gears instead of the shell circles. ;)
As usual, you make it look so simple and explain it so well. Can’t wait to make this one. Almost picked up a tie today when I was at the thrift store but decided to wait to see what colors I used in the beads. Glad I did!
Thanks again you two!!!
Oh this is wonderful! A few years ago I made shells from a moldmaker compound but never quite knew how to effectively put them together in a necklace. I thought to have 2 other types of shells in the piece but couldn’t come up with anything striking looking. Now I will know how to make them! Thanks again guys …
Hi Cindy,
I am a new member and so anxious to learn everything. I am so impressed with your site and your ease in teaching these lessons. Kudos to your husband for his video assistance.
Gramsy Daniel
I’m an informatics nurse, retiring in two weeks, and plan to dive into polyclay. Your work is extraordinary in its artfulness. The tutorials are very well run, well paced (not to slow or fast) and great camerawork. keep up the great work!
Elaine, you are so talented lady….I love your poems.
Now for anyone who has not gotten a Kumihimo wheel and would still like to get one, they actually have them in the Kids Crafts section at your local Walmart store. I believe they are less than $2 and come in
the 6.5″ size. I have not been able to find the large plastic letters and numbers someone else asked me about, sorry can’t remember who it was. The store clerk remembered them but they don’t have them anymore…..sorry could not find out more about them. Also a reminder if you live in the USA and have a Goodwill Store or a Salvation Army Store, or where ever you live if you have a second hand shop, check it out once in awhile. You would be amazed at the stuff you can find to use for claying. Also if you soak your beads in bleach water don’t use a pottery jar, bowl or whatever that porous stuff is. It leaks right through the container, I found out the hard way.
Now all I use is glass containers. ;0
Dixie Ann – why do you soak your beads in bleach water? And what condition are they in when you take them out?
Hi Freda, after doing a search on the blog and talking with other members, the bleach water helps to brighten the colors of the beads after being baked in the oven. Sometimes the oven leaves a dirty film on the beads and dulls the colors. It does not harm the beads or break down the clay in anyway. I was surprised too.
Go to the search box up top and type in “soaking beads in bleach water” After I tryed my first batch they did look a lot brighter but I didn’t know you can’t use a pottery type canister. It leaked on my sink countertop but didn’t harm it so I went over to the Goodwill store and found a nice glass dish with cover.
The gals here say to use 1 part bleach to 2 parts water and soak at least overnight. I forgot about mine and they sat in the bleach water for 3 days. Didn’t hurt em a bit! After I rinsed and they dryed out I sanded and buffed them. Turned out really nice. Hope this helps.
I post elsewhere too. This is right down my alley. Boho is awesome ( a word I don’t usually use ).Love, love this bracelet. Think I have everything for at least one…………. hmm search,search
I just want to thank you for the great customer service you give. You always answer promptly and are so helpful each time. Thank you so much.
Seashells, pearls and starfish too
Washed up from the seas so blue
With memories fashioned from a loved-one’s tie
and a colour palette to please the eye.
Put together by the clever Miss L
Boho never looked so swell
(Sorry, got carried away by the beach theme)
My DH calls these my scribbles but I do write more serious stuff.
Glad I could make somebody smile. This is a gift that is feely given to all who care to read it, so no copywrite needed…………..cheers xx………..
teehee – Love your poem. You are so cute !!!!!
love it Elaine!! And I love the look of this bracelet. But it’s so much more than a bracelet, I can see many wonderful necklaces, earrings, bag charms etc etc, all based on my favourite beach theme …. Thank you CIndy, looking forward to this one (as always)
Love to everyone in this great community xx
What a great multi-tasking tutorial this Bohemian Bracelet is going to be. I am just loving this new format! I love the sea shells and the different variations of color and how you can use them. Cindy you really have taken these tutes to a whole new level. It is so wonderful to get so much for so little!
This is going to be fun!!! Love both bead shapes.
Love the star fish and the shell beads… What a great tut this is going to be and with all eight together I can work at it on my own pace…. excellent! I see buttons in my future as well .
Karonkay