
Use Iridescent Buffalo Snow Flakes to Make Faux Opals
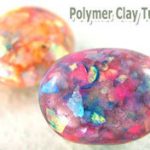
“This faux opal is absolutely stunning! I can clearly see the depth of the layers.” ~Elizabeth-S
More...

Remember way back at the end of Nov last year, I suggested that everyone pick up a bag of Buffalo Snow to get ready for my 2010 faux opal tutorial?
That super duper advance notice was because those iridescent buffalo snow flakes are much easier to find cheap in retail stores, during the Christmas holiday shopping season.
Well hopefully many of you had success getting your hands on some, because my plan is to include a faux opal tutorial in the upcoming Vol-022 video series during the month of March.
Now as most of you know by now, I like to get feedback (“votes“) from everyone before actually filming a project… just in case the topic is not that big of a hit.
But judging from all the positive comments that have already come in, I honestly don’t think there will be a problem in my going ahead with the faux opal lesson.
sue W
Making faux opals is what first got me interested in polymer clay. I’m super excited about your faux opal technique. Can’t wait for the video!
elizabeth s
Oh Cindy this faux opal is absolutely stunning!!! I can clearly see the depth of the layers from the photo. Sure hope you feel ready to teach it soon.
linda b
I can’t wait for the tutorial on the faux opals. I am thankful that I found all of you. You all are so giving.

So is everyone still on board with the idea of learning how to make some amazingly authentic looking faux opals? Is there anything specific about opal making techniques that you have always been wondering about? Any one got an good opal stories to share? Let me know in the comments section below.
Sponsored Ads & Special Promotions
Want to chat about today’s post? That’s what the comment section below is for. Scroll Down… We’d love to hear from you!
Or... if you would like to request a topic for a future post, here is the link to do that… PcT Suggestion Box
Great thread, thanks Kat. LOL!!!!
I love the way you approach claying experimentation, Jocelyn! When I read your exploits, I mean comments…I imagine you searching your home for your next project (using the classic “sneak” pose — tippy-toes, arms up in front, hands pointed, as if holding ‘imaginary pencils’ — you get the picture.) You creep up on unsuspecting household items, and then snatch them up for clay use — disregarding their original purpose with no thought for their feelings. The gravy ladle never had a chance…DID it? Tell the truth… Of course, there are no photos…you wouldn’t want to incriminate yourself, now, would you? ;D
Okay, I’m kidding of course. I know you don’t adopt the sneaking pose, do ya? But I love how you come up with cool ideas…you’re always throwing some ‘out there’ for others to take hold of. I like this reverse “Faux-pal”…using a mold to reduce the sanding seems incredibly helpful. I just came across the perfect old finding/wanna-be mold…I think. I’ll have to give your method a try & see if it works for me…and also how much depth is possible this way. Thanks for sharing your fabulous imagination…you’re awesome!!
Sorry folks, no pics of reverse fopals. But reversing the steps into a metal or silicone mold should work pretty well once you work out all the kinks.
It doesn’t have depth like Cindy gets, but, enough so I am thrilled with the results, especially the limited sanding.
In the home, the only mold I have found is the metal soapdish, though last nite I looked at tablespoons, teaspoons, and those small ladles for gravies. Hmmm.
Start slow with the liquid, line the bottom, let it set up overnite, then line it again before adding the rest.
Best of luck too. Love making this beautiful substance.
@Jocelyn: Jocelyn, I remember when I wrote the above how tickled I was by all the fun experiments and ideas you were trying at the time. I had forgotten about this…my search for Peggy’s “snow business” led me to the above posts. I had to laugh again as I pictured you “sneaking” about… Hope the New Year brings you great joy, health, & happiness!
Oooh, yeah! I’d love to see the molded “fopal” too! Smart idea there, Jocelyn! Also, another great idea by DJ…to cut up iridescent bows, ribbon, etc. when you can’t find Buffalo Snow. Still — the holiday season is approaching, so we can start watching for “snow” again. It’s a seasonal item, so it should be making it’s way into your local JoAnn, Michael’s, etc. Watch out for it… remember, Buffalo Snow can look like any of these packages shown at the following link: Buffalo Snow Packaging
Patty, the mica flakes I have are thicker, brittle pieces. They don’t have as much color variation or sheen to them either. One thing I tried a few months ago (couldn’t find bags of b. snow) was at the Dollar store. In the gift wrap section they often have iridescent, transparent bows. I bought one in a shade I liked and cut up some tiny shreds. It doesn’t take long…you don’t need too much, and one bow will last a while. You can buy a few different shades and still not spend too much either.
Jocelyn I’ve been wondering about molds for fopals, sounds like a success! Somehow, I completely missed this thread. You should post a pic in the facebook gallery :)
@Patty Collins: Hi, Patty. I am not familiar with mica flakes (except for the ones I get out of the creek by my home). I can tell you that Buffalo snow is not the same as mica powder.
Is buffalo snow and mica flakes the same thing?
More late nite experimentation, lol. Pulled out an old metal soap dish that needs to be mounted in the bathroom and used it as a mold for reverse fopals. Worked great! Much easier baking in the metal mold, just pop it in the oven then into a bath of ice cubes to unmold. Caution, this makes a pretty big bead. It is so beautiful, thank you Cindy. Now, to find more buffalo snow….
No problem Peggie, just hope your results come out happily for you!
Also, set it very gently on top of cornstarch to bake. Iced it as soon as it came out. Just happened to have the cornstarch baker set up and nearby, so used it.
Tricky to get it inverted and placed for baking, you don’t want to touch the surface. When I do it again, using the standard index card.
@Jocelyn: Members like you is what make this group so great. Thank you so much for sharing all that information with all of us. I appreciate it so much. I have problems with sanding because of pain as so many other members here. I’m Cindy will be tickled to try this out.
Many Uuuuuggggs, Peggy
Yep, Carolyn. Added a little more fluid to the top before baking, but after setting up in the mold for a day with all the stuff, it popped out pretty easily. Can’t bake stuff in those plastic resin or soap molds.
For sanding, use a fopal (Brenda, love this!) jig to make it easier on your hands. I found resting the egg on top of a plastic bag filled with air, helps cushion my hands and keep the right surface heads up for wet sanding.
But anything would work, even making sanding stands out of old polymer clay to hold specific sizes and shapes of bezels or cabs.
Jocelyn: That is awesome! Opens even more doors on using this technique. I still haven’t done any of this yet but one of these days, one of these days. Now we need a picture from you. :)