CaBezel Demo – Polymer Clay Cabochon and Bezel Mold
Video #585: The Cabezel molds are made with a unique see-through material that allows you to position your piece perfectly every time.
More...

IN THIS POST: — cabezel — wendy orlowski — shadesofclay.com — cabochons — bezels — focals — beads — cabs — photopolymer molds — cabochon mold — bezel mold — cab mold — (Topics marked with an asterisk* are discussed in the Comments Section below).
Topics Covered In This Video:
- CaBezel Molds invented by fellow Canadian, Wendy Orlowski From Shades of Clay.
- Photopolymer molds for making polymer clay cabochons and polymer clay bezels.
- I show some examples of focal pieces made with the Fab Focals 2 CaBezel Mold.
- Wendy makes these CaBezel molds in many shapes including geometrics, organic shapes, all-in-one designs, bracelet tiles, focals and more.
- What’s unique about this product is that you can see through the molds, which allows you to position them exactly where you want on your patterned clay sheet. Other cab molds do not have that feature.
- To the best of my knowledge, Wendy Orlowski was the first person to invent cabochon and bezel molds for polymer clay.
- Step by step demo of how to use the CaBezel molds.
- I use sheets of clay that are about 16 playing cards thick (two layers on the thickest setting of my Atlas Pasta Machine), for both the bezel mold and the cabochon.
- The bezel is shaped, cut and baked for 30 min first. The cabochon is formed, cut and added to baked bezel, then formed, smoothed and baked for 1 hour. I used Premo polymer clay, so I baked at 275 F.
- After baking, I sanded and buffed my pieces, making sure the edges and surfaces were smooth and beautiful.
- Bails can be added or holes drilled to make beads
00:00:03 –> 00:00:07 Hi guys, its Cindy Lietz, your Polymer Clay Tutor, and today’s PcT Product Demo I’m
00:00:07 –> 00:00:09 gonna show you how to use Ca Bezels.
00:00:09 –> 00:00:17 Now, Ca Bezels are a special mold for Polymer clay that makes cabochons and bezels…that’s
00:00:17 –> 00:00:23 why it’s called the Ca Bezel, and it was invented by a Polymer clay artist from Canada
00:00:23 –> 00:00:29 called Wendy Orlowski, and she owns the site called Shades of Clay.
00:00:29 –> 00:00:35 Now, what’s really neat about these molds is that you can do all sorts of cool things,
00:00:35 –> 00:00:40 now let me just show you what they make and then I’ll explain to you how they work.
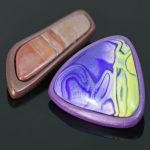
00:00:40 –> 00:00:46 Now here is a couple of the different shapes, they’re more of an organic shape and I think
00:00:46 –> 00:00:54 this one comes from the mold called the Fab Focals 2, and this is…the bezel here, is
00:00:54 –> 00:01:02 the dark purple side, and then the inside here is the cabochon that I made using the
00:01:02 –> 00:01:03 mold.
00:01:03 –> 00:01:09 Here is another shape it’s a little bit like a necktie, and this is the cab shape
00:01:09 –> 00:01:12 in the center and then the bezel shape on the outside.
00:01:12 –> 00:01:18 And it’s very unique, and what is cool about them…and she has them in a bunch of different
00:01:18 –> 00:01:24 patterns, she has something called the all in one Ca Bezel, she’s got ones for making
00:01:24 –> 00:01:30 bracelets and all kinds of stuff, but I’m gonna show you this Fab Focals one.
00:01:30 –> 00:01:35 What’s cool about it is that you can see through them, so that when you’re working
00:01:35 –> 00:01:39 with any of your patterned sheets and that kind of thing, you can see exactly what you’re
00:01:39 –> 00:01:42 working with, and that’s very unique to her…and in fact, I believe, Wendy was the
00:01:42 –> 00:01:49 first person to ever invent anything to do with making Polymer clay bezels and caps.
00:01:49 –> 00:01:54 Now, what I’ve got here is a sheet, this is just some scrap clay that I’m gonna use
00:01:54 –> 00:01:59 on the…actually I’m not gonna start with this piece, I’m gonna start with this other
00:01:59 –> 00:02:03 piece, I’m gonna start with this Purple piece, this is the piece of Purple that I’m
00:02:03 –> 00:02:05 gonna use to make one of the bezels.
00:02:05 –> 00:02:11 Now, I’ve pre-baked this one, and I’ll explain that in a second, but what you need
00:02:11 –> 00:02:16 to do is roll it out at the thickest setting on your pasta machine…mine is to 8 playing
00:02:16 –> 00:02:22 cards thick, and I’ve rolled it out and then I wanna double it over, so you want a
00:02:22 –> 00:02:28 sheet that is about 16 playing cards thick.
00:02:28 –> 00:02:33 Then I’m going to just…I mean it can be a little bit less, but if you go too thin,
00:02:33 –> 00:02:37 you can run into some problems, which I’ll show you later.
00:02:37 –> 00:02:43 Now, I’m just rolling it out flat…and in fact, I should have stuck it to this other
00:02:43 –> 00:02:49 glass tile first, one thing when you’re cutting it out, if you have it on a glass
00:02:49 –> 00:02:55 tile or something that you can turn easily… which I can’t turn this whole sheet very
00:02:55 –> 00:02:56 easily, this works out really well.
00:02:56 –> 00:03:04 So I’m just sticking it to here first, then I’m gonna take the Ca Bezel mold, and this
00:03:04 –> 00:03:11 here is the bezel…the outline part of it, so that is the bezel that I’m gonna do,
00:03:11 –> 00:03:16 and you just wanna put a little bit of water on there, and then you’re gonna turn it
00:03:16 –> 00:03:25 over on to your clay and take something like the end of your acrylic rod…this works really
00:03:25 –> 00:03:30 well ‘cause you can hold it and press down with it, and you just wanna start pressing
00:03:30 –> 00:03:37 around the outside edges of the mold, and just start pressing it down.
00:03:37 –> 00:03:42 Now, you can… what’s cool is you can see through it, so you may not…the camera won’t
00:03:42 –> 00:03:47 be able to pick up on it as well, but you know that you’ve really pressed it down
00:03:47 –> 00:03:56 well when you can see the dark color of your clay showing right through the lines on the
00:03:56 –> 00:04:01 edge of the mold, so I’m just pressing this really, really well.
00:04:01 –> 00:04:07 And then we can lift it off, and you’ve got the shape of the bezel right there…now
00:04:07 –> 00:04:11 if I’ve moved it a little bit, I’ll get a couple of marks, so I’ll just smooth that
00:04:11 –> 00:04:12 out.
00:04:12 –> 00:04:18 Now, we can cut this out using an Exacto knife… now Wendy, when she does it, she puts hers
00:04:18 –> 00:04:26 on to something called a deli sheet, I don’t even know what those are, I think you get
00:04:26 –> 00:04:32 them for putting between hamburger patties or something, but I just have this glass tile,
00:04:32 –> 00:04:39 it works great and I’m just gonna cut around it using my Exacto knife.
00:04:39 –> 00:04:46 And I find it easier for me to just move my blade, and then turn around the corners like
00:04:46 –> 00:04:52 this with the tile underneath, you’re gonna have to practice this, because everyone has
00:04:52 –> 00:04:59 their easiest way to cut it out, and you just go around, and if you don’t cut it out perfect,
00:04:59 –> 00:05:07 you can always sand those edges later…after it’s baked, so you just peel it off and
00:05:07 –> 00:05:09 then you have this bezel here.
00:05:09 –> 00:05:15 Now if your edges aren’t perfect, you can run your finger around them before you bake
00:05:15 –> 00:05:20 them, now you wanna bake this for about half an hour first, and you always wanna bake the
00:05:20 –> 00:05:27 bezel first…I made a few mistakes trying to bake the cab first, but then you can run
00:05:27 –> 00:05:29 into a few problems.
00:05:29 –> 00:05:35 Like this one here, I baked the cab first and then tried to get the bezel to shape around
00:05:35 –> 00:05:39 it, and I warped the bezel a little bit.
00:05:39 –> 00:05:48 Also, you can see that it’s nice and even, I baked it on a piece of paper, and if you
00:05:48 –> 00:05:56 do the piece too thin, you can end up with issues like little pockets in behind the piece….now
00:05:56 –> 00:06:01 I don’t know if Doug can pick that up or not, but if your bezel is too thin, you get
00:06:01 –> 00:06:06 these funny little pockets that happen in behind, so that thicker piece of clay really,
00:06:06 –> 00:06:07 really helps.
00:06:07 –> 00:06:15 Then what you do, is you go ahead and you make your cabochon, now I’m not going to
00:06:15 –> 00:06:19 make this one right now, I already have my baked piece, the clay I’m gonna use here
00:06:19 –> 00:06:30 is a piece of Mokume Gane, and I have a nice thin piece here that I cut off of a slab of
00:06:30 –> 00:06:36 clay, but I’m gonna need some support in behind it, so I’ve rolled out another sheet
00:06:36 –> 00:06:44 of scrap clay, and I’ve done it at 8 playing cards thick, and I’m doubling that one up
00:06:44 –> 00:06:53 as well, and going to put that here…now you can go 2 or 3 thicknesses if you like,
00:06:53 –> 00:06:58 of the thickest setting, it’s up to you, depending on how high you want that cabochon
00:06:58 –> 00:06:59 to pop up.
00:06:59 –> 00:07:05 Then I’m gonna lay my thin sheet, you could use cane slices, you could use all kinds of
00:07:05 –> 00:07:10 cool things, pattern…whatever kinds of surface technique that you like, I’m going to try
00:07:10 –> 00:07:16 to lay this down and not get any bubbles on it, but like I was saying, the unique thing
00:07:16 –> 00:07:23 about this particular…these cabochon molds here is that you can see through it.
00:07:23 –> 00:07:29 Now on my…I would like to have my piece sit up this way, so I’m gonna look at my
00:07:29 –> 00:07:35 mold, see which way it will fit and decide where I want these 2 colors to be…and I
00:07:35 –> 00:07:39 think I’ll put it there, and so you can see right through which makes that really
00:07:39 –> 00:07:40 handy.
00:07:40 –> 00:07:50 You do the same thing, you just press right down and rub in around until you have it pressed
00:07:50 –> 00:07:56 right in, now I’ve put a little bit of water on it before…but if you have too much water
00:07:56 –> 00:08:01 on, you find it separates from there, and I don’t like to have too much water on there,
00:08:01 –> 00:08:03 it kinda pops off.
00:08:03 –> 00:08:08 Now, once I’ve got it pressed in the center, I kinda go around the outside edges a bit
00:08:08 –> 00:08:15 and really press that edge down, and it gets that cabochon to just sort of sit right up,
00:08:15 –> 00:08:18 which is really cool.
00:08:18 –> 00:08:25 Wendy’s a clever girl, she’s invented all sorts of cool things… you’ll have
00:08:25 –> 00:08:30 to check that out…check all of her different cabs out…or her Ca Bezels out.
00:08:30 –> 00:08:37 Anyways, okay so there we go, can you see that, we’ve got a Ca Bezel right there that
00:08:37 –> 00:08:41 we’re going to cut around the same way.
00:08:41 –> 00:08:47 Now, hopefully I’m not gonna get my head in the way here, I’m gonna do my best to
00:08:47 –> 00:08:54 cut this straight, and you wanna make sure your blade is as straight up and down as possible,
00:08:54 –> 00:09:01 you don’t wanna undercut it too much and you wanna watch the edges, and try to do it
00:09:01 –> 00:09:16 as smoothly as possible, like this, got it, then you can use all of this for scrap clay
00:09:16 –> 00:09:23 on the center of another one.Now I’ve got my piece, and I want to push it down just
00:09:23 –> 00:09:31 a little bit, and just make sure that it is smoothed out, and then what we’ll do is
00:09:31 –> 00:09:42 we’ll put that in the center of the baked one…make sure it’s lined up, now you could
00:09:42 –> 00:09:48 put a little bit of Bake and Bond or something like that on the inside, I find it sticks
00:09:48 –> 00:09:53 quite well, especially once you start pressing it in.
00:09:53 –> 00:09:57 So now, I’ve used quite a bit of clay, so it’s quite thick…I’m gonna use a little
00:09:57 –> 00:10:05 bit of water on my fingers here, and just start pressing that down into the bezel, and
00:10:05 –> 00:10:11 making sure that it’s fitting in nicely and at a bit of an angle, and you can smooth
00:10:11 –> 00:10:18 it around, it’s very, very professional looking if you do this in a nice, clean way.
00:10:18 –> 00:10:24 Now, it does such a smooth job that some people don’t sand it, on a technique like this,
00:10:24 –> 00:10:29 I’m definitely gonna sand it, it just gives so much more life to the technique, there’s
00:10:29 –> 00:10:33 a lot of pearl colors and stuff in this clay.
00:10:33 –> 00:10:37 Now I’m gonna just kinda work it right down so that I can’t see any of my background
00:10:37 –> 00:10:44 color, you wanna…if you do use a scrap clay underneath, you’re gonna wanna use one that
00:10:44 –> 00:10:47 will look good with your piece, if it’s gonna show at all.
00:10:47 –> 00:10:52 So I’d work a little bit harder at that, and then I would put that in the oven and
00:10:52 –> 00:10:55 bake it for a full hour, alright?
00:10:55 –> 00:11:01 So then, what you can do is…like I did with these pieces, I sanded and buffed them really
00:11:01 –> 00:11:06 well, cleaned up any of the edges, made sure that they were nice and clean, they didn’t
00:11:06 –> 00:11:12 have little cut edges or anything like that, and then, I could add a bail to them if I
00:11:12 –> 00:11:13 like.
00:11:13 –> 00:11:16 This one’s nice and thick here, I could drill a hole down through the side and figure
00:11:16 –> 00:11:20 out how to make this into a pendant or a piece of jewelry.
00:11:20 –> 00:11:26 So I hope that was helpful for you, if it was, do make sure to let us know if you liked
00:11:26 –> 00:11:29 this video in the comment section below.
00:11:29 –> 00:11:37 And do check out Wendy’s site at shadesofclay.com, she’s got…she’s a Canadian site, but
00:11:37 –> 00:11:42 she can ship internationally, and she has all kinds of other Polymer clay products and
00:11:42 –> 00:11:45 things there too, that you might wanna check out.
00:11:45 –> 00:11:50 And if you have some suggestions for future videos, or demos that you would like me to
00:11:50 –> 00:11:54 do, leave those in the comment section as well, alright?
00:11:54 –> 00:11:55 So we’ll see you next time and bye for now.
Our goal is to translate these videos into as many languages as possible. If you are interested in helping with this initiative, then please do contact us and we will figure out a way to make it worth your while :)
Resource Links:
- Shades of Clay: Cabezels
- Related Video: Silicone Molding Techniques Polymer Clay Tutorial
- Related Article: Making Molds for Duplicating Your Favorite Polymer Clay Beads
- Related Article:Making Polymer Clay Molds Inspiration From the Sea
- Related Video: Polymer Clay Tutorial Sculpey MoldMaker Texture Plates
Resources marked with a double ** asterisk are affiliate links. If you click on them and decide to buy something, we may receive some compensation. This does not affect the price you pay in any way. What it does do, however, is helps us to continue providing free videos for you, here at the PcT website. Using our links to purchase your tools and supplies, is always greatly appreciated.
Sponsored Ads & Special Promotions
Shareable Images


To share this full blog post anywhere on the web that allows links in comments, here's a shortened url to copy and paste...
>> https://mypct.ca/v585 <<
Want to chat about today’s post? That’s what the comment section below is for. Scroll Down… We’d love to hear from you!
Or... if you would like to request a topic for a future post, here is the link to do that… PcT Suggestion Box
I had already bought a Cabezel but wasn’t really confident on how to use it, so this video was really helpful! Thanks Cindy!
Thank you – IT was a great help
Glad to help Katherine!
Not really a newbie to polymer clay, but newbie to jewelry making. What type of cane / technique did you use for your cab?
Hi Nikki, I actually took a section of my Crocus Bead Cane and pressed a stamp into it to get a mokume technique sheet. I then used that to make my purple and green cab. The other cab was done by folding and blending some scrap clay. It just ended looking cool so I used that for the necktie shaped cab.
Hello everyone. I just wanted t say “Thank you” to Cindy for doing such a great demo with the CaBezels and for introducing them to so many new people (that were more than ready and willing to give them a try!) Jocelyn is right, the bezels can be made of scrap clay and then covered with almost anything ie: Gilder’s paste, Viva Decor Inka Gold, mica powders or alcohol inks! Endless possibilities here. I hope everyone makes beautiful things with the CB’s. If you want to share photos of what you create with them I’d love to see them!
Thank you Wendy for saying that! I am glad that we were able to send some new folks your way. You really have an excellent product!
This tut was great. I have Wendiy’s Cabezels but never really persevered at using them. You made the process very clear and it will be on my todo list. I too am Canadian and try to get as many products as possible from Wendy. She is wonderful to deal with.
Thanks Sharon! Glad to help. You’re right about Wendy being wonderful to deal with. A true professional and a sweet person too!
I was so excited when I saw your tutorial on cabezels. I ordered some of these from Shades of Clay and should receive them any day. After seeing your video I will be at the mailbox early every day. You did a great job and I loved the video. Thanks for sharing.
Thanks for letting us know that you ordered some Deloris. I’d love to hear how you find working with them. Hope the mailman moves quickly for you! ;)
Love Cabzels! The work made from them is very professional looking. The see-thru feature is very helpful for pattern placement…………Loved the vid!!!
have never SEEN the exact placement so well done…………ty Lietz team………..
HAPPY HALLOWEEN, TOO!!!!!!!!!!!
Thanks Patt! The see-through feature is one of the most helpful… not only for the placement of the pattern but also to see weather or not the bezels are completely filled. You can’t do that with the Sculpey Cabachon and Bezel Molds.
Very helpful video! I have some of Wendy’s cabezel molds, but your video gave me some very helpful insights on how to finish them off more professionally. Thanks!
Thanks Sharon for saying that. Glad to be of some assistance!
Hi Cindy, Why do you bake the layered bezel & cab for an hour??
Hi Cris, I always bake my Premo pieces for an hour. Especially something as thick as the cabochons. It just makes them stronger and makes sure that the clay has completely cured all the way to the inside. Plus they sand up nicer when they are baked for longer. Type baking into the search box and you can learn more about that.
thanks so much- have bought the cabezels before, but your demo was so great I feel more confident to use them now.
Love to see you do the all in one version as well. I love Wendy’s videos but yours are way more helpful.
Also would love to see some more faux gemstones in the future.
Cindy your teaching is always so clear and your videos are really good.
Have subscribed for years and will continue to do so because no one is as clear as you.
many thanks
cara
Hi Cara! Cindy’s done many faux gemstone tutes, just pop that term in the search box, and you’ll find lots of them.
I know but I want more.
Cara, is there a particular faux stone that you would like a tute on? Suggestions always get the fires burning…
Thank you for the reply- I was interested if you knew whether you can make stones like emeralds, pearls, rubies etc… more the precious stones. They may be a bit hard to do… I don’t know. I might even experiment myself over christmas holidays… but I don’t think I’m as practical as you.
Also fordite is highly collectable now and since it is man made , but rare, it would be interesting too. I bought the book ” polymer clay gemstones, the art of deception’ but it was a little disappointing.
I’ve got a couple of other requests for Fordite… will have to try and get that in the loop for the new years tutes. Getting clear gemstones like Rubies to look right, could be tricky though, though it could hurt to put some thought into it. Thanks for the suggestions!
Thank you Cara for saying that! I appreciate you kind words. Jocelyn is right, we do have several faux stone tutorials, but I do plan to add some more. As well, I will add the All-in-one CaBezels to the list of future demos if I can. They are really nice too.
Wow, I went and looked at all their molds. I love the fact that they have larger ones and the One cabezel that makes the tile bracelet I just had to have. Thanks for showing us these wonderful new tools.
Thanks Dixie Ann! I Have the tile bracelet one too. Just haven’t had time to play with it yet. Think it would be stunning with some faux Labradorite Stones in it. Glad you liked them!
Thank you Cindy and Doug for the two-for today! That is two posts in one day–the Poison Mushroom palette and the CaBezel demo.
I saw the palette earlier and was pleasantly surprised to see the demo later in the today.
We had a heat wave here in Chicagoland–a beautiful 76 degrees–nice t-shirt weather. If only it could stay this way all year!
Happy Autumn everyone.
Mari
You are welcome Marianne… I accidentally scheduled Oct 27 (today) as the Publish Date for the video over at YouTube (it was supposed to be Oct 30)… so that meant I had to scramble to get the corresponding article here at blog, published today as well.
It was actually Jocelyn C that alerted us about this early enough in the day, for us to get things fixed up. So thanks Jocelyn for keeping an eye out!
No problem, Doug. Just clicked on the link to the video in the newsletter, which showed a not found, here on PCT. The video was fine on YouTube.
Love these molds, they make the process of adjusting the height of the cab so easy, and the framing process a snap. Real time saver and helpful for folks with hand difficulties.
After watching how Cindy was able to transform purplish mud scraps into bricks and wood in the Fairy Door tute, think the cab holders could be a wonderful way to use up scraps. Tons of different techniques to modify the bezel colors: powdered chalk, Inka Gold, Gilders Paste, Pearl Ex Powder Pigments, mica powders, paint….