Choosing The Right Brush for Glazing Polymer Clay
Video #639: Synthetic vs natural bristles makes a big difference depending on the type of finish you are using.
More...

IN THIS POST: — art brushes — brushes — brush — synthetic bristles — natural bristles — cleaning — water based — oil-based — finishes — glazes — glazing — glaze — varnish — varnishes — shiny — clear coat — acrylics — medium — gloss — glossy — matte — finish — (Topics marked with an asterisk* are discussed in the Comments Section below).
Topics Covered In This Video:
- I’m going to show you how to choose the right brush for adding glazes to polymer clay.
- First, what I’m going to do is explain to you a little bit about brushes and what are the right types.
- There are a few different kinds of brushes and shapes that you need to know about.
- It is important to know this in order to be able to choose the right brush for a specific use.
- A lot of people have problems when they are adding glazes to polymer clay.
- Issues like, streaks, brush strokes, stray brush hairs coming off… all of which can make it hard to get a nice finish on your pieces.
- Part of the reason you may have problems getting a nice clear finish when glazing, is because of the type of brush you are using.
- Most of the time when you are working with polymer clay, the finishes that you will be using are water based… there are some cases where an oil based product will work, if it has been tested for compatibility with polymer clay, like the Minwax Polyurethane (Oil Based) for example. But there are not many of those.
- There are basically two types of materials that artist brushes are made of. Synthetic bristle brushes (nylon/ plastic type material) and Natural bristle brushes (animal hair).
- When you are working with water based products, you need to use a synthetic brush.
- When you are using oil based products, you need to use natural bristle brushes.
- The reason is when you use a water based product, and you’re cleaning the bristles in water, the synthetic bristles repel the water and have no issues. But the natural bristles get swollen in water and get damaged and frayed.
- Oil based products need natural bristles because the oils and the solvents will ‘moisturize’ the natural bristles… whereas oils will ‘melt’ and damage the synthetic bristles.
- There are also several shapes of brushes… each that have their own special purpose.
- There are flat brushes, round brushes, liner brushes, fans, daggers and a variety of other shapes.
- Flat, wide brushes with fine bristles are perfect for laying down varnishes and glazes, because they cover more area and don’t leave brush strokes and lines on the surface.
- Coarser bristled brushes are tougher and are good for getting into crevices, and for creating texture on your work.
- Sponge brushes are to be avoided for putting on glazes, because they soak up too much finish and leave lots of streaks.
- My synthetic brushes were purchased as an inexpensive set at Michael’s.
- My brush set had white bristles, but some synthetics are in colors that look natural… but they are not natural. Just check the package to be sure.
- Brushes should always be cleaned the correct way, based on whether they are synthetic or natural.
- Wash synthetics in water with a drop of dish soap.
- Squeeze out bristles and reshape bristles with your fingers and let dry.
- Brushes with dried in acrylic paint and finishes can be cleaned with rubbing alcohol… but it is hard on them, so only do this sparingly.
- Natural brushes that have been used with oil based paints need to be cleaned in turpentine or paint thinner.
- Hope you learned more about brushes and which one to use for glazing your polymer clay projects.
00:00:03 –> 00:00:07 Hi guys, its Cindy Lietz, your Polymer Clay Tutor, and today’s Studio Tip, I’m gonna show
00:00:07 –> 00:00:14 you how to choose the right brush for adding glazes to Polymer Clay.
00:00:14 –> 00:00:21 Now, first of all, what I’m gonna do is explain to you a little bit about brushes and what
00:00:21 –> 00:00:22 are the right types.
00:00:22 –> 00:00:27 There’s a few different types out there, and a lot of people, when they’re adding glazes
00:00:27 –> 00:00:31 to Polymer Clay, they get streaks in it, they have little hairs falling out, they’re having
00:00:31 –> 00:00:36 issues with getting a nice, smooth finish and part of it is because of the type of the
00:00:36 –> 00:00:38 brush that you’re buying.
00:00:38 –> 00:00:41 Now when you’re ever working…well, most of the time when you’re working with Polymer
00:00:41 –> 00:00:49 Clay, you’re going to be using finishes like these ones back here, we’ve got Sculpey Glaze…
00:00:49 –> 00:00:53 it’s not really my favorite, but there’s some of these other ones here, Golden Varnishes,
00:00:53 –> 00:01:04 I like to use the Golden Glazing Medium it’s a great one, there’s also Liquitek’s Matte
00:01:04 –> 00:01:13 Varnish, some people still use Future and I’ve also used Minwax Polyurethane, now…
00:01:13 –> 00:01:20 and…there’s lots of them trust me, but most of them are water based, which means that
00:01:20 –> 00:01:24 you need to use a synthetic brush.
00:01:24 –> 00:01:29 Now, there’s a couple of different kinds, I’ve got a package of brushes here, these
00:01:29 –> 00:01:36 are synthetic brushes and these are the natural bristle brushes, now they come in lots of
00:01:36 –> 00:01:39 different shapes and sizes, both types do.
00:01:39 –> 00:01:44 The synthetic ones…being synthetic means it’s man made, which means it’s basically
00:01:44 –> 00:01:51 kind of like a nylon or… type fiber, and the natural bristles are made of different
00:01:51 –> 00:01:58 types of animal hair, this one actually happens to be a camel hair brush…poor camel, but
00:01:58 –> 00:02:01 anyways and they’re…
00:02:01 –> 00:02:08 Synthetics are used with water based products, because the bristles won’t swell up, and they…in
00:02:08 –> 00:02:14 the water, and so they’ll handle the water quite nicely if they’re synthetic.
00:02:14 –> 00:02:22 The natural bristle brushes are used for oil based products, oil based products, and their
00:02:22 –> 00:02:27 solvents to clean them up and stuff, will melt the synthetic brushes, but on the natural
00:02:27 –> 00:02:34 bristles, they will…the oils and things will work like… kinda like your hair, and
00:02:34 –> 00:02:42 it kind of moisturizes it and stuff, so its…there’s a reason why you use the 2 different types
00:02:42 –> 00:02:44 of brushes.
00:02:44 –> 00:02:50 There’s also different types of brushes for the…that are different shapes… that was
00:02:50 –> 00:02:59 easy for me to say, so this is what would be called a flat brush and it’s perfect for
00:02:59 –> 00:03:07 varnishing flat areas and it’s great for varnishes and finishes and glazes…I’ll talk about
00:03:07 –> 00:03:08 that in a sec.
00:03:08 –> 00:03:16 There are also round shaped brushes, these are not that great of a shape for doing flat
00:03:16 –> 00:03:21 surfaces or even adding glazes, because it just comes to too much of a point, this is
00:03:21 –> 00:03:27 more for painting and doing details and different types of strokes and things.
00:03:27 –> 00:03:30 There also is different types of…
00:03:30 –> 00:03:37 I don’t know what they call it in brushes, I’m not an expert in brushes, but there are
00:03:37 –> 00:03:42 fine bristles and coarser bristles, these ones are quite coarse.
00:03:42 –> 00:03:48 If you use a really coarse bristle brush on a glaze, you’re gonna leave a lot of streaks
00:03:48 –> 00:03:53 in the finish, these super fine ones, the bristles are just so, so, so fine that when
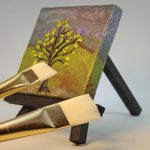
00:03:53 –> 00:04:01 they go across your project, and this actually happens to be a little Polymer Clay painting…the
00:04:01 –> 00:04:05 whole painting is done in Polymer Clay, and I’ll put the finish on it in a second, but
00:04:05 –> 00:04:13 when you’re running across a finish like this… or a surface like this, these little tiny
00:04:13 –> 00:04:20 bristles won’t leave any brush strokes, whereas a coarse bristle brush like this will, and
00:04:20 –> 00:04:23 then if you’re using something like a round brush, you’re just gonna get a little point
00:04:23 –> 00:04:30 at the end, it’s really not that effective, okay?
00:04:30 –> 00:04:35 Even rounder surfaces, like a whole bunch of beads, will work nicely with the flat brush,
00:04:35 –> 00:04:42 and you can leave them on their bead pins and just run your finish over the brush…I
00:04:42 –> 00:04:49 mean brush it over your beads and things like that, and then put them on the rack to dry.
00:04:49 –> 00:04:56 Obviously, big sponge brushes aren’t gonna be very effective, they’ll leave streaky marks
00:04:56 –> 00:05:01 and that kind of thing, plus they load up with a lot of finish which you’re gonna
00:05:01 –> 00:05:08 have to wash out later, these are better for different types of projects, alright?
00:05:08 –> 00:05:16 I got this package of 10 different flat brushes, some of them are angled brushes, some of them…
00:05:16 –> 00:05:24 there’s a couple of round ones in there, but they’re a really nice little set, multipurpose
00:05:24 –> 00:05:31 synthetic and these, I got at Michaels for…quite inexpensive, I actually can’t remember the
00:05:31 –> 00:05:36 price but just about anyone of these brushes would work great, the larger the brush you
00:05:36 –> 00:05:44 can use, the less brush strokes you need to cover the surface and the better you’ll get…finish
00:05:44 –> 00:05:45 for it.
00:05:45 –> 00:05:50 So I would use this larger brush out of the pack to put a coating on this little painting
00:05:50 –> 00:05:58 here…oh and I should say one more little thing about the different synthetics, this
00:05:58 –> 00:06:06 one is White Synthetic, this is also synthetic, it just happens to be in a color so it has
00:06:06 –> 00:06:13 a little bit more of a natural bristle look to it, but it’s actually a synthetic, so usually
00:06:13 –> 00:06:19 it’ll say on the package, but watch out for that as well, okay.
00:06:19 –> 00:06:26 So I’m gonna just use some glazing medium on here, I quite like this glazing medium,
00:06:26 –> 00:06:31 generally, I sand and buff my pieces, but sometimes, you’re not gonna sand and buff
00:06:31 –> 00:06:35 like this… with this little painting that I’m working on…I’m gonna be doing a tutorial
00:06:35 –> 00:06:43 on it soon and I’m just gonna put a little bit of this glaze on here, and just use my
00:06:43 –> 00:06:50 brush and spread it on, I will go into all the surfaces, I don’t want it all puddling
00:06:50 –> 00:06:56 up on my piece, but you can see…especially with a light stroke that you won’t have any
00:06:56 –> 00:06:58 brush strokes, once I work it in here.
00:06:58 –> 00:07:04 So I’ll just get it on, spread it over the whole surface…
00:07:04 –> 00:07:11 I’m having quite a bit a fun figuring out this tutorial, its…I’ve done paintings before,
00:07:11 –> 00:07:20 but never this tiny and never with only Polymer Clay, so it gives you the opportunity to get
00:07:20 –> 00:07:26 quite a bit of dimension and things to the piece, because Polymer Clay is also dimensional,
00:07:26 –> 00:07:29 but you can also spread it out and blend it and do some really cool things.
00:07:29 –> 00:07:37 So I would just do this until I got it nice and clean looking, I don’t want it puddling
00:07:37 –> 00:07:44 up, and this particular glaze…I’ll have to do a review on it sometime soon, it goes
00:07:44 –> 00:07:50 on kinda milky, and then it dries nice and clear with a nice gloss on it.
00:07:50 –> 00:07:57 So there we go, that’s how you do that, and then you want to always clean your brushes,
00:07:57 –> 00:08:04 it’s super important, clean them really well, I have a little drop of Dawn dish soap in
00:08:04 –> 00:08:09 here…in this water, and you clean your brushes right away, you don’t wanna let it harden
00:08:09 –> 00:08:11 in there.
00:08:11 –> 00:08:16 Then you want to just always just pinch the top of it, and reshape your brushes and let
00:08:16 –> 00:08:20 them dry that way, then they’ll always stay in great shape.
00:08:20 –> 00:08:24 If you don’t do it… like the kids weren’t doing with this one, look at it, it gets all
00:08:24 –> 00:08:31 frayed and wrecked looking pretty quick, and then it’s very difficult to get a nice clean
00:08:31 –> 00:08:39 finish with that…or a smooth finish, so…oh and if you do ever end up leaving paint in
00:08:39 –> 00:08:47 your bristles, you can clean them with rubbing alcohol, it’ll break down the old acrylic
00:08:47 –> 00:08:52 paint, it doesn’t work with oil paints, you’ll have to use the turpentine and everything,
00:08:52 –> 00:08:56 but the acrylic paint, you can break it down with rubbing alcohol, get it cleaned, but
00:08:56 –> 00:09:03 it is hard on the bristles, it’s kinda like putting something harsh in your hair and stripping
00:09:03 –> 00:09:07 it out, so you can…it’ll clean and you can kinda save them, but it is hard on it, so
00:09:07 –> 00:09:09 you don’t wanna do it on a regular basis.
00:09:09 –> 00:09:14 So I hope that was helpful for you, and that you learned a lot of great tips from this
00:09:14 –> 00:09:16 video.
00:09:16 –> 00:09:22 And if you have any other suggestions or things that you would like me to show you in the
00:09:22 –> 00:09:25 future, that would be great.
00:09:25 –> 00:09:32 And chances are, if you have a question about Polymer Clay, I’ve probably already done
00:09:32 –> 00:09:37 a video on it, so you’ll wanna make sure to check it out and see if we’ve done a video,
00:09:37 –> 00:09:42 and if not make sure to suggest the video, so that we can make sure that every answer
00:09:42 –> 00:09:45 is getting…every question is getting answered, alright?
00:09:45 –> 00:09:47 So we’ll see you next time and bye for now.
Our goal is to translate these videos into as many languages as possible. If you are interested in helping with this initiative, then please do contact us and we will figure out a way to make it worth your while :)
Resource Links:
- Related Article: Polymer Clay Finishes – Which One Is Best?
- Related Video: Triple Thick Gloss Glaze – Compatible or Not?
- Related Article: 6 Tips for Getting Shiny Polymer Clay Beads
- Related Video: Is It Compatible With Polymer Clay? Always Test!
- Related Video: Using Oil Based Minwax Polyurethane On Polymer Clay
- Amazon: Synthetic Art Brushes for Finishes **
Resources marked with a double ** asterisk are affiliate links. If you click on them and decide to buy something, we may receive some compensation. This does not affect the price you pay in any way. What it does do, however, is helps us to continue providing free videos for you, here at the PcT website. Using our links to purchase your tools and supplies, is always greatly appreciated.
Sponsored Ads & Special Promotions
Shareable Images


To share this full blog post anywhere on the web that allows links in comments, here's a shortened url to copy and paste...
>> https://mypct.ca/v639 <<
Want to chat about today’s post? That’s what the comment section below is for. Scroll Down… We’d love to hear from you!
Or... if you would like to request a topic for a future post, here is the link to do that… PcT Suggestion Box
Thanks, Cindy. Good advice as usual! I used to paint… until I discovered polymer clay and the brushes have been gathering dust. I am looking forward to the tutorial you mentioned. My brushes will be happy to be used again :-) I use Davinci brush soap – it’s worth buying as it keeps the brushes in tip top condition. Also a handy tip is to dry the brushes bristle end down… helps keep the brush in good order as the moisture doesn’t sit in the ferrule.
Dixie Ann – I wish I’d known this as I’ve just bought a quart of Varathane! Oh well, at least it will last the rest of my life :-)
Cindy… great video and such useful information! Thanks…
Hi everybody, just discovered some exciting news (at least it is to me) :) You know I am a user of Varathane polyurothane in Gloss, Semi-Gloss and Satin that is made by Rust-0-leum. It has been extremely hard to find in either a spray can or a small container. All they had available for a lo-o-ong time was Qt. Cans. I think I have tried every product out there and I just have not found anything better as a glaze for polymer clay unless of course you cover it with a resin. Menards here in Iowa has now got it in a spray (which is good for items covered in powders, pearls etc; if you aren’t able to get the PYMII) and now in a 6″ tube of each kind so you don’t have to spend an arm and a leg for a Quart can of it. I have been using it for years and it doesn’t yellow, peel or affect the clay in any manner. It is so much easier to use in the new containers since all you have to do is squirt a little into a dish and cap the tube! No muss, no fuss, no pouring it into a smaller container! Of course with Cindy’s explanation of using the perfect brush, I think we have a winning combination. So if you check your Home Depot, Lowes, Sears or other hardware stores and they don’t have it yet, ask them when it will be available. I don’t work for the company, I just love the product.
I just realized that I didn’t come in here and thank you Dixie Ann for this great information that you shared here! Both Doug and I really appreciate all that you do for our community!
Cindy thanks so much for putting together a video on paint brushes. Great information. I immediately went and checked all of mine. Too many for oils and not enough for acrylics. I didn’t even know there was a difference between the thicknesses. My mouth dropped open when you said we were going to have a tutorial on painting with polymer because I just watched one over at the Clay Adventure group and was so exciting about this technique. I will be holding my breath now waiting for yours!
Just a note in passing about Future. I just had to buy a bottle of Future and found some changes In Québec I suppose it’s the same elsewhere in Canada. It is now sold under the name Pledge only. There used to be the word Future underneath but it has been removed. It says more about the kind of surface it is for. The one you need is Floor care for multi surface finish.
Just mentioning it cause some of my students looked for it but could not find it anymore in the store.
I have wanted to learn how to paint with polymer clay ! So, I can hardly wait for the tute.
I was going to make a joke saying do I see polymer paintings in our future, then you said it would be an upcoming tutorial. I was totally SOL – SINGING OUT LOUD!!!! LOL! Can’t wait. Thanks for all the info on the brushes. :o)?
Very valuable tute for me, not a painter. But, think I will be with polymer clay as soon as you release the new tute, Cindy. Cannot wait, so excited!
Hi Cindy This is Very useful I have been using synthetic brushes & still get streaks. It may be that I need finer bristles.