Vol-063 Cone Flower Canes PcT Tutorial (Intro)
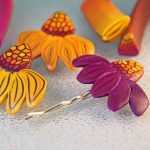
Video #416: A unique cane design where the colors shift along the entire length of the cane.
More...

** This post is an introduction to one of our paid tutorials.
Did you know that the Purple Coneflower (aka Echinacea) is a plant that is commonly used in immune boosting health products and medicines? It is very effective at treating the common cold.
Well, the same thing is true about our PcT Cone Flower Canes Tutorial. It is a well known fact (well around here anyway), that the PcT Cone Flower Canes Tutorial will boost your polymer clay skill level and is a very effective treatment for creative block!! It’s true you know… try it, you’ll see :)
All kidding aside, I think that you will find this tutorial is not only fun and easy to do… but it will get you thinking differently about making canes and how to use them in creative ways. If you run with it, I am positive you’ll be able to come up with some really neat versions of your own. Taking your polymer clay skills to a whole new level.
“
I've just watched this series, and the beads are so lovely. Thanks heaps Cindy and Doug for another awesome tutorial. ~Sandra-J
Sandra J
“
Cindy I wanted to take a moment to thank you for all your efforts. Sometimes I feel like an ungrateful child always demanding more, more, more! I loved this series and you have once again inspired me to get back to work. It is raining here so I have no outside work to be done today, so I am making cone flowers.
Karonkay C
“
What a funky little tutorial. The button and hairpin really got my attention. The cane looks very detailed and I really like the way the colors change. So many possibilities with this one!
Dixie Ann S
Transcript coming soon...
Transcript coming soon...
Our goal is to translate these videos into as many languages as possible. If you are interested in helping with this initiative, then please do contact us and we will figure out a way to make it worth your while :)
Shareable Images


Want to chat about today’s post? That’s what the comment section below is for. Scroll Down… We’d love to hear from you!
Or... if you would like to request a topic for a future post, here is the link to do that… PcT Suggestion Box
I used the tumbler for my beads and then renaissance wax and I have beads now that feel like butter and have a nice sheen, Thanks for your help Cindy my round beads are so soft and pretty.
The Other Cindy
Hi Cindy,
I just want to say that you are a very talented teacher and I enjoy a lot your tutorials.
Debbie from Denmark
Great tutorial as usual Cindy I only discovered PCT last January and have learned so much all easy to follow , I love the headpin idea and already have so many possibilities in mind for decorative headpins, something I often struggled with before to finish my jewellery pieces. Thanks again
Hi Cindy just finished watching the cone flower tutes and am confused about the cane in Video 5. You put together a beautiful Yellow section of the flower, however in the last video you showed the flower finished but the petal section was much darker. I am wondering if this happen while baking or if you used a finished flower in the darker petals to show the shine from waxing? I really liked the bright yellow petals.
Hi Dixie Ann, the color doesn’t change when baked. The sample I showed in the sanding process was one I did earlier and was cut from the darker more red orange section of the cane and not the yellow section at all. If you want lots of yellow flowers in your cane you can add a bigger teardrop of yellow than I used in the tutorial. In fact you can change all the colors if you wish. Hope that clears up your confusion.
Thanks Cindy, that answers my confusion. I probably need to pay more
attention eh? Just got too excited over this tute! :)
I’m always telling my friend how wonderful your videos are and can’t wait for the next one. Love them!!!! There is only one problem. There’s not enough hours in the day.
Hello! I haven’t posted much lately but I am here! Trying to get my creative self back into gear. These are really cute and I may just make these today. Looking for ideas for gifts to take to my cousins in Colorado next month. Plus, I have a wedding to attend in Oct! Won’t these be awesome? Got to get some of those bails. Thanks again Cindy! Hope you and Doug are well.
Cindy, I think your subscription videos and past-purchasing of videos is very reasonably priced. There is 1 PC “tutor” who charges much, much, much more and I had bought from her in the past. I am not knocking her at all, I do love her work and originality, but even without access to all past videos you are still a great bargain and the BEST teacher. I will be with you forever, God willing.You AND Doug are the best (along with the kids, too!)!!!
I love the tutorials. I’ve been in a guild now for a year with some very talented people but you have shown me things that they have never covered at any of the meetings and I’ve only been a member a short amount of time. Thank you so much. I love the fact that you assume we know nothing and explain everything to the Nth degree and there is no problems with learning your techniques.
yep – Cindy, you rock!!
Cindy, YOU ARE THE BEST!
Just started about 6 months ago with polymer clay. I feel in love immediately. I have watched many of Cindy’s videos on u-tube and by far enjoy her style the best. Just signed up for a paid membership today. This is stress therapy for me and it works!
Cindy I wanted to take a moment to thank you for all your efforts. Sometimes I feel like an ungrateful child always demanding more, more , more!
I loved this series and you have once again inspired me to get back to work.
It is raining here so I have no outside work to be done today so I will be making cone flowers.
Thank you so much.
Karonkay
Hi-Cindy As a Grandma I immediately saw a lot of little fairies or ballerinas dressed in your flowers dancing on a bracelet. Beautiful tutorial.
Btw, is Doug ok that really didn’t look like his usual camera work? Hope all is well. Everyone has an off day occasionally and you two have more reason than most probably burning the midnight oil to finish this tutorial for all of us who wait with bated breath just to see what you have in store for us every Friday. If I haven’t said it recently…. Thank you for all the had work and attention you shower on your students.
-Cheyrl
Thanks Cheyrl for your kind words! It is nice to know that you appreciate all the hard work that goes into making these tutorials. I’d have to go back through the videos to see if there were any spots where the filming wasn’t as good as it usually is, but you are perceptive to notice that we have been extra tired lately trying to pull everything off. There is a lot that goes on behind the scenes, just for us to make this business work and there are many things that we would like to improve on or tweak as we go along. We do put our hearts and souls into giving our best for you all… it is really nice of you to notice and care about our well being!
Hi Cindy – thanks for this tutorial series, I really enjoyed watching it. You’ve also cracked a problem for me; I’ve been trying to work out how a cane was produced in a Polymer Cafe article. When the author wrote back that she couldn’t remember how it had been done it set me puzzling, but in vain. Your tutorial suddenly had me saying out loud, “Ahaaa!” So I am doubly grateful to you Cindy, for a really great tutorial series with lots of amazing tips and tricks which has also provided the answer to my problem!
Marion
Thank you Marion for your kind words! I am very pleased to hear that something I taught you in this tutorial, was able to solve a mystery for you in another persons tutorial. Sometimes just seeing how something is done i a video rather than just reading it and looking at pictures can make all the difference in the learning process. So glad I was able to help!
Cindy, by now, have watched the series in full 3x, and am thrilled. Even though the sand and buff process is “like watching paint dry” in a comment you made, if you made the effort to follow all the instructions to get to finishing, that is the most crucial stage to master so that in addition to loving what you make, you can sell it to others to recoup your investment in time and product, and from the profit, get more good clay and the rest of the goodies to play with.
The first time for me hearing “3 mins” minimum at each sanding level, front and back, and that was seminal, lol. Up until that point to me sanding was a mystery sort of, and mimicked how I felt about how long and how much I brushed my teeth. Was it right? Enough? More flossing?
Using a finish, being Renaissance Wax or butcher block paste, and buffing etc, makes the object art. Watching you do it in real time helps me improve my own techniques, which I am so grateful to you for.
I’ve just watched this series, and the beads are so lovely. can’t wait to give this a go. AM possible going away tonight and not have access to internet so will have to wait until sunday afternoon. Thanks heaps Cindy and Doug for another awesome tutorial.
The colour shifting idea is definitely very cool, and that’s a beautiful colour combination to demonstrate it with. Lovely finish on the sample pieces too!
There are countless ways these ideas could be applied to other projects for non-flower people like me too :D and I’m looking forward to trying some of them out.
What a funky little tutorial. The button and hairpin really got my attention. The cane looks very detailed and I really like the way the colors change. So many possibilities
with this one!
Your tutes are worth every penny, I have learned so much from them, thank you. There isn’t anyone teaching the way you do and for so little a month.
I look so forward to the 1st Friday of the month. Great tuts worth every penny!
What a great cane with multiple possibilities, Cindy… I bet your graphic buttons would be the perfect accent on a bold handmade purse or tote!
These look so funky and fun, I can’t wait! I love all the colors and how they blend from one to the next. You must stay up 24/7 just creating polymer clay pieces. Where in the world do? you store it all, lol. I think we need a video on how to organize and store your creations once they’re done. My stuff is scattered all over the house. :o) ~Michelle-A
Hi Michelle,
I had a problem wit storage as well then I bought a bunch of tea cup hooks and now I have everything organized and hung in rows on the studio wall, it lets me see at a glance what I have.The larger necklaces and strung beads for making them are on strips of wood with wooden pegs in rows as well. It looks really pretty and is quite efficient.
-Cheyrl
Wow, sounds so organized. Thank you for the tips.
Yet another gorgeous tutorial Cindy! For anyone wondering whether to subscribe, this is brilliant! …… so much information, handy tips and beautiful projects. Join, and you’ll never look back!!!!
Cindy,
As a long time member, I just love you and more than happy to spread the word about your website. Sometimes I actually get into conversations with folks at Michaels around the Premo clay and tell them about your website. I always let everyone know that you are my polymer clay hero!!! lol
This is going to be fun as all of Cindy’s tutorials are, not to mention amazing. If you ever want to learn anything and everything about polymer clay, please join Cindy.
Love the subtle shift in colors, and so many ways to use these amazing Cone flowers thanks Cindy. ……………….Cheers xx……………….
oh this is gonna be FUN:)
Agree with you Sherry, this is a fabu project, love the interpretation and options on this beloved flower. Cannot wait.
Love the way the finals are finished, back and front, they glow.