Vol-070 Crocus Bead Lariat PcT Tutorial (Intro)
Video #490: Spring is in the air with this refreshing polymer clay jewelry project.
More...

** This post is an introduction to one of our paid tutorials.
Every weekday morning, I go for a walk with my best friend Diane. We drink coffee, chat away and get a little exercise at the same time. Often the conversation leads to my plans for upcoming tutorials.
On one of our walks, I mentioned that I was having trouble deciding on the topic for an upcoming tutorial. There were several things in the works, but none of them seemed appropriate for Spring. She suggested that I make some Crocus beads since they were her favorite Spring flowers, and she always looks forward to their arrival in her garden.
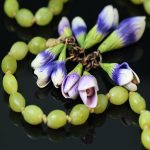
So the seed was planted, (or should I say bulb), and I was inspired to start creating a lovely Crocus Petal Cane for making the Crocus Beads, which were then fashioned into a cool Lariat Necklace… with matching earrings of course. The perfect inspiration for our next Spring 2014 Polymer Clay Tutorial… Thank you Diane!
“
Cindy, the beautiful Crocus Lanyard I made from your tutorial was put on display at the Museum here, and it sold immediately. I am kind of still in shock over this but, am extremely delighted my jewelry is making someone very happy. I can't tell you how much I love doing this tutorial. All fired up!
Dixie Ann S
“
These are beautiful Cindy! Thank you again for the great tutorials. I'm getting ready for some craft shows and these are just perfect!
Vivean B
“
I have a long strand of light green jade beads that I loved but couldn't make up my mind as to what I could do with them - now I know! Thanks for giving us such fantastic ideas and techniques, you are the tops Cindy!
Marion R
Transcript coming soon...
Transcript coming soon...
Our goal is to translate these videos into as many languages as possible. If you are interested in helping with this initiative, then please do contact us and we will figure out a way to make it worth your while :)
Shareable Images


Want to chat about today’s post? That’s what the comment section below is for. Scroll Down… We’d love to hear from you!
Or... if you would like to request a topic for a future post, here is the link to do that… PcT Suggestion Box
Hi
I am from INDIA.
I would like to buy this flower tutorial. Could you please guide me on procedure to buy.
Regards,
Uma
Hi Uma,
Here is the link to where you can buy the Crocus Bead Lariat Tutorial.
Thanks for your interest!
Your absolutely right Cindy, I am going back through the tutorials to see which flowers I can convert for this Lanyard. The Calla Lily is definitely going to be one of them!!
Cindy I just wanted to let you know that the beautiful Crocus Lanyard I made from your tutorial was put on display at the Museum here and it sold immediately. I am kind of still in shock over this but am extremely delighted my jewelry is making someone very happy. I can’t tell you how much I loved doing this tutorial and now I am all fired up to create another! The one I made measured out at 60″ in length.
Congratulations Dixie Ann! That is so great! I bet you did a lovely job on it and am excited to hear that it sold for you so quickly. I wear my crocus lariat all the time… I find it to be a very wearable piece, so I am not too surprised that it went fast. We should do more designs like that. (Just thinking on the fly here, but I bet the parrot tulip beads would look great on a lariat as well. They would have a similar feel to them only a completely different color way. All kinds of flowers would suit this kind of necklace.)
It’s the national flower of India.
Cindy, could you please teach us how to make a 3D lotus on a lily pad? I have tried it with clay – not polymer but I’m sure you will have so many more tips to make it even more beautiful.
Hi Cherie, have you seen Mandarin Ducky’s Water Lily Tutorial on YouTube? That might keep you busy for now. I don’t know when I will be able to do my own Lotus Tutorial… though it sounds like it would be a fun one to figure out. I didn’t know it was India’s National Flower. Though it does make sense… I have seen it many times in Indian Symbols and Patterns. Thanks for the suggestion!
Oh Cindy- I can only imagine what your inbox looks like!
I was commenting cause I know the type of learner I am- I watch with the video ( my laptop on the table with me) but the video kept stopping and taking forever, I tried the computer fixes Doug suggested, but it was still so frustrating to have to keep going back- so- I took notes. Being a teacher, I usually take pretty good notes- I even drew diagrams! Anyway, because I could look back at what I had written down, I can see exactly where I went wrong both times. 2 completely different mistakes at 2 different stages-but I know now where I was skipping a step. So yes indeed, watch the videos- several times, and if you are like me, take notes- just be sure you write every step down! Anyway I ended up with some very pretty paisley purple,green and striped jellyroll canes to play with :)
So I have made the blends/colors for the crocus bead cane twice now- and sadly obviously have trouble following directions even when Cindy is so clear and specific!
First time all colors came out great, got the initial cane blend started, then- instead of rolling it through horizontally, did it the long way and realized half way through i was making an enormous lavendar tape…
sigh… When I got time to do it again, made the colors (this part is apparently my area of strength) this time made sure I kept the colors together- even got to the part where I added the veins!!
Then- ended up rolling the cane more like a jelly roll…sigh.I realized I had forgotten the last long cut at the end before putting the two sided together to create the final cane shape.
so now I have a huge lavender flat slab and a kind of cool looking psychedelic cane that has purple on the outside and swirls into the middle which is green.
Just want all you newbies to know- going to go for it again- don’t be discouraged if it doesn’t work out the first, or second time- I am now keeping a journal of the steps so I remember what I forgot before!
Hi Laurie, sorry to take so long to respond… if you could see my inbox you would understand. I am not totally sure where you are getting mixed up, but maybe now that you have some of it figured out, you could try doing each step along side the video? I am assuming that you are watching the video in one location and then doing it in another. It would be hard for the brain to remember all of the steps at once. DO you have a smaller more portable device like a Ipad or a smart phone you could watch the videos on right where you work? That would probably help quite a bit. Let me know if you still have problems after trying it again. Don’t worry, you’ll get it. It is probably just some simple thing. Good luck!
That is perfect, I have the teardrops all made, and am so excited to see the magic happen. I kind of figured that was how it could be done, and I have used the square cutting measure method to make all those beautiful palette colors :) Well, not ALL of them yet!
Thanks so much, step by step I feel so much more confident because you make it so easy :)
Hi Laurie,
Glad to hear you enjoyed this project. Thanks for saying so :-)
When I use measurements like 1/4 section of this and 1 full section of that, it is in situations where approximate amounts is all that is needed, so it doesn’t have to be super precise. So what I do when I am using a large block and I want to use smaller amounts, I cut a section off the large block that is about the size of a 2 oz. block. Then I divide that into the 4 sections and go from there.
In areas that a more accurate measurement is needed, then I use that system of playing card thicknesses and use a square cutter of a specific size so that everyone is on the same page. But in cases like the crocus cane… precision isn’t that necessary.
I liked this project so much i had to go find beads to make a lariat necklace :) I was glad you included the reminder of how much a “section” “half-section” etc. actually means, but I have a question. I have the LARGE blocks of white, ultramarine blue and a couple more which can be seen at the back of the worktable.
What do you find is the best way to be able to cut the amounts you describe from these large blocks? I have tried slicing on their lines, but the blocks are so much thicker than the small square blocks- any tricks you prefer to get the same sizes from the large blocks?
Thanks for making this so much fun :)
Cindy,
I have just joined the polymer clay tutor and just started watching the videos on the crocus flower. Excellent tutorials by the way. I just have one question are the videos suppose to continually stop and start without me stopping them. I found it a bit irritating to have to keep starting the videos. Have you had complaints about this before?
Hi Karen,
Glad to hear that you are enjoying the crocus flower tutorial :-)
In regards to the Stop and Start video issue… that is caused by heavy traffic on our site… and it generally happens on Fridays which is when we send out the weekly newsletter… lots of subscribers all trying to watch the same videos all at once.
It means we are starting to “outgrow our britches” so to speak. Doug is looking at options to upgrade our server video hosting services… so in time all this will get sorted out. But for now, the best work around is to watch the videos on other days of the week besides Fridays.
Another trick that may be helpful for you, is to temporarily Stop the video immediately after you click the Play button… then let the video cache (load) onto your computer for a couple of minutes before you hit the Play button again. This works in many cases.
Thank you Vivian, Elaine, Meredith, Sherry and Susanna!! I so much appreciate all the love! I am so happy that you are having so much fun with the tutorials and that you are getting a lot out of them. It means so much to me when you come hear and share your loving words. Makes all the hard work worth it!!
I just wanted to say that you’ve impressed me again with your videos! I absolutely love them and they are so informative and really inspire me. You are a natural at making these and I hope you never stop! I will be a loyal subscriber! Thanks again!
So many helpful tips in this months tutorial
–just wanted to tell you that you solved the problem I had the last/only time I tried to knot between each bead – thank you for that, your way will remove the frustration element –YAY
–and don’t you just ‘luv’ your one step looper — mine are very helpful to me
thanks for such a pretty cane to work with, Sherry
Hi Cindy, I am so enjoying your site and videos – I think you do a fabulous job and I am learning quite a bit about things I thought I already knew. Thanks.
You have been reading my mind again Cindy, having just made a whole bunch of primroses in pale lemon I thought some purple crocus would look really lovely to go with them but was not sure how to get them to look natural.
Hey presto! Your latest videos are just perfect, just “the ticket” as my Dad would say. Thanks also for showing us the “one step looper” it will certainly go on my wish list
I had to wait for my voltage converter before I could use my new convection oven. Wow it’s awesome, bakes perfectly and with two oven thermometers was able to get the temperature just right and having that timer is great and no hot spots. I’m also a “gadget girl” so think some of the neat tools that are now available are worth buying.
In our local park all the crocus are in full bloom, such a riot of purple, orange and white against the green grass. Isn’t nature wonderful? Cheers xx
These are beautiful Cindy ! I am so ready for spring. Thank you again for the great tutorials. I’m getting ready for some spring craft shows and these will be just perfect !
What a sweet little flower tutorial Cindy. You certainly have a way of turning the hardest looking things into a simple step by step process. I was really surprised when watching how much information and techniques you really cram into a video. I am absolutely certain that anyone, beginner or advanced polymer clay person would more than benefit and learn so much by joining your tutorial sessions. The Video Library is like a treasure chest to me. I keep going back there not only to scoop up new ideas but to rely on the old tutorials so that I can duplicate them and make more projects from them. When I look back BC (before Cindy) and see all that I missed, I was so excited to learn that I could purchase back issues to complete MY Library. Now I have to quit jawing and get back to making those adorable sweet crocus flowers! thanks Cindy!
Thank you Dixie Ann for saying that! You made me feel so good this morning when I read this.
Years ago, when there was less going on across the internet than there is now, every Saturday morning, there would be a flood of comments that would come in after the new tutorial went out. Now there are more people, but less comments… not because they don’t like what their learning but more because there are so many more distractions. People are so busy these days and have so many things coming at them from so many directions that it would be impossible to leave nice long comments everywhere they went.
So when a lovely comment like yours comes in, it means even more than used to! I appreciate you and everyone here, for taking the time to share all your wonderful comments and for sharing your delightful creative ideas! Have a great weekend making flowers, everyone!
That sounds awesome Patt… The playing with clay that is… not the Bronchitis! Glad to hear that you back to your healthy self and ready to get playing! So what’s first… Lariat? Earrings? Something else? Look forward to seeing what you make with these cuties!
Love the Crocus lariat! This will be my new Spring thing! The color ways are so much fun to experiment with. Now that the Flu/Bronchitis is over, I can play clay !! I do so look forward to your tutes. They are so much fun………….Love-love-love
This is cool! I may try some purple and yellow ones! I wonder if I could get this done by Saturday?! :) Maybe not the necklace, but I could try earrings, right?
Definitely Catalina! Would love to find out you got some earrings made for the weekend! Do send pics for sure. I’d love to see some yellow versions too. Planned to make some myself but ran out of time before the tutorial needed to be filmed… and of course now I am on to other things getting ready for the next tutorial. Would love to spend the weekend making crocuses in every color! They are really fun and turn out so pretty!
I did post a pic of my earrings on your FB page. Got a lot of compliments. But I did rush them and need to practice a little more. Hope to make the yellow ones soon. Thanks for a great tute!
I saw those Catalina! Great job, I love how they turned out! You are a great girl, getting going so quickly like that and then posting a pic for all of us to see. Since you said, you still wanted more practice, my suggestion is to see if you can get the edges of the petals a little thinner. The rest of the petal is perfect as well as the cane and the blends and everything else. With the petal edges a little thinner, they will look a little more delicate and natural looking.
Thanks, Cindy! You are right about the edges. Considering I used my hand instead of the the Fun Foam (I didn’t have any on hand) they weren’t too bad. When I went too thin the clay stuck to my hand and that wasn’t good. So, that a is a tip that can’t be left out – for sure! I had a class at Michaels tonight and you think I would have remembered to get some Fun Foam – not! Good thing I got another class tomorrow, if we don’t get another 6″ of snow, hopefully, I will remember to get some ;) Yes, we Michiganders are not done with winter – yet! Ugh!!
Yes, Catalina I can imagine it would be harder to get the edges thin on your hand, unless you had some cornstarch on your hand to help keep the clay from sticking. Just so you know, a mouse pad could work instead of the fun foam, if you were desperate, but I do like the foam for the cushion and the easy release. Looking forward to seeing your yellow crocuses. Bet they will be pretty!
cool tute looking fwd to playing with this one.
Looking forward to hearing about your crocuses Sandra!
Thank you so much Cindy, these Crocus beads are absolutely gorgeous! I always love your flower beads, so realistic and so many ways to wear and use them. And thank you for all the tips along the way. You and Doug really are streets ahead of all the other ‘artists’ who try to use videos to demonstrate polymer clay techniques.
Marion
Thanks for saying that Marion! Looking forward to seeing what you make with them. Are you planning to make the lariat? Or do you have another project in mind for these pretty little crocuses?
Hi Cindy – yes, a Lariat:; I have a long strand of light green jade beads that I loved but couldn’t make up my as to what I could do with them – now I know! But my first reaction on seeing your beautiful Crocus beads was that these are of a ‘Royal’ standard: anyone who’s been on the tour of Windsor Castle (UK) will have seen in the Queen’s China room several glass fronted cases displaying the most exquisite china. Many of the plates are decorated with 3 dimensional flowers and fruits around and ‘dripping off’ the edge and my first thought was that with careful slicing these (un-cured) beads could decorate the edges of a specal plate before curing, ideal for tea parties etc. With a few thin green leaves laid between and over the flowers this could be stunning!
But your beautiful creation could be used for so many things: on Alice-bands for bridesmaids, esp. if they carried bunches of Crocuses.
Also, charms for bracelets, dangles for bookmarks, decorative box-lids, edging for mirrors – and on and on. The potential is limitless.
Thanks for giving us such fantastic ideas and techniques, you are the tops Cindy!
Marion
Marion, that sounds fabu, and would love to see a pic of it on Cindy’s PCT Facebook Site when you are finished.
Also, you asked about cleaning the container of the food processor, and I cannot find the thread, lol. The answer is that last time I used liquid 91% alcohol and a short one sided blade, and carefully scraped. Great result but ugh.
Think if you just make it religious, using wipes after everything, you keep yourself in a better spot, and that will be my goal. Especially once I get my hands on the JoollTool. No more dusting ever day would be bliss.
I love crocus flowers – we planted a bunch of yellow and purple bulbs Many years ago in the lawn– and have enjoyed them ever since —
Also a big thank you for teaching me the proper way to knot between beads, tried it on my own once…not a pretty sight;)
Looking forward to tomorrow…after I get the dentist appointment out of the way, that is! :)
Good luck at the dentist Sherry! Thanks for your comment! I hope you love this tutorial and make lots of pretty crocus beads!