Drilling Holes In Your Polymer Clay Beads
Video #386: Making straight clean bead holes using a hand held metal twist drill bit.
More...

IN THIS POST: — drilling — holes — (Topics marked with an asterisk* are discussed in the Comments Section below).
Topics Covered In This Video:
- In a previous video, I showed you how to put Holes in Polymer Clay Beads.
- In this video, I will show you how to make the holes bigger in your baked polymer clay beads, should you need them to be larger.
- Wait until you need to use your beads before drilling the holes larger.
- You can always make the holes bigger, but it is difficult to make them smaller.
- I prefer to drill my beads by hand. It is safer than a power drill or Dremel, and it is easier to make a nice clean hole in your bead… especially with round beads.
- I use a double ended Pin Vice with a small drill bit (about the size of a 20g wire) on one end, and a larger bit (about 12g) on the other. I also have a tapered burr bit (from my Dremel set), that I have put into an old Exacto Blade holder.
- Start by enlarging the holes slightly with the tapered bit, just enough that your drill bit will enter the pilot hole cleanly.
- Drill beads by hand, going halfway from one end, then turning the bead around and going through from the other end. This makes for a nice clean hole from both sides.
- If you don’t have a tapered burr bit, you need to start with the smallest bit you have and go through each size up until you get to the sized hole that you need. Don’t try to go straight to a larger bit, or you will risk chipping the edges of the hole.
- Follow these tips, and you will have professional looking holes in your beads, at whatever size you need.
Do you have any tips for enlarging holes in your polymer clay beads, that you’d like to share with us?
I look forward to hearing from you.
00:00:04 –> 00:00:07 Hi guys, its Cindy Lietz, your Polymer Clay Tutor, and today’s Studio Tip is Drilling
00:00:08 –> 00:00:10 Polymer Clay beads.
00:00:10 –> 00:00:13 Now I did a previous tutorial, and showed you how to put the holes in the Polymer Clay
00:00:13 –> 00:00:18 Beads, but now I’d like to show you how to make the hole a little bit bigger if you need
00:00:18 –> 00:00:20 it to be.
00:00:20 –> 00:00:25 Now, we did the beads on a bead wire so it has a fairly small hole.
00:00:25 –> 00:00:30 I like to leave the beads till I need to use them before I make the hole any bigger, because
00:00:30 –> 00:00:37 of course, you can always make a hole larger in a bead but you can’t make it smaller, at
00:00:37 –> 00:00:38 least not easily.
00:00:38 –> 00:00:46 So I was just drilling out some holes for…out of these Flower Petal Beads, and I realized
00:00:46 –> 00:00:50 I hadn’t showed you how to do that, so what I’m gonna do is show you how I do it.
00:00:50 –> 00:00:57 Now I like to use drill bits that I use by hand, a power drill is…or a Dremel is pretty
00:00:57 –> 00:01:03 fast, and you can…on such a small bead, you can end up hurting yourself by you know,
00:01:03 –> 00:01:10 drilling into your hand, so I like to just drill the holes larger by hand.
00:01:10 –> 00:01:15 And this little tool here is called a Pin Vise, this happens to be a double ended Pin
00:01:15 –> 00:01:21 Vise, and you can just unscrew the end and slide in your drill bits into there.
00:01:21 –> 00:01:28 Now, I happen to have some great little drill bits from Doug’s dad who used to be a dentist,
00:01:28 –> 00:01:33 so they’re dental drill bits, but you can find all kinds of different size drill bits
00:01:33 –> 00:01:40 that are suitable for you, now this one happens to be the same size as a 20 gauge headpin.
00:01:40 –> 00:01:45 Now if I just take them straight out of the oven, my headpins don’t fit, they’re too tight
00:01:45 –> 00:01:49 in there, so I have to drill the hole a little bit bigger.
00:01:49 –> 00:01:53 So that’s what I have…that’s a 20 gauge size on this side, and then on the other side,
00:01:53 –> 00:01:58 I have a much larger one, I don’t know what gauge this would be, it’d probably be around
00:01:58 –> 00:02:07 a 14 or a12 or something, but you can use whatever size drill bit that you like.
00:02:07 –> 00:02:13 I also have a tapered drill bit that’s used for Dremel, I happened to put this one in
00:02:13 –> 00:02:19 an old Exacto Blade holder, it happened to hold the thing, so it works as well, and you
00:02:19 –> 00:02:23 can make your own handmade tools or whatever you like.
00:02:23 –> 00:02:28 I like the tapered one to start a hole off with, because what it’ll do is just make the
00:02:28 –> 00:02:35 hole a little bit larger, and nice and cleanly.
00:02:35 –> 00:02:43 So I just drill each end a little bit larger like that before I go into putting my drill
00:02:43 –> 00:02:45 bit directly into the clay.
00:02:45 –> 00:02:53 If you have…if the bit is too much bigger than the hole then it will leave a chip…chips
00:02:53 –> 00:02:59 and little markings around the edge of the hole, but Polymer Clay beads are so soft that
00:02:59 –> 00:03:03 you can just drill them by hand, sometimes, if the bead is larger, you have to come from
00:03:03 –> 00:03:09 the other side, and just drill it through by hand, it’s so fast and easy, no need for
00:03:09 –> 00:03:15 a power drill, so then now my 20 gauge Silver pin will fit on beautifully.
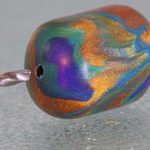
00:03:15 –> 00:03:26 Now if you wanted even larger, you would use the tapered bit again, and this is a little
00:03:26 –> 00:03:31 Peacock Feather Cane bead that I made, it’s such a pretty cane, I’ll do that from both
00:03:31 –> 00:03:38 ends, and then I’ll use the larger drill bit.
00:03:38 –> 00:03:47 Now, if you don’t have the tapered one, what you’re gonna have to do is start with a small
00:03:47 –> 00:03:53 hole, and then keep changing your drill bits until they’re big enough to the size, the
00:03:53 –> 00:03:59 tapered one will help make a nice clean hole, just about any size that you’ll need.
00:03:59 –> 00:04:06 I usually drill about halfway, and then come from the other end and finish it off that
00:04:06 –> 00:04:07 way.
00:04:07 –> 00:04:11 This way you won’t get weird chips on the ends of your…at the holes, and you’ll have
00:04:11 –> 00:04:16 nice clean professional looking holes for your Polymer Clay Beads.
00:04:16 –> 00:04:21 So I hope that was helpful for you, and if it was, make sure to press that Like button,
00:04:21 –> 00:04:22 that would be great.
00:04:22 –> 00:04:28 My question for you today is, do you have any tips for making holes in your Polymer
00:04:28 –> 00:04:29 Clay beads that you’d like to share?
00:04:29 –> 00:04:32 Do put those in the comment section below.
00:04:32 –> 00:04:35 And don’t forget to subscribe, we have new videos coming out all the time with great
00:04:35 –> 00:04:38 tips that will help you out and you don’t wanna miss any.
00:04:38 –> 00:04:41 So we’ll see you next time and bye for now.
Our goal is to translate these videos into as many languages as possible. If you are interested in helping with this initiative, then please do contact us and we will figure out a way to make it worth your while :)
Resource Links:
- Related Video: Holes in Polymer Clay Beads
- Related Video: Drilling Holes in Raw Polymer Clay Vs Baked Clay
- Related Article: Drilling Holes in Polymer Clay Beads
- Related Video: Piercing Beads with Small Pins vs Making Large Hole Beads
- Related Article: Piercing Holes Through Unbaked Polymer Clay Beads
- Amazon: Mini Micro Double Ended Pin Vise **
- Amazon: Mini Drill Set (15 Pieces) **
Resources marked with a double ** asterisk are affiliate links. If you click on them and decide to buy something, we may receive some compensation. This does not affect the price you pay in any way. What it does do, however, is helps us to continue providing free videos for you, here at the PcT website. Using our links to purchase your tools and supplies, is always greatly appreciated.
Sponsored Ads & Special Promotions
Shareable Images


To share this full blog post anywhere on the web that allows links in comments, here's a shortened url to copy and paste...
>> https://mypct.ca/v386 <<
Want to chat about today’s post? That’s what the comment section below is for. Scroll Down… We’d love to hear from you!
Or... if you would like to request a topic for a future post, here is the link to do that… PcT Suggestion Box
Hi Chris, I mixed my inks 1.5 oz. of 91% alcohol to one sharpie to get a more intense color like the adirondack inks. I let them set for 24 hrs before transferring the liquid to the no drip bottles. I purchased the 2 oz. bottles with the no drip spouts on ebay like she did and I also mixed it in baby jars. Be sure you use a fresh jar for each color as the glass tends to absorb some of the color and you could cross contaminate colors. It really is easier than it looks but it is somewhat messy. Just get everything together before you start. When I was finished, I left the sharpie insides in the jar after pouring the liquid into the bottle using a small funnel that you must rinse out after each pour. I bought a clear bag of crystals at Michaels they use in terrariums and colored a small amount of each color. After the crystals absorbed the color, I poured the crystals out on a mat and used a heat gun to dry them. I then stored each color in a small round plastic container with a screw on lid. I now have 36 colors of alcohol inks in bottles and 36 colors of crystals in little containers that I can use for druzies or whatever I want to decorate with. You can check it all out on my Pinterest page. Each container of crystals I used about a heaping teaspoon. It was a full days project but worth all the time and effort and about 1/10th of the cost of adirondack.
Hi Dixie Ann, I saw the video you recommended and it looks like fun. Question though: how do the inks take to the polymer clay–the same as Andirondecks? Do you use the same bottles as hers or something else?
Thanks for the tip.
Hey Dixie Ann,
How do you make alcohol inks out of Sharpies? I’m curious.
Hi Christine, if you google alcohol inks from sharpies, you will get several links but this one is my favorite. Use the regular point and not the fine points. Just follow her instructions and make your inks. Have fun…..:)
Hi Dixie Ann :)
How do you put hyperlinks into your messages here?
Hi Karen… it’s actually me that creates those text hyperlinks… after you post your comment.
FYI: The best practice for adding links into your comments, is for you to leave out the initial http://www … this will allow you your message to post right away, without getting held up in the moderation queue, or worse, sent to the spam folder. I will then create those “friendly” text hyperlinks for you.
Thanks Doug! Have a great weekend :)
Thank you Doug!
Hi again Dixie Ann
On the subject of making alcohol inks, you mentioned using the regular point instead of the fine point? Why is that important? I’d like to try this and all my local stationary store has in multi-pack markers is the fine point ones. Also, what are the non drip containers called on Ebay. I ask so that I can search them :). Thanks!
karen, it’s simple. Regular point sharpies have more ink. You can find them anywhere, Walmart, grocery stores, pharmacies, office supplies, target etc; On Ebay you are looking for 2 oz. no drip spout plastic bottles. You will get a bottle, the snap in spout and a screw on cap. I bought them in a lot of 50. Hope that helps. :)
I’m sure it will help. Thanks Dixie Ann :)
Hi Cindy
I went to my first works shop this week with guest instructor Lisa Pavellka. After the class I bought s spring drill by the cmpany called little-windows.com . It has drill bits size 1mm-1.2mmand1.5 mm… Are these the correct size for enlarging holes in pc beads. Person in the store said yes but I th no I made the wrong decisions in purchased it . What’s your opinions on this
NAtalie
Natalie, lucky you, I had a hard time finding those sizes and ended up getting them from a Hobby shop. You were lucky enough to find them right at the source. These small drill bits are just perfect for drilling holes in beads. They make nice holes especially if you want the holes just a tad larger or smaller for 20 gauge wire. Granted you paid more than I did but at least you didn’t have to go looking for them. I keep one in my little hand held drill all of the time. I still use a bead pin before baking and because I do, the drill lines up perfect with the pin hole and drilling the hole is so easy. Good luck to you, I think you made a smart purchase.
Great to learn the tip about starting with the tapered bit as I have chipped the ends of several beads,
Thanks Cindy!
One really frustrating thing for me as a left-handed person is that my pin vise seems to unravel on me and the drill bit always slides out after a short times of use … I have another one in which I jammed a larger diameter drill bit, and I can’t interchange the bits in this one as that one bit is pretty well stuck in there.
I’m wondering if anyone else has had this problem?
Hi Cindy
I would like to ask for your advice. When using an extruder I have problems controling the color of the “sausages”.
I want the colors I chooe to blend and result in a gradual effect.
Thank you and keep well/
Miriam
Hi Miriam! That extruder can be a tricky devil, since the way it moves the clay causes a “sheeting action” where the colors before wrap themselves around the new colors. You can go to the search box and type in “extruders” and get tons of videos, blogs, and commentary on how to use them.
You might be asking a color-based question, not a process, so the “coloration” issue I am going to leave to the experts here, and we have many.
Lee Valley sells a nice little pin vice. Holds the drill bits in the handle. nice and smooth in your hand and easy to hold. Regarding vices…I have many…kidding. I have the Walnut Hollow one that is designed to hold your extruder. It can be adjusted to be at almost any angle and it has nice padded grips. It was $40 at Michaels. $27 with the coupon. The day I bought mine, I happen to have a little polymer clay egg with a kaleidescope cane on it in my pocket. I took it out and looked at it and a man bought it from me fro $20! It wasn’t even finished yet, So I figure my vice only cost $7.
Thanks for all your hard work Cindy. I’m just a guest at this site. I just dabble. Really a stay at home Mom and Face Painter in case anyone in Toronto needs one.
I’m glad you mentioned the Lee Valley pin vise, Barbara. I purchased that one specifically for use with PC, it is very comfortable to use and the bits very durable (I once used it to ream out a glass pearl).
Checked your face-painting galleries… you have awesome skills!
Thanks. My poor husband aka practice head. My girls are 5 and 8. They are so done with it. I have to pay them now to model for my portfolio!
I have some different size double pointed knitting needles I use for making holes in beads. I check what size cord I’ll be using and then the same size needle. I put all the beads on it or several needles if I have a lot. I use the bead rack to hold them. When they come out of the oven….I’m ready to go.
You would think a hardware store of all places would have a pin vise.
Alas, even Lowe’s carry one. I have a beautiful set of drill bits that are perfect for drilling PC beads but they are very old and there is no way you can use them in a pin vise. My fingers get so sore twisting these since all I have to hold on to is the little attached hex nut which is actually soldered onto the end of the bit. I always make a preliminary hole in my unbaked round beads and then use two other size bits to finish the hole after they are baked. They always look nice doing it that way. I prefer to drill holes on flat and odd shaped pieces after I have baked them. Since PC is so soft, it is easy to push the point of a bead reamer anywhere on the piece to make a starter hole and from there drill out a hole again using my smallest bit and working up to the size hole I need. I have a question for Cindy though. If I wasn’t paying attention and accidentally put my bead hole in the wrong place, what would my options be to close and repair that hole without starting all over? Has anyone ever done that?
Hi Dixie Ann, isn’t it funny it’s hard to find a pin vise? My dad probably had 10 of them back in the day. I finally found one at a local HobbyTown brick and mortar. Not great quality, but works!
Hi Dawn, I finally found one at BoxCar Hobbies here in my home town. I went to Ace hardware and the guy had no idea what I was talking about. Who knew!
Dixie Ann:
Whenever you need ANYTHING, search for it on Amazon. That’s where I got both my pin vises. They have all manner of pin vises (cheap!), so you’ll find ones you love there. (You can find ANYTHING there. No poo!)
As far as putting holes in the wrong place … been there, done that. Worse, I’ve made holes too close to an edge and cracked a pendant. How to fix it: make yourself some spackle-like gloop by mixing some clay with some Kato Poly Paste. (I’ve also mixed clay with Kato Liquid Polyclay when I’ve needed it to be runnier because I wanted to get it into a smaller space.)
Work your gloop into the booboo (these are technical terms we clay pros use) and top it off so that the patched area is overfilled a little bit so you can sand it down after curing. (Better to overfill and sand than to hafta refill and re-cure, which is boring.) Cure for thirty minutes and sand and buff and then put your hole where you *mean* for it to go this time.
Good luck!
Binky
Thanks Binky for the advice on repairing my “boo-boo” I do search a lot on Amazon and found several that were very nice. Problem is you pay more for freight than the actual item costs and a lot of them are overpriced simply because they are an online store. Not gonna happen. I try to buy local when I can. I realize some things I have to order online and try to do so through Amazon but always get free shipping on $25.00 or more. Now……back to my boo-boo’s. :)
Hi Dixie Anne, looks like the others came to your rescue before I did. As far as where I got my pin vise, I can’t quite remember. I think I probably bought it at either Otto Frei, Fire Mountain Gems, or possibly even Rings and Things, since those are the main places I buy tools and those types of supplies.
And Binky answered your question about the misplaced hole perfectly! Just make a paste with some clay and a little TLS and shove it into the hole. Sand back to the surface after baking and try drilling your hole again.
There is a little tool for drilling holes in pearls that would be ideal for us polymer clay bead makers. Need to buy one and see if it works like I think it will. Then everyone could easily drill straight holes in even the tiniest of round beads after they were baked.
Hope that helps!
Cindy, please let us know about the pearl tool after you try it out.
Hi Dixie Ann
have you tried embedding your drill bit into a polymer clay handle?
I covered some scrap clay with some pretty left over bits centered the bit and… ta da;)
mine do not have a little hex nut so after curing I pull the bit out and use super glue
Well Sherry that’s a darn right good idea! I don’t know why I didn’t think of it. My brain is so all over the place anymore thinking up new things to do (as if I didn’t have enough). I could make a little grip handle for each one of these Finger Drills and it sure would help on the fingertips. They originally were used to clean out welding heads so I’m told. Would super glue hold the hex nut in place ya think? I couldn’t sink it past the top of the nut so just wondering how it would hold up when I start twisting the handle?
hey Dixie Ann
I was picturing your drill bit as having the hex nut at the opposite end of the business end — is that right?
then take a sheet of clay and put the unimportant part on the bottom edge of the clay and roll it up – with the drill part exposed and the hex nut and shaft covered
make it small/big enough to be comfortable in your hand
— the nut should hold the bit in place and you wouldn’t need the glue
Or am I totally on the wrong page?LOL-let me know:)
Sherry, your close. The drill bit shaft itself is soldered into the hex nut. It’s called a finger drill. If I wrap clay around the hex nut and up and over it to the shaft I’m thinking it should hold. I guess the only way to find out is to just do it and see. Right now I am in the middle of making some gorgeous alcohol inks with sharpies. The colors are amazing and I am going to try the 4 new neon colors next. Thanks for the tip. :)
I have always started with the smaller bit and worked my way up so I need to ask hubby if he has a tapered bit I can have or send him out to get me one. You are looking out for us trying to make things as simple and successful as possible. Thank you for another great tip.
Thanks Jocelyn for the tip! That would work well for those with mobility issues who have difficulties holding beads in your hand. Having the clay there to support you would be very helpful! Though it would be good to have a pilot hole in your beads that was put in when it was raw though, or it still could be difficult to drill the hole straight.
Your question about the fire petal bead had me confused, so I watched the video again. I actually said FLOWER petal beads not FIRE petal beads. And I did a tutorial on that already which you know. So, sadly I don’t have a new fire petal tutorial for you anytime soon, though that does sound like an intriguing concept!
Those beads were actually made from the rose petals when Doug’s Dad passed away, so those particular beads are extra special. They are pretty aren’t they?
OK, then that’s a future tute, right? ROFL! Actually, like the idea of seeing how you might try to replicate a fire bead, where it looks like an actually campfire flame. Might get a chance to fool with the Meyers Import Glass Glitter or Shards on that one.
The raw clay would be enough to hold the bead while drilled, but, maybe I should go check out some vicing. Things just skitter out of my hands, and I only good thing I can say about that is that it gives you exercise, lol.
Cindy, thanks for another great how to. The holes I made while the bead was unbaked never seemed to work out right. Think I am one of those that needs to wait until the bead is baked to make the hole.
Keeping a bead in my hand while hand drilling it is a recipe for disaster, but, if we use a trick similar to the soft clay cradle you introduced to slice round canes, I think I can make it work. Just need a inch large ball of unbaked clay to stabilize the bead, then, stand, so that when you use the hand held drill pin vise, the bit finds and stays true throughout the bead.
Sure like the idea of making the first entry with a slighly tapered drill bit to help keep the smaller bit from skipping around.
Qu’est-ce que c’est? The “fire petal bead?” Hope that’s coming up on the tute list, they sure look pretty.