Vol-057 Faux Labradorite PcT Tutorial (Intro)
Video #338: So real looking, it may just even fool Mother Nature!
More...

** This post is an introduction to one of our paid tutorials.
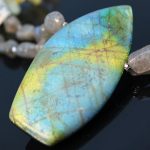
When Jocelyn C (a loyal member that has been around here forever) emailed me a picture of Labradorite stone, with only the word “Labradorite?” in the subject line, I pretty much dropped what I was doing and started working on the tutorial right away!
You see, Jocelyn, as well as several others, have been sending me their tutorial requests for a long time. Some are things I’ve already been working on and others I haven’t yet tried. But every once in a while a request comes in that gets the fire burning in my belly and pushes all the other ideas out of the way, for another day.
For those of you who have been around for some time, you may remember this happening when KaronKay Cowger, needed a Red Clover Flower for a special State themed bouquet she was working on. That flash of inspiration resulted in the Red Clover Flower Bead Tutorial.
Any who… back to the Labradorite. The picture she sent (which was from Google images, so I don’t have permission to post it here), made my mind whirl until I figured out how to get that glowing layered look of the colored stone, with all its amazing striations that make it so unique.
“
Cindy, as a newbie to poly clay, and after finding your amazing website, I vote to create a 'love' button for your videos ... maybe 'fantastic' or 'amazing' ... all would certainly apply!
Michele K
“
Hi Cindy: Faux Labradorite happens to be one of my favorite stones. Just seeing it in your video and the sanded/buffed version whetted my appetite to create it in polymer clay. Keep up the videos, love the ideas!
Pauline D
“
Love it when we get to learn how to do Faux stones. I wasn't much on sanding until I joined Cindy's video's and found out how much it made the quality of my work so much better. I'm getting another year with the Art Museum for selling my jewelry! Hurray!
Dixie Ann S
Transcript coming soon...
Transcript coming soon...
Our goal is to translate these videos into as many languages as possible. If you are interested in helping with this initiative, then please do contact us and we will figure out a way to make it worth your while :)
Shareable Images


Want to chat about today’s post? That’s what the comment section below is for. Scroll Down… We’d love to hear from you!
Or... if you would like to request a topic for a future post, here is the link to do that… PcT Suggestion Box
Hi Cindy, Quick question for you please. I tried this technique over the weekend and totally messed up but my question relates to the foil coming away from the backing after rubbing. Mine wouldn’t, just a tiny corner stuck to the clay and tried putting it back in place 3 times. It was Lisa Pevelka’s foil. I think my problem is that due to an arm injury I can’t rub quick enough to warm it up and was wondering if during my efforts to rub I warmed it artificially with a hair dryer – what do you think. When I get some more foil I’ll give it a try.
How did I mess up – well I only had some silver metal leaf flakes so thought I’d give that a go, so far so good, did the inking bit no probs. Put on the next thin piece of clay and started to make the cuts. I used a nice new blade and a couple of times went right through all layers. Then decided to add another layer on the back but put it on the wrong side so it ended up as a double layer over the inks and metal leaf, tried lifting it back off but no luck it brought up the metal leaf also. So it’s now in the scrap container waiting to be used for something else. – Not to worry though
Hi Marie, the fact that you were able to explain your steps, means that at least you know what you did ‘wrong’ and do it differently next time. By your comments, I see that you understand that mistakes are a big part of learning. Good for you! As far as what to do about the foil not releasing… the hairdryer idea might work. I have had trouble with certain foils and ease with others, even in the same line, so I sometimes wonder if the batches are different sometimes. Since you do have some mobility issues with your arm, then the leaf may be an easier option for you… as you discovered on your own. For the slicing through… you could have just pushed the sides back together… that would have fixed that issue. With the piece that you ‘messed up’, why don’t you treat it like a stack of mokume gane and take some slices off it that you can add to beads or something? Sounds like it may not look exactly like the Faux Labradorite, but it might make a really great Faux Marie-ite! :)
Hi Cindy,
Great videos as ever and love the results, just one minor question please and a request. First the question, when placing the pin in the clay to make the hole is this just to make drilling easier once baked or does the thickness of the pin depend on what you want to thread it on, or are the shield type pendants with this position of hole only meant for thin threading?
Now for the request – having watched the videos and seen all the images of Labradorite on Google I then thought how cool a local stone, only found in England ( in the area of Castleton) would look, and this is the Blue John Stone. I have no idea how to go about working out how to make a faux version of Blue John stone and wondered if you could once you are filming new tutorials again include one on the Blue John Stone.
Many thanks for your continued great tutorials.
Marie
Wow, Marie, what a beautiful and varied stone! I second that request. I particularly like the semi clear versions, what fun to play with translucent…. hmmm……
You got me started researching the stone, and i read about the latest discovery, of the rainbow vein. What fun to have such a local treasure. Thank you.
I Agree with Fran, Marie what a beautiful stone! I will let it brew around my head and see if I can create a good mock up of the Blue John Stone for a future tutorial. Thanks for the suggestion!
Hi Cindy!
This morning’s mini tute was great. Putting round cane slices on beads sounds as though it ought to be easy to figure out and easy to do. Despite that I found this info really helpful. I never cease to be amazed by how very much I learn EVERY time I watch your videos. Each little trick that you share makes my life easier! On another note….one thing I would really love to see you do would be a really in depth look at using the Jool Tool. I am lucky enough to have one, but have yet to completely bend it to my will ( ie: Help!) I can’t help thinking that I am missing a trick or two which could make a big difference. There are bowls of dull beads all around me that are yearning to reach their potential…..a Jool Tool shine!
Thank you Julia! I understand where you are coming from with the JoolTool. Like everything there are a few tricks that make it way easier to use. We are currently working on some training videos that will help. Stay tuned for more information about that!
For me, the key is how much it would raise my membership fees being on fixed income. I would LOVE a show and tell private feature per blog. Maybe if you could give us some guesstimates on that, it would help put the issue in perspective.
Doug, first heart felt thanks for all you do. Been re-reading a lot of the site and this comes up over and over again.
You and Cindy try to make your position clear over and over.
From now on, why don’t you allow the comment, but just gray/grey out the sections that you and Cindy feel trespass on the “secret sauce.”
That way, as folks progress through and read, they will learn what to speak about or not?
Someday, would love to have a private forum. But, you folks are jammed busy, and it sure would cost more. Without a dedicated volunteer to moderate it, I just don’t see a cost effective solution.
If anyone else here has suggestions or comments on this issue, or could volunteer to run a “divert Q & A, please add them after this…..
Thank you all.
Thanks for your input Jocelyn. Unfortunately, these public comment threads don’t allow us to selectively “grey-out” bits and pieces of info. But.. so that you know, I am working behind the scenes at setting up a new membership area. Not only will it be easier to use, but it will also have “protected” or “private” conversation areas for each of the paid tutorials.
Hi Cindy, what a gorgeous tutorial! I was looking for some help with my approach to this stone and found your web (I didn’t know it!) Now I am exploring and reading a lot of information… your web is fantastic :-)
I have read all the comments on this entry and have a couple of questions? There is finally some kind of members forum to discuss about the tutorial in a private way? and, it is possible to go deeper into the Sue F variation? I think her approach is similar to mine, and have tones of curiosity!
Thank you very much!
Hi Ana… welcome to the PcT Community :-) See my comment below in response to Jocelyn about some enhancements coming to the members area, regarding private conversation areas for each of the paid tutorials.
Hi, beautiful work! labradorite is a tough stone to tackle. I found your site while looking for tutorials on it.
I also just want to mention a couple of typos: “sneak peak” should be “sneak peek”, and “pendent”, which shows up on the videos, should be “pendant”.
Keep showing the world what clay can do!
The Artist Assena V
Good eye Assena! It is easy to miss mistakes even with spell check when there is more than one spelling for words. We try not to miss them but when we’re busy the mistakes sometimes sneak through. The sneak peek it an easy fix… I’ll let Doug know about that one so he can fix it, but the one in the title bar is too difficult to change without re-editing and re-rendering the video… so we’ll probably just have to try and ignore that one. Thanks for letting us know!
Hello Cindy,
I have finally gathered all the items I need to make the Labradorite pendent but I have searched high and low for a circle 5mm or 1/4″ cutter. Help I can’t find one anyplace. I have even started looking around the house for small circles but they are either to small or to big. Please where did you get such a small cutter I even tried square but it still is to big.
I love watching your videos and still getting older tutorials, but this cutting has put a big stop in making the Labradorite pendent.
You don’t have to print this I am just begging for help.
Sandy D.
Hi Sandy, if your looking for small cutters you might want to look for Kemper cutters. They have the small size in squares, circles, oval, stars, hearts, etc; A lot of the PC online stores will carry them. Just google Kemper Cutters or Kemper Kutters. One of those will work.
Hi Sandy, you don’t actually need a small cutter to do this tutorial. Did I even show one in the video? Either way, if you are looking for something small, Dixie Ann is gave you a couple of ideas. Another thing I have used is different sized straws for round or even square cutters. Milkshake and Bubble Tea straws are great for larger holes. Hope that helps!
Hi Cindy!
I’ve a quick thought about your tutorials…
I’m a curious sort, that likes to see things right to the end, and all these neat pieces you work on during the tutorial, you usually put aside before you bake… like the faux labradorite for example.
I would LOOOOVE to see the finished piece. Is there somewhere I can see these?
This one specifically off the top of my head.
Thanks!
:D Carrie
Hi Carrie, Doug is trying to take more pictures of the pieces I have made and eventually we will have them posted in a gallery and to a store. The pendant I made in this particular video is actually sold already to own of our members… Jocelyn. I don’t think we have any pictures of that pieces but I’ll ask Doug.
Do you leave the wire in when you bake? I did this project today and I left the wire in and now I can’t get it out!
Hi Denise, yes I leave the pin in while baking. If it gets stuck, just use a pair of pliers and give the wire a twist before pulling on it. Metal won’t bond to polymer clay, so once you wiggle it a bit, it will definitely come out. Hope you had fun making your faux Labradorite!
I still couldn’t get it out so I handed it off to my husband and he of course, yanked it right out! Thank for your reply! Now off to start sanding my piece! :)
I love being able to view your videos on my iPad cause I can have it with me and do whatever it is Cindy is teaching and I can stop and start as I need.
A treat to share! Right as I am typing, in the corner of the screen on the plastic edge, I am able to glance up and see the most lovely sight.
Been struggling with a hospitalization, COPD, and until yesterday oxygen and tanks (stupid bombs, really). After a successful rehab, my blood oxygen tested out at 99% post the 6 minute walk. YAY!!!! Now, the cessation of nicotine is next.
To reward me for passing unit inspection (try vacuuming entangled in a 30ft green line supplying breath support) and following my medical plan, I contacted Cindy to see if there were any of her spectacular faux lab pendants still available, and was able to purchase a beauty! It arrived two days ago and matched the decor in the bedroom, so I used teachers putty and stuck it onto the corner of the flat screen. The light dances off it, and striations and gold highlights keep the surface appearance constantly shifting. I just love it.
Cindy so appreciate the share, and I will treasure it forever.
Jocelyn, I am so pleased that you like the pendant! I think it is cute that your computer gets to ‘wear’ it… I think that’s a first for any of my jewelry. :)
I am picturing you vacuuming your place all wrapped up in hoses… what a sight! Glad to hear your numbers are better and that you are going to quit smoking. Just think of how much better you will feel and how much clay you can buy with the money you save on smokes!! Good luck sweetie. As always it is a pleasure having you in our little clay family!!
Cindy, I posted my faux labordorite on Pinterest and I think it turned out just great. I made sure to give you credit so I hope I did you justice. Thanks so much.
Looks fantastic, Dixie Ann! Awesome!!! :D
Thanks ladies, I am so proud of my Faux Labordorite. I’m also very choked up right now after reading Andrea’s Story because it so mimicked my own. You go girl!
Call me a fan, Dixie. Your version is gorgeous!
Thanks Doll, you and my very best friend have been going through the same thing. Am so glad you are improving. I’ll really be praying you can kick those butts and get a better quality of life.
I saw that Dixie Ann! Great job! I am very proud of you. I pinned it to our Students Work board on Pinterest as well. I think others will be very impressed with what you have done with the tutorial!
Thanks Cindy, you are such a good teacher! If I had an apple I’d give it to you. :D
Thank you ladies for your help and suggestions on finishing off the sides of my pendant. I am going to try the pen (Sue)
the baggie (Jocelyn) and the translucent back (Cindy L) so I can test them all. Eventually I want to learn how to make my own metal bezels to put them in. Gotta get this moving sale out of the way first. God’s blessing to all on this Easter!
Jocelyn, I always use the glad wrap to cover the clay before I use my cutters the way Cindy showed us and I like that technique. It’s simple and gets the job done. What is the acrylic plate shaping technique?
Dixiem so glad you will be in your new home and settled by the Fall. Sure wish I could be at the tag sale prior, lol!!!!
Using acrylic plates (like the one you use to make gorgeous lentil beads) is a fee based tute that I have not been able to yet afford. If you scroll through Tonya’s tute FB site, or google it, I am sure you can find specifics. I have asked Cindy to put it in her tute request file, because I am sure she will bring her own natural talents to bear on it and add her own spin.
From what I can tell, you use acrylic plates to shape the edges of your product by placing it on the center of the object, then toggling back and forth in all directions until you have the curvature you wish. I have tried my purely speculative version of it, and honestly, I like it better than the Glad wrap technique because it pulls the surface of the object to the sides and rounds it off nicely, hiding all the layers you might have.
I also like the look you get if you use a plain baggie, place it over the clay, then use your finger to burnish the edge. A double layer baggie also makes a great shaped edge when you use a blade too, though after, kiss the baggie goodbye, lol. I find the single Glad wrap sheet and blade effect gets stuck in the clay, and when I try to peel it off and out of the grooves, it marks the clay.
Also variously sized and shaped acrylic rods are used to make super accurate cane shapes. Again, this is my take. You purchase various acrylic shapes, each about a foot long, triangle, rectangle, square, etc., and use them to press up against the clay cane with brayers etc. to mirror the exact shape of the rod. Tried it with the square shape and was extremely pleased with the result, the cane reduced beautifully and the perfect square shape allowed me to use the cane slices to make wonderful fabric..
Hope this helps. All best!
very interesting Jocelyn. Never thought to use a baggie. Might try that next time. Who is Tonya? How do I find her on Facebook? The acrylic rods you mentioned to shape canes, where do I find out about them?
Hey, Dixie, for the rods you might want to check the Quilted in Clay home page; I remember Jennifer had a little video about making their designs, and I’m pretty sure she sold the square rods on her site (but this is going back a few years). The other lady Jocelyn mentioned may be Tonja (sp?) Lenderman who also sells supplies. Her FB is Tonja’s Treasures, I believe.
Hope everyone has a great and restful long weekend!
Some great ideas there, Jocelyn! :)
I was playing with faux jade a few days ago and for once wanted rounded forms and rounded edges, so your timing is perfect!
I hadn’t previously heard of the acrylic plate technique you describe but will have to try to find it and/or figure it out.
And a “baggie” is a low density polyethylene zip lock bag, right? (I’m not familiar with the term… a bit like “rubbing alcohol”, which I’d never heard of, although I’d have known “isopropyl alcohol” instantly! Nobody would ever guess I was a geek, would they? ;D LOL)
I hadn’t tried the Glad wrap technique until recently either although I’ve known about it for ages, but I found it didn’t really work with extremely stiff clay (although it probably would using much thicker plastic), so your various suggestions will all be really useful.
Thanks! :D
Yep, I use the heavier zip lock variety. Glad brands, since the plastic formula is compatible with clay, but, for just a slice, you can use just about any type of double sided bag. Had some good results using some heavier plastic bags used to ship stuff online too.
I will provide links to the tute info for the acrylic toggling technique and the cane shaping technique soon, it’s on my list of things to look up today.
Michelle, thanks! You are correct in naming the sources for both, and those two folks should get total credit for their methods.
Folks, keep in mind I did not purchase these tutes nor get the materials from those listed, just kind of “gimmicked” around with it until I was pleased with the results for my own non-Art projects.
Monique U.!
I so apologize for not getting the name correctly! Love your work! Thank you for providing the specifics on the acrylic manipulation techniques, so appreciated. I will provide links to each, I promise, soon….just have a lot on my plate, lol.
I have a query I am hoping someone can answer. I have searched the site but couldn’t find a related answer. After making a pendant such as the Labordorite with the translucent on top, foil in the middle and set on a black base, the sides of the piece show this triple layer.
No amount of sanding hides it, it just makes it nice and smooth. I don’t want to wrap it in copper foil and I don’t want to set it in a bezel.
I already have it sanded and ready to drill a hole for the bail so I don’t want to wrap another strip of clay around the sides as I have a nice rounded edge. Does anyone have a suggestion or technique for finishing the sides?
Hi Dixie Ann,
You could use a Krylon leafing pen to apply an opaque metallic finish to the sides. Depending on how you hold the pen it can just cover the sides, or you can hold it to give a fine line around the top too which can also be a nice effect.
I haven’t done this for faux labradorite — I construct mine a bit differently to avoid the visible layers you mention — but I’ve done it with other techniques and have been really happy with the results.
(If you don’t want a metallic finish, maybe a coat or two of an opaque acrylic paint would work?)
I hope that helps :)
Sue
Sue, I love that idea for Dixie. I am going to use it myself. If you use a black layer underneath, I suppose you could hide layers just using a Sharpie permanent black marker, after sanding the piece. Pretty sure the marker ink would hold up through the buffing process.
The other idea I have used is to extrude a thin rectangle of your clay through the Makins/Walnut Hill extruder, then use this strip to run around your edges.
Having done this, I can share a few tips. I make sure the clay is extra conditioned and warm the extruder on my every present heating pad (lol), then push ever so slowly and steadily to get the clay to come out. I find if I use too much pressure, the strip gets raggedy edges and twists, which makes it harder to use and just requires more finishing.
A third method is to borrow an idea from Iris Mishley and create lovely stripes or checkerboard poly fabric from where she cuts thin strips to wrap around the layers. It adds a color pop and it a fun look, but, not sure it would work for faux stone.
Just to be extra safe, before I apply the strip around the edge, after sanding the edges, I apply a thin layer of poly bonding glue. I don’t want to monkey with the strip to much so I think the glue helps the bonding process.
Last, I think that if you used the same fabric as faux lab, and did the same, the thin hiding strip would be gorgeous. Or you could use the base color and just a crackled metal top for the finish strip.
One more thing to consider. Due to the ink, the layers and the tendencies of transparent, you might want to first bake the pendant, then apply the strip with glue and rebake. Afraid that if you sealed the layers on the first bake with a strip, it might prevent the escape of air and cause more bubbling.
Hope all is well with you and yours. How’s the moving going?
Hi Jocelyn, I wanted to avoid putting a strip around the pendant since I already had a nice rounded edge and really like the finish piece. I do however appreciate your instructions for applying a strip. It was very detailed and I am going to try it the next time I make a pendant for another project. I like the extruder idea!
The moving is slow going, getting it all together for the big moving sale in June. ;)
Sorry for the misunderstanding, Dixie. Did you round the edges doing the plastic technique or did you use the acrylic plate shaping technique to round the edge.
Cannot wait to see pics of your new work!!!!!!
Great idea Sue! I do hope we get a private blog soon so you can share your techniques. I would love to know how you construct yours. Thanks Doll.
Hi Dixie, I see everyone has jumped in here to help you out! I actually like the look of the layers on the side, so I don’t see the need for myself to disguise them. But if you prefer not to see the layers, the easiest thing to do is to use the tinted translucent as your back layer as well. Replacing the black. Therefore you won’t see the transition between layers. Without revealing too much of the secrets, if it is the foil layer you don’t like seeing at the sides, then Jocelyn’s idea for using thicker plastic for rounding the edges will help stretch the top layer over the foil layer.
Hopefully between the three of us you will have the help you need to make your Faux Lab’s look how you want them to look. Remember you can also add the technique to a bezel, eliminating the need to worry about the sides at all. Good luck!
I would be fine with a private discussion area.
I have been following this discussion about a private vs. public blog, but am only now commenting. I am not one to comment much, but I will say that I avoid posting certain questions and such because I do not want to step over a line with regard to paid and non-paid members. The most seemingly innocent question could reveal something that Cindy has worked very hard on and many have paid for the privilege of learning. I will also offer that on those rare occasions when I have emailed Cindy directly, she is very prompt about replying. I also find her email voice friendly and familiar–like a friend writing to a friend. That is a tremendous help, but I would also understand if she did not respond–I assume she gets A LOT of email. I would imagine that if we had a private blog it would allow members to help members. I am a teacher (not of polymer clay but English). I am also qualified to teach art. The one thing you learn about teaching (whatever the subject is) is to provide differentiated instruction (multiple perspectives on the same learning task). Such a blog would provide just that without violating the manner in which Cindy has chosen to earn a living. For what it is worth, I vote yes.
Thanks for the chance to respond.
Gina
Great input Gina… thanks.
I too would appreciate the paid members board; helping one another out when we encounter a problem or have a suggested variation to a tutorial that we’d like to share. Lots of great ideas and suggestions have been made on this topic. I’ve been following it with great interest.
They’re all good points. I just hope people wouldn’t think they had Cindy “on call” though just because we had a paid membership discussion board.
Excellent point Christine… about this not turning into yet another Cindy Hotline. If there were enough hours in the day, I’m sure she would not mind serving in that capacity… but time is a very limited resource.
As I think you are suggesting, it would be in everyone’s best interest to make this private discussion area primarily for members to bounce ideas around, with each other…. and not have to worry about what should or should not be said, since this would all happen behind closed doors so to speak.
It would help Cindy to gauge where more support / inspiration might be needed, and therefore allow us to focus more energy on creating follow up videos that will provide the best value for those who choose to participate in the conversations.
Make sense?
With your last comments in mind, and this is just an idea to think about. (maybe it’s what’s you meant too!)… there could be one of her non-tutorial videos where she addresses an issue/technique that’s been brought up on the private boards. There’s a lot of potential for this to really enhance membership and could actually bring in more paid members as we share with others in the clay commnity about how beneficial this site has become.
I’ve only recently become active on the board, after getting beyond not feeling qualified to share an opinioin! 80)
Yup… you hit the nail on the head with what we are thinking in terms of coming up with topics for the “non-tutorial” videos that get posted on YouTube.
Now in regards to feeling non-qualified to share an opinion… please don’t base that on level of knowledge. Everyone at every step of the learning curve has something to contribute.
The best discussions are based on dialogs that follow this sort of pattern…
“I did this… This is what happened (or didn’t happen)… I’m excited because I learned that… But I’m still having a challenge with…”
Hopefully you get what I am saying…
Our objective here is to have you getting polymer clay under your fingernails. Learning comes much quicker when you actually start to try new things that you’ve never done before. Then when you talk about it with other like minded supportive friends, the sky’s the limit in terms of what you can accomplish.
Christine, I wholeheartedly agree with Doug as I am a prime example of feeling not qualified to share an opinion. After I got over my shyness and began contributing, you build up confidence and feel so good about sharing your experiences with others. (((hugs)))
… and look at where Dixie Ann ended up… she’s now selling her creations at an upscale Art Museum!
Thanks for the encouragement! Exciting things happen around here!
Hi Cindy and Doug – Sorry I haven’t been in touch lately, just getting over a long illness, but I have been watching with interest and finally feel able to get involved again.
Yes, I’d be interested in a private discussion area too. One site I saw yesterday whilst ‘surfing’ (Parole de Pate – French language) makes it a condition of membership that people ‘brain-storm’ when they meet, thus they come up with new techniques and ways of using clay, tools etc. This is one way of stretching our knowledge and sharing with other members.
Whilst writing, is there any way of giving a ‘thumbs up’ for someone’s work without having to join Facebook or Twitter? When I learned (Daily Mail article) that these websites regard anything posted as their property and intend selling photographs or personal information to advertisers I decided to keep well away from social networks. But I would very much like to add my support for beautiful and inspirational work.
Thanks for everything you both do, it is very much appreciated!
Marion
Good to see you back Marion, and feeling better.
I really like what you said about the Parole de Pate condition of membership… that brain-storming is a requirement. If everyone applied that sort of philosophy in a PcT members discussion area… I think many of you would experience huge gains in creativity, quality and professionalism.
In regards to your privacy concerns with Facebook, Twitter and other social networks… you are not alone. Others have brought that up as well. So yes, I would like to figure out how photo sharing and other personal activities could be done in a protected environment.
Doug,
I am investigating some options to allow others in my photo clubs to update the websites I created for them, which could include photos as well as text. (I have less and less time to maintain everything on it.) I would be happy to share anything I come up with if you are interested. BTW, are you a Mac or PC person?
Yes I’m always open to suggestions. For tech stuff like that, it probably would be best to use email.
I’m a PC Person.
Marion, so glad to see you back posting!!!
You mentioned a wonderful French site, Parole de Pate. It is so inspirational to read through the international commentary there, but, unfortunately my high school French can’t get me through the technical discussions, lol.
Success! A friend told me to download Google Chrome as a browser. It automatically asks if you wish to translate the page and gives you choices as to which language to translate blog into. It is not perfect, but, it sure gets the job done for me.
For those of you who struggle with Cindy’s site from all over the world, try this browser and see if it helps you. Just like Google search feature, this Chrome browser capability is like a magic wand, opening a world of information up for me. I just love, love, love it.
Yes I would love to see a private discussion area available to owners of the paid tutorials.
I am a new member, and after just a short time I can see the need for a private “members only” comment section, or maybe a “members only” chat board? Cindy already generously provides so much support to the public in general, so I think it’s fair to want to protect the paid member content.
I am trying to write thiws from my IPad .. I had written one message saying why it would be a grreat to have a members only BB but , I lost it. so I am just goiing to vote a loud YES. Thanks for asking Barb
It would be great for the benefit of more in depth learning.
I am such an amateur the free blog is so packed full of information don’t know it could get any better? And with the very small cost to join have no clue why anyone would not join.
So part of the benefit of a membership would be a plus.
You both have worked so hard for this site and your members.
Thanks :)
This is such a good point. If people are really interested in polymer clay arts, they might be encouraged to join & will quickly see how valuable membership is.
I wonder how many non-members post anyway? Are there a lot?
Christine – yes there are a lot of non-members that post here at the public blog site, in addition to those who are paid members… the hope being that some of them will decide that $3 per month is not too much to pay to take it to the next level. It really is such a tiny investment for the return that can be had.
Here is a recent example of a non-member who just received tremendous value for a “toaster oven” question she needed help with.
By the way, I just looked up the total comment count here at the blog and it is now sitting at 33,529 … that is a LOT of talking and learning and sharing that has already happened to date. Keep it up every one!
it’s a yes for me too
a lot of good reasons posted
that I didn’t even know I needed ;)
this would be great.
Yes, I would appreciate to have this option. I am a new member and I need good advice from the pro. Have a nice day
Joane
Doug and Cindy
One more idea for the private area. It seems to me it would be vital to let members show pics or videos of their work (from the cell phone, lol), in the blog thread, so that other members could help them solve a certain problem. Not many folks want to download a problem or half finished piece at youtube.com to be viewed by the general public. Is this a possibility?
Yes… I would like to see that happen… because as we all know… a picture is worth a thousand words. I had touched on that just above in response to one of Sue-F’s comments.
Yes I think I would, there are times when you want to get more detailed and I know as the format is “open” we cannot always do that.
I vote yes
Take care
Tina