
Faux Raku Beads for Bead Jewelry Projects | Polymer Clay Techniques
Do You Raku? Well Now You Can Faux Your Way To Success With These Polymer Clay Instructions:
More...

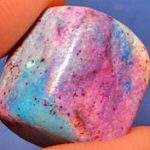
A cool thing about polymer clay is how you can combine different crafting materials to get one stunning effect. The bead in the picture is a smooth version of a faux raku bead created with white Premo clay, Adirondack Alcohol Inks, Pearl Ex Powdered Pigments, rubbing alcohol and water.
Inspired by the many techniques of Tim Holtz, I thought it would be fun to get a splotchy effect on my beads with three different colors of alcohol ink.
I dripped small dots of each color randomly on a sheet of glass and spritzed it with a 50:50 mix of water and rubbing alcohol. The water and alcohol mix causes the ink to spread in cool little droplets and swirl and mix together.
I then dipped the edges of a square bead, shaped from white Premo Sculpey clay until all the clay was covered. You do have to move fairly quickly since alcohol ink dries very fast, though the water does help slow it down.
Once the bead was inked, I dabbed a few different colors of Pearl Ex powders to bring a raku effect to the bead.
Since creating this bead I have created a more realistic version of a crackled raku which I will show you in a future post but I still very much love the style of this one and will make many more of them.
If you guys are interested, I will make some videos on this faux raku bead technique as well as the new crackled version. Let me know if the topic interests you by leaving a comment below. Your comments act like votes to let me know what you find most interesting.
Sponsored Ads & Special Promotions
Want to chat about today’s post? That’s what the comment section below is for. Scroll Down… We’d love to hear from you!
Or... if you would like to request a topic for a future post, here is the link to do that… PcT Suggestion Box
Hi Cindy
Have you do any more Raku Crackle tutorials … I don’t remember seeing any
Natalie Herbin. Aka Safti
Hi Natalie, I only have the three Raku Tutorials. The Smooth Raku (the one in the picture), the Deep \crackle Raku (part two of this series) and the Rainbow Raku Macrame Bracelet Tutorial. You can find links to all of these by using the search box at the top of the page.
I love it. Count me in!
This is beautiful, and in the photo, looks truly ceramic. I’m both addicted to polymer clay and I really like ceramic beads. I’m on board!
@Beadspiration: There is actually two video tutorials on the raku technique. If you click the link by my name it will take you to a preview clip and info on how to get the videos.
As far as the ink being permanent and your hands and glass, the answer is no. You can easily remove the ink with rubbing alcohol.
Hope that helps. If you have any more questions, I’d be happy to help! :-)
Cindy, this faux raku effect is beautiful! I have a couple of questions:
1. Do you use an UNbaked bead for this, or a baked bead?
If it’s a cured bead, do you bake it again after this process?
2. Are alcohol inks permanent as far as staining your fingers and the glass?
Thanks!
LOL! You’ll be happy to know Deb the faux raku technique has been filmed and is coming up next Friday, July 10th, 2009!
See link by my name for more info.
It’s Rock and Roll time!
Come on Cindy! let’s do this ! Rock & Roll !!
That’s great Elizabeth! Will let you know when it is ready!
Hi Cindy about those faux raku beads.
Yes I would be interested in the deep crackle beads and hope you get a videoo out soon
thanks
Elizabeth
You got it Illaya! Thanks for letting me know!
Count me in on this one Cindy
No worries Janice. I know exactly how that can feel… spending many hours looking online for specific answers… only to come up empty handing and frustrated.
My goal for this blog and for the Members Library is to create a quality destination where you can find creative and trustable ideas and answers quickly. It’s a work in progress that’s getting bigger and better every day. Thanks for your kind words and support.
Hi Cindy, I hope I didn’t sound harsh about the crackle technique, I was just so worked up. I had been on my pc for 2 days trying to figure out and find a crackle technique. You are the greatest for taking the time to help others. I will wait excitingly for your crackle technique. Thanks so much for what you do. Janice
Thank you Adrienne, Janine and Ernest for your comments! Glad you like the raku beads!
Yes, please – I would love to see more on this technique, having a nice new assortment of Adirondack inks!
Hi Cindy,
It would be great to have a video for the Raku and Crackle beads…
Your videos are great and I learned much from them.
Best regards
Janine
Hi Cindy, love the Raku style beads, this one and the sneak preview one as well. Will enjoy seeing the video on both.Thanks for all your hard work.
Adrienne
Thanks for your feedback Karen, Cindy and Corinne!
I would love to see how it is done!
Cindy, your bead is beautiful!!! I would love to see this technique on video for sure :)
Cindy E.
Hi Cindy! Love your blogs! I especially enjoyed this one as I am a big fan of raku pottery. I would LOVE to see a video! Keep up the good work!!!
@Betty: Thank you! That is great to hear!
@Sharon: Yeah I know what you mean! Polymer clay raku is way less intimidating… no fire involved!
@Jackie: I don’t sand this type of bead since the effect is on the surface and sanding would remove it. Because of that you have to be extra careful to make sure the bead is smooth before you bake it. I used Future Floor FInish to get the shine.
@Lupe: Glad to hear!
Definitely, count me in! I would be very interested in a video of this new technique.
Thank you so much for this technique info! Do you sand the bead and also varathane to make it glossy?
Yes! I love raku but I’m afraid of plunging red hot ceramic beads in shredded newspaper! Please share your latest discovery.
Haven’t been a member long, but am anxious to see Faux RaKu and other techniques. I have been looking for a recipe to make a gun metal effect. Thanks for offering all the great things.
Merci beaucoup Anne!
tres bonne idée