Vol-034-3 Finishing Wax as a Bead Polish PcT Tutorial (Intro)
Video #196: “Is there any information about using Minwax with polymer clay? I tried it on a sample piece. It looks good now, but will it stay good?” ~Claycass
More...

** This post is an introduction to one of our paid tutorials.
In my opinion, nothing is prettier and more professional looking than a silky smooth glass finish, on smooth-surface, polymer clay beads. And the best way to achieve this is by sanding well and buffing… no finish coatings required.
But sanding and buffing is time-consuming… especially with tiny round beads, or sculpted and molded ones.
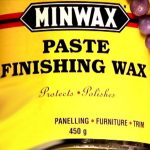
An alternative to getting a nice sheen on your polymer clay beads, without having to do a ton of sanding, or finishing using heavy gloss coatings (i.e. Finishes like Varathane or Sculpey Glaze, etc.), is to use a paste wax such as Minwax (Our Amazon Affiliate Link).
“Is there any information about using Minwax with polymer clay? I found it at Home Depot. I liked the word “polyacrylic” on the label, so I purchased some. But I have not figured out how to speed up the time test of “does it get sticky several months later.” I tried it on a sample piece. It looks good now, but will it stay good? I would be interested in hearing other peoples’ experience with this particular product.”
~Claycass
“Not everyone thinks shiny is beautiful. Of course if there are fingerprints and blemishes, then sanding probably is a good idea.” ~Heha-M
“I don’t use any wax or varnish or finish (I personally dislike such treatments, and few stand up to my stress tests anyway). I just buff them by Dremel or by hand depending on whether I want a glassy or satin finish.” ~Sue-F
“Not having to use a thick messy gloss coating is a bonus, and looks more natural I think.” ~Elizabeth-K
“I was pleased with applying Johnson’s Wax to my beads after tumbling. I applied the wax twice and buffed with a soft microfiber cloth from the Dollar Store. They had a nice shine on them when finished.” ~Cassandra-W
“I’ve had good luck creating clay sheets that mimic the appearance and feel of real Corinthian leather to cover altoid tins and pens. To finish, I threw on a sepia wash, wiped that down, baked again, then rubbed with Dutch floor Carnauba Wax, and buffed, buffed, buffed.” ~Jocelyn-C
“I love the finishing of the beads …how to make them all shiny and professional looking. Thank you for providing these awesome techniques.” ~Rada-F
“Can I ask if anyone has used wax to polish beads? I have been reading about Renaissance Wax and wondered if it is any good.” ~Ritzs
“Renaissance Wax smells horrible! And it only lasts for a short while.” ~Koolbraider
“Inevitably I have to write in defense of Renaissance Wax. For a start the smell is subjective, I love the smell! Secondly, it lasts. To quote one article about the wax >> — ‘When thinly applied and rubbed out to full lustre, the wax film is (and remains) glass-clear, with no discoloration either of the wax or the underlying surface.’ >> — To quote the manufactures >> — ‘Renaissance wax polish was originally formulated in the British Museum research laboratories in the early 1950’s. The blend which emerged from that research was designed for long term protection of all classes of museum exhibits. At last museum technicians and others caring for important collections could use wax polish that neither caused future conservation problems nor detracted from the intrinsic values of their treasures. The product was quickly accepted in the international museum world and has become a universally respected standard conservation material, probably the most widely specified, because of its almost unlimited uses.’ >> — And to quote another commentator >> — ‘It has a crystalline structure much finer than totally natural waxes, a property that confers a highly efficient moisture resistance. Countless statues and monuments in city streets are now protected by Renaissance wax from weathering corrosion.’ >> — What you always wanted to know! So, properties for us clayers? It provides a luster, easily, and the more coats you put on the more luster you get; it preserves if you want to use it for projects which will be outside, or indeed on windowsills and subject to light, it does not stain or darken (even white paper), and one uses such a small amount a small tin goes on forever. I love it!” ~Penny-V
I have actually known about wax polishing for some time now, but didn’t want to talk too much about this finishing technique until I had a chance to do some testing for myself.
Those of you who have been around this site for a while, know that I only pass along quality, trusted information. So if I am going to share or demonstrate a technique, I always try to test first hand, so that I know for sure it works.
When sharing ideas that I have not actually done myself, I will let you know that right up front. It is very important to me that you guys experience as much success as possible with your polymer clay journey… so being able to trust what you learn here, is key.
Well… awhile back I finally got the chance to use some paste wax as a way of polishing my polymer clay beads. Doug’s parents were downsizing and passed along some of their old cleaning supplies to me. In the box was a tin of Minwax Paste Finishing Wax. I took this as a sign that I should finally see if it would work, as others have claimed, for polishing beads.
And since it is always good to give a fair amount of time for any finish you use with polymer, to react with the clay if it is going to, my “test” has been in progress for the last 6 months.
“
Love this video!!!! Thank you Cindy! This cuts the process time of shining beads in half.
Rada F
“
I enjoyed this video… using this with some of my pesky smaller beads, or other hard-to-sand/buff-to-a-shine creations. Another technique to add to our bag of polymer clay finishing tricks!!! Cindy, you're so awesome for always bringing such cool things to us.
Phaedrakat
“
The tute is another eye-opener. Don't you just hate those pesky little dull beads? Now they shine! Thanks for the info.
Patt W
Transcript coming soon...
Transcript coming soon...
Our goal is to translate these videos into as many languages as possible. If you are interested in helping with this initiative, then please do contact us and we will figure out a way to make it worth your while :)
Shareable Images


Want to chat about today’s post? That’s what the comment section below is for. Scroll Down… We’d love to hear from you!
Or... if you would like to request a topic for a future post, here is the link to do that… PcT Suggestion Box
This is just a thought!! Years ago my sister used to buy a hand controlled spray (like a plant mister)and the hair laquer in a refil tube. You cut off the end, poured the laquer into the mister and squeezed. This was before it was sold in pressurized cans.If PYM II could be marketed in refil tubes I could use one of my plant misters and experiment with it?? I also collect antique perfume atomisers, which are great to spray water on texture sheets etc.
I buy most of my tools etc. from the USA but with import duty and a clearance fee it works out really expensive. I get a little impatient when Cindy talks about a product that we cannot get here in the UK as I am a (want it now sort of person) So a big thank you to Penny at Clayaround, I love my Walnut Hollow clay Extruder (I cross threaded my Makins and had to tape up the end every time I used it.) Am now on my second pasta machine,(wore the first one out) and melted my favourite clear plastic ruler by storing it with my raw polymer clay. (I am a bit of a walking disaster area.) Now going to get some of the paste wax that I think Penny has in stock. Great, as have a lotta lotta beads just waiting for a wax jacket!!
Ok, so I will admit, I’m a bit slow – if I understood this video correctly, I can tumble and then wax and that’s it? I get a pretty shine – no pain, blood, sweat or tears. Am I clear on that – it seems too easy? I must be missing something!
If that’s the case why would I ever do the buffing and sanding and all the other aggravating stuff? Yes, I’m a bit new to clay so this may be a novice’s error and if so I apologize. But I really do hate the sanding and buffing (and it doesn’t even matter what size the bead is – I just hate the extra work).
@Desiree: You got that right Desiree! Of course nothing quite beats the look and feel of a beautifully sanded and buffed bead, but a tumbled and waxed bead looks not too shabby, with a lot less work! Just make sure the bead is as flawless as possible before baking. A rough looking, fingerprinted bead won’t look good, no matter how much tumbling and waxing you do.
I just got my new Premo colours, and they look pretty good. Off now to make more magnetic chips!
Ooops, didn’t mean to send the above comment yet…what a mess! Anyway, I enjoyed this video…can’t wait to try waxing some of my pesky smaller beads, or other hard-to-sand/buff-to-a-shine creations. Cindy, you’re so awesome for bringing cool things to us, week after week.
I’m curious, too about some of the questions above…like how the wax stands up to heat, humidity, sweat, etc. If the Minwax paste is as good as Renaissance wax, I feel confident it will not yellow or discolor light clay or fabric. I researched it awhile back after seeing a comment here at the blog…and it seems to be quite the high quality product! I know it’s safest to test a product yourself, but I really love getting recommendations from fellow members who’ve tried these products. (I trust their tests, too, LOL!) Anyway, can’t wait to see what others have tried and used successfully — thanks again for a great video, and another technique to add to our bag of polymer clay finishing tricks!!! ~Kat :)
PS: I’ve also read about Renaissance wax being used on metals…supposed to be awesome for preserving finishes or acting as a shield for sensitive skins (so they can wear metals like copper or even nickel!) Also supposed to keep tarnish away, or you can “freeze” the look you want after adding a patina or using liver of sulfur on your jewelry. I wonder if Minwax can be used the same way? Or maybe it’s better to pay the extra $ for the Renaissance…? Hmmm, more testing, I guess… ;)
@Phaedrakat: That’s another reason why I wanted to try wax – I’ve made a couple of leaf pendants in silver art clay (you know, the stuff that fires to make fine silver) and applied a patina and I’d like to keep it exactly how it is if I can. Silver clay is fun!
Hi guys, sorry to take so long to respond in here. This weekend was more than its usual busy. The kids and Doug were sick, and the washing machine died. Plus Willow had a huge art project due today, making a mixed media art purse out of a reclaimed T-shirt. Anyway, today’s filming is done, and most of the dust has settled, so I am catching up on comments and post writing.
Hopefully I don’t miss anyone’s question… if I do, just let me know.
@Joyce M: Please know that although I did not respond right away, I did read your comment when you posted it and have had you and Wayne in my thoughts and prayers since you posted about his treatments. Sending you all my love and positive energy to you two, during this difficult time.
@sarahwww: Yeah, I agree with Silverleaf on this one. I do use water when tumbling beads, even with rose petals. Any inclusions that would be damaged by the water when tumbling, would just fall out anyway. That is one of the reasons I now grind the flowers, so at least those bits are quite small.
@Maria: No you don’t need to throw out your future. There is always a place for using a shiny liquid finish. It is nice to have as many options as possible.
@Ken H: That is a good question. My guess is it should hold up fine to heat. The Dremel produces some heat as it polishes and it doesn’t seem to bother it. I do use a very thin coat though. You could always pop a bead or two in the oven or hit it with a blow dryer to see. That doesn’t effect the humidity though. How does furniture that has been waxed, hold up to the whether where you’re at?
@Loretta Carstensen: I don’t know how it would handle being put through the washer with detergent, but cool water just beads up on it, so it may still work for buttons if washed gently. This would be a good thing to test and let us know about.
@Natalie B: I would only use one finish on your beads at a time. Finishes won’t stick to the wax anyway. I haven’t seen any reactions to skin or sweat with this wax, but it would be a good thing to test for yourself. As far as discoloring, it doesn’t yellow or change the look of white or light colored beads at all. I have seen no visible differences between waxed and unwaxed beads except for the shine. Hope I covered all your questions.
@Phaedrakat: What’s wrong with your first comment? It looks perfect to me. lol Great Tips! You bring up a good point. Waxing would be a great way to seal in a patina on metal. I would think that the Minwax would work the same way as the Renaissance wax, but again, that would need to be tested to know for sure.
@Cindy Lietz from Polymer Clay Color Recipes – Mushroom Palette: I don’t know as we use pledge spray polish, but we’re heading into prime testing season here in Philadelphia, we can have summers like Florida soupy hot and humid. I also want to try the Renaissance Wax.
Cindy: Love this idea to use wax for shinin my beads. You are so awesome for all of ur amazing video. I believe you probally tested ur beads for rubbin on light cloths n such. Also, I don’t know about Cindys’ brand but everybody sais Renaisance (?) Wax is musem archive quality. Wont yellow or discolor. Suposed to be the good stuff. even on are clay.
Hello! Thank you for a wonderful idea and a great tutorial!
My Q is do I need to use polish in edition to wax or it is instead of a polish? Do you know how this wax react with a skin and sweat, does it stain white fabric, does it make light or white beads yellow?
Thank you again.
Natalie.
@Natalie B: Those are good questions, Natalie! I am interested to know those answers, too.
I used some Renaissance wax today and I’m very pleased with the results. It dried instantly and I buffed my items with the Dremel on the lowest setting. I thought the odor was barely noticeable and not at all unpleasant to me. It says it won’t discolor even white paper so I tested that out and found that to be true. I coated both sides and dipped it in water and the water just beaded up on it. I also tried it on some wrapping paper and some other decorative papers that I use. No problems on any of them. I give it a thumbs up so far.
My Daughter is going to Chicago on Monday and is going to look for the wax for me, I don’t no if I will manage with one and a half hands but I will sure try, and it will be good therapy anyway. My body dose not work to well but I am beginning to look forward to the Friday tuts once more so that must be a good sign
@Ritzs: It is so good to see you on the blog again, I always enjoy reading your comments and have thought of you often. I agree with you, playing with clay is very therapeutic for both the body and soul. Glad you’re back. XXXX
@Ritzs: Bet your body will respond -your mind will control it. The body is a wonderful thing -just give it time. SOOOOOO glad you feel up to claying ;D
Cindy – I have firefox and never have had a problem. Glad others are choosing it too.
The tute is another eye-opener. Don’t you just hate those pesky little dull beads. Now they will shine. Thanks for the info