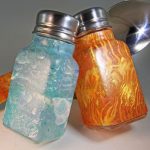
Vol-082 Fire & Ice Kitchen Utensils PcT Tutorial (Intro)
Video #633: A home decor project that will stretch your skills beyond just making jewelry. Perfect for gift giving ideas.
More...

** This post is an introduction to one of our paid tutorials.
Over the Christmas holidays, our family spent time at my parents for the festivities. While we were there, there was lots of food served and of course we needed utensils to serve it.
I had made a pumpkin pie and when digging around in my parent's cutlery drawers looking for a pie server, I found a pretty set with polymer clay handles made by moi quite a few years ago. It reminded me that I have not yet taught you guys how to use polymer clay in more of a utilitarian situation… such as with kitchen utensils!
So… I asked my parents if I could borrow their pieces for a little while, to show as samples in this month’s PcT tutorial. You will see them in the intro video below.
For this tutorial, I wanted to teach you how to not only make two different surface techniques that can be used in an unlimited number of situations… from making utensils, kitchen accessories and jewelry… but I also wanted to teach you how to cover materials such as glass and metal with polymer clay… and talk about the challenges that those materials can present.
I hope you enjoy this tutorial series, and use it as a jumping off point for all kinds of creative projects!
“
OMG, OMG. Cindy this is soooo so beautiful. I love the results. My ice shaker is gorgeous! I can totally see this as votive candles... so pretty with the glow of the candle through the translucent. Thanks again for a technique we can use in so many ways. Great job reading my mind from so far away.
Karonkay C
“
WOW and GORGEOUS! I am not a covering fan (yet), but oh the possibilities of jewellery are running around in my head. I'm off to the studio to make the canes. I just love, love the effect. Thanks Cindy and Doug for your fantastic videos and commitment to this band of clayers.
Sandra J
“
I've talked about doing this, but didn't know how. Thanks Cindy.
Peg C
Transcript coming soon...
Transcript coming soon...
Our goal is to translate these videos into as many languages as possible. If you are interested in helping with this initiative, then please do contact us and we will figure out a way to make it worth your while :)
Shareable Images


Want to chat about today’s post? That’s what the comment section below is for. Scroll Down… We’d love to hear from you!
Or... if you would like to request a topic for a future post, here is the link to do that… PcT Suggestion Box
Thank you so much Cindy! I’ve decided I’m really in love with this little spice jar and even if it stays empty I don’t know if I’ll be able to give it away. Luckily there’s no way I’ll be able to stop making them so I’ll have more to give away soon I’m sure.
I hope I do inspire someone, that would be great. I really want to see more of the work other people are doing based on these tutorials! It’s so fun to see what everyone else creates. I’m still being a bit of a chicken about the orchid tutorial and the fuchsia tutorial. I think because those things look so realistic I’m afraid that mine won’t or something… I’ve just got to jump into it one of these days.
I got my delivery from rings & things so I’m completely distracted by that right now. :D Anyone else get that crazy high giddy feeling when a package full of goodies comes in the mail just waiting for creative hands to put them to good use? Chrissy also reminded me about where to find the little pyramids for my tumbler and those arrived yesterday so I’ve got a load of beads going now which is really exciting.
So much going on, so much to do! And yet I still think I want to buy another back dated tutorial because I just can’t get enough of these. You just do such a fantastic job teaching! Thank you so SO much for sharing what you know!
:) Thank YOU so much!
Katy, I get all giddy inside when I have a package of goodies on the way, too! I bought a ginormous one from Fire Mountain years ago and my husband has the best pictures of me with it. One holding it up like Santa’s bag full of toys, and one with me and all the goodies taken out and spread out so I can get a “good look”.
:-D. It is quite fun, isn’t it?!
Oh yes! I *try* not to spend too much on my crafting goodies, but when I do, I tend to go a bit overboard. Luckily some of the places like Fire Mountain and rings and things will offer a greater discount when I go overboard, so that’s great, but it does make it even easier to get carried away. Regardless of the guilt from spending, that feeling of opening a box full of goodies is absolutely amazing! A feeling I will be experiencing again shortly because I placed another order! More bracelet blanks and barrettes on the way! (The bills can wait, right?) A couple of years ago I got a big order from dollar beads and I did the same thing taking a picture of all my goodies in the box and then spread out. It was so much fun!
Oh man this is neat! I didn’t use the Fire and Ice technique because those canes that I made sort of had issues and became torpedo beads. But I made this other sheet of clay that was another mistake but really beautiful but thin, and I knew if I continued to roll it out or double up layers I would lose the pattern I had so I decided to use it to cover a little glass spice jar I got. I just love the look! It’s not as smooth as I would like. Apparently I had some little air bubbles in there that I couldn’t see, but after sanding and buffing I was still able to get a decent sheen. Haven’t a clue what I would use a spice jar for, but maybe I’ll send it to my sister or give it to a friend. I think the quality might actually be decent enough for a nice gift!
Hi Katy, your spice jar turned out fantastic! Doesn’t matter one bit how you got there… mistakes or not… when something is pretty, that is the perfect time to stop! Great job! You are just blasting through the tutorials. You must be a great inspiration to the others around here. You are to me!
LOL, Doreen. Or, I did not glean your intent. Watch the video. What Cindy makes is enough for two shakers of each. That way, you get one set for you, and one set for a dearly beloved. Have fun and all best…..
Also, compare the size of the votive to the shaker. Lots more coverage if you will use tea lites and do inside and out. Also if you do the bottom and lip area. If you are just doing a circle around the votive exteriorly, then what Cindy shows as amount in the video should be enough for one votive with mistakes.
If you are good, and watch her new video lesson this week, she teaches some awesome stretching, so you could potentially get two votives. Thinking the votive glass is the standard Catholic Church model.
Great points Jocelyn!
Cindy and members,
I wonder if you have a method of figuring out approximately how much of a colour you need to mix for a project, or have you just done it for so long that you can eyeball it? I don’t like mixing twice as much colour as I need, because I am two hours from the nearest supply and if it is a colour that they don’t carry, then I have to mail order it.
Hi Doreen!
I can sum it up in three words, experiment, small sample pretest, and teardrop blend test.
If you search “color mixing” here, you will find a plethora of free information in blogs, videos, tutes, and in the members’ commentary back in each.
Also, Cindy provides free color recipies, so if you just want to go and play without the headache, use them.
All best, good luck!
Sorry, I guess I didn’t make my question very clear.
Rather than how much of each colour to put into a mix, I was actually trying to ask “I am trying to cover a votive this size, how much total clay will I need to mix up to make sure I have enough without going overboard?” I seem to either make so much that I have leftovers of it for the next year, or not enough and I have to mix more. :)
One little trick you can do Doreen is take a new block of clay and cut 1 section off it and roll it out to the thickness you plan to use and see if that piece will make a large enough piece for your project. If not take two pieces… etc. etc. Then when you’re mixing your clay, measure the amount up against a block of clay to see if you have approximately the right amount. Usually for each project I teach I will give you the approximate amounts you’ll need for that particular project. If you are doing something else with it… you’ll have to adjust your amounts accordingly.
Hi Cindy, wondering if you have or know where I can get a tutorial for cornflowers. I have been asked to make some for a charity and am having a hard time with design technique.
I am not a member but can purchase one time.
Thank you, Patty
Hi Patty, trying to help Cindy out.
If you Google “polymer clay cornflower tutorials” on Google.com, several come up. I looked at the Images first, then clicked on the pics, which brought me to the tutes.
Let us know which one you choose, and please share pics!
Hope this helps, all best!
Thank you so much. Will be checking this out soon as I have been asked to do 5000 cornflowers for ALS/MND.
Thanks again, Patty
Patty, would you share a link to where the cornflowers you complete will be displayed? Your name is here, so just give a site, and I can search from there. Dying to see what you come up with, really!
Hi, they won’t be displayed until about June and that will be in Kew Park in London. I’d be happy to email you a picture of the design that was selected.
Hi Cindy – Just returned from vacation in St Lucia – first thing I did was check in to the video I missed at start of March. I was stunned, because as we were waiting at the airport to leave I saw an advert for a fabulous semi-precious stone called ‘Larimar’ and it is so like your ice tutorial that I am very keen to try this out. I took a couple of photos but don’t know how to send to you, if you’d like to see them let me know. This would make a fantastic PS to your gorgeous tutorial. Thanks once again Cindy, you’re always on the ball!
Marion
You can just email me those photos Marion. They sound like a lovely stone to try and recreate!
Hi Cindy, I just watched your Fire & Ice Utensils videos… Love it! I have so many ideas for this technique. I was thinking of putting them on Christmas ornaments. Thank you for all the videos and tips. Keep up the hard work!
Best Wishes.
Love this tute. Tried the ice…perfect. Tried the fire…..ummm, not the same as your first shaker. Has anyone tried any tips or techniques that gets the fire closer to the fire shown in the first shaker? Love it if you would share any modifications to get the same effect.
Cannot wait to overhaul all the metal cutlery since I hate my wedding pattern. Then on to the rest of the metal kitchen aids. Your color palettes will be invaluable here. So excited. Might even do my toothbrush, heehee.
I loved the ice as well. Lol my fire ..is.. Well.. Not so perfect. My shakers are round so it looks a lot like a giant tangerine…. Gonna have another go at it tomorrow. Glad your ice came out well too
Great to see you back, Karon. Maybe yours is the “Ring of Fire” per the country song? Hee hee?
That sounds cute Karon. Like I said to Jocelyn, you could try doing more layers before doing the flame part… that might make the flames look more vertical rather than like coals.
Hi Jocelyn, you could try stacking the layers a few more times before pressing in the flames… that might help.
Thanks Cindy, all set up for another go after the living room/studio is cleaned top to bottom to prepare for inspection.
OOOOOoooooo, just finished test 3 with all of the advise in this thread. I see a roaring fire!!!! Thanks to all!!!!
Cindy
Please excuse my spelling errors … I was typing on. My iPhone and it hard to hit the correct keys… Now I’m using hubby’s iPad and I can see what I’m typing much better.
Thanks for all you great tuts over that past. 4 years.. Can’t believe that I have been doing PC Wor kthat long and with your great tutorials I can see how far I have come… Thank you from the bottom of my heart .. The thanks goes to Dough too!!!
You are so very welcome Natalie! Thank you very much for being such a involved member. It has been a pleasure having you with us for all these years!
OMG , OMG. Cindy this is soooo so beautiful. I love the results. My ice shaker is gorgeous! Oh my goodness how beautiful. This is going to be a favorite . I love it.
Lol I must tell you that my shaker was a failure . I said they were different but they would work. Well not so much. The tops are yellow and green. The yellow may work out but the other …. Oh dear. Yellow top does not do it justice. And decided to do your fire . I love the blue so much want to try the red ,
I can totally see this as votive candles it would be so pretty with the glow of the candle through the translucent . Thanks again for a technique we can use in so many ways.
And you solved another issue for me. So great job reading my mind from so far away and coming up with the solution once again.
Hi,
Going to try this today. Went and purchased shakers yesterday. Mine are different than typical but think they will work out well. Mine will be the ice as you have done. But am wanting to use fire cane I had to make at Christmas for special order spider… It was for a fireman , they wanted him to look like fire.
Love the ice cane you have made here I hope mine works out as well as yours . Thanks for your hard work on these . I appreciate all the time you and Doug put in for us. Hugs .
This is my first full tutorial, as I just joined the paid members set. I paid for a set of tutorials earlier, to get a specific back volume, and that prompted me to join up. Amazing how many people say “This was so timely …” It is for me also, as I have been experimenting with covering glass votive holders. I like what I have done so far, but this is going to take it a step further!
Also, the Renaissance Wax looks like a brilliant product. I have been looking for something other than varnish for some of my pieces, and this could be the answer.
Thanks SO MUCH, Cindy! This Fire and Ice concept is sparking my brain to look at other colour combinations also.
Welcome Doreen N! You will learn LOADS here. The forums are friendly and helpful and Cindy’s videos are outstanding. She’s always very thorough and explains things well. Also props to Doug for all the behind-the-scenes work! Have fun Doreen N!
Doreen, I hardly use anything else for my pieces. Renaissance Wax is the easiest and the best. Luckily for me. I bought it before I invested in too many finishes because I gave away the other thing I bought
Hi Cindy
I can’t believe how well timed this video was. I have been covering… Not completely.. What we can Nerot candles holders that we put our Shabbat candles in on Friday night .. The candle melts down to a clear liquid and Los great with the wrapped PC I have pictures of it but can never for ire it how to post it to you. I’ve done mini salt and pepper shakers and they sell very nicely with matching candle stick holders. Than Khoi for explaining about Not puting the translucent clay ones in an ice bath.. Ove the fire and ice technique… Gong t make s set of candles stick holders with just the ice since the Jewish colors or blue and white..
Big question I bought the Lisa Pavelke’s crafting foil a while ago when I got a great price.. Can I use that on top of the white translucent without usng the Mokume technique? Have you done any vidoes using their product in the past!?
Oh , now that I live in Florida I joined the Southeast Flroida PC Guild … Unfortunately some of the meetng conflict with my stain glass class… Having do much fun down here.. No snow!!????????.. Hope to be able to do some mix media with stain glass and pc.. Any tutorial coming down the pipe line using these two techniques?
Thanks stan for all Your inspirational videos and pc tips
Natalie Herbin Aka safti
Hi Cindy, Thank you so much for what you do. You are a great teacher and you keep polymer clay fun for me !!!
I’ve covered 2 cooking utensil handles that are wood. I used a textured sheet and then used acrylic paint to highlight the texture. I did not sand. I can’t remember if I put a finish on them (sorry) but they are more of a matt finish. I use them all the time and put them in the dishwasher. I have had no problems and it’s been about a year now. I covered them because they were old and all the finish had come off the handles. They look like new now.
Wow Susan that is impressive! I would not have thought they would fair well. Thanks for sharing your results!
I must admit, I’m a jar hoarder. I have a gazillion different jars in my clay room. Hubby is always finding empty jars in the sink or dishwasher and asks, “do you want to keep this?” and I always say, “Yeah, I thought I’d try to cover it.” Now I have the PCT techniques to actually try it! Thank you! Poor Hubby, he’s probably afraid I’m going to start buying weird stuff just because it comes in cool looking jars. LOL!
I’ve also been meaning to give a big shout out to Team Lietz on your videos. They are so professional. I put them on full screen and they’re so clear and detailed. Even down to Cindy’s shirt fabric. :-)
Thank you Dawn! Geez, I shudder at the thought of being on your big screen! The jars would be perfect for this kind of project. Have fun with the tutorial!
Wow! I watched the intro very, very late last night. I just love the way these projects look. I was wondering, what about dragging a fork through the fire cane in a squiggle like manner? Would it make it more flame-like? I love the look on your new ones, but the old flame effect on the older salt and pepper shakers is somewhat different. I love it all, but really, they are all truly masterpieces! Thank you again, Cindy and Doug. It has been quite some time since I last touched any clay. I have got to get my studio ‘clay ready’ and try these new tutes. Happy Claying!!!!
Hi Marianne, I suppose you could try and dragging a fork through, but maybe if you just stacked and restacked the layers, it might work even better. Just make a few small canes and see if you can get the flames the way you want them. It will be different every time… it’s the nature of this type of project. As you can see, even I couldn’t get it to be the same every time. :)
Thanks for yet another great tutorial, Cindy! Even when I don’t do the projects exactly as shown, I always love watching the videos. I’m thinking candle holders here ……. :-)
I do try and make projects that people can either do exactly as is… or use in their own unique way. Everyone consumes the tutorials for different reasons. I am happy to hear that you like to take them in your own direction!
WOW and GORGEOUS. I am not a covering fan (yet), but, oh the possibilities of jewellery are running around in my head. I’m off to the studio to make the canes. I just love, love the effect. Thanks Cindy and Doug for your fantastic videos and commitment to this band of clayers
You are so welcome Sandra!
What a fun tute! I love trans colors -they are so “alive”. I have several glass vases ( from flowers sent) to play with. They will be transformed into things of beauty ! I have a lavender rose that needs a special vase……………now she can have one!! TY for such a neat tute.
I would love to see pictures of your lavender rose in it’s lively new polymer vase Patt! Do make sure to take pictures when you’re done!
Just caught up with the latest product demos. The CZEXTRUDER box set (without box) is certainly one for my wish list. ( Stripped 2 Makins but Walnut Hollow still going strong.)
Test Lab was interesting, but probably T/H ink and stain best mixed in with translucent clay. Loved the Fire n Ice Cindy and it’s funny because I started covering glass bottles a couple of months ago in between visits to The Royal London Hospital where my sister has just had yet another operation on her long road to recovery. It’s been over four months now and try to visit most weeks to support her.
I felt guilty going off to Bali but she said GO GO GO you will love it and will get lots of inspiration for your crafts. Also you will have lots of interesting and NEW things to tell me. (Well I do crack on about polymer clay on most of my visits to her bedside!)
So really looking forward to learning CINDY’S way, as sure I will learn heaps from these videos.
Just one question. What are botles of Hope? ………cheers..xx……….
Hi Elaine, your trip sounds wonderful! I am glad your sister made you go. In regards to the bottles of Hope. They are small glass medicine bottles covered in polymer clay that are donated and given to Cancer patients. They are meant to give hope and joy to those who are going through treatments such as chemo therapy. I am not sure who started making them or whether it is only something done by polymer clayers but I do know there are many people who have made bottles of hope over the years and that they have brought joy to many who are going through a difficult and fearful time. If you Google ‘Bottles of Hope’ you will be able to learn more about it.
Oooooo, cool tutorial or should I say hot, lol.
How witty of you Michelle! :)
I am excited to watch this tutorial. I’ve talked about doing this, but didn’t know how. Thanks in advance, Cindy. I know it will be great!
Well now you know! :)
Oh boy, this looks great, beautiful and practical in one go!
I am a major fan of tools & utensils, so getting to embellish my kitchen stuff will be fun. I have tried covering some metal things and found that, as Cindy is wont to say, this has “some challenges.” Never even tried glass but i bet i will now!
Fran
You should try glass Fran. There are so many cool things you can add polymer clay to and glass is a perfect one… especial;y when you know the tricks of working with it!